
Likes
Comments
Share


@NoviciOnWeed
Follow
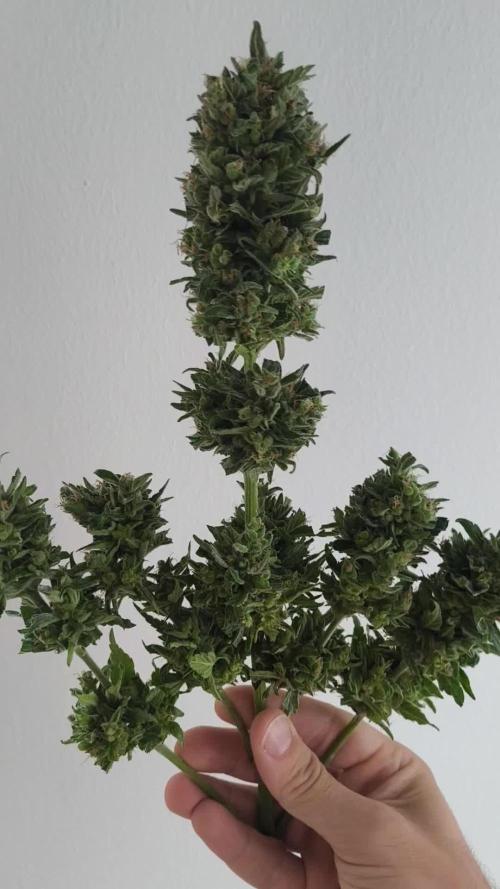
Semana 8, cada vez falta menos jajaja
Todo bastante bien, los tricomas invadieron por todos lados, parece brillantina jaja
Los cocos ya están bastante formados y comienzan a engordar.
También fue constante la defoliación ( también saque los brotecitos chicos que no tomaran volumen y solo sacarían recursos valiosos) y el acomodo de los cables del lst.
Cada día mas bella, puedo quedarme horas viéndola y hablando con ella.

Likes
13
Share


@Roberts
Follow
Blue Dream Auto is looking good. She showed her first pistils. So stretching, and flowering has started. I will likely change her to bloom nutrition in about a week. Thank you Spliff Seeds, Medic Grow, and Athena nutrition. 🤜🏻🤛🏻🌱🌱🌱
Thank you grow diaries community for the 👇likes👇, follows, comments, and subscriptions on my YouTube channel👇.
❄️🌱🍻 Happy Growing 🌱🌱🌱
https://youtube.com/channel/UCAhN7yRzWLpcaRHhMIQ7X4g.
Likes
8
Share


@Smithsgrow420
Follow
Day 70 really are getting fat now. Is such a leafy strain in itself. Love how the main clone is so big and bushy, can't wait to see all the buds pop.
Day 71 weather is rain, rain and a little bit more. Thinking about putting a roof over the top for a little potetion. The normal UK weather is back. We had a good late run tho. Can't wait to start this plant earlier next year.
Day 72 gave her a feed today upped it to 5% to 1ltr want her to really start to pop out! Beautiful to grow. Weather, been raining all morning and starting to brighten up this afternoon.
Day 73 had to remove the top bud as saw a little fluff deep in there, weather is getting so cold at the moment at night, may more her into a shelter and get a heater for the finishing weeks. Won't be able to take her as long as wanted. Looks amazing tho!!!!!!
Had to move her to to the greenhouse, she doesn't like this rainy weather!!!!
Day 74 had to take a little bit more off today, this evening weather is so cold at the moment. Meant to get warming in a week or so but don't think she will make it till then. Got a heater in there and a dehumidifier to help. May have to cut her all down a bit before I wanted. Will keep checking her all the time. Smells amazing very sweet with a hint of diesel at the moment. Want that diesel smell to over power the sweet sugars. She does look a bit weird with the top cut off, but had to do what I had to do. Removed all of the larger leaves to help keep down humidity.
Day 75 weather is so rainy today, had to give her a pre trim of all the larger leaves today. Buds have really popped in the last couple of day. Kicking myself that I didn't start it early, we had a amazing run of good weather last month. Wish it was the finishing month. But hay ho. Give her the first flush today 1 ltr of just rain water.
Day 76 end of week 11 what a week this has been, really have seen them buds fatten an fatten up. Don't think I'm going to run her for another week, thinking about cropping tomorrow evening. The weather was not on my side at the end of this grow. I believe she has done amazing, was truly a dream to grow.

Likes
27
Share


@Fullmeltalchemist
Follow
D93ish - 11.6 - I found her in a dumpster with a split stem and no grow equipment and our journey began. From the clandestine tent and trying different lights to spider mites and super cropping. Me and this baby been there. She was a great teacher and I loved her dearly. I'm incredibly grateful for her resilience and patience with me as learned my way around this new skill. I killed her last night, cut her into pieces and put her in a box to dry. I havent smoked any of the newly harvested Dumpster Queen and won't test it until it goes into cure jars, but the sample I took off over a week ago was divine and opened my eyes to everything I've been missing in organic grown nugs. Thank you all for you support. I'm so stoked moving forward with this newfound hobby and passion.
Will update in a week or so on the dry weight, cuz I'm really interested too. Expecting about a QP, just enough to give as gifts to some awesome friends and keep me going until my next harvest!
11.9 - stems were snapping i trimmed her up further into jars and weight came out to 80g. The nugs are not very dense or large, but are very very sticky and full trichomes. Smells of sweet dank floral and pine and the dank and floral notes really come out in a joint. I just got bubble bags from BubbleBagDue and will practice extraction on some the the trim and super larfy stuff : Thanks again for the support and following along everyone. My other diaries are where Im implementing all the lessons I learned with DQ and where I'll continue documenting my ongoing pursuit of growing grade A organic meds!
11.19 - D106ish - Our cure with the boveda 62% bags has been on for 10 days and the bud is about perfect. Been smoking hard on it and is still thoroughly enjoying it. Notable changes in flavor is the shift of that floral scent to more berry. It smells soo good I bury my face in the jar haha. The effect is still very uplifting and creative, which is great since I'm writing my phd dissertation. Anyhow, be well. Tons of love!
Likes
5
Share

@BalconyBoy
Follow
24.07.25 after a last sunny day lemon Kix was chopped and trimmed. I went for very few amber trichomes to have a less sedating effect and was surprised with two mature seeds already. I'm curious if I'll find many more when the buds are fully dried. The maturity of the seeds seems a good indicator that I'm not harvesting impatiently ahead of time. Due to the tiny result I will not grow auto strains on the balcony again unless diaries on this platform show that its really a XXL Auto.

Likes
23
Share


@adam_pawloski87
Follow
This week went real great , one has been getting flushed and the rest we will start flush Tomorrow! These ladies are doin so amazing! Hope you all enjoy !! Stay tuned for next week! Cheers an happy holidays!

Likes
50
Share


@Weedpixels
Follow
INFO:
__________________________________________
LIGHT:
* 400 PPFD, 12/12
+ Keep raising the PPFD with a (100) each week until we reach +800 PPFD.
__________________________________________
NPK:
* MAIN: PLAGRON // Coco A // 3,0ml / Liter
* MAIN: PLAGRON // Coco B // 3,0ml / Liter
* Stimulator: PLAGRON // Power Roots // 1,0ml / Liter
* Stimulator: PLAGRON // Pure Zym // 1,0ml / Liter
* Stimulator: Blackstrap Molasses // 5,0ml / Liter
* Foliar Feeding: BIONOVA // Silution // 2,0ml / Liter
__________________________________________
ENVIROMENT:
* Humid: 60-65%
* Temp: 22-25C
* CO2: 600-900
__________________________________________
HAPPENINGS:
+ Flipped over to flower 12/12 light schedule
+ Increased the main nutrients
- Can see some spots on the leafs, so im adding BIONOVA Silution in foliar feeding
__________________________________________
STRAIN INFO:
Gender: Feminised
Genes: 80% INDICA - 20% SATIVA
Genetics: Californian Sunset Sherbet and the autoflowering strain Strawberry Cola Auto.
Harvest: 450-600 g/m²
Flowering: 7 weeks
THC: 18-22%
CBD: 0,1%
Taste: Earthy, Citrus, Cool
EFFECTS
Stimulating, Happiness, Relaxing
Release Year202?
WEBPAGE:
https://sweetseeds.es/en/f1-fast-version-seeds/3237-strawberry-cola-sherbet-f1-fast-version.html

Likes
3
Share


@Muxa752
Follow
Цветение скучная пора, ну оно и к лучшему , походу дела гров получится. без серьезных ошибок) шишки набираю вес . пытался рассмотреть трихомы , получилось не очень , вроде уже мутные . но спешить не будем . удобы убрал вообще , побольше промою водичкой . напомню , все делается без измерений PH. на видео показан состояние грунта , корневая развита , аэрации помогают мелкие существа )


Likes
Comments
Share


Likes
6
Share


@BigGGrows
Follow
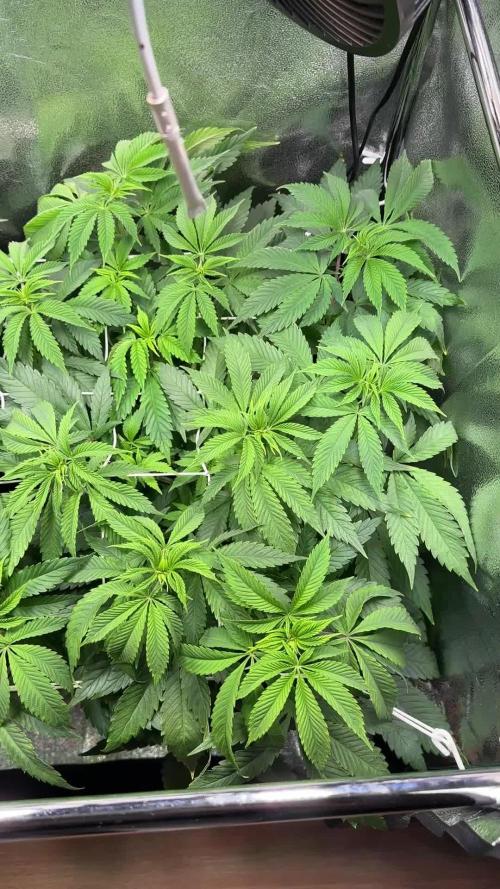
I have a few week 3's in here but they were literally a couple daya from coming into week 4....and i forgot to put them into the last veg journal, soooo....to sum up week 4 in 1 word, that would be " EXPLOSIVE"!!! THE GROWTH IS UNREAL. i had to train the plant about 4 times this week alone. I am seriously regretting putting this in a 1/2 gallon pot...should of kept her in the 3 gallon. Oh well we gonna roll with the punches!


Likes
7
Share

@PhinolaGreen
Follow
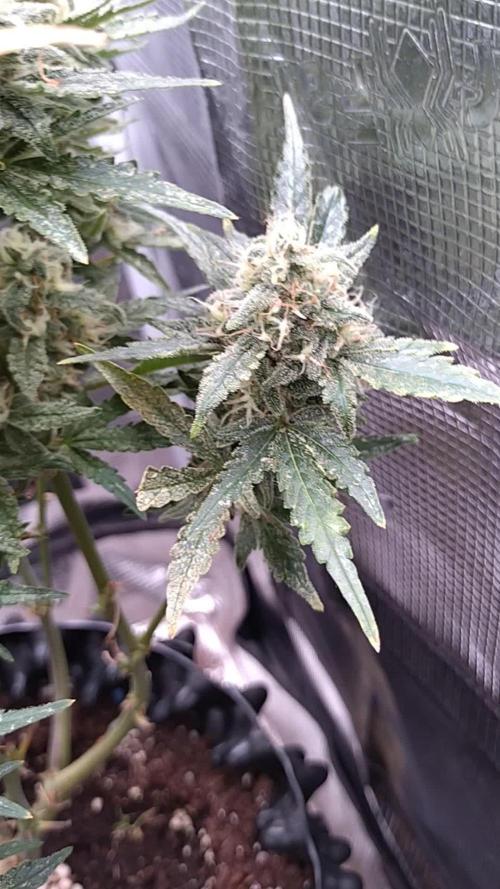
11. Woche
Denke sie braucht noch 10-14 Tage, dann sollte sie rdy sein. Crzy, wo ist die Zeit schon wieder geblieben *in der Kommode nach seh 😄
Tja da hab ich nur Anhaltspunkte und Indizien gefunden, zB den Apfel, den ich scheinbar vor längerer Zeit dort abgelegt habe. Gleichzeitig stell ich mir die Frage, wozu liegt ein Apfel in der Kommode? Und so, wie der aussieht, scheint der nicht mehr sonderlich genießbar zu sein mit seiner krustig, vertrockneten und brüchigen Schale und dem Stengel, der traurig einsam wie eine Kerze nach oben ragt. Wenn ich so weiter darüber nachdenke, was Zeit eigentlich bedeutet, nehme ich den Staubtrockenen, rote gerade Kurven, wiegt der Apfel in meiner Hand leicht. Das letzte, was ich von dem Klumpen in meiner Hand sehe, ist die faltige schrumpelhaut mit seinen Furchen und Rissen, Tiefen und Tälern, die im dunklen Schlund des Mülleimers verschwindet. Au revoir Vergangenheit, Willkommen Zukunft und bis dahin, verbringe ich meine Zeit in der Gegenwart und geb Gas. Ka warum ich euch das erzähle haha.
Habt einen guten Start in die Woche und bleibt Achtsam mit Euch 😊
Update: habe die Dame gerade gespült, denke ich schaue nach dem Wochenende nomma. Sonst sieht sie wirklich gut aus 😃
Likes
14
Share


@danwho
Follow
8/21/2024
Added two fresh gallons with week 4 nutrients to bring the reservoir up to 750ppm. Will plan to do a more substantial water change in the next few days. Both plants are booming! Added the trellis netting to begin training the plants to fill the tent! This week should be interesting.
8/24/2024
Both plants are looking good up to this point. Have continued to add fresh nutrient water as they are drinking much more now. I have a second trellis net on hand as I believe it will be required for an aditional layer of support as they stretch into pre-flower. Looking like a 4.5 or 5 week veg before flipping.
8/25/2024
Noticed Plant B water level was only a few inches in the bottom of the bucket. Had a pump flow rate issue with most of the feed from the reservoir diverting to the closer bucket. Working to rectify the issue, but Plant B is definitely stunted, unfortunately.
8/27/2024
The water level issue was remedied by putting a separate pump and feed line in place for each plant. Continuing to defoliate as I prepare to take clones. I will likely run this week of veg a few extra days to allow Plant B to recover a bit from the water issues. Additionally, after taking clones I will give 1-2 days of recovery for the plants before switching to 12-12 and starting pre-flower!
8/29/2024
Raised the lights to drop DLI to about 30. Continuing to monitor water level issues.
8/30/2024
Did a final pruning on both plants before flipping to flower tomorrow. Started topping reservoir with bloom nutrient blend. Shortened light cycle by 2 hours to not shock the plants into flower. Added a second layer of trellis netting. Plant A (larger of the two) is absolutely thriving, plant B (smaller of the two) is bouncing back from the water level issues earlier this week! Both plants are looking ready for flower.


Likes
31
Share


@Mr_Motalovah
Follow
Hello growers and tokers! 👋 👩🌾 🧑🌾.🔥💨
There has been much change this week!!
First there was a big defoliation done, I cleaned the bottom of the plants.
All the growth that wouldn't amount to anything because the light doesn't penetrate that low.
Also took off the biggest fan leaves to give more light penetration.
Then finally switched to 12/12..
After just 36 hours after the defoliation there wasn't much change
Some new growth..the colas are stacking nicely which is good.
Hope they stretch some more still..
I'm still watering every other day, After the defoliation I watered with only Enzymes 2ml/L to clean the roots a bit then started with the nutrientes again.
I dropped the amount of grow nutrients from 3ml/L to 1ml/L and started adding bloom nutrientes 2ml/L for now.
I'll slowly be upping the bloom nutrientes and after week 2 I'll no longer add grow nutrients.
That's it for this week. Stay tuned to see how they flower.
Stay safe!
Likes
13
Share


@LockDownGrow
Follow
Been a tough week as my ph pen failed so had signs of defiantly
But that’s now corrected so hope it didn’t set them all back too much
But this girl really has rippened up fast so will start too flush her this week coming
Processing
Likes
5
Share


@Jubaea
Follow
The bud's are starting to to swell up stopt feeding leafs are green enough fore the last weeks
Likes
Comments
Share

@Dr_Zauberer
Follow
Day 37-44 just putting brenches through the net. Soon putting in bloom for the switch to 12/12.
