


Likes
27
Share


Likes
4
Share


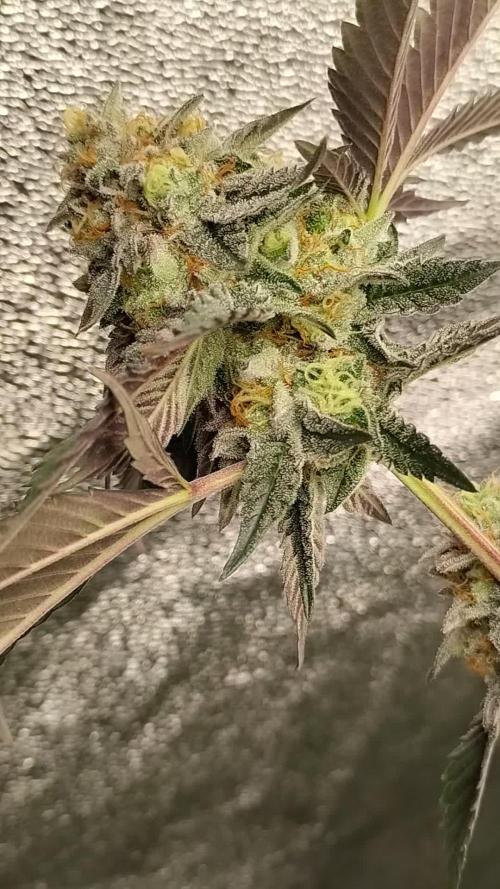
@leo2023
Follow
Very nice plant to grow. Beautiful flowers covered with trichomes. The smell is very lemon citrus flavourt. She gave a bit of a stretch. I think she isn’t the biggest yielder but definitely quality over quantity. Later on the results. Very pleased sofar!
I underestimate the density of the buds. Dry weight 375 gram of 5 plants. Pheno number 2 yielded almost 100 gram!
Powerfull lemon flavour with a touch of sour. Running pheno number 2 again!

Likes
60
Share


@Clutch
Follow
Hello again.
Welcome to Week 6 or 7 😊
Buds are riping and starting to give a good smell.
Minor problems with some caterpillars but the plant didn't take lot of damage, I guess I was lucky too spot it soon enough.
Temperatures are far from ideal but she looks like she can handle it.
It's kinda like 22° Celsius in a normal room. Barely sunlight and for fresh air she stands at an open door. No idea about the air humidity but It rains a lot outside😂 no chances on mold this way. With al the things I did wrong I'm pretty sure this is a very resistant strain.
Some yellowing fan leaves but totally normal in this stage. It is what it is, I will be happy if I have something good to smoke from her.
2L water with 7ml Alga Bloom and 2ml Green Sensation was given. The soil was pretty dry and only a little bit of water went out on the bottom. Thinking this will be one of the last waterings with nutrients. Wanna be sure too flush soon enough since my Orange Bud last year only had one week of flushing. Any thoughts on that subject? Give me some advice.
Happy growing friends 😉

Likes
10
Share


@iLoveGoodWeed
Follow
She has stretch 17 cm this week, nice stretch. Is is getting tall. Next week she should get more bushy after this week defoliation.

Likes
39
Share


@MariRemediesLLC
Follow
Great week. Switch lighting to 12-12 for flowering. 2 plants showed male and was removed. Watering every 3-4 days now. Babies thirsty.


Likes
4
Share


@CannaIGrow
Follow
Plant is growing well. Transplanted them from a 1 gallon pot into a 3 gallon pot this week.
Likes
6
Share


@artems
Follow
Bad Guy is thriving, but some lower leaves are yellowing. I've boosted feeding and will keep a close eye. Despite that, its upward growth is impressive, and I'm excited to see how it progresses. 😊🌿

Likes
3
Share

@AestheticGenetix
Follow
I freaking love this plant. She's got dense buds already but she's throwing out pistils like no tomorrow. I'm curious to see how much bigger she's going to get in the next few weeks. Only a little over halfway done. She's already having trouble staying up right. I'm having to balance branches on other branches and using the ratchet hangers to keep the mains upright
Likes
4
Share


@eldruida_lamota
Follow
Que pasa familia, vamos con la quinta semana de floracion de estas Rainbow Melon feminizadas de fastbuds.
Vamos al lío, de las 3 plantas, me quede con 2 por espacio, siempre pongo alguna semilla de más por si no abriese alguna por no perder ese hueco del indoor.
También se trasplantaron a su maceta definitiva, en este caso de 7 litros.
Tenían algo de shock por el trasplante pero ya fue solucionado.
El ph se controla en 6.2 , la temperatura la tenemos entre 20/22 grados y la humedad ronda el 50%.
Las flores empiezas a formarse y progresan a buen ritmo.
Hasta aquí todo, Buenos humos 💨💨💨

Likes
8
Share


@CannbellFarms
Follow
Nightmare having 2 plants maturing nearly 3 weeks faster than the other 2
Likes
9
Share


@Northern_Ent
Follow
July 12: Sunday Punch EV is definitely the star plant this year. Very impressive grower and is doing great.
Force flowering by putting in dark garage for 10 h per night plus using far red light at dusk. Far red light puts plant into dark mode two hours faster so its like having a 26 h day. This is a great trick if you have daily access to tour plant.
Added a 1:1 mix of malted barley and Power Bloom. I had added barley a few days ago, but those sprouted, and then I remembered that its supposed to be malted barley. Removed the barley and replaced with malted barley.
July 13: obviously stretching even after just the first night of force flowering. She seems really good.
July 15: still stretching.

Likes
14
Share


@SinSemillaWhisperer420
Follow
I top dressed with worm castings and Dr. Earth’s Flower Girl. Also, the reservoirs in my DWCs got a water change to switch to transition stage nutrients.Growth is really accelerating.


Likes
6
Share


@organicman
Follow
- lock outs
- dimmed light and nutes again drastically
____________________________________________
light- and watering schedule: see photos
now:
12 plants
2 x Auto Orange Bud > Dutch Passion (early80's)
2 x Haze Berry Automatic > Royal Queen Seeds (2018)
2 x Auto Bubblegum > TH Seeds (late 80's)
2 x Original Auto BubbleGum > Fast Buds Company (late 80's)
1 x Strawberry Pie Auto > Fast Buds Company
1 x Gorilla Cookies Auto Seed Stockers (2015)
2 x Auto White Widow x Big Bud > Female Seeds
setup + strategy:
18 seeds
3 x Auto Orange Bud (early80's)
3 x Haze Berry Automatic (2018)
3 x Auto Euforia (late 90's)
2 x Auto Bubblegum > TH Seeds (late 80's)
2 x Auto Bubblegum > Fast Butts (late 80's)
2 x Strawberry Pie Auto
1 x Gorilla-Cookies Auto (2015)
2 x Auto White Widow x Big Bud
setup:
18 x gronest 2 liter
60 cm x 120 cm x 180 cm (2 x 4) growtent
4 l humidifier
25 watt axial fan
15 watt clip fan
ro-filter
bath room with a 50 watts room fan (-> carbon filter not necessary)
...and a lot of odds and ends.
grow strategy:
max yield by stressing with:
1. tiny shoes (2 l fabric pots standing on 3 plastic rings (4 cm) for max oxygen)
2. tiny growspace (18plants on 0.72 sqm)
3. many strains (8 strains)
4. annoying neighbourhood (mixing old - i.e. bubblegum (late 80's) - with young- i.e. hazeberry (2018) - genetics)
5. no stress by light or food or water
6. unintentionally too much food
plus:
- no lst - no hst - just leaf tucking
- positioning bigger strains (euphoria, orange bud, haze berry) or just bigger phenos on less intense light spots (end of tent + edges)
- music-rotation: 24 hrs reggae (for sativas) - 24 hrs classicals (because it's scientifically proofed) - 24 hrs traditionals from the hindukush region (for the indicas)
max efficiency (min electricity - max yield):
- light: 23 h on - 1 h off
- keeping the distance of 18" (45 cm) and dimming to the right par (lux) - value depending on growing stages (see sheet: beginning 185 par ( 10000 lux/100 watt )/end 340 par ( 18000 lux/175 watt )) => ends up in approx. 170 watts in average over max 15 weeks
temperatur management:
- using approx. max. half of what the lamp can do keeps temperature low:
my tsl 2000 is pulling max. 360 watts of the wall - i need only 175 watts, results in less temperature than using a 175 watts lamp
- adjusting the temperature by using a humidifier outside of tent:
blown in humidity is soaking degrees and is transported out by fan, works much better than doing the same with pure air
summer extreme: no humidifier: 36°C / 35 rh - with humidifier: 29°C / 65 rh
works for 1-2 weeks of real hot summer days, no mould, no signs of stress in two summers
germination:
seeding in waterglass
spraying "basic"-water: ro-water (22 ppm) + calmag to 180 ppm every 4 - 8 hours until sprouted
man versus fungus gnat:
5 days before seeding i'm running the tent with "basic"-watered pots as if there were plants inside - led on, fans on, humidifier on. Fungus gnats coming with the soil might take the chance to come out now for breeding. i'm waiting with a 9 mm rifle. in the past i found 6 gnats in 2 of 8 x 50 l biobizz lightmix bags coming out of the soil. i could eliminate every single gnat successfully ;)
rotating harvest:
the little ones will be harvested completely when ready. at this point only the top branches of the big ones will be cut...and the new (basic-watered) pots of the new grow will move into the tent. 2-3 weeks later the secod half of the big ones will be cut and the second half of the new grow will move in...
nutes:
biobizz / soil: biobizz lightmix
bloom,grow,topmax,activera,algamic
+ aminopower instead of bio heaven (too expensive)
individual feeding schedule/once a week:
veg: 200 - 600 ppm
bloom: 600 - 900 ppm
water:
ro-water with:
veg: 100-150 ppm calmag
bloom: 150 ppm calmag


Likes
21
Share


@Growermina
Follow
This strain really surprises any grower in relation to yield. The plant's structure itself does not have much density. The flavor and aroma refer mostly to pine and its production of trichomes is not the best that I’ve seen.
Likes
11
Share


Likes
16
Share


@Comfrey
Follow
Blacky reacts quit well on my low stress training. It‘s raining and raining…🤨

