
Likes
Comments
Share


@420pete
Follow
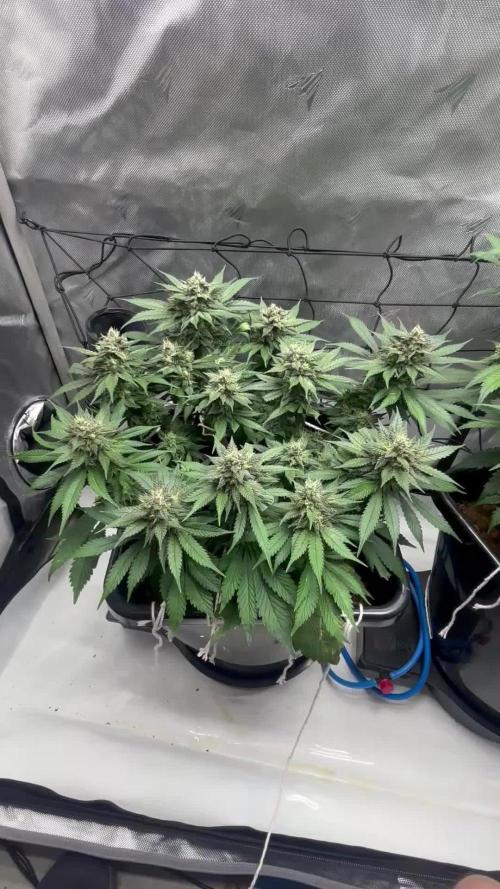
Chop day. Everything is looking and smelling incredible. The range of smells I've got so far are: floral, grape, blueberry, gas, burnt rubber, tangerine, funk. Everything appeared fully mature beside the Cambodian x Meat Breath and Pak Man so decided this was the best time to cut them down.

Likes
12
Share


@THCeitor
Follow
Normalmente una planta automática ya está floreciendo en la cuarta semana, pero estas RUNTZ auto no quieren parar de crecer formando una estructura fenomenal gracias al LST.

Likes
16
Share


@Vps420
Follow
In the middle of the 5 week most of them show their sativa characters with long branches, now in the 6 week they are completely start flowering, more photos soon
Today 14/05/2021
I will change the lamp bulb to a specific one for flowering (always 400w) and will experience the CalMag for the first time in 4 years, all I have learned was self taught and I have never used this product...in my opinion it was a big mistake, hope to have a positive result 🌋🏔️🌋🏔️💚💚💚💚

Likes
2
Share

@DelBoy07
Follow
Starting to swell up nicely now, the more indica one may be only 2 weeks from harvest going by the trichomes. Eased the EC back slightly as I was starting to notice some slight burning on the tips.
Will need to harvest the more indica one 2 weeks earlier I’m thinking, which means I’ll need to buy a small drying tent with fan and filter. Hopefully the weathers kind to me as the attic gets very hot on warmer sunny days.
Likes
11
Share


@BluetenVomBodensee
Follow
Day 56
Happy 8 weeks, Fiona!
Still the easy going plant everyone wishes for :)
I am pretty sure I can see first signs of flower. So one week after switching to 12-12, we are in (very) early flowering.
Day 58
Well, I am running out of space 😅
My Scrog-Screen is bursting and I am really happy I have been using it because this Green Princess Fiona is BIG in every aspect (I guess this is what a long veg does with them 😍).
From now on, I‘ll only use LST to adjust height differences but no more Scrogging.
I‘ll defoliate her soon (probably towards the end of the week).
Day 61
Decided to make perfect use of home office and defoliated Fiona. Also fed her 2.5l with half the recommended dose of nutes.
Day 62
She looks happy! Doesn‘t seem to care about the leaves she lost yesterday. I‘ll give her another day rest before one final round of LST tomorrow 👑
Likes
15
Share


@Aleks555
Follow
Gorilla Zkittlez Auto is a true work of art among autoflowers. With its powerful, dense buds literally dotted with 'sugar', each stage of growth of this plant is pure eye pleasure. The scent she exudes is as delicious as her taste-sweet, with fruity notes, promising an unforgettable delight. This beauty not only looks great, but also gives a strong, powerful effect that both relaxes and cheers up. Special thanks for this outstanding variety of 42Fast Buds, and, of course, Xpert Nutrients-your fertilizers made such impressive results possible. Each stage of growth was perfect thanks to this tandem. This variety is a real miracle for any grower!
Xpert Nutrients is the fertilizer that truly makes a difference! 🌱
From the very start of our grow, Xpert Nutrients has proven itself to be exceptional. Every plant receiving this nourishment flourishes—from strong roots to dense, trichome-covered buds. With its balanced formula and ease of use, our beauties get everything they need for optimal growth and flowering. It’s a joy to see how the plants respond to this fertilizer!
A huge thank you to Xpert Nutrients for your high-quality product and continuous support. Without your nutrients, our results wouldn't be as impressive! 🙌
Likes
1
Share

@letmegrow85
Follow
Die gezwitterte pflanze habe ich nicht gewogen und zu früh geerntet, die anderen beiden bin ich mit zufrieden, die eine hat kurz vor 70 abgeworfen und die andere 66 bei 61% rlf Rest feuchte.
Wirkt ganz gut.

Likes
2
Share

@GREENPHOENIX6262
Follow
Week 7 - 08/11 - Topped most of the plant so far - LST tied down all main colas - Had an issue with the PH - has since been neutralized - clean water feeds for the next 2 weeks - prepping for transplant into 7 gallon pot.
8/15 - 7 week veg transplant - Myco/Worm castings added to the soil and perlite (60/30/10) - Humidity 85%


Likes
12
Share


@AtomicOrgy
Follow
ALL went well, next week I'll start the 2 weeks flush. The smell is great, it's full of tricomes. I think it's going to be a good yield. What do you guys think?


Likes
15
Share


@Trueorganics84
Follow
I love this girl. She grows tall and fast. Super easy grow so far. Just starting to lst her a little bit more.
Posted 4 videos on how I make my tea. I use this When I start seeing hairs until the last 2 weeks.
Then I flush
Just a compost tea you see here.

Likes
16
Share


@Beans416
Follow
Another week in the bag.everthing is filling out and should only be a couple more weeks till harvest.
Thank you for looking happy growing

Likes
7
Share


@grow_rva
Follow
Changed the reservoir for flower this week.
*Athena proline is measured in grams per gallon. The option isn’t allowed on grow diaries so I had to use an online converter for tsp to grams. *
Defoliation and readjusting of the ties seems to happen daily at this point.
In hindsight I left to many flowering sites, i was afraid I wouldn’t get a decent yield 😂. Removing more would have saved me time defoliating and readjusting the branches in the later stages.
I was surprised at how well the auto took to topping and training I’ve done so often. Really happy with the root system. Video added.
Likes
50
Share


@DogDoctorOfficial
Follow
🌟 Eternity Grow Cup – Week 3 Veg Report 🌱
Another week in the books, legends, and though the temps aren’t perfect, our Runtz babies are growing strong! 💪 This week marks a pivotal moment as we get serious and start to push these girls toward greatness.
🌱 Growth Update:
• The girls are officially showing their third pair of leaves, and while they’re growing slow due to cooler temps, they’re consistent. Standing at 6 cm tall, these beauties are ready for the next steps in their journey.
• The yellow sticky traps have also done their job, catching some gnats—always a win for pest management!
Let’s talk about the unexpected guests making an appearance in the grow room—gnats! These tiny critters can be a common nuisance for growers, especially in environments with moist soil. While they’re not devastating, they can be a sign that things need a bit of tweaking.
Why the Yellow Stickers?
Yellow sticky traps are like candy for gnats—they’re irresistibly attracted to the bright color, which mimics flowers. These traps are a simple, non-toxic way to monitor and control the population. It’s not just satisfying to see them stuck (though, let’s admit it, it kind of is)—it’s also a great way to keep tabs on how many are lurking around and take action if necessary.
What Causes Gnats?
Gnats love moist environments, and overwatering or humidity that’s a bit too high can create their perfect breeding ground. Using high-quality soil like Pro-Mix HP with Mycorrhizae helps, but these little critters can still sneak in.
How to Handle Them?
While yellow stickers are a great first line of defense, staying vigilant with watering practices is key. Letting the top layer of soil dry out between waterings can disrupt their life cycle. Plus, products like beneficial nematodes or soil conditioners can help keep them under control.
They may be tiny, but we’ve got our eye on them! Let’s not let the gnats steal the show—our Runtz have got all the spotlight! 🌟
Nutrient Regimen:
This week, we’re sticking with the Aptus Clean Mineral Line for Veg, a powerful combo designed for optimal plant health:
• Regulator: 0.15 ml/L – This keeps the plants strong, aids in stress tolerance, and boosts nutrient uptake.
• RO Water Conditioner: 0.8 ml/L – Balances the water profile and improves nutrient delivery.
• All-in-One Liquid: 1.25 ml/L – Provides a balanced mix of essential macro and micronutrients for sustained growth.
📌 Key Stats:
• pH: 6.05
• EC: 1.0
• Temp: 18.3°C
🔧 Tech, Tools & Building the Dream Studio
Behind the grow, I’ve been fine-tuning my workspace. Using just a piece of wood, carefully cut feet, and some imagination, I’ve elevated my monitors for better editing. It’s not fancy, but it works! 💻✨
For the grow, my trusted TrolMaster gear (from the Tent-X to the AMP-3) has been my go-to for precision. Every measure—pH, EC, temps—is logged and tracked to keep these plants thriving.
🌟 Exciting Milestones:
💚 Huge thank you to the community for helping me reach:
• 500 YouTube Subscribers 🎥 – Weekly episodes are dropping, so make sure to tune in for detailed updates!
• 4.5K Instagram Followers 📸 – Join the fun as we share the Runtz journey and so much more!
💨 Welcome, Ziggi Papers!
A warm welcome to Ziggi Papers, our newest sponsor! 🌟 Ziggi’s high-quality rolling papers are the perfect addition to any smoke session. They’re all about sustainability and precision—just like this grow. Check them out at ziggioriginal.com.
💚 Shoutouts:
To the diary sponsors, to my sponsors and this incredible community:
• @GrowDiaries, @Plagron, @Zamnesia, @AptusHolland, @ProMixSoil, @TrolMaster, @ThinkGrowLED, @FutureOfGrowLED, @CannaKan, @ZiggiPapers
Thank you for believing in the craft and making this journey possible!
To the community—supporters, lovers, and yes, even the haters—you all inspire me to give my best every day. Together, we’re writing history with this grow.
This week, I’m dropping:
• A photo set of all 5 phenos, showing their progress.
• Behind-the-scenes shots of my workspace build.
• A closer look at the tools and products making this grow epic and more.
For next week only God knows but one thing is for sure this promisses to be epic 💚
Let’s keep the momentum going, legends. This grow is more than just a competition—it’s a journey of learning, growth, and passion. Good luck to all the participants—may your grows be epic, your spirits high, and the journey fun for everyone involved! Stay tuned, and let’s make history together!
Genetics - Runtz https://www.zamnesia.com/6000-zamnesia-seeds-runtz-feminized.html
Nutrients - Plagron https://plagron.com/en/hobby
- Aptus Holland https://aptus-holland.com/
Controls - Trol MAster https://www.trolmaster.eu/
LED - https://www.futureofgrow.com/en
LED - https://www.thinkgrowled.com
Soil - https://www.promixgardening.com/en
Germination - Cannakan https://cannakan.com/?srsltid=AfmBOopXr-inLXajXu3QFgKXCXXos4F1oEvScjMKIB5MR5dk8-GJ-F49
DOGDOCTOR 15% off
Smoking Papers - https://ziggioriginal.com/
Terpene saver - https://grovebags.com/
As always thank you all for stopping by, for the love and for it all , this journey of mine wold just not be the same without you guys, the love and support is very much appreciloved and i fell honored with you all in my life
With true love comes happiness Always believe in your self and always do things expecting nothing and with an open heart , be a giver and the universe will give back to you in ways you could not even imagine so
As always, this is shared for educational purposes, aiming to spread understanding and appreciation for this plant. The journey with nature is one of discovery, creativity, and respect. Let’s celebrate it responsibly and continue to learn and grow together!
Growers Love To you All 💚
#EternityGrowCup #RuntzHunt #GrowersLove #CannabisCommunity #AptusHolland #ProMixSoil #TrolMaster #Zamnesia #Plagron #ZiggiPapers
Likes
28
Share


@TheGreenQueen420
Follow
Plants were looking terrible this week. I use a humidifier and I am In a hard water area. Well I wondered why the exhaust fan I had to keep adjusting and researched and the hard water had clogged the carbon filter. Ordered a new one costly mistake.
Anyone know exactly what the brown patches are. I assumed a calcium deficiency due to lockout as I was adjusting ph to 6.3. So I flushed through with 6.8 and they perked up the next day. I added calmag to be safe. Also suffering cold temps at night so could have been phosphorus deficiency lockout (only guessing) so I have increased temps at night. Never had these issues in veg before.

Likes
20
Share


@siLva_77
Follow
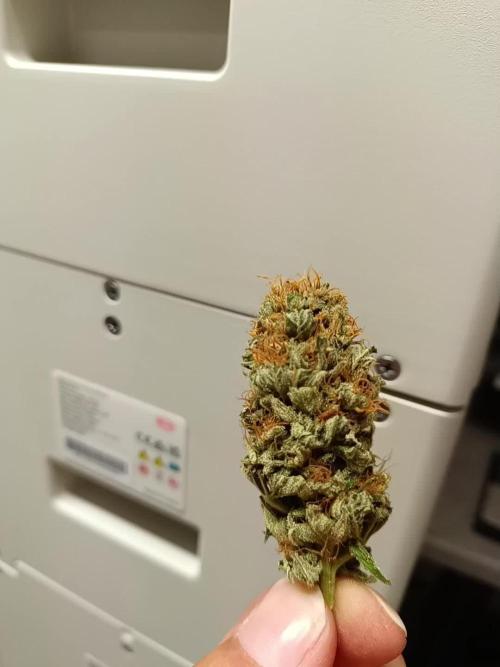
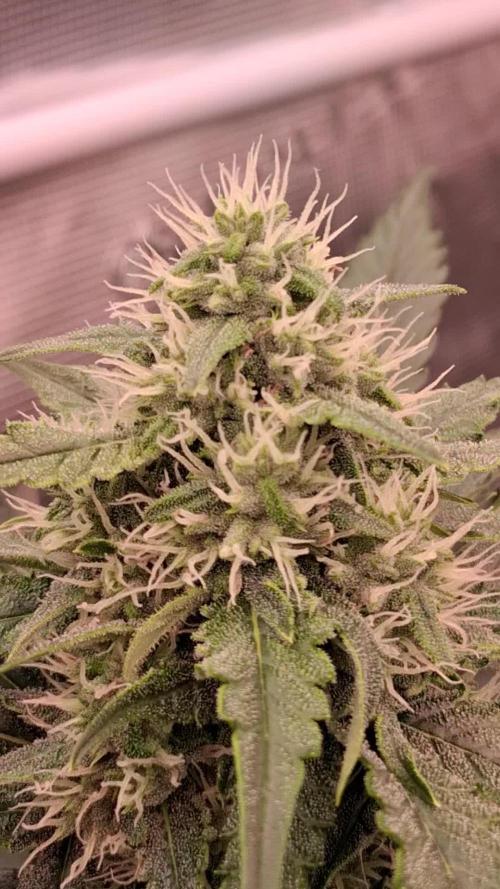
End of the 4th week of flowering. The buds become fatter and the trichomes spread to the sugar leaves.

Processing
Likes
14
Share


@Mr_Og_GreenThumb
Follow
Today 7/30/19, day 57 and the start of week 9. I'm still continuing to alternate between days with my pesticide treatment (especially after finding that bug living on one of hulkberries fan leaf) and thrive alive green daily foliage spray as a prophylactic solution against any possible pests or mold going into these last few dog days of veg. I will flush them with distilled ph'd water for two days this weekend in preparation for flower. Then I'll start them on some "flower fuel" bloom booster on top of my secret for success flower recipe at 1/4 of the recommended strength.
Outside of that still no adverse issue to report for the end of the 8th week. After my last trim, they both have responded very nicely, I was kind of worried about fat banana stalled growth. But one thing I noticed when I topped her at the 6th node, yes the main stem stopped growing but it developed many bud sites up and down every stem. Whereas hulkberry was topped at the 8th node, she has mainly focused on developing long stems and only 2 or 3 bud sites along her stems. Even though hulkberry in structure, is much bigger than fat banana and has a way bigger root system. Fat banana is bushier and has developed way more bud sites than hulkberry. I can't tell which strain will yield the most at this point only time will tell!
Also, a big shout out to "J"@RQS, thank you for the excellent customer service. Another reason why Royal Queen Seeds is top 3 in breeding!!
Likes
5
Share

@BlaKX
Follow
Hallo Growmies und Willkommen zur Woche 6!
Die Hitze steckt die Banana Purple Auto 🍌 💜 gut weg und wächst allgemein ganz gut 👍🏻
Die Blüten fangen an Volumen und Harz Produktion anzukurbeln ❤️

Likes
30
Share


@Cremo
Follow
Sweet mother of god! What a beautiful plant!
Now I finally know what it means to grow US genetics. Sherbinskis in collab with Sensi Seeds has made some uniquely beautiful plant. She's dark, almost black, she's extremely good looking, and frankly I didn't expect the plant to look as good as the advertisement photographs but here she is! As beautiful as it can get! I've pushed my photography skills again and god damn, it was worth it. I don't know if any other plant has been this photogenic!
The yield is great, as expected from a extra longer veg period. The smell is off the hooks!
Please, have a closer look at all the photographs, there are soooooo many gems that should be able to win dozens of contest IN MY OPINION XD
PS: Hopefully I'll grab your attention with these bomb ass macro shots!!!!! I love me some great Trichome worlds, and this is a special one!
Cheers
XOXO
Cremo
Likes
5
Share


@High_like_Thai
Follow
As we can see I’on on my pre flowering need some advice if I should train them or just let’em grow ?
ตอนนี้ บางใบมีสีออกเขียวเเกมน้ำเงินทางปลายครับ คือ mimosa cake ส่วน forbbiden runtz เราก็เขียวดีสีไม่ตกครับผม