
Likes
Comments
Share


@love_2_grow
Follow
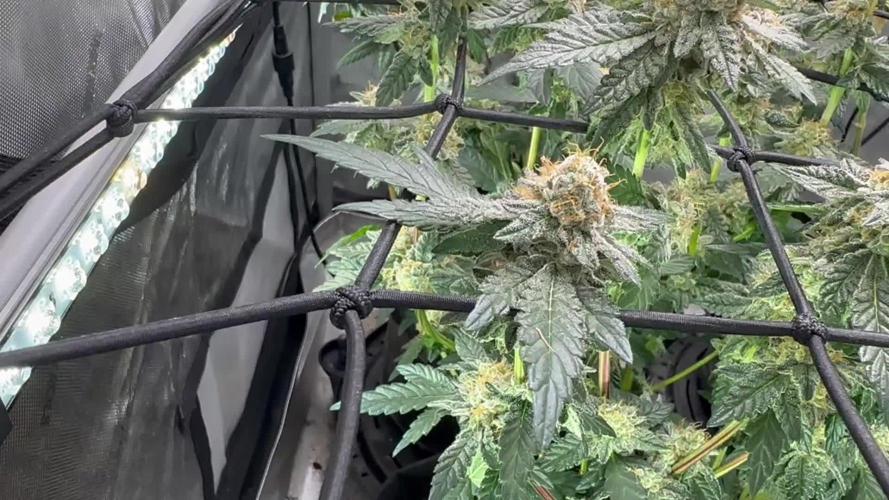
Day 64 Flower (Day 106)
Today is the first day of the 10th week of flower and I put on a powerful headlight and some magnifying glasses and closely inspected the right girl during the dark period, so the colors from the grow lights didn't fool me.
Unfortunately, I found another couple of buds with bud rot. Soon I'll have to decide to harvest the plant now and cut my losses even though she isn't done, or I'll take my chances and let her go a while longer.
I turned up my extraction fan, installed another circulation fan, and ordered a dehumidifier that will arrive tomorrow. I'm hoping that all those measures will bring down the humidity in the tent (unfortunately, I can't do anything about the temps) and prevent further rot. I will let her go another few days and see if any additional rot pops up. Fingers crossed that it won't.
The left girl is just doing her thing, but it doesn't look like she will fatten her buds. I guess all that stress in the tiny tent was too much for her.
No matter what the result of this grow will be, it certainly has been a great learning experience.
Day 65 Flower (Day 107)
Things are looking good for the right girl as I haven't found any more bud rot yet. Turning up the extraction fan certainly helped, not only with the humidity but also the temperature dropped. Not by a huge amount, but I'll take whatever improvement I can get. Today the dehumidifier arrived as well, and I put it in the tent right away.
The humidity in the tent has now dropped from the high 60s to a much more suitable mid-40s, and I hope this will be enough together with additional air circulation to prevent any further rot.
I looked a bit closer at the trichomes today and found that most have gone cloudy, and I finally found some amber ones (about damn time!).
I'm aiming for around 20-25% amber in this harvest as I'm hoping for a relatively "heavy" smoke - one of those frying-pan-to-the-head kinds of smokes suitable for late nights.
Day 66 Flower (Day 108)
Still no signs of more bud rot. Fingers crossed
All I did today was to mix up some more nematodes in water and then feed each girl with 3 liters of it at ph 6.4.
I'm not sure it was necessary for my main tent as the fungus gnats seem to have died out by themselves. I put in a new yellow sticky trap yesterday, but it was still empty today, and many dead gnats were lying on the tent floor. I have no real idea why, as I don't use any pesticides, but maybe the gnats really don't like this new low humidity in the tent. In any case, I'm just happy that the little buggers are gone.
Day 67 Flower (Day 109)
The bud rot is still staying away, and I'm getting hopeful that it will stay gone.
All I did today was to give the right girl 3 liters of pH 6.4 water. She was a bit thirsty as I had the irrigation turned off for a couple of days due to the nematodes I gave them yesterday.
I've now turned on the system in each tent and will just cruise along until harvest.
The girls are already way over time, but most trichomes are cloudy, and I've started to see some amber here and there. Although, not much of a fade so far.
Day 68 Flower (Day 110)
All I did today was snap a couple of pics.
It's all just a waiting game at this point, and I hope it won't take that much longer. I'm ready to cut the girls down and have some time off before the next season is here. I plan to grow a couple of photo CBD girls in my main tent and maybe an auto in my smaller tent. We'll see. But yeah, first, the current grow must come to an end. It looks like the left girl is starting to get her fade on, so there's that at least. I didn't bother looking at the trichomes today, but I'll have another look in a day or two.
Day 69 Flower (Day 111)
I didn't do a single thing with the girls today except snapping a couple of pics.
What I did, though, was to make a smoke test of the right girl. Let me explain: Earlier this week, I had to cut off four buds due to bud rot. Out of those four buds, I saved two small tops after trimming off all rot (as well as plenty more just to be safe). I left those tops on the tent floor, where they dried in only a few days, and yesterday I decided to try a smoke.
Naturally, I can't say anything about taste as this weed is dried the worst way possible: fast, hot, and in the light. On top of that, it's not cured either. That being said, holy smokes, batman! This stuff kicks like a mule, which is why I didn't post this last night already. I was too stoned to care. Precisely the effect I was hoping for from this harvest: properly stoned and incredibly lazy. Boom!
Day 70 Flower (Day 112)
Today was the last day of week 10 of flower. Not much exciting is happening this late in flower, so it is primarily a waiting game at this point. I did remove the irrigation system from the left girl and will hand water her instead. That cheap system I had was too erratic, and I'm better off without it. Plus, I hope that she will be done soon-ish. She will never win a beauty contest due to her scraggly foxtail flowers, but I'm still happy to get something from her considering all the stress she went through.
The right girl has been doing fine all week, and no other bud rot has been seen since I fixed her environment.
I rechecked the trichomes today, and still hardly any amber in either girl. I'll let them go for another week, but then it is time for the chopping block. This grow already went a lot longer than planned initially, and it is time to bring it to a close soon.

Likes
55
Share


@420DeepGrow
Follow
Sorprendido por la noticia de mi primera colaboracion con MarsHydro 😊🙏 y muy sorprendido tambien por el envio de las semillas por parte de Sweet Seeds.
La marca numero uno en focos 💡, carpas de cultivo ⛺️, extractores 🌬️ y demás aparatos que necesitas para tu cultivo.
Para esta aventura arrancaremos con 💡Mars Hydro TS 1000 Full Spectrum LED Grow Light 150W Regulable y 1 semilla autofloreciente a un ciclo de 20/4.
Verdaderos 150w con este TS1000, la mejor luz de cultivo LED para principiantes.
Ofrece una luz adecuada para 2-4 plantas 🌱. Su precio razonable, la marcada mejora del rendimiento y el control variable de la producción la hacen amigable para los nuevos cultivadores. Todo un tesoro para cualquier cultivador que este comenzando.
Usaremos para esta aventura una carpa de 60x60x90, MarsHydro una carpa para los más exigentes.Con una solapa de cremallera mejorada, dobles cremalleras de metal con forro,reflectante diamante tipo Mylar, postes de metal para una estructura mas solida, no se puede pedir nada mas.
Garantizando una respuesta en solo 24 horas tanto si has usado antes la marca como si no.
Que decir de Sweet Seeds, uno de los mejores bancos de semillas a nivel mundial, con cepas que te sorprenderan.
Variedad muy productiva y resinosa que produce niveles de THC de hasta el 24%, y niveles muy altos de terpenos.
Excelente aroma y sabor, muy dulce, intenso y denso, con tonos de mango, pinceladas terrosas y amaderadas, y leve fondo de Skunk.
💡 MarsHydro TS1000:
https://www.amazon.com/gp/product/B07PLY1WKK
⛺️ 60 x 60 x 90 MarsHydro:
https://www.amazon.com/dp/B081PN2QDN/
🌻 Tropicanna Poison XL Auto:
https://sweetseeds.es/es/the-red-family/3211-tropicanna-poison-xl-auto.html#
Comienza el perido de floracion, aunque se anticipo la semana pasada, en la etapa anterior se aplicó agua y humus de lombriz.
📅 Dia 29: Riego con nutrientes EC 800
📅 Dia 30: Descanso
📅 Dia 31: Descanso
📅 Dia 32: Riego con nutrientes EC 750
📅 Dia 33: Descanso
📅 Dia 34: Descanso
📅 Dia 35: Riego con nutrientes EC 450

Likes
15
Share


@Springbokke
Follow
Доброго времени суток
Сегодня конец первой недели перевода на цвет. Перед переводом поставил сетку, от верхушки растения до сетки было 20 см(нужно было ставить не выше 10см от верхушки растения), девочка моя выросла за неделю 19-20см, что оказалось не достаточным и мне пришлось поднять сегодня горшок на 4-5см. Так же я сегодня поставил железный хамут у основания, но я еще не стал сильно зажимать его. а так сказать подготовил для дальнейшего зажима(и за сетки мне бы было проблематично в будущем это сделать). Планирую зажать хамут где то через недели 3-4, не раньше. Яркость лампы 3500К увеличил до 75%, а 5000К до 100%, через неделю планирую убрать 5000К и поставить 200вт 3500К, и 200вт 3000К.
Поливать стал каждый день, сегодня девочке моей 68 дней жизни.
Полил ( 980ppm )-3л Cal-mag Xtra - 0,5мл/л; Bud Candy - 2мл/л; 1-й день предцвета
Полил ( 919ppm )-3л 2-й день предцвета
Полил ( 903ppm )-3л Bud Ignitor - 2мл/л; 3-й день предцвета
Полил ( 754ppm )-3л 4-й день предцвета
Полил ( 936ppm )-3л Bud Candy - 2мл/л; 5-й день предцвета
Полил ( 872ppm )-3л Bud Ignitor - 2мл/л; Piranha - 2мл/л; VooDoo Juice - 2мл/л; Tarantula - 2мл/л 6-й день предцвета
Полил 3л 7-й день предцвета
До харвеста 9-10 недель, не думаю чтоб заняло больше.

Likes
6
Share


@gr3g4l
Follow
Una semana en la que las plantas dejaron de crecer como lo vinieron haciendo y emplean todo ese esfuerzo o energía en mejorar la formación de los cogollos.
A week in which the plants stopped growing as they had been doing and used all that effort or energy to improve the formation of the buds.

Likes
43
Share


@WAWAWEED
Follow
My pH meter was troubled that make my plants got lower pH you can see brown spot on the leafs that's it.🌱✌️


Likes
57
Share


@MadeInGermany
Follow
Day 6 since the time change to 12/12 hrs Hey all together 😋.
in the last six days since the changeover, it has already made a nice boost 👌.
She looks beautiful and it is fun to watch her grow 😉.
In the next few days, as soon as the flowers start to appear, I will add GHSC Powder Feeding Bio Bloom to the coconut substrate 😃.
I wish you a lot of fun with the update 👍
You can buy this Strain at :
https://sweetseeds.es/de/red-mandarine-f1-fast-version/
Type:
Red Mandarine F1 Fast Version
☝️🏼
Genetics:
Red Poison Auto®️ (SWS39)
X
Tangie (California Orange x Hybrid Skunk)
👍
Vega lamp:
2 x Todogrow Led
Quantum Board 100 W
💡
Bloom Lamp :
2 x Todogrow Led
Cxb 3590 COB 3500 K 205W
💡💡☝️🏼
Soil :
Canna Coco Professional +
☝️🏼
Fertilizer:
Green House Powder Feeding
☝️🏼🌱
Water:
Osmosis water mixed with normal water (24 hours stale that the chlorine evaporates) to 0.2 EC. Add Cal / Mag to 0.4 Ec Ph with Organic Ph - to 5.5 - 5.8 .
Likes
4
Share

@L8bloomr1008
Follow
Day 49- This week I think we cut out the nutes and let them finish, atleast for the mbrxgp. The Pablo’s revenge looks to be about a week or so behind so we’ll go until they’re finished. Smells on the mbrxgp is heavy citrus, lemon almost, slight gas. Pablo’s are very earthy, I’m expecting a hashy, dank finish for them.
Likes
11
Share


@Fibro_Witch
Follow
Gave the photos a haircut today. Removed some fan leaves and lower branches that wouldn't amount to much. Gave the branches to my horse because he loves them! Tried enticing the ducks with fan leaves but they weren't having any of it. They prefer lettuce, not "The Devil's Lettuce"😂
I added in a little 5-1-1 fish fertilizer to my feeding regimen as well. Still picking off inchworms.
Hurricane Dorian came through yesterday and gave us a good bit of rain and wind, so while the other girls were tucked under the roof, including the autos, Aubergine was at the end of the bench. I'm sorry, but I had to prioritize the others, I feel like they're at greater risk for mold. It got down to 49 F last night, which means it's really Fall now!

Likes
Comments
Share


@GrowDiaries
Follow
Best Breeder 2025
Hats off to Cookies—our GrowDiaries.com growers picked them as Best Breeder 2025! Huge props to our community for voting! #GrowDiaries
@spannabis_official @cookiesbarcelona @cookiessf


Likes
3
Share


@High_Grade_Dadli
Follow
Quick update I know I been MIA..diary label xmas tree got deleted after losing the mother tree(die back)and about 80 cutting(weather)
1 of the cutting which I took before from the mother that died is the mother to set 1 and 2 (29)...took some cutting off of set 1 (30) jus waiting to see how rooting goes...mother tree jus hit the 2nd week of flowering will update with pic in week 2

Likes
11
Share


@4_Pro2Bono_0
Follow
Harvest 2 weekend ago and dried at ~60° at 60 RH. Took about 12 days total.
Likes
3
Share


Likes
11
Share


@artems
Follow
In the first week after switching to a 12/12 light cycle, I continued to train the plant, but I believe it'll be the last time. It already boasts 8 healthy-looking colas, which seems sufficient. Let's see how it progresses! 🌿😊

Processing
Likes
1
Share


@Teddy01500
Follow
Hello everyone here are new photos with a new video this is the second week of flowering for my babies. Thanks.


Likes
9
Share


@Cestlaweed
Follow
Satisfecho con los resultados y el control sobre la temperatura con nuestro Cooltube reduciendo eficientemente cerca de 5-6 grados al armario.
El itinerario para nuestro cultivo es mantener en las condiciones actuales a nuestras 5 bebes y durante la tercera semana germinar La sexta. Recordar que este diario está enfocado solo en 4 babys, macetas de 11Litros 3xGlueberry OG Auto de DutchPassion y 1xLSD-25 de FastBuds, muy buenas genéticas de muy buenos bancos que esperamos potenciar en cosecha con tecnicas de Bajo estrés incluyendo el mallado SCROG, y ya en etapa avanzada de crecimiento una tecnica de Alto estrés conocida como popping (poda de bajos) además de un casi completo programa de fertilización, contando con los nutrientes básicos de vegetacion y floracion (top veg y top bloom) y para las primeras semanas ya en uso un enraizante (Top underground) y otros productos para terminar la floración de la mejor manera posible.
Sígueme en IG @cestlaweed para mayor información, y cualquier comentario o consejo es sumamente bien recibido ✨🌱
Likes
46
Share


@Mr_Motalovah
Follow
Hello growers and tokers! 👋 👩🌾 🧑🌾.🔥💨
It's my first harvest on this community and I'm loving it.
Everyone always ready to help each other and have great feedback.
Tracking my grow on here has made it way easier.
There were times that I misplaced notes or forgot what I did or when with a certain strain and all I had to do was come on here and check it.
Also motivated me take more pictures and do more logs. All out great site. Don't know how I haven't found it earlier.
HIGHLY recommend for all growers.
The grow cycle went pretty smooth.
She's easy to grow and flowers early so you can't do much training. That being said it's great for beginners. 👌
Had no problems with pests on these, while on the other plants (none cannabis) in the balcony I had issues with spider mites.
They grew better than expected given the few hours of direct sunlight they received.
Results were good, I was expecting 10-15 grams per plant and ended up with a tad bit more.
Drying went a bit fast because there were few buds.
I probably could have took it down a few degrees as well.. my fault on that part.
They dried in 4 days, they've been curing for 10 days.
I normally test them after 15 days but they smelled so good I had to try them.
Smell: Lovely earthy, woody, slightly like diesel. Quite pungent for being autos.
Taste: Just as it smells.. leaving a nice after taste of diesel.
Touch: Very sticky, dense buds.
They break down finely in the grinder.
Cleaned the grinder before testing and after 4 joints ( 2 grams or so)
I already have a good amount of kief collected in the bottom. (Check photo)
Might grow this one again just to make some bubble hash.
The high is awesome nice uplifting, long lasting energetic but without a heavy euphoric rush.
Reminds me of a smooth haze high, although if you smoke a lot even being an experienced smoker, she'll get to you.
Only down side is dry mouth, very dry mouth!
Have some water on hand because your mouth will transform into a desert. 😂
Great strain to kick start the day.
Beginner smokers take it easy with this one. She hits hard! 👊
Likes
11
Share


@GRow_M8s
Follow
Only new for this week is that topmax dose increased to 4ml/L.
There was a light defol made on HC#2. Some leaves from main stem that had kept few buds hidden were removed.

Likes
2
Share


@The_Doctor_Green
Follow
Hola a todos, esta semana hicimos una buena deformación, en las partes bajas de la planta.
Regamos con oro negro de namaste 2ml x litro, en total regamos con 5 litros de fertilizantes y el resto de la semana, solo agua.
No se midió ph ni ec .La planta soporto bastante bien el stress por la defoliacion, esperemos siga así.
Hasta la próxima amigos!.
Likes
32
Share


@GrowingTime
Follow
Guys shit happened at the end of week 9, my ph tester went off and i messed up.
my leaves looks soft as shit. now i am using the drop ph tester and brought in a decent level the ph, see if things will come back or will have to do something more