
Likes
Comments
Share


@CrazyRussian
Follow
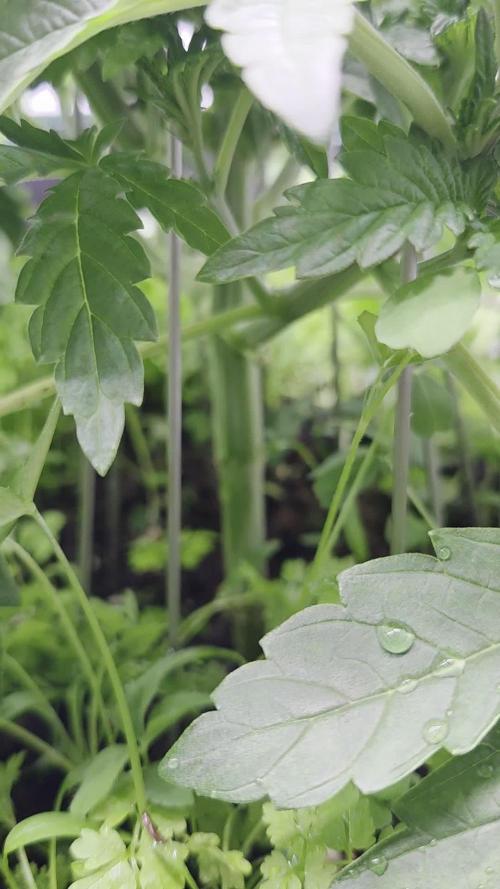
This week was amazing! I gave green sensation for the first time, and the results are as good as I expected. The buds are incredible, the smell is amazing, everyone looks healthy so far! :) I hope everything will be alright, see you guys next week!


Likes
19
Share


@Mr_Juice
Follow
-light intensity increased to 100%
-watered twice a week with 1.5 liters of water. 1x with nutrients, 1x pure water
-pre-flowering this week, flowering officially begins next week🌹

Likes
19
Share


@Sti_Cazz
Follow
I hardly watered, tried to feel their water need and only gave a bit of regular tap water (left out for 48hrs)...not doing nutes until I see def.

Likes
15
Share


@VanHealzing
Follow
All 4 are growing very well. I noticed some light stress on 2 and 3, so I dimmed the lights.


Likes
9
Share


@Rckeh
Follow
18/05/2023 Day 36 - Today i finally fed her after 1 week without feeding. Kept almost the same feeding from last week, just removed root juice and alg-a-mic and rised MagNifiCal to 1,5 ml/L
Day 37 - Today she stretched nicely and i noticed her first pre flowers so preflowering begins, next fedding i´ll add 1ml/L Alga Bloom and Top-Max and will slowly rise up to 4ml/L
Day 39 - Today i fed her again, added 1ml/L Alga Bloom and 1ml/L Top-Max and rised MagNifiCal to 1,8 ml/L. Has been hot and dry these days. (for my zone).
Day 40 - She´s growing well. This afternoon i sprayed under her leafs with Alg-a-mic. Soon i´ll defoliate her, so i want to give a good dose of vitamin b so she recovers beautifully.
Day 41 - This morning sprayed her again before sunrise. I wont defoliate yet. Pot is already kind of light, so tomorrow is feeding day.
Day 42 - Today i defoliated, did some LST and fed her. Added 0,5 ml/L Alga Bloom, making 1,5 ml/L in total. 😃


Likes
42
Share


@Mz876
Follow
Overall I am satisfied with this grow and harvest . The plant was extremely resilient. She was a beast and in a better environment she would have been even more amazing. She smells great . I refuse to smoke her before she’s fully cured . So I’ll be back in a little over a month with the update
Likes
9
Share


@SuperSmoker
Follow
This week i topped the plant at the 4-5th node
Check out YouTube video
SuperSmoker for more!


Likes
6
Share


Processing
Likes
10
Share


@Barcelona_Farmers710
Follow
Muy Buenas señores! seguimos a la espera del equipo Led, Entramos en semana 2 de Flora con muy buen color esperemos conseguir mantener esa línea...las Royal Gorila están verdaderamente monstruosas, esta tanda pondremos menos fertilizantes por usar Mykos. Empieza lo bueno en breves veremos que tal va la resina con este calor. Salut e força al canut Farmers!


Likes
22
Share


@emmett
Follow
On cruise control, getting into flush weeks in the bubble buckets. always water in the 30 gallon living soil? worm bin. I dig a small hole in a corner toss in kitchen scraps cover and water.
Likes
8
Share


@Sorelone
Follow
Eine wundervolle Woche, habe erlaubt, was soll ich sagen viele Blüten zeigen sich, meine Art scrog scheint eigen aber es bringt denn Flächen Effekt 😁😁😁
Habe denn Lady ein bisschen Erde ausgestreut und lasse sie mal ihr Leben Leben

Likes
81
Share


@UnorthadoxDude
Follow
Hey! Welcome to week 8! Karen is mid way through her flowering stretch. Please check back to last week as I update daily so the week is now complete. I count about 20 colas now.
Day 51: Have reconfigured the tent, see video. Karen is now 36cm and still stretching. Karen has more light now. Smell is still there hits you when you open the tent. Fertigated 2l.
Day 52: Height: 39cm. Karen's scent is heavenly. I have reconfigured again and installed some upgrades. Better reflector. Much bigger carbon filter. Increased airflow. Better config. More efficient pot layout. Karen is lovely.
I am grateful to her and for her, so I wrote her a little poem, I hope she liked it.
"Karen! Oh Karen! The phoenix of flowers,
Three lowly weeks she struggled in vain,
Shadowed and starved for five hundred hours,
He slowly wept to witness her pain.
Karen! Oh Karen! I P-H'd your showers,
and in the fourth week you started to gain,
Hallowed and hard you survived as you cowered,
I thought you meek, I was wrong once again.
Karen! Oh Karen! Forgave me my howlers.
She set a pace, a pace she maintained,
Now shes a girl at the peak of her powers,
And so I'm a geek, with buds on the brain."
Day 53: Approx 48h into a simulated dry spell.
Alright I think it is time for Karen to get her first MAJOR defoliation. I will update shortly with photos and info. I will also be doing some gentle LST to separate the colas a bit.
Day 53.5: Defoliation and LST. Finally got chance to photograph that bunda. Enjoy!
Day 53.75: Bit of a fail. Messed up the timer and the lights ended up being off for about 3 or 4 hours. Because I was cooling the room (open window) to keep temperature in the tent down, without any light the temperatures absolutely plummeted as it is sub-zero outside. By the time I realised and turned the lights on, the temp in the main tent had dropped to 14 degrees celsius. Whoops! How is that for mistreating your girl? Defoliated about 80% of her leaves, 4 nodes, significant LST, then stuck her in the cold and dark for 1/6 of a day. Not to mention she is now almost 3 days into a "dry spell". There do not seem to be ill effects, and Karen has already begun to respond to the LST; all the colas that had been changed in angle are now upright again.
The dry spell I keep mentioning, there is a method behind my madness, I have spotted one or two small flies and I think they may be fungus gnats. I am starting to suspect that the 2nd seedling in the Purple OG Punch Auto grow was actually beheaded by fungus gnat larvae. So I am drying out the mediums as much as I dare. I am closely monitoring the plants, so far the only one I have had to break the drought for is Enigma; all the girls in big pots haven't even noticed it's dry yet. How far am I going to push it? Well I will judge it on a plant by plant basis, but quite honestly I am hoping to see physical signs of thirst before I breakdrought. Of all the plants the two I think will respond most strongly to this will be Karen and Bertha, because of where they are. Karen here is actually probably 4 weeks into flowering rather than two, so about now is a good time to give her a little hydration stress. I do not think I will push it past 5 days, as RH is 34%. By now all the plants will be compensating for the lack of moisture and the high temperatures and low humidity. They will be taking more and more moisture out of the coco, and as the coco dries further and further down, those plants that have space will start desperately growing roots to find moisture. Mark my words, 24 hours after I end this drought, every plant in the tent will throw out crazy growth.
Day 54: Ended drought and fertigated 6l, no run off, I will re-fertigate tomorrow. Karen is still stretching her height post LST is now 37cm. The two tallest colas seem to have stopped but the other colas are still stretching.
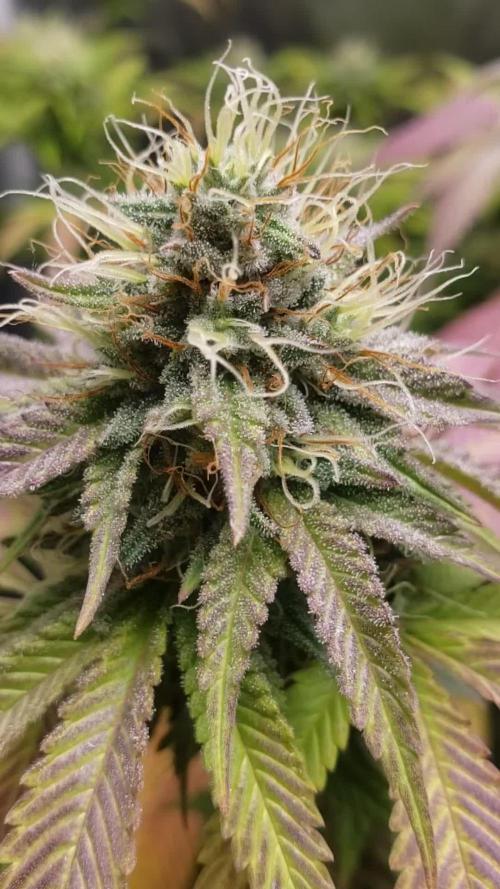
Day 55: Alright so it has been 5 hours since lights on, and Karen is looking in good shape, all her drooping leaves have perked back up and she has added quite a bit of foliar growth. The colas are all still rising, except perhaps the two tallest. This girl is absolutely loaded with pistils, I'm starting to see trichomes on the sugar leaves, but trich production hasn't started in earnest yet. She has a least 20 colas, and 6 of them are thicker/taller than the primary cola at her tip. Every one of her nodes has reinforced itself with a bulbous growth and these cola branches are swelling rapidly. I am increasingly of the opinion that, all being well, this girl is going to surprise us all with her yield. My first grow, which was just mucking about really, I got 60-70g of the two main plants, and they were just bare sticks with 2 colas. Although her height is less than theirs was, 2/3 of their height was bare stick... whereas every mm of her is befoliaged and living. So in terms of the height of the actual cola I think they were about comparable in usable space on a per cola basis. The main difference being that Karen has 20+ colas whereas they had 2 primary and 2 lower. I know that it is probably unrealistic to expect more than 70g from a single auto grown indoors. Nevertheless my gut tells me this baby could achieve at least 100g, perhaps as much as 150g. The next few weeks will determine that, but given where we were in week 3 I will be grateful for any yield of quality bud. I have dropped the lights down to 18/6 from 'tonight' onwards.
I really have no idea how long we have left for Karen. According the the "brochure" she flowers for 7-8 weeks, with a total crop time of 9 weeks. The problem is I don't know what a total crop time is? Does that mean from seed to finish? If so Karen is clearly not going to be anywhere near that timescale.I am going to go ahead an assume that, for my plant anyway, the first 4 weeks were veg weeks. I think it is fair to count week 5 and 6 as flowering because pistils were popping out very early in week 5 if not before. So that makes this week four of flowering. I am going to assume 8 weeks rather than 7, so I think we have another 4 full weeks give or take a week. On that basis I am expect harvest week to be around week 12 or so. I am not fixed on this though, I am determined not to harvest this girl early.
Day 55: Photos taken 00:00 9/3/23 Strong 24h of veg growth as predicted.
Day 56: Existing leaves continue to swell. Stretch appears to be slowing. I've taken so many media this week that I cannot scroll down far enough to select a recent thumbnail. Probably Karen's biggest week in terms of changes. She is looking like she is going to impress. Height 39cm.

Likes
14
Share

@Borberad
Follow
Woche 5
Der kleinen geht es blendend, die einzelnen Triebe haben ordentlich an dicke zugelegt und langsam kann mit dem training begonnen werden.
Tag 29 Die 6 Triebe werden gleichmäßig in 60° zu einander verlegt.
Tag 33 Ein Tag Ruhe 🐦
Tag 35 Leider beim Training ein Ärmchen abgebrochen, jetzt müssen es halt zwei neue werden.

Likes
1
Share


@hidemefromevil
Follow
21.08 - First leaves appear and start consuming light.
Watering - 0.2 ml per plant - pH 6.30
Lamp distance - 50cm
Humidity - 75% - 95%
Temperature - 23 - 27 C
Light - 18/6h - Dim - 50%
22.08
Watering - 0.25 ml per plant - pH 6.50
Lamp distance - 50cm
Humidity - 75% - 90%
Temperature - 22 - 27 C
Light - 20/4h - Dim - 50%
23.08
Watering - 0.50ml per plant - pH 6.30
Lamp distance - 50cm
Humidity - 70% - 90%
Temperature - 22 - 27 C
Light - 18/6h - Dim - 50%
24.08
Watering - 0.80ml per plant + Root Juice + Acti Vera- pH 6.30
Total 250ml water with 1ml Root Juice and Acti Vera - 0.5ml
Lamp distance - 50cm
Humidity - 62% - 79%
Temperature - 25 - 28 C
Light - 20/4h - Dim - 50%
25.08
I skip watering, the soil is wet
Lamp distance - 50cm
Humidity - 70% - 85%
Temperature - 22 - 27 C
Light - 22/2h - Dim - 55%
26.08
I skip watering, the soil is wet
Lamp distance - 50cm
Humidity - 55% - 85%
Temperature - 22 - 27 C
Light - 22/2h - Dim - 55%
27.08
Skip watering
Lamp distance - 50cm
Humidity - 70% - 85%
Temperature - 22 - 27 C
Light - 22/2h - Dim - 55%
28.08
Watering - The big one get 450ml water - pH - 6.3
The other 2 get 250ml per plant - pH - 6.3
Total 1L water with 2ml Root Juice
Sprayed leaves with Acti vera
Lamp distance - 40cm
Humidity - 70% - 85%
Temperature - 22 - 27 C
Light - 20/4h - Dim - 80%
Also at the end of the day I gave to the biggest one cal mag biobizz 2,3 pippet drops with 200ml water.
Until September 2nd, I use one lamp. From the 2nd there are already two
Likes
24
Share


@TerpTurtle
Follow
14 day dry | Curing in Grove bags, filled 7 QP bags & got 56g of keif out the trim bin from only 2 plants!
More pictures coming! STAY FROSTY GROWMIES


Processing
Likes
2
Share


@Patillac31
Follow
●Day 49, end week 7. Added bembe, Boomerang, and blackstrap molasses to the diet. Noticed some brown freckles on a handful of leaves. Hopefully the cal and mag in the molasses will help get me through another week before the big flush🤞 recalibrated my p.h. meters. On to week 8
●Day 44 just picked up a new microscope (Wireless Digital Microscope, ROTEK 50x and1000x Microscope Magnification with HD 1080P 2MP Camera, Mini Pocket Handheld Microscope Camera with Light Compatible for iPhone Android, iPad Windows Mac) via Amazon. So, sorry for the blurry trichome pics. I'll work on it. This diary will focus primarily on Big Bud by Seedstockers for the remainder. But the agent orange will finish her journey. Pretty pleased with how things are going. Any suggestions or comments are always appreciated. Happy Gardening ✌️🌱🤙🖖


Likes
8
Share

@The_Doctor_Green
Follow
Hola a todos! Esta semana he regado solo con agua, y un poco de melaza 1ml x litro de agua.
Los cogollos empezaron a engordarse🤩💪😅.
El aroma aun no lo sé distinguir. Pero de seguro debe ser rica🤞😅.
