
Likes
Comments
Share


@TheNotoriousWeed
Follow
Esta es la segunda semana cambiamos a bases de floración y las chicas se vienen comportante exelente ya han sexado todas y no hay machos :D. Peyote purple 2 parece que tiene alguna enfermedad? parece como si poco a poco sus hojas se consumieran solas, será intolerancia a los abonos? si alguien me pudiera ayudar estaría agradecido. Saludos y buena semana colegas


Likes
43
Share


@Ju_Bps
Follow
Hello happy growers 😁
Nothing special this week,
I'm trying carnivorous plant and yellow trap for insect.
I'll start blooming fertilizer soon,
Plant look finishing to up in tall, and bud start to up.
I give him 0.6/0.7l each 3 days.
Have a good week 👌👌

Likes
36
Share


@valiotoro
Follow
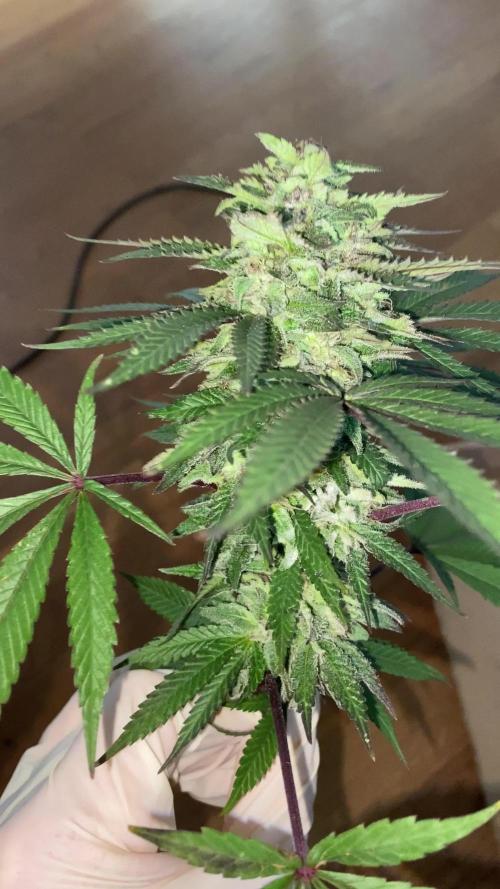
Super frosty & rock hard buds💥
Delicious terps🤤
Perfect buds leaf ratio

Likes
46
Share

@German_GrowLab
Follow
Soooo, nach langem Warten (ich bitte um Entschuldigung, es kam immer irgendwas dazwischen), nun die Ernte! Nachdem ich jetzt alle Sorten verkostet habe, kann ich euch nun mein Fazit präsentieren.
Im Großen und Ganzen bin ich eigentlich ganz zufrieden mit dem Ergebnis, muss aber auch gestehen, dass ich bei der ein oder anderen Strain doch etwas mehr erwartet habe. Bei den nun folgenden Bewertungen möchte ich noch anmerken, dass sich diese rein auf den Outdoor-Anbau der jeweiligen Sorte und nur auf den einen bekannten Phäno beziehen. Man kann grundlegend behaupten, dass sich alle Sorten doch sehr solide geschlagen haben, und das bei diesem … naja, sagen wir mal wechselhaften Sommer. Allerdings merke ich einfach, dass sie lange nicht ihr volles Potenzial ausgeschöpft hatten, was ich immer etwas schade finde. Ich bin trotzdem froh, dieses Projekt durchgezogen zu haben, und gehe mit reichlich neuen Erkenntnissen sowie einem abwechslungsreichen Stash in die besinnliche Zeit.
Was hat mich grundlegend bei den meisten Sorten gestört?
Bei fast allen Sorten, mit Ausnahme der Hella Jelly und der Lemon Tree (wer hätt's gedacht), waren die Terps doch sehr flüchtig. Im Vape kamen sie wirklich gut zur Geltung, wenn man sie allerdings im Joint (pur, versteht sich) geraucht hatte, haben sie oft nach den ersten Zügen an Präsenz verloren, was wirklich schade ist. Dies ist aber wahrscheinlich auf die Anbaubedingungen zurückzuführen und soll den Breedern keinesfalls ihre Qualität absprechen. Wie schon in einem vorigen Kommentar erwähnt, haben sie einfach nicht ihr volles genetisches Potenzial erreichen können.
Ich bin mir des Weiteren auch nicht sicher, ob ich beim nächsten Mal wieder auf die Dryferm-Bags setzen werde. Es war doch ein ziemliches Gefummel, bis man die Blüten ohne Kontakt zueinander in die Beutel verfrachtet hatte. Außerdem hat es meiner Meinung nach die Trocknungszeit eher verkürzt, obwohl ich mich an die Temperatur- und Luftfeuchtigkeitsrange gehalten hatte, was ich auch nicht unbedingt begrüße. Und zu guter Letzt sind sie auch echt nicht billig, wenn man bedenkt, dass ich pro Pflanze teilweise über 4 Beutel benötigt hatte (pro 3 Stk. ca. 25 Euro) und sie laut Hersteller nur dreimal verwendet werden sollten. Das ist doch auf Dauer ein ganz schönes Investment. Aber das sind nur meine 2 Cent zu dem Thema :).
Nach und nach sollten jetzt hier die Erntereports eintrudeln. Ich hoffe, ich schaffe alles heute. Falls nein, seht es mir bitte nach. Falls ihr noch spezifische Fragen zu einer Sorte habt, lasst es mich einfach wissen, dann bekommt ihr noch eine ausführlichere Beschreibung.
PS: Die Filmore-Slim musste ich leider fast komplett entsorgen. Sie hatte die festesten Blüten, die ich je bei einer Outdoorpflanze gesehen habe, was ihr leider zum Verhängnis geworden ist (durchgeschimmelt). Von ihr hatte ich leider keine rauchbaren Blüten. Von der Optik war sie auf jeden Fall ein Champion!
Ich habe von allen Sorten Fresh Frozen in der Gefriertruhe, die ich in der kommenden Zeit wachsen möchte (auch von der Filmore Slim). Also kann ich sie hoffentlich als Konzentrat verkosten.
Das soll es gewesen sein. Ich wünsche euch viel Spaß mit den folgenden Ernteberichten und eine ruhige, besinnliche Weihnachtszeit mit euren Liebsten! Wir hören uns dann hoffentlich im nächsten Jahr wieder, mit vielen neuen spannenden Projekten.
Peace!


Likes
7
Share


@Jays_Not_Here_Man
Follow
Love using Grow Diaries and the community of people I have met and chatted with along the way ❤️🇨🇦👊 I’ve “grown” so much over the past year from the advice and journals posted! Thanks Growmie’s! 👊❤️

Likes
13
Share


@Robeeriegenetics
Follow
Dropped light hours down to 16 . Topped off nutrient solution with 5.0 ph evened out .removed none chosen phenos to be flowered in separate room no longer tracking those we will only follow the chosen mothers clones i cut clones today as well had the lady friend clean floor with bleach and dawn put clones in ez cloner 32 systems
Likes
18
Share


@Pokan187
Follow
The trichomes on the Runtz are all milky and I'm getting some amber on the sugar leaves, I think the end is near 😁
The G13 is looking great and smelling wonderful, the buds are getting heavier and same for the GDP

Likes
4
Share


@el_cultivito
Follow
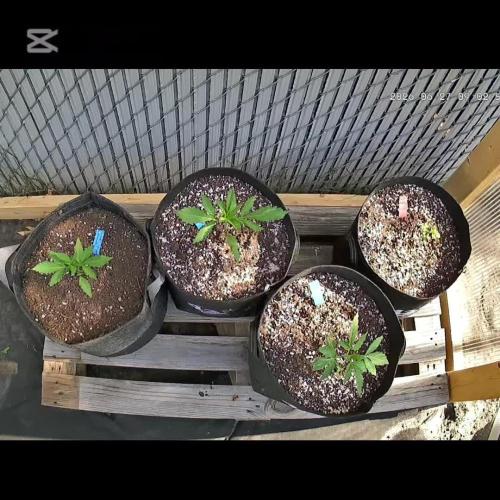
Week 15 (5/30/22 - 6/5/22) - FLOWER Week 1
Left camping for a week and came home to these lil ladies shooting past the trellis.
I pulled them down under the trellis and tried to evenly shape the canopy then defoliated and "shaved the legs"
Then flipped to flower on 6/1/22
Likes
16
Share


@DeepSouthDank
Follow
Pheno #7 and #4 showed the most desired traits and will be running both indoors iagain the coming weeks under better conditions.
I didnt get as much photo's as promised but things have been hectic on all fronts, but I will do better next time ;)
Its a pitty we had some issues and not all phenos where in a position to show the true potentail. There for we are running the 5 with re-running outdoors this season. Along with some new beans :D


Likes
52
Share


@Santica_Garden
Follow
Uploaded a video which explains everything 👍🏾................................................................................................!


Likes
7
Share


@Suchy329
Follow
Die Woche war ganz gut Blätter haben kurz mal gehangen hab dan aber gegossen dan war alles wider gut ich hoffe das sie in Woche 5 langsam in die Blüte geht
Likes
11
Share


@Hempface86
Follow
Today is day fourteen and all she has got Is very little bit of maxi bloom.. we are off to a good start way better than the last star.. shout out to pro mix their medium.It's awesome.. and thank you too Kannabia Seeds for making this all possible.. stay tuned.I hope everyone is doing well.God bless and happy growing ✌️

Likes
9
Share


@AtticGrowing
Follow
Harvest day!
This is my first autoflower ever and after 66 days this is what I got. Now it's hanging to dry for a dry trim. Definitely not the best, but feeling happy with the outcome. Even with some major feeding mistakes, I managed to finish her. Learned so much.
I will update with the final weight and a strain review!

Likes
4
Share

@Emerald_Gardens
Follow
Week 3 shows good growth and showing signs of needing food. The organic purple lemonade is starting to smell. Next week feeding will begin, starting with a compost tea.
Likes
56
Share


@MrGrow
Follow
05.09.2022
🌱 75 giorni dal seme
🌻 5 giorni fioritura
💧 1.5 l/48 h
ph 5.8
ec 1.35


Likes
21
Share


@AutoCrazy
Follow
Things are really starting to look good. This plant has really stretched a lot for an Indica dominant plant.
The frost is starting to come on now. The tent smells quite nice when I first open it now.
Cooler internals are:
5.9 pH
600 ppm on the 500 scale
1.2 EC
66F solution temp
Can’t wait to see how she fills out over the course of the next week.
Likes
65
Share


@Dedon
Follow
Hi everyone !
Water change today, only tap water with adjusted PH.
leaves color is now light green and some leaves are dying. Buds are solid and the smell is awesome.
Last week of flush...Will harvest in the late week
Processing
Likes
3
Share


@evergreenterrace420
Follow
Día 20, han dado un buen estirón. Hoy toca riego, misma cantidad de H2O y abonos. En una semana empezarán a salir las preflores en los primeros ejemplares. Iremos viendo. 420 life.