
Processing
Likes
Comments
Share


@TheNotoriousWeed
Follow
Esta es la segunda semana cambiamos a bases de floración y las chicas se vienen comportante exelente ya han sexado todas. Saludos y buena semana colegas


Likes
41
Share


@MrHightimes
Follow
Fun Contest. Maybe coulda gone a week longer but i was ready! And trichomes were done enough


Likes
4
Share


@madlangs
Follow
Getting the chop tomorrow all resin glands are milky with a few ambers on the buds. Not had a single problem


Likes
119
Share


@Natrona
Follow
Sponsored grow
***DIVINE SEEDS *****
*****OPIUM*****
Week 5 This week 5/5-5/11
Germination April 6.
Vegetation
Week 1 water only
Week 2 water only
Week 3 added recharge and TPS1 increased ppm to 570.
Week 4 continues with recharge and TPS1. I added Fox Cal mag increasing ppm to 685 - 805.
Week 5
TPS1 9ml/gal
Recharge 5 ml/gal
Fox Cal-mag 5 ml/gal
This was an exciting week for my ladies. It started out with the usual feed and defoliation and training. With my upcoming vacation, I am going to be hardening off these ladies to relocate to their outside location. I checked the expected weather forecast for the week. Looks good to start hardening off. Partly cloudy with temps in the low to mid 80s just like in their tent. So that’s good. Night temperatures were in the 50-60s. This is much cooler than what they are used to as our house is at 73. They need to get used to what mother nature will provide. Our summers are hot and humid. I had planned to bring the plants back in the sunroom but since conditions were similar, I let them stay outside every night. And every night but 2 it rained. I did not water or feed nutrients this week.
I am attempting the scrog technique on all plants. I am using a peony cage as the support structure. The cages are about 2 feet high. This may not be enough side or top support as she grows and may have to resort to tomato cages.
Took pics May 6,9, & 11 Opium is a vigorous lady. She will be my glamor girl. She is taller and has the typical sativa structure and has space between the nodes. There is not much leaf growth, so I don’t defoliation much. Her nodes are close but starting to spread out a bit. They remain even and balanced which show she is still in vegetation.
Thank you @DivineSeeds
Thanks for the visits, likes and comment, I appreciate all the plant love💚.
Have fun & love what you grow 💚
Sending you good vibes of love, light, and healing 💫
💫Natrona 💫
DIVINE SEEDS
***OPIUM***
Harvest:1000 g/m2
Divine Seeds developed Opium as a new champion strain, unprecedently powerful and loaded with unbelievable quantities of resin. Certainly, no average genetic base could be behind such brilliant parameters! Several Afghani Indica landraces, recognized as most potent and resinous, were bred together with a mighty Brazilian Sativa which Opium inherits its bright berry taste from. Then a great deal of work followed aiming for the highest THC level and endurability as well as a branchy structure that would provide maximal yields. Now we can proudly title Opium the best Indica you could dream of growing!
Indoors these plants mostly stay mid-height (1.5 m), reaching up to 2.0 m out of doors. Depending on your height limitations, Opium flourishes universally in grow boxes, balconies, green houses and terraces. Due to its Afghani parentage, this strain can stand hot weather if provided enough water and some shadow. Responds well to any training techniques: ScroG and SoG, LST, topping and FIM, supercropping. The start of blooming is marked with a rush of growth, when plants stretch almost 1.4x. Expect heavy colas that often require additional supports. Whilst ripening, Opium gives off a pungent earthy stench with fruity and berry undertones, also a bit of pine. Ready for outdoor harvesting in October.
The stoning psychedelic impact of Opium is like being hypnotized (unless you’ve had too much, then it feels more like a blackout). Stone-lovers will appreciate every minute with Opium: its spicy taste immerses your mind into daydreaming, while the body rests flat. Recreation with this psychedelic Indica means silent tripping from one insight to another. Mighty enough to kill chronical pains, Opium is also medically efficient against insomnia, nausea, appetite disorders, muscle spasms, headaches, irritation, fatigue, panic attacks, epilepsy. Best consumed at night time, the effects keep going for up to 4 hours.
Equipment and nutrients
Pots: 5gallon Air pots
Soil Fox Farm Happy Frog Amended with worm castings, dolomite lime and mychorihiza Recharge
Seeds provided by Divine Seeds
Divine Seeds breeding company
The link to Opium Feminized Seeds
Opium - Divine Seeds breeding company
The link to Opium Auto Seeds
Auto Opium - Divine Seeds breeding company
=================================
Equipment: AC Infinity
CLOUDLAB 844 – Advance Grow Tent 48”x48”x80”
CONTROLLER 69 PRO – Grow Tent Controller
CLOUDLINE LITE 6 - Inline Fan 6"
IONBOARD S44 – LED Grow Light Board 400W
CLOUDRAY S6 – Oscillating Circulation Clip Fan
Carbon Filter 6” 4

Likes
12
Share


@Bryankush
Follow
Probabilmente il topping del ramo apicale non è stata la migliore cosa per me, mi servirà di lezione per la prossima estate.
Likes
5
Share


@Renatissima
Follow
* Watering 2l every 3 days, no nutrients
* Always tuck in the leaves to expose lower tops
* Check the trichomes for amber
Processing
Likes
13
Share


@Sticky_icky
Follow
Realized I was keeping my rock wool too wet in standing water in tray. Also that runoff tested at 7.5 pH.
Fixing that the last few days. Keeping 29c 90ish rh and hardening a few times a day.

Likes
38
Share


@TheCannaProphet
Follow
--------------------------------------------
~DUTCH PASSION OUTLAW AMNESIA~
--------------------------------------------
Outlaw Amnesia is a top quality old-school Amnesia Haze dominant Sativa that will appeal to both beginners and connoisseur growers alike. She is 80/20 Sativa/Indica with around 20% THC and is a cross of our Super Haze with a very special clone of Amnesia. The high is powerful and fast with a clear uplifting sativa high and a strong Haze accent. The taste is fresh, sour, strong and old-school Hazy. Outlaw will stretch more than most, she can triple in height during bloom, and grows well with the SCROG method.
Although she can be harvested as early as 9 weeks, a full 12 week flower period may be required for best taste, yield and high. She grows well in all grow mediums with perhaps the best yields in hydro where yields of up to 500g/m2 are possible, classifying this as a high production variety.
*description credit to Dutch Passion
OUTLAW AMNESIA (DUTCH PASSION) FEMINIZED DATA SHEET
Breeder: Dutch Passion
Genetics: 20% Indica / 80% Sativa
Parents: Super Haze x Amnesia
Flowering Time: 11-12 weeks
THC: 20%
Yield (Indoor): 450-500 gr/m²
Height (Indoor): 50cm
Available as: Feminized seeds
Flowering Type: Photo-period
Sex: Feminized
*Specified by breeder when grown under ideal circumstances
--------------------------------------------------------------------------------------------------------------------------------------------------------------------------------------------------------------------------------------------------------------------------------------------------------------------------------------------------------------------------------------------------------------------------------------------------------------------
THE SETUP:
~Planted into Jiffy Peat Pellets that were hydrated with de-chlorinated water with SuperThrive added then ph'd to 6.0 @ 80℉
~Grown 100% organic in 10g fabric pots with Mother Earth 70/30 Coco/Perlite medium amended with 2tbs/g of Down To Earth 4-4-4 / 2 cups/g of Earthworm Castings / 1tbs/g of Dr. Earth Flower Girl 3-9-4, 1tbs/g of Dr. Earth Bat Guano, 3/4 cup of Down To Earth Azomite and 1 tsp/g Down To Earth Fish Bone Meal.
~24hr light cycle during Germination / 19/5 light cycle for Vegetation and 12/12 for Flower
~Straight water ph'd @ 6.2-6.8 when needed and weekly Compost Tea's.
__________________________________________________________________________________________________________________________________________________________________________________________________________________________________________________________________________________________________________________________________________________________________________________________________________________________________________________
WEEKLY UPDATES:
9/20- 💥BOOM!💥 Week Six of flower is here and my girl's in high gear, stacking her flowers and pumping out trichomes!
Today I watered her with 1.5g de-chlorinated water with 5ml/g of Botanicare CalMag+ added, then ph'd to 6.2 @ 72℉. I turned her pot and plucked a couple of yellow shade leaves...the basic daily maintenance.
9/22- I didn't water her yesterday as she looked great and was 'praying' hard. Today she was given 1.5g of de-chlorinated water which was ph'd to 6.2 @ 72℉ which I gave her through her drip pan (bottom chuggin) and I also gave her pot a turn.
I'm keeping an eye on what appears to be a few seeds developing. I'm hoping they're just fat calyx's that haven't matured yet however there's a strong possibility that, due to a temperature fluctuation that was excessive (20℉) may have caused her to stress and turn hermaphroditic... Fingers crossed! 🤔🤞
9/24- We're getting close to wrapping up Week Six of flower in a couple of days and she'll be past the half-way point with the most exciting weeks yet to come!
I didn't water yesterday and today I went ahead and Top Dressed her with 2 tbsp/g Dr. Earth Flower Girl 3-9-4, 1 tbsp/g Dr. Earth Gold Premium 4-4-4, 1/2 cup Down To Earth Bio-Fish, 1/3 cup Down To Earth High Phosphorus Bat Guano and 2 cups of Worm Castings.
I watered in the Top Dress with 1.5g of de-chlorinated water which was ph'd to 6.2 @ 72℉ and let her enjoy her meal! 😜
9/26- After her heavy watering on the 24th I didn't water yesterday and when I checked her today at 'lights on' and she still had some weight to her pot and her leaves were praying hard so I held off on watering today and will hit her tomorrow with her usual 1.5g watering.
~Thanks for stopping in! Things should be getting a lot more interesting in the coming weeks...Stay lifted and be Blessed! 😎🙏~


Processing
Likes
35
Share


Likes
13
Share


@Kayotic
Follow
Zkittles
- Day 92 since sprouting
- Week 9 of flower
- Watering right now
- Buds are fattening up, leaves at top are changing color
- Super sticky and potent smell
Northern Lights INSIDE
- Day 88 since sprouting
- Week 8 of flower
- Watered Tuesday, 3 tsp Florabloom ( all I had)
-Great smell, very sticky
Northern Lights OUTSIDE
-Day 86 since sprouting
-Week 7 of flower
- Been in the 90's and very dry
- Watering multiple times a day with water from the hose

Likes
20
Share


@Robin87
Follow
And the first week of flower is amongst us, I’m not sure if it’s the fast bud genetics, the living soil, or a mixture of both, but I think the videos say it all, the deep green throughout, day 41 and just look😍. Everything’s been sitting nicely 24/7
Humidity 49~56%, temps 23~26c
This week they all received there last top feed, along with a slight bit of defoliation, some massive fan leaves! slightly over watered as you will notice in one of the videos, but I won’t be surprised if they’ve grew another few inches over night.
Likes
35
Share


@The_Bearded_Grower
Follow
welcome to week 16 it is day 71 and she is looking good and getting euge lol quick reminder that my watering schedule says 2L or .5 gallons but that is because that is what I put in for my nutrient mix I do not include the 3L of water or .75 gallons. That being said the ppm's in the run off are holding steady at 1558 ppm's my nute mix that I added was 1642 ppm's for those who may be relatively new to growing this discrepancy in numbers is normal as the water that I add drips out the bottom a little bit before I add the nute's there for diluting the nute mix ever-so-slightly
Day 72 looking healthy still and nute ppm is 1594 and run off is 1501 ppm also she is still gaining mass so i will keep going
Day 73 fatter by the day it would seem lol nute ppm 1700 with run off at 1500 pmm never had such growth at this late in the game
Day 74 she may be starting to slow down now in growth. nute ppm 1669 run off is 1643 ppm time to get a closer look again. YES i found a new way to use my jewelers scope nute ppm 1486 run off is 1687 ppm
Day 77 and this ia the last day of nutes starting tomorrow its water only for at least 2 days then 1-2 days of darkness or maybe i will do a dark flush with ice water and see what happens. sooooo ppm of the nutes is at 1553 and run off is 1412 ppm
Day 76 amber trichomes are starting to appear and orange hairs are becoming more abundant then the white ones. so i have made up my mind that this is the last week of flower flush starts sat morn for 2 days then 2 days darkness

Likes
32
Share


@MadeInGermany
Follow
Unfortunately, I had to find out that my account is used for fake pages in social media.
I am only active here on growdiaries.
I am not on facebook instagram twitter etc All accounts except this one are fake.
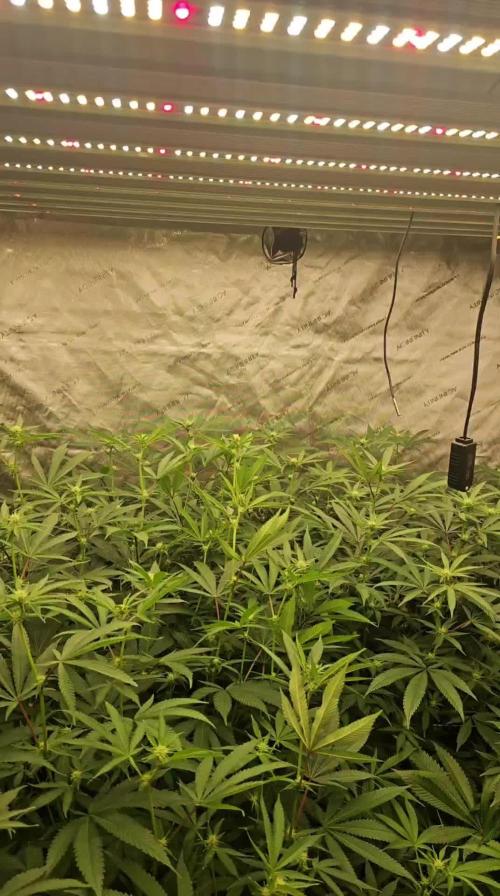
Flowering day 20
since time change
to 12/12.
Hi everyone 😃.
The lady continues to develop very nicely :-).
The buds get thicker and look tastier 😅.
This week it was poured 2 times with 1.2 l each time.
The tent was cleaned and everything checked for functionality.
Have fun and stay healthy 🙏🏻
You can buy this Strain at :
www.Zamnesia.com
Type:
Runtz
☝️🏼
Genetics:
Zkittlez x Gelato
👍
Vega lamp: 2 x Todogrow Led
Quantum Board 100 W
💡
Bloom Lamp : 2 x Todogrow Led
Cxb 3590 COB 3500 K 205 W
💡💡☝️🏼
Soil : Bio Bizz Coco
☝️🏼
Nutrients : Green House Seeds Company Powder Feeding Bio
☝️🏼🌱
Water: Osmosis water mixed with normal water (24 hours stale that the chlorine evaporates) to 0.2 EC. Add Cal / Mag to 0.4 Ec Ph with Organic Ph - to 5.8

Likes
51
Share


@Bones_1986
Follow
Looking like i have a magnesium deficiency as show in the leaf pic.
I'm Gonna increase the cal-mag.
Day 37 : Pots were dry so fed 2.5 liners to the 5 gallon pot and 1.5 liters to the 3 gallon.
Upped the cal-mag.
Introduced Big Bud & PK Boost


Likes
3
Share


@Snuffys_garden
Follow
Week 8 is going great, started flush
toward the end of week 7 on Zkittlez and OG Kush. Also started flushing Pink Kush CBD and Purple Punch at start of week 8. All are packing weight still and smelling very fragrant. Trichomes are starting to cloud out and I am planning on harvesting when trichomes are starting to amber.

Likes
75
Share

@Smoking_Joe_Frazier
Follow
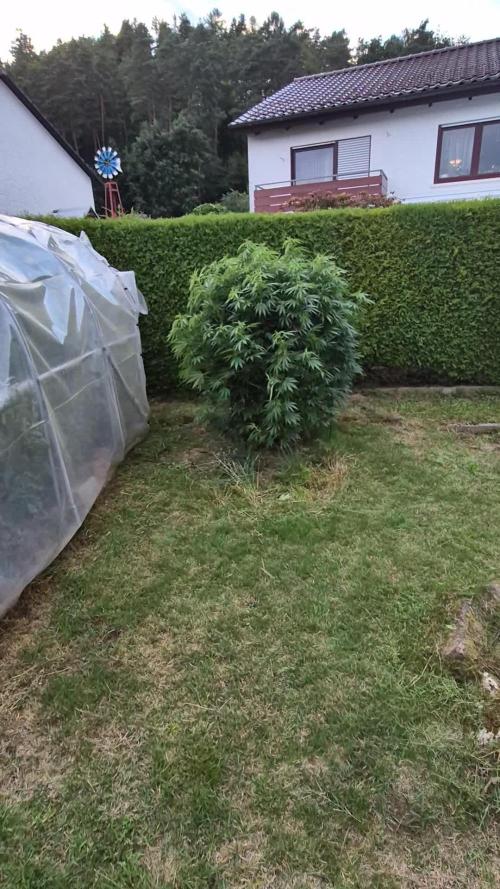
Flowering Week 21: Structural Battles & Rainy Reprieves
Update: 07.08.2025 | Day 150
Hey Growmies,
Man, Week 21’s weather is a pain in the ass – constant rain would’ve wrecked us in full bloom. Thank god the girls are still stretching in pre-flower! Mold can kiss my ass for now. Here’s the wrap :
Support Wars
I hauled ass to the hardware store today – grabbed four 2.1-meter stakes and heavy twine. Blueberry’s dancing past 2 meters like it’s nothing, so I caged her up proper. Durban? She’s splittin’ like cheap firewood under those heavy side branches. Shoutout to Birdmountain – I lashed her split stem together with hemp cord. Ugly? Maybe. Working? Hell yes.
Durban Poison – The Bush Queen
This girl’s exploding like fireworks on New Year’s! New shoots popping out everywhere – it’s a damn jungle down there. I gotta get ruthless soon: Light lollipopping’s coming to clear those lower branches. She needs airflow, not a mosh pit. Hardest part? Deciding what to chop without butchering her. Wish me luck.
Blueberry – The Elegant Giant
My god, she’s beautiful. Textbook structure – like one of those fake plants in grower magazines, except real and stretching past 2 meters. After staking her? Even prettier. If Durban’s the fat-bottom girl, Blueberry’s got that peach-shaped ass. Perfection with leaves.
Silver Linings
Zero pests crawling around – maybe this shitty rain’s good for something. Still feeding nothing but Bokashi juice, and they’re sucking it up like cheap beer.
Next Moves
- More Bokashi – if it ain’t broke…
- Lollipopping Durban’s undercarriage
- Tucking branches into their new support harnesses
Week 21 Takeaway
Sometimes you fight plants with stakes and twine.
Catch y’all next week – keep growin’ dirty.
– Smoking_Joe_Frazier
Likes
1
Share

@Shefman93
Follow
Forgot to take a video of the other tent at day 14, but my day 21 upload will have it. Tent 1 had a short stretch, while tent 2 stretch has been amazing.

