
Likes
Comments
Share


@NewbieGrowmie
Follow
Just been flushing her these past 12 days, and she is starting to fade, so I'm harvesting her this weekend. Gonna try bud washing her as well, I'm excited to see if it has any effect on the quality of the smoke.

Likes
6
Share


@Mr_nugs_lover_David
Follow
Absolutely High quality strain! This strain is pure gold, strong smell very freaking stinky, you can't believe how much this little monster stinks, the colas are huge man, very hard dense like authentic Rocks, Brutal resin production very stinky, I can see her parentales of Zkitzy Gorilla because of the crazy amounts of glue she has produced, fat colas for real, I'm in love with this strain, I could grow her forever! I know she's gonna make me sleep amazing at night, brutal indica híbrid. Enjoy guys! ✌️💚 🦍👽

Processing
Likes
7
Share

@Mr_nugs_lover_David
Follow
This ladies look absolutely gorgeous and super strong, they're gonna be flipped into flower tomorrow on February 15th when they'll hit the 30th day since they were planted and the first day of flower!
As said, I have flipped this ladies into flower on February 15th so now I think we're gonna see a beautiful stretch specially on this 2 plants which are the biggest one in the tent, very nice genetic, cannot wait to see their performance ❤️💛💚👨🌾 stay tuned everybody! This is gonna be a beautiful run! ✌️

Likes
6
Share


@Jrae420
Follow
Just finished 10 days of flush. 2 days in the dark with no water and theses ladies are coming down. Very pleased with the results. Everything looks as it should

Likes
6
Share


@CrashTest420
Follow
So just started giving them a bit of low stress training and upped the ml's nutrients. These are my first ever auto's and im a bit dubious to how they'll turn out. I do have high hopes for that tiny one i got there i think she'll put out most just you wait and see. Take care guy's n gals stay safe and happy growing :)

Likes
14
Share

@Miketama
Follow
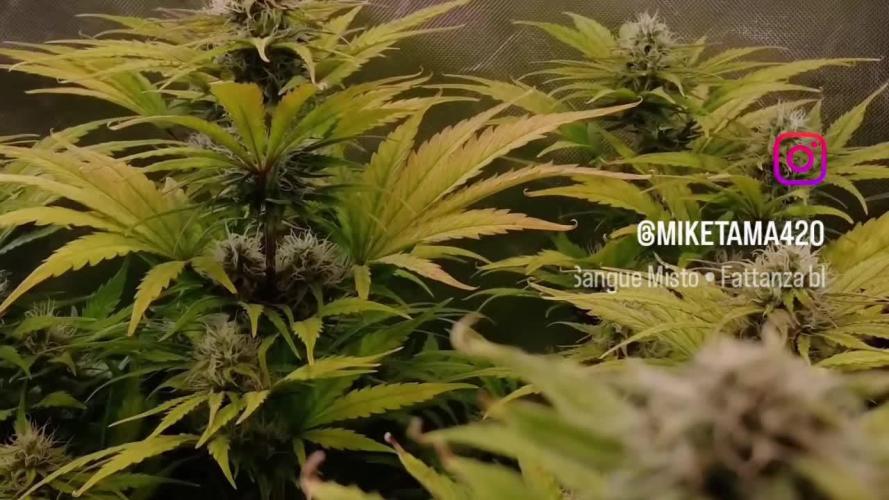
Despite the leaves 🍁 turning yellow, the buds are still fattening up nicely, so I’m not worried at all. I’ve read that this indoor strain tends to sacrifice the fan leaves pretty early and yellow out (a pattern I’ve seen in other grow diaries and even on the RQS website!). I removed the dead or almost-dead ones and I’ll keep doing it gradually throughout the flowering.
See you in the next episode! 🌱💨
Likes
76
Share


@DogDoctorOfficial
Follow
Week 3 in the Pink Rozay saga has been nothing short of epic, and I'm thrilled to spill the chlorophyll beans on all the exciting happenings.
First things first – the big move. Our girl got a VIP ticket to the 16L final autopot. It's like upgrading from a cozy studio apartment to a spacious penthouse. The roots were rocking and ready for this next level of luxury.
Now, let's talk numbers. TDS? Bumped it up to 490. pH? A cool 5.8. Water temperature? A perfect 21 degrees. It's like we're throwing a plant party, and everyone's invited!
But the real magic happened in the soil. I whipped up a concoction that even Mother Nature would give a nod of approval. Picture this: a mix of super soil goodness, Aptus All-in-One pellets providing the NPK party essentials, Mycormix for that mycorrhizal fiesta, a mix of endomycorrhizae that's like the backbone of your plant's support system. Picture it as the plant's personal entourage, consisting of various species of endomycorrhizae. These fungi are fixed on a vegetal carrier, playing the role of bodyguards that feed and protect the fungi. It's a symbiotic relationship, with mycorrhizae enhancing nutrient uptake and the carrier ensuring their well-being. It's like having a team of nutritional bodyguards ensuring Pink Rozay's well-being, Micromix soil for micronutrient extravagance, and just to top it all off, a dash of Substrate Buffer Powder. It's like creating a nutrient symphony, where each element plays its part in harmony.
Now, when it came time for watering, it was like orchestrating a liquid masterpiece. I unleashed the full schedule veg mix, and oh boy, did our Pink Rozay dance with joy. Regulator, the conductor of this symphony, containing Mono-silicic acid (Si) as a nutrient transporter, Boron (B) acting as a precursor to enhance calcium uptake and fiber production, and Molybdenum (Mo) making moves to shift nitrogen from lower to upper leaves. It's like a nutrient ballet, each element performing its unique role.
CaMg-Boost, giving that extra boost of calcium and magnesium.
All-in-One Liquid, the maestro of well-rounded nutrients, covers all the bases:
Essential Elements: Nitrogen, Phosphorus, Potassium, and Magnesium. These are like the fundamental building blocks, the ABCs of plant nutrition.
Microelements: Boron, Molybdenum, Iron, Manganese, Zinc, and Copper. These are the plant's essential micronutrients, like the subtle brushstrokes that complete a masterpiece.
Imagine it as a nutritional buffet, offering a variety of elements to satiate every nutrient craving Pink Rozay might have.
Start Booster, the kickstarter for vigorous growth,It's not your ordinary nutrient supplement; it's a powerhouse containing:
Organic Nitrogen Chelated with L-amino acids: Think of this as a protein-packed energy shake for your Pink Rozay. It provides the necessary organic nitrogen, fueling her growth with a burst of vitality.
Microlife Biomass from Controlled Fermentation: It's like a microbial party, specifically invited strains gathered through controlled fermentation. These microorganisms are the VIP guests, promoting a healthy, thriving environment for your plant.
Humic Acid from the Leonardite Layer: Extracted from the deep, dark layers of Leonardite, this humic acid is like the plant's personal spa day. It improves nutrient absorption, water retention, and overall soil structure, making the growing experience luxurious for your Pink Rozay.
High-grade Fulvic Acid: The secret ingredient, like a master key unlocking nutrient absorption. Fulvic acid enhances nutrient transport, ensuring your plant gets the most out of every drop.
Imagine it as a nutritional buffet, offering a variety of elements to satiate every nutrient craving Pink Rozay might have.
And just to spice things up, a touch of Micromix drip, because why not add a little extra nutrient flair?
And let's not forget the star of the show – the transplant itself. It's like Pink Rozay moved into a botanical mansion, complete with all the amenities a growing plant could dream of.
Before I sign off, let me send a massive thank you to Aptus Holland for their continuous support. Your products are like the superhero squad of my grow room, ensuring my Pink Rozay gets the VIP treatment she deserves.
And of course, a nod to F.O.G. - Future Of Grow, for illuminating our growing journey with that powerful Black Series 600W LED. The future looks bright, my friends!
So here's to week 3, a chapter filled with growth, nutrients, and transplant triumphs. Until next time, keep on cultivating that green goodness!
Genetics -Pink Rozay @zamnesiaseeds
https://www.zamnesia.com/7646-zamnesia-seeds-pink-rozay.html
Nutrition - @aptusholland
https://aptus-holland.com/
Led Power @ F.O.G. Future Of Grow
https://www.thefuturofgrow.com/en/online-store/BLACK-SERIES-600-p489093171
As always thank you all for stopping by, for the love and for it all , this journey of mine wold just not be the same without you guys, the love and support is very much appreciated and i fell honored and blessed with you all in my life
With true love comes happiness Always believe in your self and always do things expecting nothing and with an open heart , be a giver and the universe will give back to you in ways you could not even imagine so
Friendly reminder all you see here is pure research and for educational purposes only
Growers Love To you All <3 <3 <3

Likes
44
Share


@MadeInGermany
Follow
Info :
Unfortunately, I had to find out that my account is used for fake pages in social media.
I am only active here on growdiaries.
I am not on facebook instagram twitter etc All accounts except this one are fake.
Harvest day 67.
Hey guys :-) .
Finally the time has come the lady has been harvested :-).
In the last week the water was freshly mixed with Canna Flush and an Ec of 0.4 in order to completely use up the nutrients in the last few days 👍.
You can see it on the beautiful autumn yellow leaves :-).
Before harvesting, the lights were turned off completely for 48 hours.
After everything was neatly trimmed by hand, the buds were put into the drying tent, where they are allowed to dry for the first 8-12 days at a humidity of 62% before they ferment with 62% boveda packs in jars.
After another 3-4 weeks in the glasses, the 58% boveda packs come in for the final touch :-).
Of course, the final update comes from the fermented end product 👍.
Until then, I wish you all a lot of fun and stay healthy 🙏🏻
You can buy this Strain at
www.Zamnesia.com
Type:
Runtz
☝️🏼
Genetics:
Zkittlez
X
Gelato
👍
Vega lamp: 2 x Todogrow LED CXB3590 COB 55 W
1 x Sanlight S2W 62 W
💡
Flower lamp : 2 x Todogrow LED CXB3590 COB 55 W
1 x Sanlight S2W 62 W
💡 ☝️
Grow Aero System : Growtool 0.8
☝️
Fertilizer:
Canna Aqua Vega A + B , Canna Aqua Flores A + B , Rizotonic, Cannazym, CANNA Boost, Pk 13/14, Canna Cal / Mag, Canna Ph - Grow, Canna Ph-Bloom
☝️🌱
Water:
Osmosis water mixed with normal water (24 hours stale that the chlorine evaporates) to 0.2 EG. Add Cal / Mag to 0.4 Ec Ph with ph- to 5.6 - 6.4
💦 💧


Likes
46
Share


@Roberts
Follow
Drunken bitch slap is going good. Roots hit the solution a few days ago and were going deep. So I pruned them so they start spreading wide from basket. The Hortibloom Solux 350 is doing good. Everything is looking on track. Thank you Aeque Genetics, and Hortibloom. 🤜🏻🤛🏻🌱🌱🌱
Thank you grow diaries community for the 👇likes👇, follows, comments, and subscriptions on my YouTube channel👇. ❄️🌱🍻
Happy Growing 🌱🌱🌱
https://youtube.com/channel/UCAhN7yRzWLpcaRHhMIQ7X4g

Likes
19
Share


@Organic473
Follow
The pictures speaking for themselves...added some plants that would go to seed after being cross bred with Khalifa Kush. This week onward the girls would be fed black strap molasses for taste and big bud.
Likes
42
Share

@MadeInGermany
Follow
Hey everyone 😃
Today is the 42nd flowering day.
Both phenotypes continue to develop great 👌.
For me they should have been a little bigger.
But since I have cuttings from both, I will let them grow longer next time 😀👍.
The buds also continue to grow vigorously 😀 and already smell very sweet 😍.
I am very curious how the coming week will continue and until then I hope you have lots of fun with the update.
Stay healthy 🙏🏻 and let it grow 🍀
You can buy this Strain at :
https://sweetseeds.es/de/cream-caramel/
Type:
Cream Caramel
☝️🏼
Genetics:
Blue Black
x
Maple Leaf Indica
x
White Rhino
👍
Vega lamp:
2 x Todogrow Led
Quantum Board 100 W
💡
Bloom Lamp :
2 x Todogrow Led
Cxb 3590 COB 3500 K 205W
💡💡☝️🏼
Soil :
Canna Coco Professional +
☝️🏼
Fertilizer:
Green House Powder Feeding
☝️🏼🌱
Water:
Osmosis water mixed with normal water (24 hours stale that the chlorine evaporates) to 0.2 EC. Add Cal / Mag to 0.4 Ec Ph with Organic Ph - to 5.5 - 5.8 .

Likes
9
Share


@Bafforr_autoflower
Follow
Se realiza transplante a maceta definitiva de 20 LT AIRPOT
Sigue el riego día por medio


Processing
Likes
13
Share


@BigNoob
Follow
End of week 4 in the books. They are starting to stack, especially the Taquitz OG. The Fire OG is full of bud sites that im hoping will turn into colas. Tropicana cookies is starting to express more purple notes along with her blingbling of trichomes. Still battling humidity, between 45-65%. Hoping to grab a bigger humidifier, i have 2 small $40 ones, but its not cutting it.

Processing
Likes
3
Share


@XxBILLZAxX
Follow
Increased their food by a tad. Looked perfectly health raised to about 1900ppm.
Again spider mites at it crawling up every leaf and creating a colony. I thought it was over until I sat there nearly every night finding the f*****s and rubbing the leaves with the spray.
Defoliation was needed ASAP due to them stretching nicely. Started slowly from the bottom up. (repeated this process every 3-5 days.)
Likes
Comments
Share

@smoking_hills9
Follow
Fantastic grow. Very happy with all 3 strains, all just perfect. Super stinky, very frosty, and as always tones of buds . Now time to cut and dry.
Likes
10
Share


@YAKDADDYDWC
Follow
I found seed foeming and bananas so i decided to cut my losses before it got out of hand im just glad they got to where the are now first time grow first time using dwc and i fucked this shit up for a first timer you beauty
Likes
Comments
Share


@BruWeed
Follow
Se encuentra perfecta. Los cocos cada vez estas con mas tricomas. Algunas chalas tienen color violeta. Su olor es fuerte y se siente dulce. Yo creo que en un mes ya estaria, voy a dejarla 3 semanas mas con fertilizantes y despues empiezo con el lavado de raíz.
Es una planta muy linda, todo es perfecto y sin dudas volvere a cultivarla.

Likes
Comments
Share


@acidblue
Follow
I got Buds! Only a about a week old so the're tiny.
Just watered with some Recharge and did some pruning, looking a tad droopy but should peak up in couple hours.
Over all very health looking plants, So glad I switched to organic fertilizer, saw one gnat in the garden a few days ago,
so as a precaution I put up a couple sticky traps, already got mosquito dunks mixed in the top soil from last time.
Haven't see him since, might be stuck on one of the traps :).

Processing
Likes
5
Share


@MyloGrow2019
Follow
Just at the end of week # 2 in bloom , LST training is going well and the canopy is pretty full , cooler outside temps allow me to use my co2 burner and they are all looking great with lots of bud sites and liking the nutrient balance, made new nuits today and it went from 1400 to 1150 in two feedings , one more week of stretch and then I will finish the under canopy cleanup and plan on a light defoliation at week 4 of bloom. The 8 Ball Kush is really showing great growth and it’s early on , should be some huge buds this crop , the Blue OG Kush is healthy , it’s my first time with it so I’m not sure what it grows like . Stay Tuned

