The Grow Awards 2026 🏆 


Likes
Comments
Share
@CrashTest420
Follow
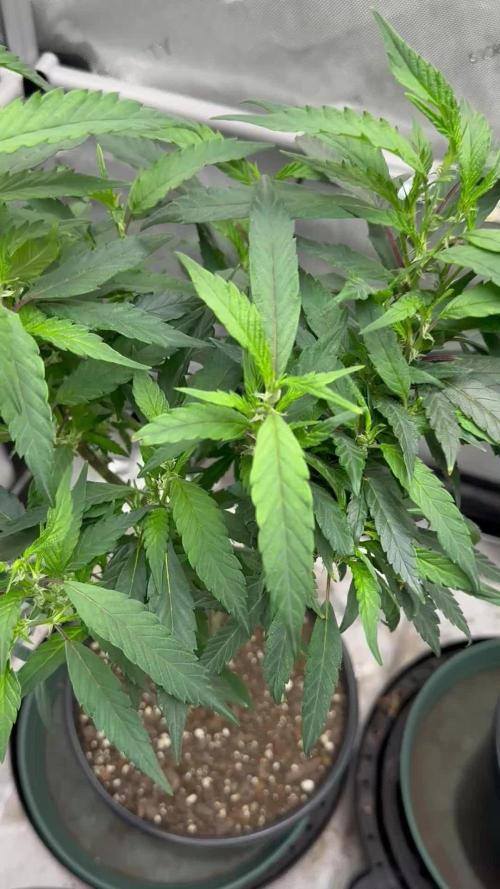
Everything is going fine can wait too see some more fan leaves come out

Likes
46
Share
@LittleBigTrees
Follow
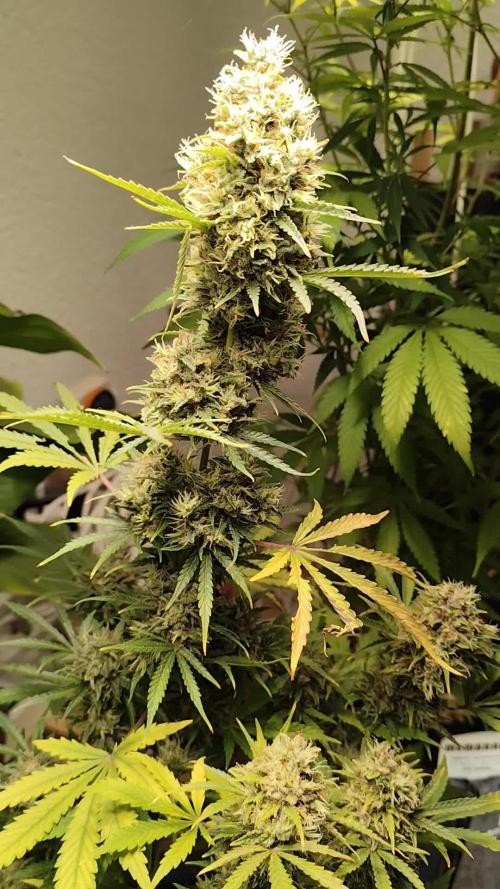
Getting over being locked out due to timer and dripper issues ramping the EC up to 3.8 !
, the size will suffer a bit but hopefully the quality will still be there 🤞

Likes
7
Share
@ExoticoSativo
Follow
Week 13 (Harvest Week)
M14 Day 85 - 24/0 (12am-12am)
Not check up
M15 Day 86 - watered regulars .
Not ph. Left only 1 light dimmed at 50%. 24/0 (12am-12am)
M16 Day 87 - 24/0 (12am-12am)
Not check up 🙏
M17 Day 88 - Dark Period 8pm/ watered regulars not ph.
M18 Day 89 - 24/0 (12am-12am)
First 24h D at 8pm. Bring electric extension/ for air circulation.
M19 Day 90 Jueves - Harsvestday ❤️ Water Regulars/
Harvested autos
Bud wash Bk, purple punche big cola only,
Hang dry buds, place air 2.
Trimmed bigger fan leaves with hands only.
M20 not check up
M21 water regular, transplant
Tools:
- scissors ✂️
- bandeja
- alcohol
- dry paper
- extension
- jars
- gloves
Water curing experiment
Jar con cogollitos de bk, 2 ramitos de purple punch y demas cogollos de gorilla glue.
M19 1st water 11:50 pm
M20 at 11:50pm Day 1
M21 at 11:30pm Day 2
M22 at 10:22pm Day 3
M23 at 9:50pm Day 4
M24 at 8pm Day 5
M25 at 9pm Day 6
M26 at 8pm Day 7
Dry process
Secador 1 hora, secando en la interperie
Necesito
- malla
-agua destilada
Driying Process
Temp 18⁰-22⁰ Humd 55-65%
M19 Day 0 Harvested
M20 Day 1 - T34 ⁰ H40-70
M21 Day 2 - T33 H55
M22 Day 3 - T32 H50
M23 Day 4 - T30 H52
M24 Day 5 - T25 H70 dif loq
M25 Day 6 - T26 h75
M26 Day 7 - T25 h80
M27 Day 8 - T23 h80
M28 Day 9 - T25 H80 (Pp bud test was amazing, crazy body high, mind as well, munchies, cotton mouth. The smell is super strong but im too used to it.)
M29 Day 10 - changed to warmer place, T30 H55
M30 Day 11 - T25 H80
M31 Day 12 - curing process jar buds
Will open jar every 24h for one full month.
First smoke july 1st ❤️

Likes
16
Share
@UnitedStrainsGermany
Follow
🌱 Eternity Cup 2025 – Woche 6 Update 🔥
Unser Eternity Cup 2025 Grow, powered by Zamnesia & Plagron, geht in die nächste Runde! 🚀 Die Runtz Autoflowers unter der Evo 301 (Samsung Chips, 180W) zeigen jetzt deutliche Unterschiede – jede Pflanze entwickelt sich nach ihrem eigenen Tempo. 🌿
🔍 Setup & Entwicklung nach 6 Wochen:
🌿 #1 – 20L Topf, nicht getoppt, aber LST
Diese Dame steht jetzt voll in der Blüte! 🌸 Dank des großen Topfes hat sie sich super entwickelt, schöne Buds setzen sich langsam an. Sie bleibt stabil und gesund – die LST-Methode zahlt sich aus! ✅
🌿 #2 – 8L Topf, getoppt & LST
Während die anderen zwei sich voll auf die Blüte konzentrieren, legt #2 nochmal ordentlich in die Breite zu! 📏 Das Topping und LST zeigen ihre Wirkung – die Pflanze bleibt kompakt, aber buschig. Die ersten Blütenansätze sind zu sehen, aber sie nimmt sich weiter etwas mehr Zeit. 🌱
🌿 #3 – 8L Topf, nicht getoppt, kein Training
Genau wie #1 steht auch diese Pflanze voll in der Blüte! 🌸 Sie ist von Natur aus etwas höher gewachsen und beginnt jetzt, schöne Buds auszubilden.
🌱 Fazit nach Woche 6:
Die ungetoppten #1 & #3 sind mitten in der Blüte, während #2 sich weiter in die Breite entwickelt und noch ein wenig hinterherhinkt. 🌱💪 Aber alle drei sind kerngesund, und es bleibt spannend zu sehen, ob sich das Wachstum von #2 am Ende durch höhere Buddichte auszahlt!
➡️ Wie wird sich der Blütenaufbau in den nächsten Wochen entwickeln? Bleibt #2 länger in der Vegi? Wir halten euch auf dem Laufenden! Stay tuned für Woche 7! 🔥
Update vom 25.02 die explodieren ich muss das Zelt wechseln maximal 1 Woche noch und sie kommen in das doppelt so große Zelt !!! Ich bin so Happy bitte schaut euch #1,#3 an das sind Autos
#EternityCup2025 #Zamnesia #Plagron #GrowDiaries #RuntzAuto #Homegrow #CannabisCommunity

Likes
2
Share
@Grow420pice
Follow
Hopefully :-)
Barney's Sweet Tooth Auto
Week 1
HomeBox 120x90
12.5l Potsize, soil Biobizz light mix
LED 2xGC4 250w, 1x GC-BAR Single 70w, 4x Secret Jardin per 26w (Flowering)
Biobizz nutrients

Likes
3
Share
@MrGrOH1008
Follow
Did a light defol on 1. Gonna let the other just go until day 21 of flower. But yeah, these babies been a little struggle. But they’re drying out from their first real pot soaking feed. Another day or 2 and we’re gonna flip! Let’s gooooo!
Likes
6
Share
@Growbody
Follow
Herzlich Willkommen zu meinem Growbericht der Black Runtz Automatic von Zamnesia Seeds.
Die URL für den Strain findet Ihr hier:
https://www.zamnesia.com/de/11159-zamnesia-seeds-black-runtz.html
Für den Grow verwende ich die 9 Liter doppellagigen Stofftöpfe von ROOTIES. Sie haben sich bei meinem letzten Grow gut bewährt.
Auch die Smart Start Plugs von Zamnesia werden wieder verwendet, dieses Mal ohne den Samen vorher einzuweichen.
Und die Erde und der Dünger von BioBizz findet wieder Verwendung.
Tag 101: Die Black Runtz von Zamnesia Seeds bekommt ab jetzt nur noch reines Brunnenwasser. Nächste Woche wird sie geerntet, obwohl sie noch soviele frische Blüten hat. Sie ist wunderschön anzuschauen.
Schön, dass du dir mein Tagebuch angesehen hast. Schau gerne wieder rein✋😎


Likes
10
Share
@Schnabeldino
Follow
After I changed the lamps to 2 x 200 watts, the plant on the left also started to bloom.
I gradually had my equipment delivered and starting to go "Professional".
AC Infinity Controller and exhaust fan, from now on I can also check my values from outside
Likes
27
Share
@Bread_n_Buds
Follow
Here we are at the moment of truth, the flowers are starting to form, our Ghost Train Haze reveals its sex and of course like all Zamnesia plants I will be the father of two beautiful females.
One is growing straight but I will show it to you later because I have been focusing a lot on this one in main - lining. It is a plant with a wide internodal distance so we have more time to shape it before the woodification and it lends itself very well to late lst interventions.
I managed to open it on the main line very well and the lateral branches are really, growing and stretching properly.
We will not see the super productive trees of the autumn harvest but I am willing to bet that we will have lots of beauty and lots of resin in beautiful bush-sized plants.
Wait for the uncle BreadandBuds....
We are still using soil, feeding and all the recommended additives from Plagron 100% organic. We have moved on to the flowering start schedule that keeps the same Power Roots additives - Sugar Royal, Pure Zym and adds the flowering stimulant dear in my house for obvious reasons of Biscotti. Of course the basic fertilizer is now Alga Bloom.
The Green Sensation when the flowers are already a bit swollen, do not start immediately. The Power Buds must immediately stimulate the start and development of the buds.
---- Decide on the right soil and calculate your fertilizer schedule based on the soil on the official website.
-- www.plagron.com
Try a seed of this strain that drives us crazy..
---- https://www.zamnesia.io/en/12511-zamnesia-seeds-ghost-train-haze-auto.html
Zamnesia Description // From the day its cotyledons emerge from the substrate, Ghost Train Haze Auto will surprise you with its rapid growth and robustness. When it starts to flower, this short sativa will develop long and compact buds with pungent scents of spice, citrus and fuel.
All the best that mother nature can offer is on ---- www.zamnesia.com
Likes
5
Share
@GanjaFarmer101
Follow
9 weeks and 3 days to harvest
Not much to say until 3 are harvested and dried/cured
Will update when the time comes.

Likes
9
Share
@ThePifferyAndCo
Follow
Week 7 of Veg. 4x4 filled out very nicely. Added in a 2nd 500W light and spread the plants out a bit more to allow more airflow/light penetration. Now the fun begins :D

Likes
25
Share
@OZDAOgrow
Follow
2 weeks into the growing season.
Things are going well, starting to apply LST to some plants. I have also started to remove little by little those leaves that interfere with light penetration.
Bruce Banner unfortunately turned out to be retarded in development, but I won't remove him, in my experience, retarded people often turn out to be very strong ^_^
Likes
69
Share
@PEAKYPLANTERS
Follow
Hi everyone, Weed brothers.
Here we are ready for a new week of fire!
My dolls have been transferred under a wider tent with the hope of opening up their final yield ....
It's very hot ... let's get the best
Likes
4
Share
@myketb
Follow
WK2D2 - Everything is looking very good. Start giving them some 250 ppm nutrients today and they are still bathing under light CFL of about 350 ppfd.

Processing
Likes
142
Share
@MadeInGermany
Follow
Hey everyone :-).
There is not much to tell this week :) A few came to the flowering tent, 2 are still in the vegi phase for 2 days and then come last to the flowering tent :-)
The Blue Cheese and the Kosher Tangie Kush smell very good and how they should 😍👍
It will be difficult to choose 2 mums :-).
I wish everyone a nice week 👌 Let it grow


Likes
15
Share
@I_Identify_As_A_Dan
Follow
Week 23 for Peyote Zkittlez by seedsman,
Not too much to report shes drinking a hell of a lot of water.. I do think she would have been in a bigger pot at this point you aren't even able to scratch the soil surface because its just roots.. 😂
So im hoping that doesn't effect her too badly can already tell that shes a little light on the nitrogen... May feed some FPJ to boost that up a little otherwise she may fade too early.

Likes
7
Share
@Eaegifts
Follow
No major growth, in fact she’s kinda slow so I fim’d her today and have been doing minor lst to work on stem strength and bushing out, maybe she’ll show off during flower which is one week away

Likes
8
Share
@Kimngan6221
Follow
This week I'm going to talk a little bit about the 2 gal pots I leave outdoors. Since they're going to be indoors now, I've assembled a fertilizer rack and the bottom compartment is perfect for a cage with all the plants I have. With a length of 1.5m, width 65cm and height of 1m, I will use 4 led bulbs 50w and 2 full spectrum LEDs 36w long 1.2m. 272w / ~ 1m2.
2/3:Plant the plants indoors and lst them. 4 led bulb 50w
5/3:Run off all the trees, as it was soaked with rain water when left outside. is still the old nutritional dose.
6/3: Today I received the led light I ordered. I perfect my design and let the tree in the cage out and lst.
9/3:I feel everything is perfect today, I reduce their lighting time to 12/12. I will cut off all the fan leaves from the stem of the 2gal pots and prune all the small branches of the 1gal pot. in this pruning I will trim them as much as possible. It's been 37 days since the seed and I think they're ready for flowering. I need to flower them urgently because in the next 2 months the weather can be as hot as 40 degrees, and I really have no way to reduce their temperature. I would probably have them flower for 7 to 8 weeks to retain maximum resin. a few days before high, I fliming an NL plant, I experimented with this technique and I feel that they have been very successful since the fliming plants have a much larger stump than other plants. I really like this technique, as it will save me the small space I currently have without having toppings. With just a few simple steps I have got a really big stump and still keep the biggest main bud of the tree. I hope each plant can give me 20-25 grams of dried marijuana.

Likes
26
Share
@pifflestikkz
Follow
Day 85
23/09/24 Monday
De-chlorinated tap water pH 6 and calmag today.
Day 87
25/09/24 Wednesday
Feed today using de-chlorinated tap water pH 6 only.
Day 89
27/09/24 Friday
De-chlorinated tap water pH 6 with Plagron PK13-14 today.
Picture and video update 😎
Day 91
29/09/24 Sunday (End of week)
De-chlorinated tap water pH 6 only today. Will start only water next week 👌💚 added pictures 😎
Notes: auto orange bud getting deep purple tips, lovely colour. And deep rich pungent smell.
Auto melonade Runtz, absolutely beautiful, pink under leaves, and nice bud structure.
Auto overdose, dense compact beautiful structure of a plant 💪💚

