The Grow Awards 2026 🏆
Likes
Comments
Share
@Brickie74
Follow
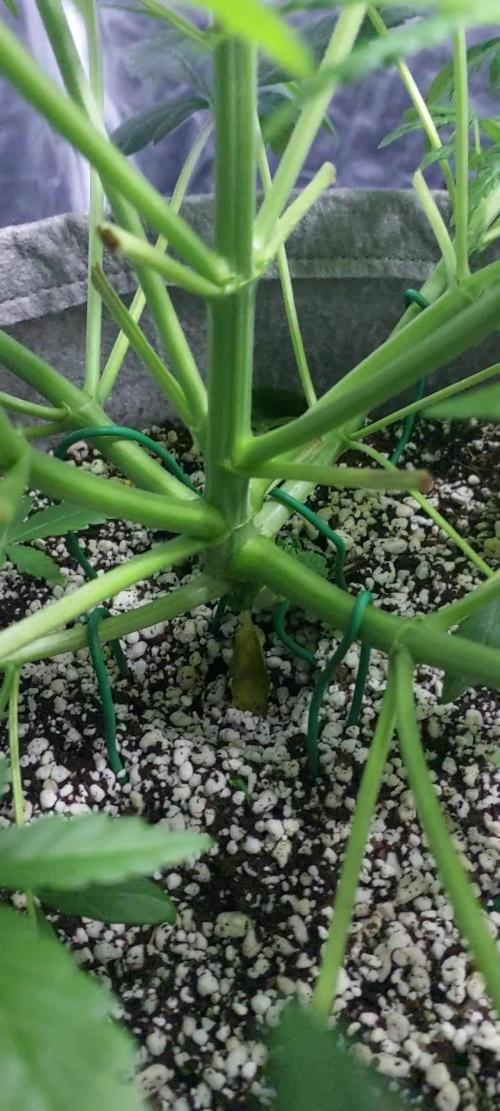
This plant has been growing unbelievably well. She has not only grown fast but evenly. I've been doing some pruning of the tiny lower bud sites that won't grow into much and doing some more LST to let more light in.
Likes
105
Share
Bending, tucking, wireing. Jackie seems to love it all, my fastest plant so far from seed. She is enjoying sun and few hours a day of CFL-s. Light nutes dosages seem to suit her needs, bacillus and myco doing their job very well, more than happy I am what can i say :) __________________ Update 13.10. I Decided i want to try supercropping on an auto strain, my jack is groeing ultra fast on a daily and i blv today is kinda good day considering the growth of an auto and her life cycle.. you can see the training i am doing as well, every 2 days i must move green wires and gently stick them to soil not to hurt roots, and spread them side branches that have 2 pair of nodes already. Lets see how will she respond in the next days :)
Likes
24
Share
Monkey berries is finished up in 55 days flushed too 0.0 EC . The colours are so beautiful!! She’s went quite purple for me the trichomes are thick what a killer strain to go it was my first exotic mikes genetics looking forward to the next run with exotic genetics.. stated flushing the slurrican IX yesterday she be chopped by day 60 . One last update coming of the final grow in a week or so .. happy growing
Likes
12
Share
@AGP90
Follow
3rd week of Flower done, Shining silver haze is 99days old and honey cream and critical are 68days old. Been hard controlling the front 2 plants definitely taken over light of back 2 plants, starting to support honey cream at front as its coals are getting heavy ans dropping. Will increase nutrients today, 3rd week done and looking good and healthy got the odd brown pistols and hoping it's not mould related
Processing
Likes
120
Share
Hi all the happy people here in GrowDiaries. This is my second cultivation ever and it will be fun to try a bigger space than my closet grows First, I'm just going to say I'm done with the construction of my new growroom. I put some pictures on the construction here in week one. The room is 2.14 meters by 1.7 meters and has a ceiling height of 2 meters. It provides a floor area of ​​3.6 square meters. I use a 54 Watt Lightwawe T5 for germination and 2 Pcs 400 Watt HPS lamps. I have a channel fan that replaces the room air about 40 times an hour to get a comfortable theme in the room, the air enters a fresh air intake from the outside. The air is purified through a carbon filter to then leave the room to the rest of the basement. Then I use that heat to heat the rest of the basement. I will use 8 pcs 15 liter Autopots to grow with and a 100 liter water tank that supplies the pots of water and nutrition. I will grow completely organically in soil and will watercure my buds to get the best possible medicine for me. But there are no cultivation rooms to be displayed here, so I continue with what is most important. Today I have put my seeds in my moisture dome and hope the seeds have germinated within a few days. I am very excited to see how the new growroom will work and how this CBD Fast Eddy plant from Royal queen seeds will turn out. CBD Fast Eddy Automatic is combining Cheese x Juanita la Lagrimosa x Ruderalis, Fast Eddy is a rapid growing, flavourful, and CBD-rich auto strain that goes from seed to harvest in 8-9 weeks, produce generous yields, and induce a clear, mellow, and most importantly, functional high. THC: 9% CBD: High Yield Indoor : 400 - 450 gr/m2 Yield Outdoor: 80 - 130 gr/plant Height Indoor: 60 - 100 cm Height Outdoor: 80 - 120 cm Flowering: 6 - 7 weeks Harvest month: 8-9 weeks after sprouting Genetic Background: Cheese x Juanita la Lagrimosa x Ruderalis Type: Sa 50% In 40% Ru 10% Effect: Clear, Painrelief Climate: Mild .............................................................................................................................................................................................................................................................................................................................................. Update 2017-08-15. Both seeds have germinated and planted in small pots inside the humidity dome. I'm so glad it worked so well and now it's just hoping they'll start growing and become 2 big healthy girls :) ............................................................................................................................................................................................................................................................................................................................................... Update 2017-08-16. I have mixed my own soil today. Its 40% sieved peat harrow H2-H4 0-30 mm, 45% sieved peat harrow H4-H6 0-30 mm. 5% sand and 10% of compost soil. And i use 15% of perlite and mix it all together. ............................................................................................................................................................................................................................................................................................................................................... Update 2017-08-20. These girls are much slower to germinate and to start growing than the other 6 girls I started at the same time. One of the germinated seeds split in half, so I had to take a new seed and germinate it. It took 2 days. It was just a smal taproots after germination with this strain as opposed to my Fastbuds cbd. But I hope everything goes well from now and that they live up to their name, Fast Eddy. ................................................................................................................................................................................................................................................................................................................................................ Update 2017-08-21. New pics. ................................................................................................................................................................................................................................................................................................................................................ 2017-08-22. Nr1 dident make it and died. Started germinate a new seed to get another Nr1. .............................................................................................................................................................................................................................................................................................. 2017-08-27. Nr 1 is in a small pot in humidity dome and i hope shes going to break the surface soon. Nr 2 is slow but doing fine. --------------------------------------------------------------------------------------------------------------------------------------------------------------------------------------- 2017-08-28. Nr2 is transplanted in 15 liter autopot. --------------------------------------------------------------------------------------------------------------------------------------------------------------------- 2017-08-29. New movie of the girls Nr2. Its no water for 3 days now so the roots develop more and match the plant above the soil. The temp controlled fan is awesome, its easy to set what temp you like to have in the room. Right now its 28 celcius. And humidity is 56%. ----------------------------------------------------------------------------------------------------------------------------------------------------------------------------------------------- 2017-08-29. Hello to you who read my diary, I just want to say that I am pleased that you have chosen to check in with me and in my diary. I just want to say that I do this for myself and for a steady flow of my medicine. Everything you read and see in my diary is 100% honest and I will never distort or beautify anything here. I document my crops so that I can learn from my mistakes and also to look back at those different crops. I try to update with pictures every day and with text if something special has happened in the garden. This is my strainhunt for the best medicine and the beginning of my journey with cannabis and the cultivation of it. ----------------------------------------------------------------------------------------------------------------------------------------------------------------------- 2017-08-30. Cleaned the room this morning, just vacuuming and cleaning with chlorine solution. Im testing the fan to control temp and humidity, it works great. Added a movie. Everything is looking great right now. ------------------------------------------------------------------------------------------------------------------------------------------------------------------------ 2017-08-31. 3 New pics. ------------------------------------------------------------------------------------------------------------------------ 2017-09-01. New pics and a video of the grow room from today. ---------------------------------------------------------------------------------------------------------------------- 2017-09-04. Week 2 starts now, new pics. -------------------------------------------------------------------------- 2017-09-05. KL 08.00. Cleaned the room this morning, just vacuuming and cleaning with chlorine solution. KL 12.00. The girl got 2 liters of water with nutes in it, added a video. ------------------------------------------------------------------------------------- 2017-09-06. KL 08.00. The girls woke up after their beauty sleep, the leaves are always a bit down after 6 h of darkness, but they will stretch now when the HPS lamp starts. Everything looks good and I keep trying to tuck the leaves so they get the maximum amount of light where needed. Added pics and video. -------------------------------------------------------------------------------------------------------------------------------------------------------------------------------------------- 2017-09-07. Day 17 from sprouting. I have never tested PH in my grows, when growing organic in soil iv learned that it adapt PH by it self. But im curious by nature so i had to test. Kl 10.00 Tested PH in the soil, it was 6.9 and tested my tap water and it was 6.8. Added video of the girl. Kl 22.30. New pics. ----------------------------------------------------------------------------------------------------------- 2017-09-08 KL 08.00. Good morning, added new video. 2017-09-08. Kl 23.50. Gave every girl 3 liters of water and nutes, added new video. ----------------------------------------------------------------------------------------- 2017-09-09. Kl 21.00. Defoliated a lot and added pics. ------------------------------------------------------------------------------------ 2017-09-10. Kl 08.00. Last day of week 2. New video. 2017-09-10. Kl 23.00. 3 new videos. --------------------------------------------------------------------------------------------------
Likes
25
Share
@Dunk_Junk
Follow
Day 21 - she got repotted into her 38 Litre airpot. She is not as close to the lights as I'd like, but saying that I wouldn't mind her to stretch a little bit.
Likes
5
Share
@Ensign420
Follow
Greetings fellow growers 🖖 and welcome to my first grow ever. This adventure actually started several months ago when I decided to stop buying flower from dispensaries and just grow my own bud. How hard can it be!? This is actually my second seed of this strain. The first bean sadly died due to over watering (sorry girl, RIP). I was literally watering the cube to the point where water was dripping from the bottom, then heavily sprayed the humidity dome and tray with the vents completely closed. Everyday. Multiple times. I never let the dome or try dry out. So after about 8 days of not sprouting, there was a funky smell of rot. So that was that. Later I learned that rockwool retains a lot of water and can easily drown seeds. So a wet/dry cycle is best for rockwool germination. So even after hours of researching and digging through forums and tutorial videos, I was still under prepared for this journey. Did not consider how delicate the germination phase is. Oh well. Lesson learned. Reset and try again! I hope everyone is safe and stoned during this corona crisis. Just like everyone else in the world, I want this pandemic to be over with. But in the meantime, let's grow some weed! 🖖 [START OF WEEK 01] Day 01 - Monday - 08/03/20 - Total Days: 001 ----------------------------------- - [0830]: Light Schedule: 24Hrs/0 --- Soaked cube in 5.5 PH water for 10 min. Did not shake water out. --- NO NUTES! Only PH'd down to control the PH levels. --- Did not use the default hole (way too deep). --- Flipped cube upside down and made a shallow hole for the seed (less than 0.25" deep). --- Placed seed in and pinched hole close. No additional water added. --- Sprayed the tray and dome with straight water (5.5 PH). --- Vents are cracked opened a for ventilation (about 1/4 opened each). --- Distance between the light and tray was 53" --- AC was set to 80 °F --- Exhaust fan was set to 86 °F --- Room average temp was at 85 °F --- Dome humidity was at 85-99% when sprayed. --- Allowing to completely dry before respraying. - [2200]: Dome and tray were completely dry! Sprayed only tray and dome with more water. Day 02 - Tuesday - 08/04/20 - Total Days: 002 ----------------------------------- - [0845]: Sprayed dome and tray in the morning. Everything was dry. --- Hoping for the best! - [2130]: Everything was dry again, so sprayed dome and tray at night along with a light spray on the cube. Day 03 - Wednesday - 08/05/20 - Total Days: 003 ----------------------------------- - [0830]: Everything was dry again. Resprayed dome and tray. Slightly sprayed cube. - [2125]: Hooo damn!! She popped! Am little stub is visible! Resprayed dome and tray again. --- Still going 24/0 for lights. - [+0033]: Just checked up on her and I swear she grew a bit taller! Getting excited! Day 04 - Thursday - 08/06/20 - Total Days: 004 ----------------------------------- - [0845]: Wow! Went from a little stub to fully sprouted overnight! Everything was pretty dry again so resprayed dome and tray. - [2200]: Tap root is visible! Over 1" long too! Just resprayed dome and tray again. -- Going to prep for hydroton transplant tomorrow! Day 05 - Friday - 08/07/20 - Total Days: 005 ----------------------------------- - [0930]: She keeps growing! -- Added a bit of CalMag to the spray bottle (8 drops to 650ml of distilled water). Resprayed dome and tray. Water was at a 5.4 PH with 141 PPM. - [1045]: Prepped the bubble bucket with 4.5gal of water. Water is high enough to reach about 0.25" above the bottom of the net pot. --- Added 3 drops of Superthrive --- Added 3.5ml of CaliMagic --- Added 2ml Hydroguard --- Then PH'd down to 5.6 --- Solution Strengh: 120 PPM --- Water chiller is set to 20 °C - [1100]: Transplant time! --- Filled the net basket 1/3 with hydroton. When placed in the bucket, air bubbles are not visible, but are slightly below the surface (slight digging will reveal the water/bubbles below). --- Removed plastic on rockwool cube and placed in basket, then filled around and covered with hydroton. Making sure to block any light from passing through the net pot and into the nutrient solution. --- Covered with a half-bottle dome sprayed with the CalMag water from earlier. --- Hoping for the best! - [1300]: Raised Bucket 5" higher. Now light distance is 48" to top of bucket. - [1820]: Lowered tent exhaust temp to 76 °F --- Lowered AC to 75 °F --- Raised bucket even higher so light distance is 30" to top of bucket. - [2300]: Looking good! --- Sprayed dome and surrounding hydroton with more CalMag water. --- Attached timer to light! So new 18 Hrs On/6 Hrs Off light schedule. --- Lights On: [1600] (4pm) --- Lights Off: [+1000] (10am the next day) --- Decided to go with lights on during the evening/night and off during the later mornings/afternoon (the hottest part of the day) to see if temps can be controlled better. --- Please survive girl! Day 06 - Saturday - 08/08/20 - Total Days: 006 ----------------------------------- - [0800]: Everything was dry. Resprayed hydroton and dome. - [2000]: Here first night cycle seemed to go well! Get'n taller! --- Dry again. Removed the dome. --- PH went up to 6.5 so PH'd down to 5.7 --- Ran the top feed drip ring for a bout a minute to wet the hydroton and rockwool with the nutient solution. ---Too scared to leave the top feed on 24hrs (I don't want over water her and cause dampening-off). Will let dry before re-watering. - [2100]: After closer inspection, I think she's looking a bit yellow. --- Decided to add a bit of grow nutes to the bubbler solution. --- Added 2ml of Sensi Grow A --- Added 2ml of Sensi Grow B --- Solution strength after adding more nutes: 176 PPM --- PH went up to 6 --- I hope that the extra chelating properties of the 'PH Perfect' solution is enough of a buffer for proper nutrient uptake. Day 07 - Sunday - 08/09/20 - Total Days: 007 ----------------------------------- - [0800]: Water dropped a bit (mostly due to evaporation) so solution strength was at 190. --- Checked PH again. Was still at 6, so PH'd down to 5.4 --- Ran the top feed for a minute to wet the hydroton a bit. - [0915]: Since she's looking perky but still a bit yellow. So decided to up the nutrient concentration even more before lights out. --- Added 2ml more of Sensi Grow A --- Added 2ml more of Sensi Grow B --- Solution strength after adding more nutes: 199 PPM --- PH went up to 5.8 - [1700]: Checked nutrients. --- PH: 5.9 --- Solution strength: 202 PPM --- Added 4ml of Voodoo Juice --- Added 4ml of B-52 --- PH after adding more nutes: 5.9 --- Solution strength after adding more nutes: 238 PPM - [2130]: Decided to make a new foliar spray to address the continued yellowing. --- Started with 500ml of distilled water. --- Added 3 drops of CaliMagic --- Added 3 drops of Sensi Grow A --- Added 3 drops of Sensi Grow B --- Added 3 drops of B-52 --- Added 1 drop of Superthrive --- Solution strength: 164 PPM --- PH was at 5.9 and did not adjust. --- Gave her one spray. --- Also sprayed the surrounding hydroton. [END OF WEEK 01]
Processing
Likes
22
Share
@EelGrows
Follow
Week 8: Day 50-53: All seemed well with the White Crack plants, gave em their normal feed on day 51 PH'd to 6.5 and measured runoff PH(only got enough from WC#1 and #2). WC#1 read an astoundingly low 5.3 PH!! Like what??? No visible signs of stress or deficiences, but leaves feel less healthy than the other 2 White Cracks. WC#2's runoff measured at higher than ingoing at 6.7PH, which I think means I'm under feeding her. She looks insanely healthy though, so will just up her and WC#3's doses next feed, as they both look like very similar phenos and leaves feel and look healthy on both plants. Day 54-56: Ok so decided to flush WC#1 like I did with the 4 Assed Monkeys because runoff was more tha 1 whole PH off from ingoing last feed on day 51. Ended up with a runoff of 6.5PH, same as ingoing feeding immediately after the flush read 6+PH(took 4L of 6.5 PH'd water with regulator). Fed WC#2 and #3 with their scheduled calmg feed but I added some super PK this time to get the PH of the soil down a bit. Ended up getting 6,2-6,4 runoff on both plants, very happy with results of all my runoff now. Finally got that behind me... End of Week 8: WC#1 seems to be finishing the fastest, along with 4AM#1(if we go by the orange pistils). WC#2 and #3 have really stretched a bit more these past few weeks catching up to WC#1, and they all look amazing! Really stoked for the end of the month!
Likes
4
Share
@AustinRon
Follow
LJ 2Q24 Flower Week 6 Start of Week: - [Sun Aug 4, 2024, LJ 2Q24 36:F:6:1] - Plant Heights: [ 25, in] End of Week: - [Sat Aug 10, 2024 LJ 2Q24 42:F:6:7] - Plant Heights: [ 26, in] EC: 2.4. # Until Week 10 __ Sun Aug 4, 2024 LJ 2Q24 36:F:6:1 Add 7.5 ml of Dr. Zymes to 1 PT of Last Two Plants Feed (Ran out last night) THIS CHART FOR WEEKS 7 - DEHU Water, Reducing Lush Green (N), Eliminating Root Anchor + PSP, 1 Drop Beauvaria Bassiana Soluble __ Mon Aug 5, 2024 LJ 2Q24 37:F:6:2 RLA Week 6 +BioAg TM-7 Nik wonders if it might actually be a molybdenum deficiency w/ Lemon Jeffery. __ Tue Aug 6, 2024 LJ 2Q24 38:F:6:3    Environmental: - LightIntensityAvg: [ 836, µMol/m2/s] - TempAvg: [ 78.4, °F] - RHAvg: [ 65.7 , %] - VPDAvg: [ 0.90 , kPa] - EC: [ 2.4, mS] Note: - Nik @TheRootedLeaf mentioned Molybendum as an ESSENTIAL µNutrient participating in Nitrogen Reduction. - The BioAg TM-7 contains Mb, Apply @ 1 tsp/gal  __ Wed Aug 7, 2024 LJ 2Q24 39:F:6:4 __ Thu Aug 8, 2024 LJ 2Q24 40:F:6:5 Note: - We really need at least 2 Fertigations/day, @2000 & @0130 - We’ll water to saturation each event (10% Pot Volume, 440 ml/plant/event) - We need 440 * 2 * 7: 6.16 Liters,Need 1.62 Liters, Will mix 1.75 - Need to increase daily total from 1.5 to 2 Gallons - 1.1 L/Plant/Day - 440 ml/plant/event * 2 Per Event - Estimate Minimal Runoff - Pot Size 4.4 Liters - Saturation: 440 ml - 0% Runoff 1.75 Gal, 5700 ml, 814 ml - [x] Light Defoliation (as needed/lowers) Feed Chart for 1.75 Gallons Apply 440 ml/plant @ 2000 & @ 0130 - [x] Mixed! 2024-08-08T16:03:01-0500   __ Fri Aug 9, 2024 LJ 2Q24 41:F:6:6 - [ ] Collect Dehu Water - [ ] Water 440/plant @ 2000 - [ ] Water 440/plant @ 0130 880 ml/plant/day * 7 : 6160 ml, 1.62 Gal __ Sat Aug 10, 2024 LJ 2Q24 42:F:6:7
Likes
48
Share
~ WEDDING CHEESECAKE FAST FLOWER by FastBuds ~ Well fam, here we go again with another epic strain from FastBuds Fast Flowering stable. After having such tremendous success growing their Gorilla Cookies Fast Flower outdoors last year, I've decided to run another of their fast flowering strains outdoors this year... Wedding Cheesecake Fast Flower! The best description of this awesome cultivar comes directly from my friends at FastBuds which is as follows: "A delight for the mind and body: Wedding Cheesecake FF (Fast-Flowering) is a delicious strain that offers XXL yields in a 7-8 weeks flowering cycle. This terpene powerhouse produces loads and loads of mouth-watering vanilla-creamy-cookie-scented terps with hints of citrus and cinnamon. In addition to its delicious aromas, this variety grows very well in both indoor and outdoor setups, yielding up to 650 g/m2 without extra maintenance, making it the ideal strain for beginners as it allows you to maximize yields while minimizing work. This super-fast feminized photoperiod version offers upbeat and energetic yet deeply relaxing effects that are perfect for consumers looking for a heavily focused, motivating, and creative high. It’s the ideal strain for those needing that extra energy boost to start a busy day on the right foot. Wedding Cheesecake FF boasts chunky, large-sized buds with a thick layer of silvery-white resin and bright orange hairs scattered all over: that just screams ‘quality’. The lime-green flowers sparkle with an array of hues ranging from dark to light green, to magenta and purple, and reek of a delicious aroma that’ll remind you of fresh store-bought cheesecake. This is an XXL hybrid that grows extremely tall in height, reaching up to 3m with one huge main cola and multiple long side branches that can withstand enormous yields of up to 650 g/m2 with ease. Wedding Cheesecake FF is extremely resilient to the elements and can be grown in almost every climate as long as you’ve got the space and basics covered, making her an excellent choice for those looking for large-scale harvests with a quick turnaround time without much effort." ________________________________________________________________________________________________________________________________________________________________________________________________________________________________________________________________________________________________________________________ The Setup: This is going to be an outdoor grow, but I have started the Wedding Cheesecake FF indoors as our weather is still too cold to put her outside (nighttime temp's dipping regularly into the 30's℉). The plan is simple... let her grow inside under a 19/5 light schedule until the nighttime temperatures stay above the mid 40's℉, at which point she'll be moved outside and transplanted into the soil which I have already setup and inoculated with beneficial microbes, and then let the fun begin!🤪💚 ________________________________________________________________________________________________________________________________________________________________________________________________________________________________________________________________________________________________________________________ Weekly Updates: 9/6- Well, Week Five of flower is here and the Wedding Cheesecake FF by FastBuds is rockin-n-rollin! Well fam, the 'Beast From The East' is going strong, and so far has not encountered any issues with any bud rot but is showing signs of the beginnings of Septoria. Luckily, this far into flower it shouldn't be too much of a concern at this point. This late in our growing season I always worry about Boytris, especially with cultivars that have really dense and tightly grouped flowers as our weather is now turning cooler and wetter. 9/8- I'm continuing to water the Wedding Cheesecake FF in the mornings on days that we do not get any substantial rain with well water via the garden hose. Today I went through the plant and removed a bunch of old dead leaves, along with any shade leaves that were totally yellow. I did not water today as we had a good amount of rain yesterday and the soil is still really moist. 9/10- My daily routine of watering, removing dead foliage and checking over the flowers continues. The aroma coming off of the Wedding Cheesecake FF is really loud now and you can definitely pick up some subtle hints of her Cheese lineage in it! 9/12- With Five weeks of flowers now behind her, the FastBuds Wedding Cheesecake Fast Flower only has 2-3 more weeks to go (weather permitting) and she's on track to be an enormous yielding plant! I can't wait!!! Thank you for checking out my diary, your positive comments and support make it all worthwhile! 💚Growers Love!💚😎🙏
Likes
6
Share
So heres my germination method. Soak/shake seeds in 3% h202 solution for a few minutes and let sit until tiny bubbles form on seed coat. Rinsed in clean rain water. Then placed in HPO's GREEN-SUPREME used as seed soak solution. With a small amount of ANTI-MATTER for enzymes. Soaked 12hrs (mostly I just soak a few hrs) Straight into Gro-Dirt Super Starter soil. Watered seeds in gently with diluted DARK-MATTER solution to get the mycorrhizal species attached as soon as possible. Once they came up, 18-24hrs later, sprayed gently with a mix of GREEN-SUPREME & RHIZO-MOJO Just a small pinch of both in a 1ltr spray bottle. All this was done in a dark warm place on a heat mat. In a humidity dome.
Processing
Likes
8
Share
@Barham64
Follow
Buds are getting bigger by the day. I’ve trimmed a lot of fan leaves off to reveal more flower sights, plants didn’t seem to stress much.
Likes
22
Share
@Spliffi
Follow
Week 1👍🤙👍🌱 The fear of non germination!! I gave the Trichome & Cream an extra week. Nothing happened but nature is funny like that. These seedlings are exploding. Dynomyco is the Bomb. Jon Dabs Check them out here: https://jondabs.com @jondabs Instagram The Sponsors Check them out here: Dutch Passion https://dutch-passion.com/en/ Hydroponic.co.za https://hydroponic.co.za/hydroponic/harvesting-and-growing-accessories/ Bud Juice https://www.gohydro.co.za The Best Grow https://thebestgrow.co.za Dynomyco https://www.dynomyco.com Nuclear Roots https://www.nuclearroots.co.za Photronic https://shop.photronic.net Special Thanks to Hydroponic.co.za. I buy all my products from them. Best service. Daily updates coming...
Likes
20
Share
Einfach eine super Woche Ich bin einfach wieder komplett überzeugt davon autoflower indoor anzubauen, dank fastbuds gibt's so geile Sorten. Ich will am ende alle mal gegrowed haben
Likes
17
Share
@nonick123
Follow
En este caso es un diario un poco distinto... Tengo en mi terraza (outdoor) una maceta de unos 25 litros, con sustrato reciclado de todos los ciclos hechos con BIOTABS este invierno pasado Durante todo el invierno / primavera, he ido añadiendo a esta maceta los "restos" de estas macetas del indoor, cargados de vida, sustratos y materia orgánica Cada vez que añadía sustrato reciclado, añadía / renovaba la capa de mulch (heno) para proteger la micro-vida Además, ha estado protegido por un techo de metacrilato todo el invierno, para evitar que las lluvias torrenciales de mi zona se llevasen los nutrientes He mantenido este sustrato húmedo con Agua RO A principios de mayo, planté una tomatera (tomate canario) en esta maceta Alrededor del 26 de mayo, decidí dejar caer aleatoriamente una semilla de Gorilla Z Auto que me regaló mi amigo StackFarms Unos días después, nacía con fuerza y vigor una pequeña plántula! 😍💥 Esta maceta se mantiene hidratada con un sistema de riego por goteo (TEMU) muy ingenioso: Utiliza un gotero medico como se usan en los hospitales! Este sistema ha demostrado (en mis pruebas) ser bastante consistente en el riego diario! La maceta con la tomatera + Gorilla Z Auto se mantiene hidratada con 1 Litro de H2O diario (RO o agua declorada, depende como me pille) A divertirse con este experimento! 🚀 FastBuds 15% DISCOUNT code "NONICK" 2fast4buds.com @fastbuds.official 💦 BioTabs 15% DISCOUNT code "GDBT420" biotabs.nl/en/shop/ @biotabs_official 🌱Substrate PRO-MIX HP BACILLUS + MYCORRHIZAE @promixmitch @promixgrowers_unfiltered
Likes
75
Share
Day 36- LST adjustments. Each lady received almost a full gallon of water each. I also dosed each gallon with 4ml cal mag plus. I guess I would consider this week 1 of flowering. Next watering I'll introduce bloom nutrients. They getting hairy! I feel like I'm also seeing some improvement in each plant after Foliar Spray, so I'm hoping after this watering they'll perk up and not have more sick leaves to look at. Day 37- I did a few LST adjustments on the smaller plants. "Blue Marker" is getting pretty stiff so I'm afraid to tie her down and have only been tucking leaves. Probably just going to try to keep her spread out as much as I can do. No more LST for her. Day 38- They've been drinking alot of water and are thirsty! Now normally I water once a week, but they may need it before their next water time. Lowered the lights to 18" above canopy. Will see if I get any canoes or not when I get back home tomorrow evening. It smells good when I open the tent as well 👌. Only uphill from here on! Day 39- Ladies didn't show any light stress to me lowering them down to 18". Blue Marker looks like she needs to be watered. The other two are still heavy. Probably be watering blue marker tomorrow evening and starting bloom nutrients. Day 40- Watered Blue Marker today with 4ml/gal CalMag+ and 2tsp/gallon of Old Age Bloom. Will be watering Yellow Marker tomorrow with the same ratio. The runt still probably has a few more days until she's ready for a drink. Day 41- Watered Yellow Marker with 4ml/gal CalMag+ and 2tsp/gal of Old Age Bloom. Will be watering the runt tomorrow. Went ahead and snapped a lower bud site on the runt. Didn't look promising enough to warrant keeping it. As you can see in the picture, most of the leaves were shriveled up on it anyways. I also tucked fan leaves on all plants and measured Blue Marker (17.5in) tall and Yellow Marker is about 1ft tall. Day 42- Watered "Runt" with 4ml/gal CalMag+ and 2 tsp/gal of Old Age Bloom. All plants new growth looks better and doesn't look like it's traveling up plant. More and more bud sites are popping up. Yellow Marker looks farther along than Blue Marker. End of week 6!
Likes
67
Share
@Ageddd
Follow
Whats up GD !!! ------------- GROWTH------------- They keep growing without problems, but added more micro vita and microbes are eating nutrients too fast, but does not matter as tomorrow im transplanting both plants. I hope taller cheese can eat more, as you can see, lower leaves are yellowing a bit. Wether is not good... cloudy days.. Started the training season !!! :) Used threads to bend the plants. You have to check the roots !! This combination works flawless.. They are more stinky this week, when you touch a plant smells like lemon skunky notes ... ------------- IRRIGATION------------- Watered both ladies, around 0.2-0.3l each one with nutrients. ------------- NUTRIENTS------------- Deeper underground (2ml/l) + Bio-Grow (2ml/l) + Micro Vita. New soil, mixed with Micro Vita + 1 ml/l Green Explosion + 1 ml/l Biogrow + 1ml/l Deep Underground 7l aprox pot --------------------------------------- Good vibes !! _24/04/2018_
Likes
15
Share
@BUZIMAN
Follow
Everything's fine, each one has really distinct flowers and the smell is starting to get quite strong 🤤. They drink plus minus 2 liters a day. I water them once with the pH Perfect mix, another time simply with Green Sensation(1ml/L), and once only with water at a pH of 6.5. I've been doing this cycle since last week with the Green sensation. (I think I could water them more to help them gain weight, but they seem very happy as they are, so I'll continue like this.) 😎✌️