


Likes
10
Share

@Schmucker
Follow
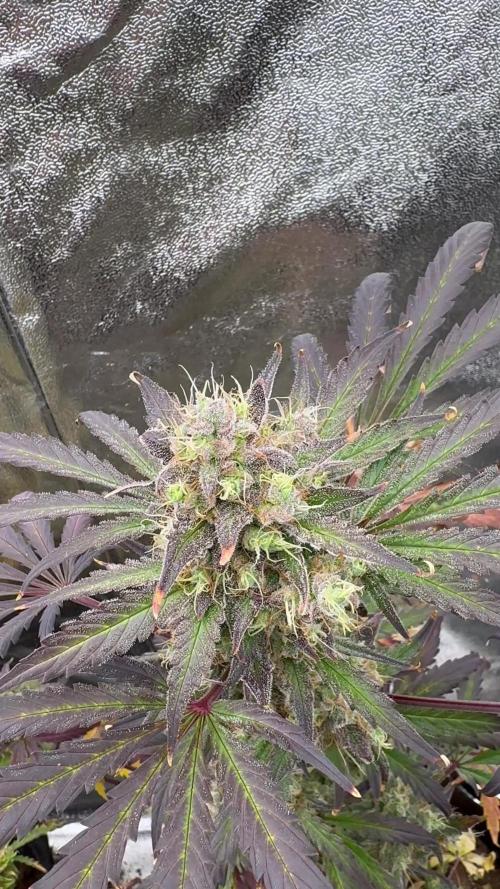
Das purpeln der einen Pflanze ist stark ausgeprägt. Wir gehen in die finale Phase.
Die Trichome sehen echt super aus. Nur noch wenige Tage. Ich bin sehr auf den Ertrag gespannt.

Likes
35
Share


@eldruida_lamota
Follow
Venga familia, va la octava semana de vida y segunda semana de floración de estas Frosted Guava de Zamnesia.
Añadimos la malla de Scrog hace dos semana.
Que color que sanas se ven como se nota que Agrobeta es de lo mejor, las niñas están de 10.
La humedad está en su punto, y por fin puedo controlar la temperatura en 24 grados.
Ya vamos viendo cómo progresan estas próximas semanas y van formándose esas flores.
Os comento que tengo un descuento y para que compréis en la web de Zamnesia de un 20%, el código es ZAMMIGD2023
The discount 20% and the code is ZAMMIGD2023
https://www.zamnesia.com/
Mars hydro:
Code discount: EL420
https://www.mars-hydro.com/
Agrobeta:
https://www.agrobeta.com/agrobetatiendaonline/36-abonos-canamo
Hasta aquí es todo, buenos humos 💨💨💨.
Likes
9
Share


@Hazebuster888
Follow
In der sechsten Blütewoche haben sich die Blüten weiter verdichtet und an Größe zugenommen. Die Pflanze profitiert sichtbar von der erhöhten Lichtintensität und den zusätzlichen Netzen, die für Stabilität sorgen. Das Scrogging hat sich als äußerst effektiv erwiesen, da alle Blüten gleichmäßig Lichlt erhalten und sich prächtig entwickeln. Die Pflanze wirkt insgesamt sehr vital, und die Blütenstände zeigen eine schöne Harzbildung, was auf eine erfolgreiche Ernte hoffen lässt.
Likes
36
Share


@White_Greengo
Follow
The cultivation was very easy and relaxed. I just watched the insanely fast growth and did LTS. 😄
But by my mistake, the plants received a small nutrient burn, at the moment when the plants were at the end of the peak of maturation. This did not do much damage to the plants, but after that the plants were watered with clean water and washed with FlashClean. The inflorescences are dense and have a large number of trichome crystals 👌

Likes
75
Share


@TheFoxFarmer
Follow
While I was away in Mallorca, enjoying the sun and smoking some Sativa Landrace, the girls were given a more simple feed to make things easier for my friend whilst he was taking care of the garden.
The feedings came to around 700ppm (Including 150-190ppm tap water).
As you can see in the video I've been bending her down for a couple of days instead of tying a string to her. It's just a lazy LST that should basically do the same thing.
This Royal Cookies girl has progressed well since her topping and LST. She's a bit stretchy but a few more toppings should make her bush nicely. Every second feed from here on out will also contain Mammoth P for the first time in my garden! 🐺

Likes
18
Share


@BLAZED
Follow
Week 15 (5-5 to 11-5)
5-5
Temps: 18.5 to 23.5 degrees
Humidity: 43% to 61%
Watering: 1000 ml. 1.6 6.2
6-5
Temps: 18.2 to 23.5 degrees
Humidity: 43% to 64%
Watering: 1000 ml. 0.4 6.3
7-5
Temps: 18.6 to 23.6 degrees
Humidity: 45% to 64%
Watering: 1000 ml. 1.6 6.2
8-5
Temps: 18.7 to 23.6 degrees
Humidity: 42% to 60%
Watering: 1000 ml. 0.4 6.3
9-5
Temps: 19.3 to 24.2 degrees
Humidity: 43% to 53%
10-5
Temps: 17.7 to 24.3 degrees
Humidity: 40% to 58%
Watering: 1000 ml. 1.6 6.2
11-5
Temps: 18.5 to 24.9 degrees
Humidity: 40% to 56%
Watering: 2000 ml. 0.4 6.3
Likes
11
Share


@Loud_Jazz_de_Cavolo
Follow
Their first Neem oil leaf drench massage. Their first fertigation or watering.
For the Og kush the third week Biobizz nutrient dose was followed. The only addition to the third week All Mix dosology was the inclusion of Alg a mic. At the above rate + Great white + bactrex. The above list of nutrients correspond to the OG KUSH Allmix schedule and doses.
Fot the amnesia haze the watering had only Bactrex, White sark and Pro symbiotic at the doses listed above. No pH was adjusted nor measured and no EC either.
*03/29 UPDATE*
Since no option given for "breaking down" each strain individually ragarding the Nutrients section I ll update the irrigation/fertigation/nutrient regimen for each week in this section. Each time something changes on the Nutrients section it ll always be the last used doses of nutrients only for the OG Kush strain. For the Amnesia only CalMag treated water will be given in alternate irrigations along with a twice a week bacteria introduction to the system. So, today
both plants got 1.8 lts of RODI CalMag treated water to .340EC with a controlled pH of 6.3. The Amnesia had a significantly higher runoff which I didn't anticipate nor understand but I'll find out why for sure.
Some light LST directional guiding was given to the plants for forming purposes and future canopy levelling.
In the Grow Hut since day one the plants are continuously enjoying the company of Pandit Hariprasad Chaurasia s music. They love it!
*03/30 UPDATE*
The best possible outcome regarding live phytoprotection by beneficial insects for pest control.
As of yesterday I have two unidentified tiny sliders, possibly common garden ones and as of today a Coccinellidae sp. larvae running around the canopy (check the video) Hope for many more of them sweet protectors. Neem oil along with DE has successfully helped in deterring some Gnat "congregation".
*03/31 UPDATE*
Plants are growing strong and vigorous. Some LST done and their new canopy hairdo can be seen in the pics.

Likes
6
Share


@MNGrowBro_Angel
Follow
Pistols are Starting To Show And she Is Very Big and Beautiful And I'm Definitely Getting her Right with the Feeding Cause She Ain't Showing Any Deficiency's I Wish My Cloning Process Worked Sadly Both Clones Died But It was My First time
Likes
Comments
Share

@hassehujasse
Follow
Driving to harvest through German AutoBahn
Aceleramos al cosecha


Likes
21
Share


@Bluemels
Follow
Die Pflanze entwickelt sich prächtig. Nach dem umtopfen ist sie auch gleich auf 30 cm innerhalb ein paar Tagen gewachsen.
So habe ich sie dann auf 16cm runtergebogen 😁
Hat ein paar Tage gedauert bis sie sich an die neue Position gewöhnt hatte. Nun wächst sie wieder fleißig 😍


Likes
4
Share


@Bread_n_Buds
Follow
Our Fruit Punch Automatic are both doing great.
Remember that we are growing 1 Plant worked with the techniques and one left to grow without cutting techniques to preserve its speed.
In this diary we find the plant that is growing straight, just a little defoliation. I exaggerated with the Nitrogen a little and we have some yellow tips, we will use it to explain the problems on Zamnesia, but I did not do it on purpose, it remains a small mistake that if possible is to be avoided. Small if it does not go much further now the plant is taking bloom but up to a couple of days before the photos it took ALga Grow.
The comparison is the salt of the experience so the plant in the other diary will be worked very differently go and see it to compare them.
We have started the Plagron fertilization program, we are in 100% organic configuration, the soil is recycled Promix + 1/3 fresh soil + 10% Perlite + RQS Mycorrhiza Mix (4 g in the mix, 1 g under the small fiber pot).
We are administering // 1 ml/l Power Roots - 1 ml/l Pure Zym - 1 ml/l Sugar Royal - 3 ml/l Alga Grow
We have sprayed Vita Race Foliare 3 ml/l.
https://plagron.com/en
The doubts about the compatibility between Pure Zym and mycorrhizae have been dispelled, they can get along according to Plagron experts. If someone tells you that enzymes eat mycorrhizae, which in principle may seem possible, explain to them that it is not true.
https://www.royalqueenseeds.it/growing/452-easy-roots-mix-di-micorrhize.html
One of the best in recent years with a very high THC level
--------------------------------------------------------
https://www.zamnesia.io/en/10965-zamnesia-seeds-fruit-punch-automatic.html
Brief description of Zamnesia // Sativa strains are very rewarding to grow, but their long flowering times and their greater susceptibility to disease and overfertilization can make them a little more difficult to manage. Also, their imposing heights are less suitable for indoor use and can attract unwanted attention if grown outdoors. However, with the arrival of Fruit Punch Automatic, growing sativa strains at home just got a whole lot easier. Combining Skunk #1, Haze and ruderalis, Fruit Punch Auto is 70% sativa dominant and produces up to 21% THC, along with a delicious blend of terpenes. Plus, it can be grown indoors, outdoors and in greenhouses. With their bright green hues, golden pistils and thick layer of resin, Fruit Punch Auto buds always have a great appeal. When you smoke her, you will be amazed by her flavours, aromas and effects! As the name suggests, Fruit Punch Automatic boasts delicious tropical aromas reminiscent of banana, pineapple, mango and citrus. When you open the jars you will feel like you are in a tropical cocktail bar on an exotic beach. Fruit Punch Auto will delight your palate with pungent fruity notes followed by light notes of Skunk and spice on the exhale. Within minutes of your first hit, this potent sativa will stimulate your mind, leaving you in an energetic and carefree state, ideal for morning or daytime sessions, as well as social settings or creative pursuits.
You can find the entire world of growing on Zamnesia and more, just take a look at the site and you will find "all the best that nature has to offer" in various shapes and colors.
The new strains are fantastic and the old ones are no exception...
The new strains are great and the old ones are no exception... p.s. no Hermaphrodites yet, growers, can you say the same?
--- // www.zamnesia.com
Likes
37
Share


@DogDoctorOfficial
Follow
🌿 Week 7 Veg Report: Terpyz Mutant Mentha de Croco 🌿
Hello, Grow Fam! We’re now into Week 7 of this exciting adventure with my Terpyz Mutant Mentha de Croco ladies, and what a week it’s been! The theme for this week? Patience and appreciation. These girls continue to grow at their own pace, each one showcasing their unique traits and incredible beauty.
Week Recap: Slow and Steady Wins the Race
The girls are still on the slower side in terms of growth, but that’s part of their charm. Each leaf is a masterpiece, more intricate and stunning than the last. Their prayer posture remains consistent—a true testament to their health and contentment in their environment. They may be taking their time, but their vitality and uniqueness shine through every step of the way.
Environmental Conditions: Keeping Things Balanced
This week has been about maintaining a steady environment despite the natural slowdown in growth due to cooler temperatures.
• Temps: Daytime 18–20°C, nighttime 14–16°C. It’s a bit chillier than usual, but these resilient ladies are adapting beautifully.
• Humidity: Stable at 65%, ensuring the girls remain hydrated and comfortable.
• Airflow: Gentle but constant to keep the space fresh and prevent any stagnant air pockets.
Feeding Program: Aptus Holland Perfection
Feeding remains consistent, and the girls are loving the organic-mineral lineup from Aptus Holland. Here’s what’s in their mix this week:
• Regulator: 0.15 ml/L – To strengthen cell walls and increase stress resistance.
• CalMag Boost: 0.25 ml/L – For robust development and prevention of deficiencies.
• StartBooster: 0.25 ml/L – Enhances early vegetative growth and root systems.
The switch to All-in-One Pellets last week has eliminated the need for liquid All-in-One, and the girls seem to be thriving with this natural, slow-release food source.
Watering: A Gnat-Free Approach
This week, I continued with bottom watering. Filling the trays and letting the soil absorb the water has been a game-changer—not just for healthy root development but also as a part of the war against gnats. Paired with yellow sticky traps, this strategy has kept pests in check while ensuring the roots get all the hydration they need.
Growth Observations: Slow but Stunning
• Structure: The slow growth might test patience, but the payoff is worth it. The compact, vibrant structure of each plant is breathtaking.
• Leaves: Dark green, uniquely shaped, and full of character. Each girl is like an artist’s brushstroke—no two alike.
• Praying Posture: Their leaves reach for the skies like they’re soaking up every ounce of light.
Still no cloning or flipping to 12/12 yet, as I want them to grow a bit more before making any big moves. Next week, I’ll decide whether to flip them for a brief period to determine sex or wait until cloning is feasible.
Photography Spotlight: Capturing the Details
This week, I took some time to immortalize their beauty with my Sony A6000 and Nikon DSLR cameras. The intricate details of their leaves, captured through different lenses, reveal their individuality.
📸 Photography Tip:
• Cameras like my Sony and Nikon bring out fine details you’d never see with a phone camera. The larger sensors, interchangeable lenses, and manual controls allow for stunning clarity and depth.
• Macro lenses, in particular, are fantastic for close-ups, like capturing water droplets or vein details in leaves. The difference between these and even the best phone cameras (like the latest iPhone) is night and day when it comes to quality and creative control.
Looking Ahead: What’s Next?
As we move into Week 8, I’m hoping for an uptick in growth speed, but I’m perfectly content to let these beauties take their time. The journey is just as rewarding as the destination, and these girls are proof of that.
Shout Outs & Gratitude
A massive thank you to:
• Terpyz Genetics for these exceptional mutant seeds.
• Aptus Holland for their top-tier nutrient lineup.
• Future of Grow (FOG) for lighting that keeps these ladies praying.
• Pro-Mix Soil for providing the perfect growing medium.
• TrolMaster for environmental controls that make my life so much easier.
• Grow Diaries for the platform to share this incredible journey.
• And, of course, all of YOU—followers, supporters, and even the haters—for being part of this adventure. Your feedback, encouragement, and interaction mean the world to me.
🌟 If you’re curious about the journey, feel free to check out my Instagram and YouTube for behind-the-scenes content, photos, and more!
Until next week, stay positive, stay curious, and as always: Growers Love! 💚
Genetics - Mentha De Croco
https://terpyz.eu/products/menta-de-croco-fern-type?_pos=1&_sid=e9237cbcb&_ss=r
DogDoctorOfficial Discount Codes @ terpyz.eu - DOCTOR 15% off
Nutrition - @aptusholland
https://aptus-holland.com/
Led Power @ F.O.G. Future Of Grow
https://www.thefuturofgrow.com/en/online-store/BLACK-SERIES-600-p489093171
Controls @ TrolMaster
https://www.trolmaster.eu/tent-x
As always thank you all for stopping by, for the love and for it all , this journey of mine wold just not be the same without you guys, the love and support is very much appreciloved and i fell honored with you all in my life
With true love comes happiness Always believe in your self and always do things expecting nothing and with an open heart , be a giver and the universe will give back to you in ways you could not even imagine so
As always, this is shared for educational purposes, aiming to spread understanding and appreciation for this plant. The journey with nature is one of discovery, creativity, and respect. Let’s celebrate it responsibly and continue to learn and grow together!
Growers Love To you All 💚

Likes
11
Share


@cadur
Follow
Whoops, power went off in the shed, plant has been in the dark for 5 days basking in high humidity!
Silly me
Likes
32
Share


@WhiteWidow
Follow
Training and defoliation, plus i decided to transplant two bench plants that were chillin in 500ml cups incase smth goes wrong with the rest but nothing went wrong ofc.
So i transplanted them into 3 galons and supercropped so at least i get somewhat even tops.
Plan is to veg them 7-10 days more and we go into flowering :)


Likes
223
Share


@GERGrowDesigns
Follow
Welcome to week 8 or Flower week 3
The Strains from Sweet Seeds doing Amazing !
4 x gorilla Girl f1
6 x tropicana Poison F1
-Gorilla Tent 4x8 Shorty
-2x 600 watt lights
-20 Liter pots with Narcos Organic Mix
-Narcos organic Nutriets With every water for the Plants
- 2-3 Liter every 1-2 day Each plant
- 28 day temperature
- 55 % Humidity
The plants Stretching a lot . The tropicana more then the gorillas .
Every Plant looks Healthy and im doing a bigger defoliation the next days for Each plant .
Tempartures are betwenn 27-30 and the Humidity about 50-63%
Keep up Growing everyone !


Likes
46
Share


@Daweed83
Follow
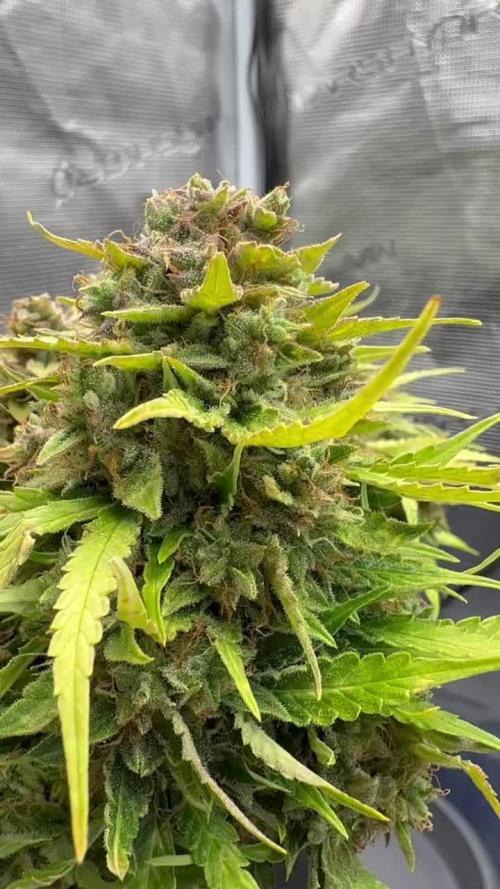
So i’ve learned this week that the plant at the back has “foxtail” buds which is probably due to some sort of light stress. Im not too worried about because apparently the quality isn’t damaged at all. Just very curious on why only one has it out of the 2 peanut butter. Anyway getting closer to harvest. Caaannot wait 😍🙏🏽
🖖🏽🖖🏽
