Likes
Comments
Share
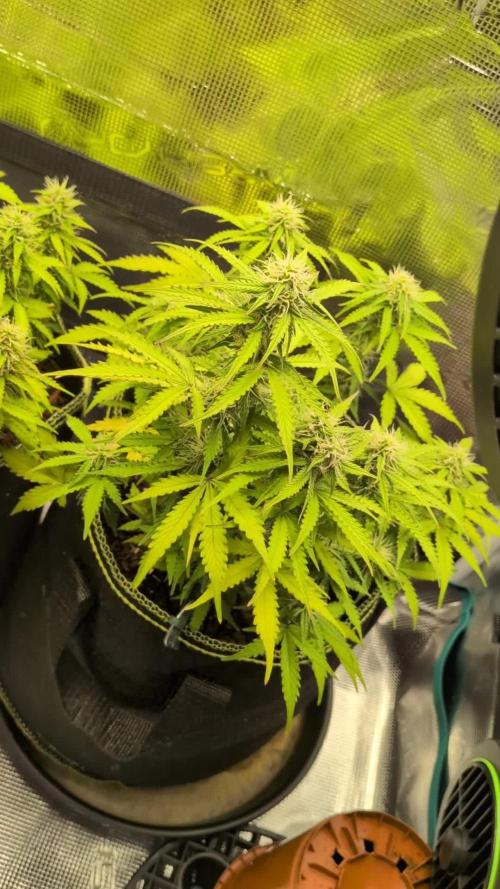
The thrips infection is gone but there’re still a lot of damaged leafs as you can see in the photos/videos, but the growth hasn’t slowed down which is good. Anyway after I did some research into the big bang strain I found out that the company that sells this strain recommends “flushing” for a few days every other week starting from day 16 of flowering. This is meant to speed up bud development and I think it really did something here as the buds got twice as big. But I didn’t exactly follow their recommendations as it calls for watering the plants with large amounts of water and letting the soil dry for a few days and I don’t feel comfortable with that, so I watered them every day but made sure the soil was dry.
Likes
34
Share
A lots been going on 😉 Day 30 of veg for the candyman! All tops now reaching for light and filling out again 😏 I got people telling me what's the point or I'm stupid for doing some stuff I do but that's just me 🤷‍♂️🏼🤣 don't tell me I can't do something because I'll prove you wrong like I did with my last autos 😉 Pretty happy with the training this run. Will Let them grow for about another 20 days then it's flip time Update: looks to be showing early signs of sex I think it's female
Likes
12
Share
Off to the races after the first week of veg. And the girls are looking good. They had about 24-48 hours of transplant shock but have since turned over and look perky. They never fully transitioned and all of em look like they’re turning back around. Definitely starting to see some pheno variation on one of the indicas (F6) - trademark from the Skywalker 100%. A light bluish/purpleish hue on the fan leaves. We’ll see what happens over the next week then probably just pick a day and flip. We don’t need em huge - just big enough to show off dem buds. On the hardware side of this grow, the mods to the dutchy system look to be working well. It just makes plant management easier with a full trough drain as opposed to individual drainage holes. Really, the system isn’t a concern for the most part. It’s proven time and time again how manageable a recirc system can truly be. Scaling down to smaller pots and more plants has also been a revelation of sorts around here. We used to grow monsters and now the aim is strictly proportional yields across a wider array of genetics. Been a great trip so far🤟. Couple more boring weeks of veg. And as soon as the breeding tent is cleaned up and pollen free - it’s go for blast-off👍. Background This cycle of clones represents all the potential of this F1 line of WalkerBerry OG. Bred by myself over the last couple of years. This genetic shows excellent hybrid vigour, incredibly stable nutrition requirements to date and an eclectic mix of long and short internodal spacing bu specimen. We know we have indica and sativa dominant traits spread evenly across the 6 available clones. Now it’s just a matter of seeing them run out under controlled and pollen free conditions. We’ve labelled each plant and it’s resulting seed accordingly. Once we get to the F2 run, we’ll hopefully be able to isolate down to 2-3 phenos if the bud is any good. From there, who knows. It’d be great to get to a finished, stable generation that would be fem worthy but that could be a very long way off. For now - we’ll focus on this line and see where it goes🤞🤞.
Likes
15
Share
I love this new diary app! Getting to document each and every grow, makes it easier to improve the next time. If this website continues to gain more and more growers, I think Grow Diaries might be the goto site for uniting together growers from all over the world.
Likes
12
Share
@Kakui
Follow
Flower32, riego con 6.3 pH y EC 2.8, las plantas tienen cogollos muy grandes y densos comparado con el cultivo anterior, a simple vista pareciera que tendré una cosecha más grande y en menos tiempo, quedan entre 3 a 4 semanas todavía, si que queda bastante tiempo para que sigan engordando.
Likes
283
Share
FD43 - We're off into the seventh week of flower and we're in the homestretch. There's amber in the trichomes but I'm still seeing quite a bit clear so it will take a little while before the girls are done. FD45 - Pics FD47 - Pics FD49 - The end of another week and we're getting closer to chop.
Likes
22
Share
@NoVC01
Follow
8/23/2025 Still Feeding Week 4 extended of feeding schedule. Pinching off the mite damaged leaf and some of the fans needed to go. Daylight has entered 13:59 hours. Waiting for front left plant to show sex. The other five have shown female, and unless my eyes are out of focus have a pistil or two at the top. They are starting to stretch. Waiting on Pre-Flower. I'm inclined to think because these are modern hybrids, they might be genetically bred for the 12/12 flip. Just a thought. If they pop by September 8th, I should get a decent flower stage. Looking for 1st week October for harvest. Season is beginning to change. A few months appeared yesterday. Sprayed entire garden with AzaMax and that should hold until the end. The moths bring the budworms. I do have one big grasshopper that hangs out. He fly's away and laughs at me everytime.
Likes
38
Share
@Suprmoux
Follow
This week I harvested these two Quebec Black Bud, it was really a great experience. Its unique appearance and these colors charm us from start to finish. Calm in vegetation but surprises us in flowering. I can't wait to see the final product 😇 Harvest : Pheno #1 day 56 flowering 119 total Pheno #2 day 60 flowering 123 total Training : They have received my hand manipulation since day 8 and this every day to force them to grow bigger and stronger until the addition of the scrog. I started my base again on a manifold. For now I'm having fun like that, let's see later 😁 I'll leave you with these beautiful photos and come back to you later. After drying and curing I realize how the color is an intense purple almost black, The genetics are not called Quebec black bud for nothing. the buds are really compact, I know that with the auto pot system I give myself a chance that they will be denser but I believe that hard training leaves its mark.
Likes
5
Share
Son fotos y videos de múltiples cultivos debido a que nunca e realizado un seguimiento como tal, espero realizar uno ahora! Nutrientes Utilizados en general Trybac y Trypack biobizz. Las criticas siempre serán bien recibidas!😋 Espero les guste el contenido!
Likes
42
Share
@AsNoriu
Follow
Day 21. I post one day earlier, but its a huge week for them. Cleared space, install chicken wire fence. Added worm castings, epsom salt, mono potassium, calcium nitrate , Great White, Biosys and hope they will be ok. Next visit in two weeks. Root system was good, couple girls had mini root bound on the bottom, so timing was perfect ! Sherbet was strongest, purple haze weakest, both Apples were ok too. Happy Growing !!!
Likes
Comments
Share
@Raster893
Follow
Entramos hoy en su 4 semana de flora y hemos realizado una poda de bajos, reducido el tiempo entre riego y riego a 2/3 dias entre uno y otro. El uso de Acti-Vera muy recomendable la verdad es que hace magia en tus plantas.
Likes
34
Share
So there were a couple little things I did to the tenth I removed some of the very low but that we're definitely not getting anywhere close to the canopy in fact they're only sticking up about three and a half for in above the trellis net so got rid of those guys and I moved the air conditioner Inlet to the top of the tent other than that the girls are doing really well
Likes
15
Share
Topping was great ! Starting now with LST using a wire but gently don’t want to harm the plant they opened up pretty good 🙏🏽 I am increasing water by looks.
Likes
8
Share
@Kirsten
Follow
16.4.25: As mentioned last week I top dressed with a mix of canna terra plus dry amendments. The soil is very waterlogged and, as a result, has started to grow some mould/mildew on the top layer. I decided to scrape off as much mould as I could, then redress by mixing in some coco and perlite. This should aerate the soil, and prevent the water retention becoming excessive. 23.4.25: I hope everyone had a great 420! HulkBerry has grown significantly since last week. She is now exceeding the perimeter of the 8 Gallon pot. The leaves are looking good to me. It's not too dark, but still luscious in appearance. I have barely given any water, as unfortunately I had overwatered when I top dressed. The top dress was not my usual substrate and, unfortunately, ended up growing mould on the surface. I removed the top soil to take away the mould. Then I replaced it with 2 Inches of Canna coco and perlite 60/40%. I did not add any amendments to this. Nutrients; Cal-Mag amino acids and Ecothrive Biosys. I watered 2 litres yesterday, and today, I am going to LST for the 1st time. It needs to be done ASAP now, before she begins to flower. I'm just aiming to open her up and keep the tops at an even height. I'm happy with this plant her structure is lovely, and uniform. Which I hope to maintain. Thanks for checking out my diary and hanging out 🍃✌️💚😊🌱
Likes
31
Share
@Pedrojuan
Follow
Bueno esta semana se sube el EC a 0,8 aprox. Probé a hacer un corte apical ( no sé si lo hice bien 🙁) y una defoliación, si todo va bien la próxima pasamos a floración. Esperemos resistan mis torturas, pobrecitas!🙏 Esta semana fue bien, soportaron los cortes y se recuperaron bien, mucho olor a vegetal....🌲🌲🌲🌲👌
Likes
38
Share
Utopia Haze is a rare heavily sativa dominant hybrid (90% sativa/10% indica) strain created through back crossing Brazilian Sativa strains. This tasty little bud took home 1st Place for Best Sativa in the 2008 High Times’ Cannabis Cup and for good reason – with its potent 18-22% average THC level and long lasting cerebral effects, Utopia Haze is one powerhouse smoke. The Utopia Haze high comes on soon after you finish your first toke, hitting you with a strong cerebral lift that infuses you with a sense of hazy relaxation. Type: Feminised/Photoperiod Cultivation: Indoor/Outdoor Flowering Time (days): 70-75 Indoor Yield (g): Up to 650 Feminised Outdoor Harvest Month: October Feminised Outdoor Harvest Month Week: 3rd-4th week Aroma: Citrus, Woody, Pungent, Mint Effect: Cerebral Lift, Hazy Relaxation, Sleepy Welcome Everyone to the Final Entry of my Utopia Haze Grow ! There is so much to discuss ! I have been extremely busy as of late trying to get this Harvest together, but i am happy to have it here for you now ! I Seriously under estimated the amount of time, help from others, and my own necessary skills to pull this off.. and i still kind of screwed it up lol ! But its worth noting i have never actually done this before and trying to document it during....was extremely hard. It is next to impossible to work an iPhone with rubber gloves on ! First I want to discuss everything step by step so before you jump straight into the comments on how the end product is so small in "quantity" Rest assured i am happy with its"quality"...and thats all that matters to me because Life is a journey not a destination! and i have learned so much from this grow that I couldn't be any happy even if i messed some things up :) But at the very least I hope you read through this entry in its entirety with an open mind and focus more on the process, rather than just the outcome! I ran out of Ice & i was only able to wash three times..(normally I've heard you should go sometimes 5-6 washes) Preparation is Key & things will be much better next round :) Photos 1-22 These are pretty self explanatory but for those of you just tuning in now.. this is what happens to a very happy plant when you don't have the necessary tools to monitor key components of growing cannabis.. Ph, as well as EC levels play a very key role in the outcome of your grow lol that being said I was just able to save this plant by purchasing both tools but that doesn't mean the plant didn't suffer because of the prior events.. This was a Huge reason behind me choosing to turn this harvest into what i would consider "Solventless Hash Rosin" from "Ice water extracted Bubble hash". Pictures 23 The idea here is the process of using "fresh Frozen Cannabis" this has been discussed many a time online on such sites as instagram and here on grow diaries as well.. I personally have Never tried the process so i decided to try it out and make a judgement for myself.. Video 24 The Cannabis has now been in the freezer for 72 hours making it very well frozen.. as you can tell i struggled getting it all into the 25u Screen Wash Bag. One thing of note i would do differently is i will de-stem my next batch as i also believe this played a part in the amount of plant matter that escaped through the sieves. Photo/Video's 25-28 The idea here is "ice water Seiving" & especially with the bags that I am using here that are only have screen material on the bottom portion of the bag it is very important to have spaces in-between the screens to allow the water to pass directly through the screens into the bottom bucket with the least amount of resistance.. because the hash is so extremely temperature dependant if it gets warm on the side of the bag.. it will stick there and not make it to the bottom to become use able product.. 29 You do not need to use as much Ice as i used here lol... the idea is to keep everything very cold..i certainly achieved that but at the sacrifice of using so much that i ended up grinding product and producing "contaminants" but in the end they are just plant matter that i would be smoking when i rolled up my joint either way so.. I'm not super disappointed.. But it should be noted that what you want to achieve here is a Layering effect where you have the wash bag between two small layers of ice while the "water current" washes the Trichomes away allowing them to be separated by the screens setup below :) Before Starting the machine you should allow some time (i.e.;10-12minutes pre soak to allow the product to become saturated) before the first cycle. By video 32 I have just ran out of ice lol.. Video 33-34 Here I have a tip for you.. to separate the screens that you sieve through.. cut 5 gallon buckets to stretch them across nice and tight.. it'll make scooping your Bubble that much easier ! i learned this from the many "Frenchy" videos I have watched :) Picture 35 Here in lays the problem for most people.. drying your hash without loosing vast amounts of "Terpenes" whilst also stay ever vigilant against mold ! Thanks to all those videos I've watched on youtube.. id like to think this was one of my most successful parts of this process.. Things to Note; Terpenes start to seriously evaporate at temperatures 68F or 20C you need to stay as cold as possible whilst bringing the Relative Humidity in the space down into the 40-30% to stay away from that nasty mold ! I used my cold storage room in the basement.. with a dehumidifier running to keep the space at 45% RH & staying at a constant 15c. All while spreading the hash as thin as possible across parchment paper, on top of the white screens with a fan moving air across both sides of the paper. Pictures 36-38 These are some macros i took in the middle of my drying session I fell in love with the colour. Yes i know the black spots are plant material but they will get caught when i bag the hash & squish the oil out. Thing to Note; at this stage it is important to ensure you 'micro plane" the hash down as fine as you can whilst staying weary of the temperature... any "chunks" will hold pockets of moisture.. that lead to potential problems..ie; mold ... Picture/Video 39-41 Successfully planed bubble hash ready to be bagged and Squished ! Picture 42 Ive decided to follow Pedro.. from Pedros Grow Room and double bag to be on the safe side so i don't have any blow outs. So thats One 25u bag inside one 160u bag ! :) Pictures 43 This is almost 3 grams of the bubble hash from above, already melting in the bag.. this is where i ran into trouble again lol things started getting to warm in the house and i was only able to get one of the three squish's i did on video :( things started getting sticky. Picture 44 This is basically just a photo of the equipment I'm using; 3x5 LowTemp Cage in the frame I built myself, with a 20Ton bottle jack. Something to note here is this is an older Lowtemp model with only a single heating zone which is which i have it closed here heating Both sides of the press :) As well as the importance of having adequate pressure on your plates.. my rig is very overkill for the size of hash bags..lol Video 45 Here is the lovely press video.. its didn't quite work the way i wanted either lol my directional folding wasn't quite tight enough for a big "drip" :) &the Press was set to 65°c Photo's 46-50 are pretty self explanatory :) I had a blow out.. but still managed to pull an 80% return from the hash once squished...& yes it tasted amazing :) Was it worth it in the end... that could be debated.. for some..i understand..its not your thing, but for those of us that are interested in making our own concentrates.. free from Solvents... I wouldn't make it any other way :) If even ONE of you reading this diary finds it helpful to reference for ANYTHING.....even if its "what not to do" ill consider it a success ! Thanks again for tagging along on this garden adventure.. its been one heck of a journey ! Much Love from B.C. Canada, Until Next time, Cariboo
Likes
14
Share
En el centro de Chile hay una ola de calor donde las temperaturas llegan a las 34°C. Las plantas están resistiendo el calor y la baja humedad. El riego ha sido más frecuente.
Likes
62
Share
@nonick123
Follow
Día 71 (30/12) Christmas holidays. Only watering Día 72 (31/12) He recibido mi nueva lampara Mars Hydro FC1500 EVO Led Grow Light (2024 NEW FC 1500-EVO Samsung LM301H 150W LED) - https://marshydro.eu/products/fc1500-evo-led-grow-lights/ - https://www.amazon.de/dp/B0CSSGN5D8?ref=myi_title_dp Procedo a instalarla, de modo que tengo la tienda de 120x60 cm perfectamente cubierta con las DOS (2) lámparas FC1500 EVO Es ideal tener dos lámparas, porque así puedo ajustar la distancia a la lampara en función de la altura de capa planta Ajusto ambas lámparas al 75% de potencia (Total 225W), que es más que suficiente para cubrir el área de 120x60 cm Día 73 (01/01) CBD Auto 20:1 #1 - Muestra una ligera deficiencia con algunas puntas de las hojas dobladas hacia arriba y clorosis... Creo que le voy a dar otra ración de BIO PK 5-8 OG Kush Auto - Está apilando cogollos de forma brutal. Increíble el olor y la cantidad de tricomas que está formando 😍 Día 74 (02/01) CBD Auto 20:1 #1 - Se empiezan a formar tricomas entre los incipientes cogollos OG Kush Auto - Una pena que se haya intensificado la deficiencia de CalMag... en las hojas, porque los cogollos son gordos y densos, y cubiertos de tricomas Día 75 (03/01) CBD Auto 20:1 #1 - Voy a darle un boost para las 4 semanas que le quedan hasta la cosecha con SILICIUM FLASH Hago un pequeño agujero cerca del tallo, espolvoreo 25g de SILICIUM FLASH en el agujero, lo cubro de tierra. Riego con una solución de 2g de BACTREX por litro de agua. OG Kush Auto - Impresionante densidad de los cogollos que empieza a doblar las ramas 😍 La ventana de cosecha se acerca! 💥 Día 76 (04/01) CBD Auto 20:1 #1 - Investigando me doy cuenta de que lo que le pasa es quemadura de luz, ya que la parte externa de la planta sufre clorosis, y la parte interna (donde no alcanza la luz) está completamente verde Ajusto la lampara sobre esta planta para 40 DLI OG Kush Auto - Sigue poniendo los cogollos duros como rocas y muy llenos de tricomas! 😍💥 Día 77 (05/01) CBD Auto 20:1 #1 - On going OG Kush Auto - Empieza la senescencia en las hojas de abanico, acelerada por la deficiencia de CalMag... que ha tenido. 💦Nutrients by Bio Tabs - www.biotabs.nl/en/ 🌱Substrate PRO-MIX HP BACILLUS + MYCORRHIZAE - www.pthorticulture.com/en-us/products/pro-mix-hp-biofungicide-plus-mycorrhizae "GDBT420" 15% DISCOUNT code for the BIOTABS Webshop https://biotabs.nl/en/shop/ With 2 x Mars Hydro FC1500 EVO Led Grow Light (2024 NEW FC 1500-EVO Samsung LM301H 150W LED) - https://marshydro.eu/products/fc1500-evo-led-grow-lights/ - https://www.amazon.de/dp/B0CSSGN5D8?ref=myi_title_dp