
Likes
Comments
Share


@TheCannaProphet
Follow
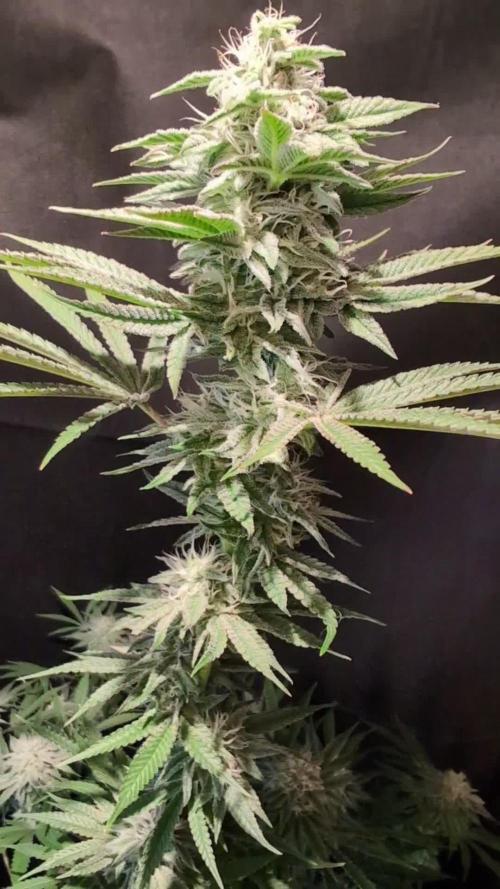
~Humboldt Seed Co. AMHERST SOUR DIESEL~
???Secret origins???
The mystery of the unknown🧐
Amherst Sour Diesel is a cannabis seed whose origins are kept a secret. This wonderful vigorous marijuana plant will reward your work with large, elongated, compact buds complemented by a rich complex aroma. Indoors it performs best with a short growth and outdoors, in temperate, warm, dry and Mediterranean climates or in a greenhouse. A marijuana plant that boasts balanced properties.
-Top-notch flavor and effect
-Idyllic feelings to treat the senses
-The aroma of this cannabis hybrid is a pleasant combination of ripe fruit and oil. The flavor is rich and complex, with hints of tropical fruit, oil and exotic wood.
-The effect, typically Sativa, is euphoric, uplifting, powerful and long-lasting. A cannabis strain Sativa lovers will know how to appreciate.
________________________________________________________________________________________________________________________________________________________________________________________________________________________________________________________________________________________________________________________________________________________________________________________________________________________________________________________
Tech Specs:
~Amherst Sour Diesel~
Feminized
Genotype: 20% Indica / 80% Sativa
Cross: Chemdawg x Amherst Super Skunk
Suitable for: Indoors and outdoors
Indoor flowering: 65-70 days
Indoor yield: 400-600 g/m2
Outdoor harvest time: Late October
Outdoor yield: 2000-3000 g/plant
Outdoor height: 2-3 m
THC: 27%
CBD: 0.1%
________________________________________________________________________________________________________________________________________________________________________________________________________________________________________________________________________________________________________________________________________________________________________________________________________________________________________________________
THE SETUP:
~Planted into Jiffy Peat Pellets that were hydrated with de-chlorinated water with SuperThrive added then ph'd to 6.0 @ 80℉
~Grown 100% organic in 10g fabric pots with Mother Earth 70/30 Coco/Perlite medium amended with 2tbs/g of Down To Earth 4-4-4 / 2 cups/g of Earthworm Castings / 1tbs/g of Dr. Earth Flower Girl 3-9-4, 1tbs/g of Dr. Earth Bat Guano, 3/4 cup of Down To Earth Azomite and 1 tsp/g Down To Earth Fish Bone Meal.
~24hr light cycle during Germination / 19/5 light cycle for Vegetation and 12/12 for Flower
~Straight water ph'd @ 6.2-6.8 when needed and weekly Compost Tea's.
________________________________________________________________________________________________________________________________________________________________________________________________________________________________________________________________________________________________________________________________________________________________________________________________________________________________________________________
WEEKLY UPDATES:
9/20- 💥BOOM!💥 Week Six of flower is here and my girl's in high gear, stacking her flowers and pumping out trichomes!
Today I watered her with 1.5g de-chlorinated water with 5ml/g of Botanicare CalMag+ added, then ph'd to 6.2 @ 72℉. I turned her pot and plucked a couple of yellow shade leaves...the basic daily maintenance.
9/22- I didn't water her yesterday as she looked great and was 'praying' hard. Today she was given 1.5g of de-chlorinated water which was ph'd to 6.2 @ 72℉ which I gave her through her drip pan (bottom chuggin) and I also gave her pot a turn.
She continues to have a great deep green color that is beautifully contrasted by the snow white trichomes piling up on them! Her height has not really increased but she is extremely bushy with tight node spacing which will necessitate plucking some leaves to keep the light penetrating into her canopy.
9/24- We're getting close to wrapping up Week Five of flower in a couple of days and she'll be past the half-way point with the most exciting weeks yet to come!
I didn't water yesterday and today I went ahead and Top Dressed her with 2 tbsp/g Dr. Earth Flower Girl 3-9-4, 1 tbsp/g Dr. Earth Gold Premium 4-4-4, 1/2 cup Down To Earth Bio-Fish, 1/3 cup Down To Earth High Phosphorus Bat Guano and 2 cups of Worm Castings.
I watered in the Top Dress with 1.5g of de-chlorinated water which was ph'd to 6.2 @ 72℉ and let her enjoy her meal! 😜
9/26- After her heavy watering on the 24th I didn't water yesterday and when I checked her today at 'lights on' and she still had some weight to her pot and her leaves were praying hard so I held off on watering today and will hit her tomorrow with her usual 0.75g watering.
~Thanks for stopping in! Things should be getting a lot more interesting in the coming weeks...Stay lifted and be Blessed! 😎🙏~


Likes
3
Share


@MrGrOH1008
Follow
Alots transpired but not really lol. Chopped 3 so far for being male and as you can see this week I may (99% sure) have another male. I’ve given one light feed of Cronk grow, kelp me kelp you, and some cal mag.
So looks like I’ll be taking 3 into flower which is all I wanted to know before spent too much effort and time on em. Prolly transplant the 2 smaller ones this week and just continue to wait it out.
I know next time I could wait a few weeks before popping new beans if they’re regs atleast…
Likes
64
Share


@Roberts
Follow
Do-Si-dos auto has grew well. She has a strong fruity, citrus aroma. Smells really good. The colas didn't get super big, but looked to be very frosty and dense. This is my first time trying this famous strain. It looks like it will be really good. I never had any huge issues during the grow. I also didn't juice her with nutes like I normally do to others in flowering. I am curious to test the results once I get her processed. Thank you Zamnesia seeds, Athena, and Medic Grow. 🤜🏻🤛🏻🌱❄️
Thank you grow diaries community for the 👇likes👇, follows, comments, and subscriptions on my YouTube channel👇.
❄️🌱🍻 Happy Growing 🌱🌱🌱
https://youtube.com/channel/UCAhN7yRzWLpcaRHhMIQ7X4g

Processing
Likes
31
Share


@BucketBrother
Follow
Hi all and welcome back.
This is week 9.. its been an easy journey so far despite she is not as tall you guys hoped, but for the bucket it is awesome! Learning from this experience, should have added side lighting and the little fan i installed was not meant to spin around the clock..
But still im happy. Good colour and she is very sticky.. and the smell hmm.
Will edit along the week, stay updated!
Edit: sadly i had to remove 1 top because of rot..
Edit 2: day 62 end of the week. Made my first video to give you an all good view!
Thanks for watching :)
Grtz- BB

Likes
2
Share


@GreenLupinCWB
Follow
Terceira semana de flora, começando a feder ,tricomas surgindo e começando a engordar.


Likes
17
Share

@GoodTimesOrganics
Follow
Hi liebe Community and Welcome Back! 🌿💚
Willkommen zur sechsten vergangenen Blütewoche!
Hier im Weedefix Grow, erreichen wir aktuell eine höhe von 142cm. Und eine Breite von 62cm.
Beide Pflanzen sind gleich hoch.
Es zeichnet sich ein durchgängis schönes und gesundes Wachstum ab.
Die Pflanze reift nun ihre Blüten aus und es ist eine richtige Trichomexplosion zu erkennen.
Das Icing zieht sich bei diesem Pheno stärker durch, dafür ist die Blütenstruktur etwas kleiner.
Das Aroma der Pflanze ist etwas chemischer/ skunkiger als bei der anderen.
Die Umgebungsgegebenheiten sind aktuell gut:
—————
🌞 Temp: 27
🌚 Temp: 18°C bis 19°C
💨 RH: 56%
VPD: 1,00kPa
💡ppfd: 830 mpm
—————
Viele Grüße 👋
Likes
2
Share

@PhinolaGreen
Follow
5. Woche
Ja läuft gut 😃 👍🏻
Stimmt alles von den Werten, das Mainlining ist auch fast durch, finde sie sieht echt toll aus 😁


Likes
13
Share


@Killer_Grow
Follow
This week the plants were not in shock when switching to a larger pot.😬
The red spider (tetranychus) is attacking my garden😠
Within 1 week, I applied compost (for rabbits). silica, aloe juice, alfalfa, moringa. Enzymes from seeds, corn kernels, green beans, and rice seeds.😈
I made a net for the tree in the hope it can go through holes (10cm-10cm). I prune the branches that I want them to spread evenly over the net👽
Thank you for watching please leave advice at the bottom yo👺


Likes
51
Share


@eldruida_lamota
Follow
Bueno resumiendo cookies gelato es una variedad híbrida muy fácil de cultivar pero ojo, cuidado con los últimos riegos si no queréis perder cosecha por moho. Lo demás de 10 pegada heavy sabor increíble, cogollos duros como rocas y bañados de una gran capa de polen.
El ambiente del secado se mantuvo en 23 grados de media y la humedad estuvo por debajo de los 45% en todo momento.
Poco más la verdad estuve encantado de poder cultivar una genética tan potente .
Un saludazo que paséis un final de año increíble y por supuesto buenos humazooos💨💨💨.

Likes
121
Share


@ctm_dzagi
Follow
It should be noted that with the current share of blue in the spectrum, the sprout does not stretch at all, I will probably adjust in favor of red in the coming days

Likes
11
Share


@4_Pro2Bono_0
Follow
These ladies did'nt stretched much so far in week 2 but that could be due to the light intensity and distance I had it at in week 1 of the stretch period. This strain is really starting to show signs of that Gassy, Sweet, Creamy smelly that I was looking for and so far these ladies have been a breeze to grow.

Likes
17
Share


@Solarcradle
Follow
Highest center cola is 21" tall and rest of the canopy averages about 10"... LST included


Likes
11
Share


@Paradox_1ste1
Follow
The plants look very healthy and they have big and dense buds , ill havr to wait anothe week or cuple days until harvest even tho it may be a bit soon for it. One of the plants has started to root its top head of the buds , but i soupose its because of the temp . The air is getting dry cuz of the hot weather even tho im using 250w-400w lights on them . Trichromes look preety good and the bud is frosty . Some of the plants are not ready yet for some reason so i think i have to give them a bit more time
Likes
18
Share


@Cannaguy
Follow
This week I spent a little more time indoor since I finished up with the outdoor ladies. I should have noticed sooner but #2 turned out to be a male! I’m not going to kill the plant, I would actually like to collect the pollen and use it for seeds. Instead of allowing the plant to pollinate the entire grow tent I will grow the plant outdoors where it will hopefully develop enough for me to collect the goods. The three plants remaining have all shown great health up to this point and have begun to show their first buds. One of the Peach Maraschino is also beginning to show a beautiful purple color in the leaves without drop in temperature which leads me to believe this could be a very colorful pheno!
Likes
9
Share


@High_Grade_Dadli
Follow
She ready to harvest ...the focus is the other two now.. the same stain look very promising now she getting into flowering branches are turning a bit purple.....just have to watch the purple paralysis n see wat she becomes
Likes
37
Share


@GrownwithLED
Follow
In week 10 all remaining plants developed well, they have a healthy green color and grow copious amounts of new flowers every day. The trichome production has been going strong as well, therefore the plants start to smell stronger than before. The BLUE-MINT plant from Mountain High Seeds is going strong... she grows so many trichomes it has started to build so called RESIN RAILS on the fan-leaves...so AWESOME to see! 😍 The tallest plant is the Strawberry Sour-Diesel from OriginalDevilHarvest-Seeds. Even after being supper-cropped she grows taller every day! She also developes FAT and DANK buds on all branches with a HUGE AMOUNT of trichomes. The smell of this plant is VERY LEMONY, its so fruity and mouthwatering, I cant wait for her to be finished. The Serious Happiness from Serious Seeds does well, she also has big buds with lots of trichomes. The SNEEZE from Cnnbs.nl and Seedstockers is doing GREAT! She has a tremendous amount of trichomes on her buds, and has fat colas on all sidebranches.
The nutrients from BIO NOVA work VERY WELL...all plants are doing GREAT.
At this stage of flowering the SANlight EVO4-120 LEDs are dimmed to 100% and hang at 30 cm distance of the top of the plants. My genetic treasures LOVE the intensity and spectrum of those LEDs as you can see in the pics.
Unfortunately I spot some traces on my leaves and discover some THRIPS on the backside of my fan-leaves. This insects eat away on the plant-sap and can decrease your harvest, if the infestation gets too much. Therefore I immediately order some bags with predator insects against THRPS from KOPPERT and hang them on each plant. These predators are the natural enemies and will eat the THRIPS from my plants.


Likes
11
Share


@growerflowerweed
Follow
bueno hemos iniciado el dia de hoy con un transplante final de cada de estas niñas las he transplantado a un sustrato propio hecho por mi con los suficientes minerales y propiedades para qeu este cultivo sea una locura , solamente estoy con pulverixador
