
Likes
Comments
Share


@DniceWJ
Follow
Day10 I started my first large feeding today I’m using the basic general Hydro growth chart my LSD seems to be growing very well I have no complaints today we transfer from the small pot into a 3 gallon Hydroponics tank Day 11 after the large feeding on yesterday She looks great.

Likes
43
Share


@deFharo
Follow
Bienvenidos cultivadores de marihuana clandestinos, y también, a los que tienen la fortuna de no serlo!🖐️👨🌾
Catorce semanas de vida para esta planta hija de una Reina, nacida en casa y ahora cultivada al calor del hogar, cinco semanas en horario de floración 12/12h.
La planta avanza sin distracciones, se esfuerza en deshacerse de las hojas inservibles, mientras las colas sobresalen, ahora estamos a la mitad del juego, puede que a la planta le queden 4 semanas más, y en este tiempo espero ver triplicado el tamaño de las colas.
Esta semana le he dado dos comilonas (EC: 1.8) con mezclas variadas de Bio Nutrientes, el consumo de agua es muy alto la maceta air-pot lo favorece, riego profundamente cada 3 días, pero por otro lado y a pesar de que las macetas air-pot son buenas macetas, no voy a cultivar más en ellas, porque es complicado y lento regarlas, además, ocupan demasiado espacio con respecto a los litros de tierra que contienen, y yo ando muy escaso de espacio.
Estos días alimentando la planta con mezclas variadas de Bio Nutrientes y a la vez alimentando la tierra con nuevas capas de mulch que traigo de las hojas desechadas por la propia planta, las trituro y las añado al sustrato, estas hojas todavía verdes han demostrado que es un excelente hábitat para la proliferación de la microbiología aeróbica, actualmente todo el mulch de mis cultivos tiene un tacto grasiento, esto es la señal inequívoca de la humificación de la materia orgánica del mulch, además, esta semana he añadido como enmiendas secas harina de huesos (Ca, P...) y Guano de gusano de la harina o mealfrass (P,K, Mg...), este guano para mi es excelente, pues promueve como ninguno la proliferación de la microbiología y es de más fácil digestión que los clásicos guanos de aves o murciélago, también tengo una fórmula donde he solubilizado este guano con Microrganismos de Montaña Activados (MMA) y Pasto Fermentado, demostrando ser un compuesto fantástico para reavivar cultivos perezosos.
Hasta el próximo año...
SALUDOS Y SALUD A TODOS!!
Hasta el próximo año...
SALUDOS Y SALUD A TODOS!!
================================
Semilla obtenida el año pasado de la planta original, probablemente un retro cruce S1, un paso más hacia la auto suficiencia total en cultivos de marihuana! Mira el diario original: https://growdiaries.com/diaries/146971-grow-journal-by-defharo
Info de la cepa original: https://en.seedfinder.eu/strain-info/Queen_Mother/Delicatessen/
Floración: 8 semanas
Queen Mother es una cepa sativa estabilizada, gracias al minucioso y sistemático trabajo de selección y mantenimiento de la cepa, que el breeder Mario Bellandi, afincado en España desde hace más de 30 años, desarrolla sin descanso y con la máxima coherencia.
El cruce inicial de esta cepa, y que hoy permanece intacto, surgió a finales de los 90 entre una sativa desconocida, cultivada en los altos de Tarragona (España) por la misma persona desde los años 60, unas semillas de la isla de Reunión y semillas de un cruce estabilizado de dos landrace congoleñas...
==============


Likes
10
Share


@Fat_Olsh_Farms
Follow
Forming a nice cross shape. Filling out nicely
Don't forget to pH up if you decide to try the maxigro. I use it every other watering, watering slowly until 10-15% runoff
Day 33 super cropping like a boss.

Likes
8
Share


@DabNinja710
Follow
5/3/2020
this is my first grow. Today I took the seedlings and put them in there pots.
Tomorrow ill start the lights.
I added...
2 tsp Big Bloom
¼ tsp Holy Mackerel
1 tsp Boomerang
5/4/2020
I just checked on the seedlings. There both already popping there heads out of the ground already.
5/5/2020
Turned the light on for the first time for this grow and for the first real time ever.
5/6/2020
The first real leaves have sprouted.
Also gave her
¼ tsp microbe Brew
¼ tsp Kangaroots
1 tsp Kelp I kelp you
5/7/20
As per advise. I'll be adding only water for the next couple weeks. Ph to 6.5ish.
5/8/2020
I watered with PH'd water around 6.4PH. it seems like it hasn't grow much in the last couple days. The G.G. us already starting to grow its second set of leafs. Wich the Zkittlez isn't. I just hope I didn't fuck anything up. I know there two different Phenotypes. (strains) I know I shouldn't be going off each other. But it's something I'll add just for the records of them growing.
5/9/2020
I'm just going g to start off saying I think I'm over watering my plants. Im watering every 3 days or so. I also think I may have stunted my life one. I really hope its me bing a noob and worrying to much. It would really suck to have to kill it cause of something I did. Maybe its too many nutes. Idk but I'm going to just water with allot less regular pH'd water. And let it dry much more between watering.
5/9/2020 (#2)
Here's an extra entry for the day.
I have the exaust fan just blowing into my room.... until today!
Its going to be summer very soon. And with that comes a ton of heat. Now my place isn't that big and it gets hot and I mean like 95⁰ inside when it's 75⁰ outside. I do have A/C's that's an added cost. I didn't see spending all this money to grow and not set it up properly. A few days ago I woke up late and some how in got to 95⁰ in the tent I was lets say not very happy about it. And I know its going to happen again unless I do something about it..
So what did I do about it?
I installed a dryer vent to vent the hot air to the outside. With a summer/winter box. To eather recycle the air or blow it outside. I also ordered a Ac Infinity cloudline t4.
I'm also going to be making a board with a place to put the led drivers out of the tent if need be. And have a place for the T4 monitor/control.
Likes
60
Share


@MrSpooky882
Follow
Also was kann man abschließend sagen, ich finde die Sorte echt sehr sehr stabil und robust, verzeiht auch Fehler 😅🙊😁
Ich finde nächstes mal muss ich weniger Lampen Leistung in der vegi Phase nutzen und oder höheren Abstand, denn sie hätten noch größer / bzw bisschen mehr Strecken können, aber das lag halt daran das ich die Lampen mit zuviel Leistung zu nahe, an den Pflanzen hatte während der vegi Phase und nächstes Mal mehr auslichten, aber das sind Erfahrungs Werte die man sammelt von daher bin ich sehr sehr zufrieden, und Runtz Muffin von Barnys farm hat voll und ganz überzeugt, die Farben während des grows waren einfach toll und der jetzige Geruch und Geschmack ist fast nicht beschreibbar ha ha aber unnormal lecker schön mit meinem volcano bei 185 grad, einfach köstlich ha ha ha und die6 Wirkung is bombe 😅😁😁😁💣
So what can you say in conclusion, I think the variety is really very, very stable and robust, also forgives mistakes 😅🙊😁
I think next time I have to use less lamp power in the vegi phase and or a greater distance, because they could have been larger / or a little more stretch, but that was because I had the lamps with too much power too close to the plants Thinning out more during the vegi phase and next time, but these are empirical values that you collect, so I'm very, very satisfied, and Runtz Muffin from Barnys farm was completely convincing, the colors during the grow were just great and the current smell and taste is almost indescribable ha ha but abnormally delicious beautiful with my volcano at 185 degrees, simply delicious ha ha ha and the effect is bombshell 😅😁😁😁💣


Likes
26
Share


@iiTzToasty
Follow
More indica leaning than I personally like. Definitely a late afternoon nighttime smoke. Have about 4gs of larf I’m making hash out of; she is very resinous.

Likes
26
Share


@ButterfliesLittleFarm
Follow
Hello Diary.
Two new diaries. Hulkberry and Green Gelato, both Automatic. Many thanks to RQS for these strains, and I am very happy to be starting with the new storys.
WHY HULKBERRY AUTOMATIC?
HulkBerry Automatic is Royal Queen Seeds’ revved-up version of Bruce Banner #3 Auto. She’s one of the most potent autos you can get your hands on, easily outperforming many photoperiod strains in this area. Her compact and frosty flowers provide a THC content of up to 21%, enough to satisfy the most experienced of smokers. Expect a wave of euphoria to crash over you after a vape hit or bong bowl of HulkBerry Automatic. The strain is motivating, increases alertness, and gets the creative juices flowing. She makes a superb smoke when listening to music and watching films, or when indulging in your own creative endeavours. Overall, she’s an excellent strain for daytime use.
LET'S START FIRST WITH THE FARM SET-UP:
Box - Secret Jardin DS120W 120x60x178
Lights - MIGRO 200+
Ventilation - Blauberg Turbo - E 100
Fan - Oscillating Koala Fan
Humidifier - Beurer LB 45
Soil - BIOBIZZ Light - Mix
Pot - 11L Fabric Pot from RQS
Seed - Royal Queen Seed
Nutrition - BioBizz and RQS Organic nutrition
I apologize in advance for the detailed documentation, or the large number of photos, but I enjoy it, and I think it will help others around tracking their plants.
LET THE DIARY START OFFICIALLY:
10/06/2020. planting.
I have prepared everything I need for planting. The 11lit fabric pot I got from RQS, also Organic Boost Nutrition and Mycorrhizza from RQS, Soil is Light-Mix from BioBizz and of course the seeds of the new strain Hulkberry Automatic. After adding 50g of pellets from Organic Nutrition and 5g of Mycorrhizze, I mixed everything well in the pot. After that I watered well and soaked the soil, I dug a hole with a wooden stick about 2-3 cm, I first put 1g of mycorrhize and then put the seeds inside. I lightly covered the hole with earth and put the pots in their new home. I planted two Hulkberries and one Green Gelato Automatic. The temperature was about 25 degrees and the humidity about 65%.
14/06/2020. She sprouted.
After 4 days, Hulkberries came out. In the meantime, I sprayed the surface of the earth a little twice. The temperature is still around 26 degrees, thanks to the summer and the high temperature that enters the apartment anyway. I regulate the humidity with a humidifier, I maintain it around 60% -65%.
15/06/2020.
Their first photo shoot, I also watered their with about 2 liters of water, which I only regulated p.H. at 6.3 with Plagron, Lemon Kick.
19/06/2020. Day 1.
Hulkberries is officially one day old. On that occasion I took another photo shoot to celebrate this big day :).
24/06/2020. First Feeding
First feeding. Their got a whole meal from BioBizz, Root-Juice, Bio-Heaven and Acti-Vera, p.H of water I regulated with Lemon Kick from Plagron.
25/06/2020. Day 7.
End of the first week. For now, everything is great. It is developing nicely, its conditions are almost perfect.
Hulkberry #1 - Day 7. - 9 cm
Hulkberry #2 - Day 7. - 10 cm
I think that’s all for this week, I’m happy that it’s starting all over again, following its development and looking forward to what’s to come. See you next week.

Processing
Likes
7
Share


@Kushizlez
Follow
Day 56-63
(Day 57) I might have to fix the light to the roof of the tent so I can get another 3 inches up. The ppfd is just too intense at this height. The node stacking is super tight, I’m seeing some droop on almost every plant and the plants just look stunted. I might have to take out the big shelf I just paid 90$ for and raise the light to get the ppfd level down. This happened my last grow as well. It’s a great light for flowering but sucks ass for veg unless it’s hung 5’ above the canopy. I’ve seen videos of others with the same light and they have to fix it to the roof. The dimming function only works with a master controller I don’t have the money for right now.
Pulling bbb #2. I’m seeing very small but clear pollen sacks. It’s also drooping like crazy. The roots don’t look as healthy as some of the other males I pulled earlier. They have a slight brown tinge but still mostly white. I wonder if I accidentally gave top dressed it too many times when I mixed them all up a while ago.
I’m going to transplant bbb’s #1, #3, #6 & #7 into my 10 gallon destiny/coco pots lightly water. This is kind of a gamble because 2 of them are not showing definitively. Although I’m about 75% sure they’re fems. If not, I got my two backups.
(Day 58) I was reading about symptoms of high PH and I definitely have it indicated by the twisted and stunted growth on top. I’m going to try to water in a full gallon at 5.8 and see if I get a good response. I sprayed the pump nozzle directly into the soil after it was empty to put some oxygen into that big 10g pot.
The blackberry I gave the lowered PH water too noticeably responded within a few hours. The clawing has pretty much stopped and it now looks like the healthiest plant in the tent. I’m going to see how it responds over the next few days then try it with my other plants if everything looks good.
I’m going to try it with bbb #5 in the 1.7g pot and see if it responds in the same way. I ran a gallon of 5.8 water through 1.7g and got less than a 100ml of runoff which is a little surprising. The runoff measured 1750ppms which seems a little on the high side but isn’t insane for peat based soil.
(Day 59) Wow. The plants responded to that little PH adjustment insanely well. #5 isn’t dropping at all and the leaf wrinkles are actually flattening out. It’s starting to look like one of the healthiest plants in the tent. I’m still hoping for #5 to show female. 5 plants would cut my veg time down and give me another opportunity for a keeper pheno.
All 4 plants are looking like they’ve already recovered from their transplant. #1 in particular was drooping like crazy yesterday and today it’s bounced back and looking happier than ever. I’m seeing a bit of tip droop on a few plants but they still seem fine
I wonder if because my soil is 50% coco I should try watering on the acidic side, around 6.0-6.2 from now on. I’m almost certain that solved all the issues I was having.
(Day 62) Plants are all looking really healthy. They all seem to have outgrown the initial light stress actually but node stacking is still really tight and I hope to raise the light up next week sometime.
I’m going to drop the humidity to 60% for the rest of veg.
These pots are massive and I’m still a little worried about dry downs but they aren’t showing any signs of overwatering or lack of oxygen.
BBB#3 is starting to show some weird discoloring like an mag or nitrogen deficiency. Which is weird because it’s freshly transplanted into nitrogen rich soil. Guess I will give it a kelp foliar spray.
I’ve been looking for a good organic source of K without an absurd amount of magnesium and sulfur like langbeinite has. I found some 0-0-15 kelp/seaweed extract in soluble crystal form. So from time to time I will water that in at half strength or with compost teas to keep my soil K dominant.
(Day 63) I’m still waiting on #6 to show sex. I am shocked it hasn’t shown sex yet. Although it was started a week and a half after the others but still. I’m going to be so pissed if it ends up being a male. I’m taking a gamble but I’m confident it will show female when the time comes.
bbb#3 got a little more color back from that foliar spray. Hope that doesn’t get worse because it’s my favorite pheno so far. I will give a N boost in the form of compost tea tomorrow afternoon to both of my tents.
I’m starting to utilize the scrog net and boy does it make training way easier. This seems to be a much smarter style of growing for yield and quality.
I’m getting tired of these pH fluctuations every time I water. I’ve been eyeballing for the most part and I need a consistent formula. I found the perfect mix to stabilize my RO water and stabilize the pH at 6.2. I moistened the top soil of each plant and will watch for any reactions.
Water recipe:
60ml bottled water
2000ml RO water
3ml calmag
2ml microbes
Likes
3
Share

@CaveGanja
Follow
I think she is done trichomes are all milkey and i go for a few days on vacation so i cant water the plant
other plants are fine but she needs water all 1-2 days.
The only thing that keeps growing are foxtails on every bud.
I give her 5 days more but i think trichomes wont change a lot and i dont want risk budrot for some foxtails.
Likes
6
Share


@FumateAlgoo
Follow
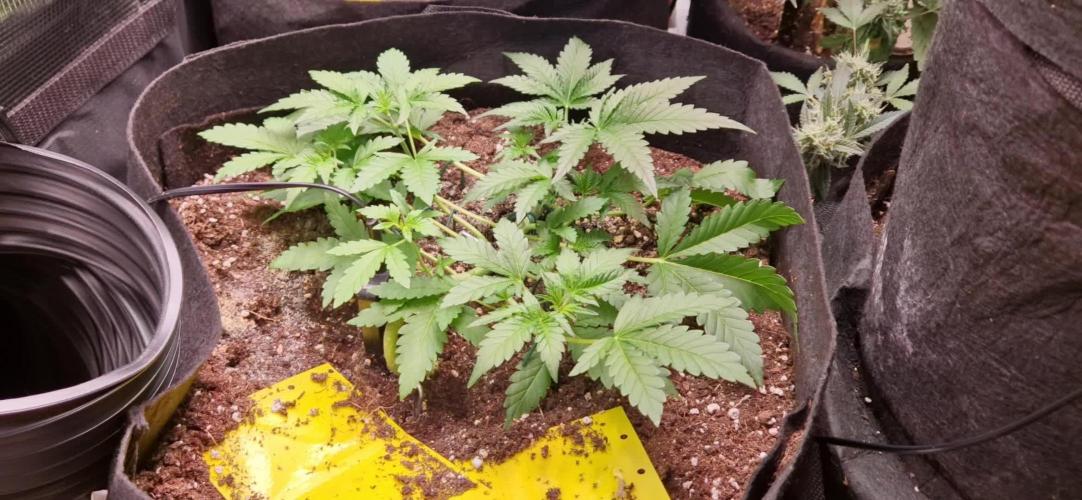
🌱 Terminando la semana 4 y las plantas se ven vigorosas 💪
Después del trasplante, las niñas se han mostrado bastante fuertes y adaptándose muy bien al cambio. Se nota que el trabajo previo dio resultado.
Detecté una pequeña carencia de nitrógeno, así que en el próximo riego voy a incorporar unos mililitros extra de Bio Grow para corregirlo. Por ahora, todo marcha excelente y las plantas están respondiendo de maravilla. 🌿
Dato útil: Unos días antes del trasplante (semana 3), a las macetas de 11 litros les apliqué al menos 1 litro de agua con una dosis mínima de Root Juice. Esto fue para preparar y humedecer el sustrato, lo que facilitó mucho el trasplante y evitó la necesidad de regar en exceso esta semana.
¡Seguimos dándole con cariño y atención al cultivo! 🌞🌱

Likes
152
Share


@EBxAH
Follow
Well, week 11 has started today 8/15. So blessed to have gotten this far! I'll be flipping the lights tomorrow to begin to start flowering. I have both my tents linked up so I don't have to run two separate exhausts! Now that the stress part is over time to sit, enjoy some puffs and continue focusing my energy! Happy growing everyone
✌️🍀✌️
UPDATE: 8/17 Day one of 12/12 in the books! I gotta say, I always chill with my plants before I turn down for the night and it was strange not doing it last night, lol. So I'm gonna get some green lights! I have an awesome app on my phone called Hydroponics Green Screen Light, it's in the app store for free. Developer in Timothy Johns. It works great but not enough for me. But it is great if you need to go in during the dark cycle for whatever reason. Or you can get yourself a lamp and a green grow room bulb! Happy growing everyone ✌️🍀✌️
UPDATE: 8/19 Everything is looking very good. Got some very noticeable growth! That's about it really. Happy growing everyone ✌️🍀✌️
UPDATE: 8/21...just uploading a few pics to end the week with. Well 12 and the start of 2nd week of flower begins tomorrow! Everything still looking good 😁
Happy growing everyone ✌️🍀✌️
Likes
Comments
Share


Likes
36
Share


@A1420
Follow
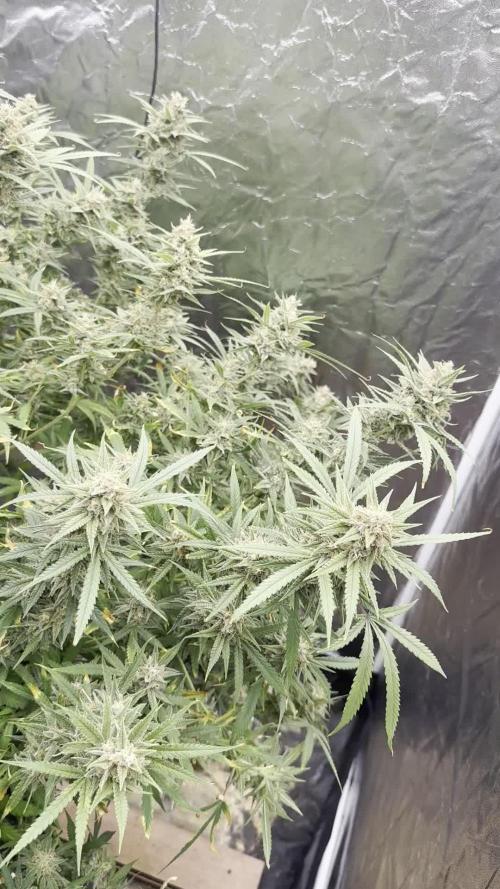
Plant starting to bulk up and frost nicely, getting a few top heavy buds already and had a few dry leaves too at the back of tent which i'm putting down to the fan in the same corner.
PK 13-14 been added in this weeks nutrient and be a week back to normal nutes ( no pk) followed by a week flush ready to chop at 9 weeks of flowering.

Likes
5
Share


@420Hydro
Follow
This will be day one of flower ...gonna run 12/12 starting 7 am lights will turn off till 7 pm until time change then will be 6am to 6pm...also running my Moby dick under 400watt hps next to these ...got it as a freebie from greybeard..have changed res to flower nutrients... Will be fun watching these girls grow .a lot new gear running in this tent so hopefully everything goes good...only running 6inch exhaust fan atm need upgrade to 8 inch later but seems be doing ok in there.. .
Likes
3
Share


@Lesjardiniers420
Follow
We had a heat wave this week the seedlings where in direct sunlight sins they popped so they handled it very well and it seems that they are using up a lot of nitrogen so I just started feeding them a few days ago with 500 ppm of veg nutes .
Likes
2
Share


@PalmaGrow
Follow
8 - 14 septiembre
Se inicia quinta semana de floración buena formación de cogollos y excelente aroma se percibe por todo el patio de mi casa

Likes
3
Share


@Dangster
Follow
I deliberately missed a week as not much is happening during flower stage. The mandarin punch auto is alive but not really kicking, on paper it has about 4/5 weeks left but I'm still feeling like it should be further along at this stage. The smell is virtually nonexistent and the buds are not much bigger than my thumbnail and not dense at all, nutrient lockout? The lemonade OG auto from real gorilla seeds has caught up with the mandarin punch despite being 2/3 weeks behind but I'm now feeling like she has stalled as well, maybe it's just me getting paranoid, on the up side the lemonade OG stinks amazing. Happy harvests to all, peace

Likes
8
Share


@QQNPK
Follow
Going alright however they didnt like the soil refill i had to buy some crap and didnt mix my own this time so they got abit chocked and locked out well well
Likes
19
Share


@Chi_K24
Follow
Alright folks always are now on day 18 and we are looking good. I did notice the plants needed water pretty badly. Hope I didnt stunt them. (Better than over watering imo) They did perk up once I watered them. They blew up since the last update and it was time to LST. Water the ladies today with aprox 8 cups of de-chlorinated water each, pH to 6.5. Moved the lights a little closer and added a new humidifier due to a break down with the old unit.
