
Gorilla Girls’ Just Wanna Have Fun!


Soil
Custom

Perlite
Custom
Indoor
Room Type
Defoliation
weeks 6, 9-10
19 l
Pot Size
0.75 l
Watering
Start at Harvest
G
Germination5y ago


Momgrowsthechronic Welcome to the second of three grows showcasing the reputable, legendary genetics of Sweet Seeds. For some reason I can’t change the number above in the diary to reflect the number of seeds germinated, which is four (4) lovely Gorilla Girl XL Auto’s. Planted on January 1st, 2022 in Jiffy Peat Pellets and kept warm/moist in an inexpensive Jiffy germination tray. The first two seeds were up and transplanted on the 5th while the second two were up one day later on the 6th of January. Another 100% germination success rate for all four of these SSGG XL Auto’s! Unfortunately one of the seedlings suffered the loss of one of it’s cotyledon leaves while removing the seed husk and is a little further behind the others for now. All of my seeds are always germinated in peat pellets and transplanted within hours of sprouting into their final containers. Those containers are inexpensive VivoSun 5 gallon cloth pots filled with a mixture of 45% Fox Farm Happy Frog Potting soil, 45% regular bagged potting soil from my local greenhouse and 10% perlite for additional drainage. The temperature is around 75 degrees Fahrenheit while the humidity is low at only 25% and the lights are five feet (60) inches above the tops of the pots. My last grow/diary was also Sweet Seeds and it was super successful although a little lighter than I had hoped for (final dry harvest weight) so I am optimistic that these Gorilla Girl XL Autoflowers will do fantastically! Thank you Sweet Seeds, once again for the opportunity to grow and show your genetics to the Grow Diaries Community and beyond.
4 likes
4 comments
Share
Used method
Peat Pellet
Germination Method
1
Week 1. Vegetation5y ago


5.08 cm
Height
18 hrs
Light Schedule
24 °C
Day Air Temp
6.0
pH
25 %
Air Humidity
20 °C
Solution Temp
21 °C
Substrate Temp
18 °C
Night Air Temp
18.93 l
Pot Size
0.35 l
Watering Volume
147.32 cm
Lamp Distance
Momgrowsthechronic Welcome to Week 1 of the Sweet Seeds Gorilla Girl XL Autoflowering grow courtesy of the fine folks at Sweet Seeds! This is the second of three consecutive grows/diaries that I am doing to showcase the tried and tested genetics from this reputable seed breeder. My last grow was a smashing success so I have high hopes for this grow as well. Nothing much to report for Week #1 although I will mention that the first watering was only 0.7 of a litre per plant (0.18 of a litre per plant per day) and the second was 1.4 litres per plant (0.35 of a litre per plant per day). I am watering on my usual schedule of every fourth day as this seems to be the sweet spot throughout past grows. I am using the usual- air bubbled tap water that is PH’d to around 6.0 and if need be (over the winter months in Canada) warmed to 68-70 degrees prior to hand watering with a small watering can. The seedling that lost one of it’s cotyledon leaves is fine but still a little smaller than her sisters. So now on to Mom’s tip of the week…
Mom’s Tip for Week #1 is- YOU GET WHAT YOU PAY FOR- QUALITY IS KEY!… When considering growing Cannabis, even on a small scale, quality is an important factor in all aspects from the seeds to set up to the supplies used throughout the grow. Starting with seeds from a established breeder will raise the odds considerably in your favour for a successful outcome. Many seed companies are more than willing to ship out freebies while building up their brands which seems attractive to new growers- but use at your own risk! There’s nothing worse than being halfway through a grow and discovering male flowers tucked in amongst the lowest branches or realizing that your beautiful buds have been mysteriously pollinated just weeks before harvest. I know that seeds from a reputable seed breeder are usually more expensive and can be hard to access in certain parts of the world. But purchasing quality seeds from a reputable seed company is the first step towards homegrown Cannabis success. An area that new growers often overlook due to the high price is the quality of crucial components in their set up- including tent, lights, and intake/exhaust fans. Anyone can get away with cheaper pots, oscillating corner fans, water pumps for dechlorination, etc but it’s worth every penny investing into the workhorses of your entire operation. An initial investment of around two thousand dollars will provide serious growers with the longevity and hassle free basics needed. If done right, quality components will pay for themselves within the first 6-12 months of use and continue to serve your needs for 3-5 years to come. Supplies used throughout the grow are the final area where quality is important but somewhat subjective too. Although I’ve already stated that I don’t feel the need to spend big dollars on all the extras (pots, oscillating fans, water pumps for dechlorination, PH/moisture meters, etc- I do believe in doing my homework to make sure that I’m getting the best bang for my buck. I thoroughly research every item purchased and used in my grows by reading customer reviews, speaking with other growers and sometimes even trial and error at my own expense. Making quality an important factor in all aspects of Cannabis cultivation will benefit you, your grows and the planet we live on. 🌳🌎🌳
2 likes
2 comments
Share
2
Week 2. Vegetation5y ago


10.16 cm
Height
18 hrs
Light Schedule
24 °C
Day Air Temp
6.0
pH
25 %
Air Humidity
20 °C
Solution Temp
21 °C
Substrate Temp
18 °C
Night Air Temp
18.93 l
Pot Size
0.35 l
Watering Volume
134.62 cm
Lamp Distance
Momgrowsthechronic So here’s Week 2 of the Sweet Seeds Gorilla Girl XL Auto’s grow. All in all an easy week but there has been time spent reinforcing a couple of the seedlings because they are so top heavy. I check in on my seedlings at least once a day (oftentimes 2-3 times daily) just to make sure that all equipment is functioning well and temps are stable. Upon looking into the windows of the tent I discovered that the smallest seedling (the one that lost one of it’s cotyledon leaves) was tipped right over. I gently supported her with a homemade splint (a tent peg/pipe cleaner combo- pictured above) and she’s currently standing on her own again. She’s still smaller than the others but surviving, not thriving for now. I used some fresh additional soil to fill in any gaps and pack down around the bases of the other three plants’ stems. Speaking of stems/stalks- the three healthy seedlings have peeling/stretching stalks and are starting to push out their first sets of branches. Other than that, same routine as always- watering every fourth day at 1.4 litres per watering or 0.35 of a litre per plant per day. I will be increasing the water sometime over week three. That’s it for now.
Mom’s Tip for Week #2- Don’t Over Water! (when growing in soil of course)… When learning to read your plant’s needs, water is a very important factor to consider. I often notice other growers with tiny seedlings sitting in completely saturated pots of soil. Or read that many other growers don’t believe in placing newly sprouted seedlings into their final containers/pots. Both issues being easily resolved by simply paying close attention to your plant’s body language, it’s grow environment and sticking to a schedule. Cannabis truly thrives and benefits from a wet to almost fully dry watering cycle. From my own personal experience with photosensitive strains grown outside in the summer to growing autoflowers indoors through the fall, winter and spring- all of my Cannabis seems to do best when watered every 4th day like clockwork! This schedule is somewhat subjective of course depending on the environment that you are growing in. Here in Canada, much of our year is cool to cold and the humidity is relatively low. Because of this my plants are not always able to take in moisture from the air through their stomas so they suck up more water from what’s readily available in their pots. In other environments (ex. tropical), you may be able to stretch out this cycle- watering every 5-7 days because your plants are pulling so much water directly from the humidity in the air. And how you water your plants matters too. When starting out with newly sprouted seedlings placed into their final containers- less is more. There is no need to completely soak all of the soil in a 5-7 gallon pot. Simply start with a small amount (0.5-1 litre) directing the water to the base of the plant, working your way outwards in a circular pattern. As you increase the amount of water, I try to work my water outwards- making my circle slightly bigger each time I water until eventually I am soaking the soil surface all the way out to the edges of the pot. This process is gradual, stretched over a period of 4-6 weeks. It will encourage the roots to reach for water and allow your plants the time needed to grow into a heavy dose of H2O. Finally, learning to read your plant’s body language will help you to understand when they need and don’t need water as well as food, more/less light, temperature changes, etc. Healthy, well watered plants are generally light green with leaves slightly turned up towards the light/sun. They will be growing/thickening every day and able to support their own weight even in a very breezy environment. Leaves are soft and supple, not dry and brittle and there are usually no marks or discolouration of any kind on the foliage throughout your grow. Water quality is important too but that’s any entirely different tutorial for another time. Bountiful harvests are very possible by simply tweaking your watering schedule to suit your plants’ ultimate needs.
2 likes
comments
Share
3
Week 3. Vegetation4y ago


15.24 cm
Height
18 hrs
Light Schedule
24 °C
Day Air Temp
6.0
pH
25 %
Air Humidity
20 °C
Solution Temp
21 °C
Substrate Temp
18 °C
Night Air Temp
18.93 l
Pot Size
0.52 l
Watering Volume
129.54 cm
Lamp Distance
Momgrowsthechronic Welcome to Week 3 of the Sweet Seeds Gorilla Girl XL Auto’s grow. It’s been extremely cold here in Canada this last few weeks and these plants are doing their best to survive- not thrive. Although they are healthy and happy, they are just not thriving like my previous Sweet Seeds grow from the fall of 2021. The temperatures are only a few degrees cooler than spring, summer and fall but the humidity is extremely low at this particular time of year- 20-25% at best. Without adding additional humidity via a humidifier, my plants are at the mercy of the dry Canadian winters. Week 3 did not bring the expected growth spurt experienced by the plants in my previous Sweet Seeds grow (the Cream Mandarine XL autos). I have included a side by side comparison photo above to show the massive difference in size between the two SS grows. It’s because of the slow growth that I have decided not to top these plants 👎🏼 I increased the water early in Week 3 to 2.1 litres per plant every 4th day (0.52 of a litre per plant per day). Hopefully these ladies pick up a little over week 4.
Mom’s Tip for Week #3- To Top or Not to Top?… Topping is an simple technique used by growers to split the main stalk/stem into two separate stalks/stems. This allows for height control when growing XL strains, encourages lower branch growth creating a more equal canopy height and of course- creates two beautiful, big colas instead of one! But topping Autoflowers has long been the source of great debate so I’m here to clarify Mom’s Do’s & Don’ts when topping autos. Do top your plants if they are healthy, thriving and on track (growth wise) with other growers and any info the breeder’s might provide. Don’t top your plants if they appear unhealthy, simply surviving and behind/slow (growth wise) compared to other growers growing the same strain. Do top your Autoflowers between 3-5 weeks from seed or when your plants have grown as many sets of branches as you desire (usually 4-6 sets of branches or nodes). Don’t top your auto’s beyond the 5th-6th week as they are most likely going into full flower. Do top, prior to or very early on in the pre-flower stretch and don’t top too late in pre-flower or once budding has begun- it’s too late and you’ve missed your opportunity for this grow. Do top your plants if you know what you’re doing and you’ve got the right tools. Believe it or not, I use a sterilized set of nail clippers (dedicated to this job alone) as they deliver a clean, controlled, perfect cut every time. Don’t top your plants if you haven’t done your homework or you haven’t got the right tools. Many people use their fingers but I find they are too large and awkward for such a precise job. More than once I have missed (FIM’d) or taken one of the two baby branches that are supposed to be left behind or simply injured those tiny developing branch sites by accident. Do top your autoflowers if you are growing a large/XL strain in a small/short space. This allows the grower to influence/control the overall height of the plants and creates a more equal/level canopy of foliage and eventually bud. Don’t top your auto’s if you are growing a short, fast flowering strain as this can sometimes stall/stunt them a tiny bit. Some Autoflowers run such a tight seed to harvest schedule that they legitimately cannot afford any interruptions in their growing cycle so check the breeder’s info before you chop. Do have fun with growing your Cannabis and don’t be afraid to try something new. Don’t top your Auto’s expecting to triple your yield though. I have learned that it will change the shape and height of your plants and you’ll end up with less low level, larfy bud but your yields will be almost identical whether you top or not. ✂️✂️✂️
3 likes
1 comment
Share
4
Week 4. Vegetation4y ago


30.48 cm
Height
18 hrs
Light Schedule
21 °C
Day Air Temp
6.0
pH
Weak
Smell
25 %
Air Humidity
20 °C
Solution Temp
21 °C
Substrate Temp
18 °C
Night Air Temp
18.93 l
Pot Size
0.7 l
Watering Volume
116.84 cm
Lamp Distance
Momgrowsthechronic So, Week 4 is done and the Sweet Seeds Gorilla Girl XL Autos are slowly coming along. It has been even colder in Canada this past week and temperatures in the tent have been hovering around the 70 degree mark. The humidity has come up a bit to around 30% and this is an improvement but the combination of too cold + humidity too low = small, struggling but surviving plants. It’s disappointing but this is consistently my toughest grow cycle of the year. Other than that, I increased the water to 4 litres per watering which is still being done every 4th day- so that’s 0.7 of a litre per plant per day. Although I was planning on topping all four of these plants following my previous Sweet Seeds grow experience, these ladies are just not up for it- too small, too slow and surviving not thriving. I will look forward to that with my next and final Sweet Seeds grow so stay tuned for that in future.
Mom’s Tip for Week #4- Cleanliness is next to Godliness!… I wholeheartedly feel that a clean and organized tent/grow room is essential for a successful grow. I often see other growers leaving dead foliage to pile up in the bottom of their tents, watering with no drip trays or not cleaning their space in between grow cycles. They are often plagued with unwanted visitors, fungal infections and a nasty build up of crud in the most precious place- your happy garden! Here are my top tips for keeping your tent/grow room clean, organized and consistently productive. Always remove dead or defoliated foliage from the bottom of your tent and take it all the way out of the immediate growing area/room. Biodegrading foliage provides the perfect environment for unwanted insects/pests to hide in and feed on- potentially creating an infestation that could devastate your crop and contaminate future grows. I place all green materials including my post harvest plants into the compost pile where it breaks down creating beautiful, natural fertilizer for future grows! Always use drip trays when watering or clean up excess dirty water that seeps through your pots/containers- potentially creating ideal conditions for various fungi and molds that can affect your plants, equipment and perhaps even you. I use inexpensive, plastic drip trays to catch any run off instead of relying on the waterproof bottom that is sold with my tent. I have personally witnessed the mold that can grow on and between these waterproof bottoms and the actual bottom of your tent as well as moisture so severe that it rotted through the stitching/seams of an otherwise perfect tent. Always clean your tent/grow room in between each and every grow cycle as well as throughout the grow as needed- potentially avoiding cross contamination from the previous grow and maintaining a high daily standard. Aside from insects and pests, fungi and molds- pollen from a previous grow gone wrong can wreak havoc on future grows if not dealt with correctly. I thoroughly vacuum my entire tent and wipe it down with a hot water/bleach solution applied with a spray bottle and a clean cloth. I also use a cordless Black and Decker hand vac conveniently mounted on a wall near the tent for daily maintenance and clean ups as needed. Keeping your tent, immediate grow space and supplies organized will also make things easier. I keep everything up and off the floors and if possible stored in rubbermaid type containers. This allows for quick and easy sweeping/vacuuming, wiping/dusting and the deep cleans required in between grows. All of the above mentioned tips will help increase the odds in your favour for a successful grow/harvest but they will also increase the longevity of your equipment too. Growing Cannabis at home can be quite a hefty initial investment so if a little light cleaning can make my core components (tent, lights, intake/exhaust fans, etc.) last longer, work better and equal more bang for my buck- it’s a no brainer!
3 likes
1 comment
Share
5
Week 5. Vegetation4y ago


45.72 cm
Height
18 hrs
Light Schedule
21 °C
Day Air Temp
6.0
pH
Weak
Smell
25 %
Air Humidity
20 °C
Solution Temp
21 °C
Substrate Temp
18 °C
Night Air Temp
18.93 l
Pot Size
0.7 l
Watering Volume
101.6 cm
Lamp Distance
Nutrients 1

NovaMax Grow
0.33 mll
Momgrowsthechronic So it’s the end of Week 5, Day 35 for the Sweet Seeds Gorilla Girl XL auto flowering grow. I have come to the conclusion that these four plants are not going to be XL after their pre-flower stretch. Overall the plants are healthy but the prolonged low humidity and temperatures have robbed them of the vigorous growth documented in my previous Sweet Seeds diary (Cream Mandarine XL Autos). I am disappointed that this will most likely be an XS harvest but a tiny quantity of quality bud is better than nothing. I gave them their first feeding of GHE FloraNova Grow fertilizer at a rate of 1.25 ml/gallon and this is 1/4 of a full dose that would be given to a photosensitive strain. I am still watering every fourth day at a rate of 2.8 litres per plant or 0.7 of a litre per plant per day. I will only be using the fertilizer every other watering or every eight days. That’s about it for this update and on to…
Mom’s Tip for Week #5- To Tuck or Take? The when, where, why and how to defoliate Autoflowers successfully…. Lets start with some basic Biology- Photosynthesis is the process by which green plants take in sunlight, water and Carbon Dioxide and transform it into energy in the form of sugars that feed the plant and make it grow. So essentially, every fan leaf on your plant is a solar panel collecting light and therefore valuable in it’s own right. I always try to tuck my leaves if possible before considering removal as my plants need all the energy they can get to power through until harvest. But sometimes tucking isn’t enough or just isn’t an option anymore so here are my suggestions for taking the fan leaves from your Cannabis plants if needed.
When- defoliating Autos can be done anytime throughout the grow although it’s generally not done within the first 3-4 weeks. The plants are usually quite small and those early weeks are valuable growing time that these plants simply can’t afford to miss. This is when I find leaf tucking to be most valuable, allowing the plants to keep what few solar panels they have while also allowing the grower to position the leaves so that they are out of the way. I personally find that I defoliate my plants the most over the final 3-4 weeks of the grow as foliage is dying off on it’s own by that point and a few less leaves at harvest time is always a good thing! Of course anytime you see dead/dying or diseased foliage, it should be removed as needed throughout the grow.
Where- defoliating Autos is a delicate balance due to their small size and short lifespan. If my plants are healthy, thriving and tucking is no longer an option, I will only remove fan leaves if they are covering/blocking new growth or potential bud sites. As the plants age and the foliage begins to die off naturally, I tend to remove the oldest, lowest growth first working my way up the plant as needed until harvest.
Why- defoliating Autos is done for a few basic reasons but only as an extreme in my garden when all else fails. Removing certain large leaves will allow more light into the lower portion of the plant’s canopy reaching young branches or potential bud sites. As the plants age, it also helps with increasing airflow around your swelling buds thus reducing your risks for mold and fungi in humid grow environments. Removing any and all dead/dying or diseased foliage is absolutely necessary in keeping your plants healthy and the grow room clean and pest free.
How- defoliating Autos is simple if you keep it simple. Only remove what you absolutely have to and use a sterilized set of sharp pruners for a clean, controlled cut. As the plants age and the foliage begins to die off naturally, just wait. What doesn’t fall off on it’s own will snap off with a simple twist of the leaf’s stem. If the leaves don’t come off with ease, they’re just not quite ready yet so be patient.
Be mindful that removing the solar panels from your Cannabis plants is always risky business but Autoflowers are even more challenging in their own way. Smaller plants with a lower leaf to bud ratio and a short lifespan means less room for error so paying close attention to the when, where, why and how is crucial for successfully defoliating Autoflowers. Tuck if you can, only take what you absolutely have to and of course- never take more than 25% of your plant’s overall foliage at one time as this can be devastating or deadly to even the healthiest of plants. Allow your plants to take the lead and they will show you which leaves are ready to go- at what time, all on their own just as nature intended.
2 likes
comments
Share
6
Week 6. Flowering4y ago


60.96 cm
Height
18 hrs
Light Schedule
21 °C
Day Air Temp
6.0
pH
Normal
Smell
30 %
Air Humidity
20 °C
Solution Temp
21 °C
Substrate Temp
18 °C
Night Air Temp
18.93 l
Pot Size
0.75 l
Watering Volume
91.44 cm
Lamp Distance
Nutrients 1
NovaMax Grow
0.528 mll
Momgrowsthechronic Welcome to Week 6, Day 42 for the Sweet Seeds Gorilla Girl XL Autoflowering grow. All four of these lovely ladies are now fully into flower and the tent has filled up considerably. Even though this grow cycle is not going to produce the XL plants I was originally hoping for, this strain seems to have a lot of bud sites compared to other autos I have grown previously. Had these plants reached their full potential- I truly believe that this could/would have been a massive harvest. I fertilized them again in Week 6 with their final dose of a Grow based formula at 2 mls/gallon. They will be switched over a Bloom based fertilizer in Week 7 at a rate of 2.5 mls/gallon. I am still watering every 4th day and all four plants are receiving 3 litres each or 0.75 of a litre per plant per day. There is something killing off the foliage from the bottom up on the plant in the front of the tent on the left hand side. Not sure what the problem is so I am simply removing the dead/dying foliage as needed and hoping that she’ll have enough leaves to make it through to harvest.
Mom’s Tip for Week #6- When it comes to Fertilizer- $Less$ = More… For me, successfully growing Cannabis indoors means trying to mimic what nature normally provides for free. Sun, fresh air, water and nutrient rich soil are all essential for healthy, happy plants. At some point during the grow (usually 4-6 weeks in) the plant has used up all of the nutrients originally present in the soil thus requiring the grower to have to supplement with some type of fertilizer. I see many growers photographing and showing off their huge displays of colourful bottles and I gasp when I read their long lists of 10-15 different fertilizers and supplements being added to every single batch of water. Not only is this unbelievably expensive and overwhelming but time consuming and completely unnecessary for a successful grow. For those seeking an Organic path there are options such as homemade compost tea or powdered formulas consisting of bat guano, glacial rock dust, bone meal, alfalfa meal, etc. I often use a Canadian made brand called “Gaia Green Organics", mixed in at the start to create my own super soil thus carrying the plants through their first 4-6 weeks of life needing nothing more than PH’d water. The organic fertilizers are usually more expensive and often have a slower uptake by the plants themselves as they tend to feed the soil first which in turn feeds the plants. For novice/newbie growers and those with fast flowering strains such as Autos- a non organic, liquid, water soluble fertilizer is often the way to go. They are generally cheap, easy to use and quickly taken up by the plants when they need it most. My ride or die brand is "Flora Nova” by General Hydroponics and it comes in a 1 part nutrient grow and bloom formula catering to my plants’ needs from start to finish. This company has many options available including all kinds of additional supplements to be used in conjunction with their standard grow/bloom formulas but I’ve never found these products all that necessary or beneficial. Using them in the past has led to over fertilization resulting in burnt foliage, stunted bud development and harsh flavours when smoking/vaping the final product. Not only does $Less is More$ apply to how many fertilizers you are giving your plants but it also applies to how much. Most photosensitive strains can easily tolerate a full dose (as per the manufacturer’s recommendations) and thrive with being fed every time you water. But Autoflowers and some smaller photosensitive strains seem to respond differently to a slight tweak- keeping in mind that if you start small, you can always add more but if you start big, you can’t take back what’s already been given. I will generally only fertilize at half of what the manufacturer recommends for a photosensitive strain- every other or every second watering. Starting out at a quarter dose for the initial feeding which can sometimes be as low as 1.25 mls per gallon and working my way up from there. It doesn’t seem like much but within hours I can see my plants responding positively with increased/sustained turgor, greening up a little and increased resin production which equals "smell/scent". For me, I can smell when I’ve just fertilized my plants- it’s a stronger smell than the normal scent that they give off with a plain watering. If you’re lucky, you’ll end up growing a greedy Autoflowering strain that seems to want more than what you’re giving it. Rather than increasing to a higher dose in a single feeding, try feeding more often at the same dose- so if you’re feeding every other or every second watering, try feeding every watering at the same dose (trying not to increase above half of the manufacturer’s recommendation for the photo strains). Occasionally I will increase beyond the halfway dose to accommodate for the plants’ needs in late flower as most fertilizer companies list an increase to adequately feed during late flower anyhow. I guess the main message for this week is to keep it simple as nature intended. Learn to read your plants and supplement the small amount of nutrients that your plants don’t already have in the high quality soil you initially provided. Cannabis cultivation can be overwhelming at first but the $Less is More$ approach will save you time, money and the realization that you’ve accidentally fried your plants!
2 likes
1 comment
Share
Used techniques
Defoliation
Technique
9
Week 9. Flowering4y ago


81.28 cm
Height
18 hrs
Light Schedule
22 °C
Day Air Temp
6.0
pH
Normal
Smell
35 %
Air Humidity
20 °C
Solution Temp
21 °C
Substrate Temp
18 °C
Night Air Temp
18.93 l
Pot Size
0.75 l
Watering Volume
71.12 cm
Lamp Distance
Nutrients 1

NovaMax Bloom
0.66 mll
Momgrowsthechronic So welcome to Week 9 of the Sweet Seeds Gorilla Girl XL Autoflowering grow! Unfortunately after two years of due diligence- I was finally infected with Covid 19 so I have gotten really behind with this diary. In Week 7, I switched from the Grow to the Bloom fertilizer at a rate of 2.5 mls per gallon. I am still watering every 4th day at 3 litres per plant or 0.75 of a litre per day per plant. This strain seems particularly hungry/greedy so by the end of Week 7, I’ve decided to fertilize with every watering instead of every other. I’m not increasing the dosage of the fertilizer but the frequency in which it’s being given. Other than that the plants are doing fine through Weeks 7, 8 & 9 with the buds fattening up nicely, loads of wet to the touch resin and a super strong smell emanating from the tent even when it’s closed! That’s it for the past three weeks, Covid sucks and thank goodness harvest is just around the corner!
Apologies for not offering up any further "mom’s tip of the week" but I’m just finishing up this diary for kicks at this point. Thanks.
likes
comments
Share
Used techniques
Defoliation
Technique
10
Week 10. Flowering4y ago


81.28 cm
Height
18 hrs
Light Schedule
22 °C
Day Air Temp
6.0
pH
Strong
Smell
35 %
Air Humidity
20 °C
Solution Temp
21 °C
Substrate Temp
18 °C
Night Air Temp
18.93 l
Pot Size
0.75 l
Watering Volume
71.12 cm
Lamp Distance
Nutrients 1
NovaMax Bloom
0.66 mll
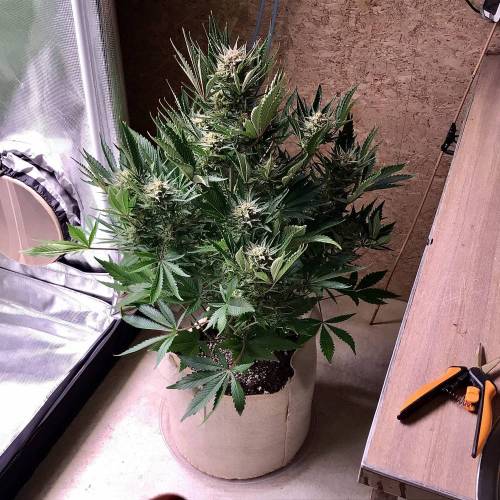
Momgrowsthechronic Welcome to the Week 10 update for the Sweet Seeds Gorilla Girl XL Auto’s. Not much to report as this grow is on cruise control until harvest. I will be finishing up with the bloom fertilizer and starting to flush as these lovely ladies finish out Week 10 and move into Week 11. Defoliating as necessary and consistently checking trichomes as I’ve already spotted the first few ambers in and among the already cloudy trichs! Thanks for stopping by and checking out my grow! 😎
5 likes
3 comments
Share
Used techniques
Defoliation
Technique
11
Week 11. Harvest4y ago
Happy Harvest Day!


8/10
Rated
The Gorilla Girl XL Auto’s turned out to be a pretty decent strain. The plants were not XL as I had expected but they were healthy and vigorous from start to finish. This strain had an extremely alluring smell from early on and the buds were dripping with resin as advertised by Sweet Seeds. I did find that the buds were much lighter, fluffier and not nearly as dense as I had hoped for and unfortunately that really affected the final harvest weight. I only harvested and cured three of the four plants as the forth was so larfy that it’s been put aside for bubble hash production. I did not bother weighing the final dry product but it filled up three full size mason jars which is usually about 50 grams of smokable bud. I would average 150 grams total or 50 grams per plant so definitely not a memorable harvest weight compared to previous grows. But as far as the smoke report for this strain- it’s great! Very strong, an energetic and creative Sativa high without being overwhelming and sending my heart rate/thoughts racing. I usually don’t enjoy a Sativa high all that much but this is a nicely balanced strain that can be enjoyed throughout the day into the evening without worries about keeping you up at bedtime. The flavour is tough to describe as it’s kind of piney, citrusy, and sweet all in one- let’s just say that it tastes like really good pot! So to summarize the Sweet Seeds Gorilla Girl XL Auto’s in a few words- easy to grow, tasty, intoxicating effect but a low harvest weight- quality over quantity with this strain. I would definitely recommend to anyone looking to grow great weed for personal use. The genetics seem stable, reliable and a safe choice when looking at the overwhelming number of Cannabis seed breeders in today’s market. I believe that your money is well spent when you choose seeds from Sweet Seeds!
Show more
Translate
Spent 58 days
Ger Veg Flo Har
200 g
Bud wet weight per plant
3
Plants
0.91 m²
Grow Room size
Normal
Difficulty
Height
Day air temperature
Air humidity
PH
Light schedule
Solution temperature
Night air temperature
Substrate temperature
Pot size
Lamp distance


Momgrowsthechronic Enjoyed growing it but harvest was far less than I had hoped for so I’m not sure if I’ll grow again. These were free seeds so thank you very much for the opportunity to grow and showcase your genetics.
4 likes
2 comments
Share
Equipment Reviews


14 comments
Sort by
popularity
popularity
newest
oldest

homerjgangia commentedweek 05y ago
Good luck with your grow mate!💪💪
likes 5

Sweet_Seeds  commentedweek 15y ago
Thank you very much for sharing a new diary with one of our strains. 😊
We hope you enjoy it. 😋
Sweet smokes,
- Apolo
likes 4

JaramnieJazz commentedweek 05y ago
good luck for your grow
likes 4

PeppaWutz commentedweek 05y ago
Good luck and happy growing 👊😃
likes 4

Sour_D commentedweek 44y ago
Looking good, best wishes on your journey! 💪
likes 3

cannapassion commentedweek 34y ago
Nice start.. looking great good Luck for the futur 👌💪
likes 3

Cyrusdavirus commentedweek 15y ago
Good luck with the new babies 😁🤞
likes 3

Kynareth commentedweek 05y ago
nice grow mate!!
likes 3
Cyrusdavirus commentedweek 114y ago
Congratulations on the chop 👍
likes 2

Momgrowsthechronic commented4y ago
@Cyrusdavirus, chopped months ago but fully cured now so able to give an accurate smoke report. I’m just about ready to post my new pics and harvest info for my latest grow- check out the Fast Buds replenishment grow featuring the Lemon Pie Autos. Thx for all of your positive feedback about my grows, always appreciated buddy!
likes 2

Rangaku commentedweek 64y ago
Nice diary with extensive reports , plants look fantastically healthy as well
likes 2
Momgrowsthechronic commented4y ago
@Rangaku, thx so much! This was on track to be one of my best diaries- info wise. But Covid finally got me and I was just too sick to keep up. I will finish but it’s not what it could have been. Oh well, on to the next grow… 🤷♀️
likes 2

antikvar13 commentedweek 104y ago
like a queens 🤜🏻🤛🏻😎
likes 2

Qutro commentedweek 104y ago
Wow. This tent is filled nicely with some delicious buds. Nice job buddy.👌 Wish you a pretty harvest.🌞🌱
likes 2

the end.
Enjoying this diary? Follow for more updates!


Prefer the old Diary view?
Go back to the old Diary view