
Late Orange Bud Auto grow outdoor and greenhouse


Coco Coir
Custom

Perlite
Custom
Outdoor
Room Type
FIMing
weeks 2
LST
weeks 3-6
Defoliation
weeks 5-6
15 l
Pot Size
1.17 l
Watering
Start at Harvest
G
Germination2y ago


Nutrients 2

Calcium Magnesium Supplement
2 mll

Root Booster
5 mll
Smoking_Joe_Frazier Week 1: Kicking Off the Late Season Grow with Orange Bud Auto
Start 28.06.2024
After ordering my seeds from Dutch Passion for next year's outdoor run, I decided to start a spontaneous late grow with an Orange Bud Auto. I’m excited to share my progress and tips with all my fellow growers.
Germination Success
I used my trusted germination method: a wet paper towel with the seed inside, wrapped in cling film. This method has never failed me:
Last year, I had a 100% germination rate with seeds from Fast Buds.
This year, I'm continuing that streak with another perfect start.
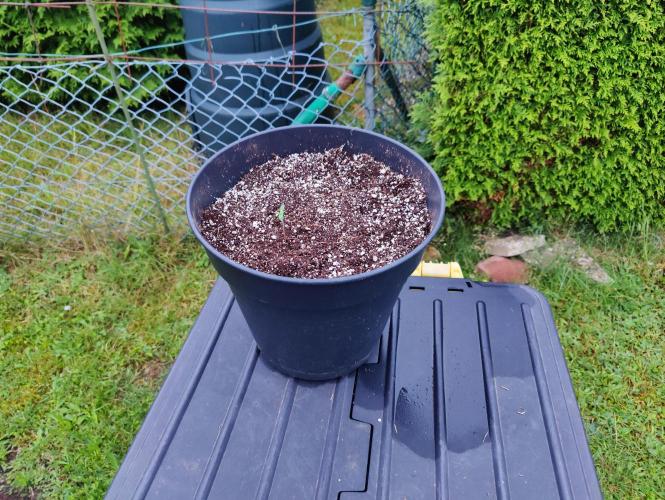
Preparing for Growth
For this grow, I'm using Plagron’s 70/30 coco/perlite mix in 15L pots. In my recent grow, I found that 11L pots didn’t provide enough space for effective Low-Stress Training (LST). Here’s how I got started:
Germination:
Placed the seed in a moist paper towel, wrapped it in cling film, and kept it in a warm, dark place.
Checked daily to ensure the paper towel remained moist (but not soaking wet).
Preparing the Medium:
Filled the 15L pots with the 70/30 coco/perlite mix.
Thoroughly watered the mix with PH 6 water and added some CalMag also.
Planting and Initial Growth
Once the seed sprouted, I carefully transplanted it into the prepared pot. Unlike in my other grow diary I placed here directly in the final pot. Let's see if it makes a difference.
Here are the key steps I followed:
Transplanting:
Made a small hole not in the center of the coco/perlite mix. I hope to have more space to one side for LST.
Gently placed the sprouted seed into the hole and lightly covered it. This time I placed the root tip downwards.
Calculated risk
Due to the bad weather, I'm trying to give the dwarf as much light as possible. Despite the significant risk of snails attacking the plant, I've decided to leave it in the greenhouse overnight.
4 likes
2 comments
Share
Used method
Paper Towel
Germination Method
1
Week 1. Vegetation2y ago


4 cm
Height
15 hrs
Light Schedule
18 °C
Day Air Temp
6.1
pH
No Smell
Smell
332 PPM
TDS
60 %
Air Humidity
22 °C
Solution Temp
20 °C
Substrate Temp
11 °C
Night Air Temp
15 l
Pot Size
4.5 l
Watering Volume
Nutrients 6
Calcium Magnesium Supplement
2 mll

TriPart Bloom
0.25 mll

TriPart Grow
0.25 mll
Smoking_Joe_Frazier Week 2: Seedling Stage and Early Growth
After a successful germination and initial transplant, my Auto Orange Bud from Dutch Passion is now entering its second week. The seedling is establishing itself in the 15L pot filled with a 70/30 coco/perlite mix. Due to the poor weather, the plant is growing very slowly, and the light conditions are suboptimal as the sun hardly shows. Here’s the progress for this week:
Day 7-8: Settling In
The seedling is adjusting well to its new home. I've been ensuring the coco/perlite mix stays consistently moist without being waterlogged. The greenhouse offers some protection from the poor light conditions during the day, but the sun hardly shows.
Watering: Continued with pH 6 water and a light dose of CalMag to support healthy growth.
Now it's time for their first feeding. I added Cal-Mag to achieve an EC of 0.5 mS/cm to start with. I gave them a half-dose of nutrients as described in the T.A. chart and watered with enough runoff.
Monitoring: Checked daily for signs of stress or pest activity. So far, no issues with snails or other pests.
Day 10 and 11: The good weather has triggered a significant growth spurt. The next three days will be warm but mixed with rain and thunderstorms. I think the rapid growth will continue.
Day 13: I need to fully open the greenhouse because the temperature is rising too high. It's too hot, even for my tomatoes. Whenever it’s not raining, I take her outside.
2 likes
comments
Share
2
Week 2. Vegetation2y ago


4 cm
Height
24 hrs
Light Schedule
27 °C
Day Air Temp
6.1
pH
No Smell
Smell
480 PPM
TDS
60 %
Air Humidity
22 °C
Solution Temp
20 °C
Substrate Temp
12 °C
Night Air Temp
15 l
Pot Size
4.5 l
Watering Volume
Nutrients 6
Calcium Magnesium Supplement
2 mll
TriPart Bloom
0.4 mll
TriPart Grow
1.25 mll
Smoking_Joe_Frazier Week 3 full growth phase:
Day 15:
The plant will now remain completely outdoors, except during heavy rain when it will be moved to the greenhouse. I'm still unsure if I should top the plant. If I decide to do it, I will perform it as gently as possible to minimize any delay in growth.
Day 16:
Until 5 p.m., we enjoyed some really nice weather. However, after that, all hell broke loose with heavy rain and thunderstorms here in Germany. I had to rush to bring her back into the greenhouse for protection.
Day 18:
My lady made a good development over the last days. The weather is really nice. Some pest gave me problems with my other grow. I got to watch her closely that the thrips don't bother her also. I sprayed some neem oil the protect her from these assholes.
Day 20:
Today, I decided to top her, as I'm looking to experiment a bit with this grow. I did it as carefully as possible. I took my fingers and did only remove the small top of the plant so it was more of a fiming than topping. There should come out 4 new branches instead of just 2. Let's see how it turns out.
I also gave her another feeding. I noticed the runoff pH was too low at 5.1. Unfortunately, I was in a hurry and couldn’t address it right away. To maintain a stable pH, I'll need to feed her more frequently. Tomorrow, I plan to flush her with water at pH 6 until the runoff pH is closer to 6.
Update Day 21:
Today, I addressed the pH issue. I used a 10-liter bucket with pH-adjusted water (6.05) to flush the coco. Surprisingly, the final runoff had a pH of 5.5. How did that happen? I checked the EC, which was very low at 0.36, indicating no significant salt buildup. It seems I made a similar mistake as in my previous grow. I had only watered with nutrient solution once every five days due to the size of the pot. Even though it wasn’t particularly hot and the coco stayed moist enough, could this have caused such a significant pH shift?
1 like
comments
Share
Used techniques
FIMing
Technique
3
Week 3. Vegetation2y ago


20 cm
Height
15 hrs
Light Schedule
25 °C
Day Air Temp
6.2
pH
No Smell
Smell
480 PPM
TDS
60 %
Air Humidity
22 °C
Solution Temp
22 °C
Substrate Temp
18 °C
Night Air Temp
15 l
Pot Size
4.5 l
Watering Volume
Nutrients 5
Calcium Magnesium Supplement
1.3 mll
TriPart Bloom
0.4 mll
TriPart Grow
1.1 mll
Smoking_Joe_Frazier Day 23: Week 4 has begun
The plant has recovered very well from topping and continues to grow without delays.
The temperatures have dropped slightly, from 31°C to 25°C. But still only sunshine so she stays outside the whole time.
Due to the low pH of the runoff, I flushed the plant multiple times with pH-adjusted water (6.2). However, I couldn't get the pH above 5.5. I will now continue feeding with a nutrient solution with a slightly higher pH (6.2) until the runoff pH returns to 6.
Day 25:
Since it rained the day before, there were more snails than usual. During my nightly snail patrol, I removed some large snails. Unfortunately, during the night, some snails attacked my plant, eating entire leaves and parts of the side branches, which will set her back a bit. From now on, I'll bring her inside onto my balcony at night until she's big enough to withstand the snails.
Death to all snails 💀!!!
Day 28:
She shows the first small signs of preflowering. I'm sure in the next week she will really start to shoot up.
Unfortunately the weather has been pretty bad, with rain continuing for three days now, so she’s staying on the balcony full time. The balcony faces north, so the light isn't optimal. To help with light distribution, I've decided to start some light LST. I'm gently bending the side branches down to ensure the lower shoots get more light.
3 likes
1 comment
Share
Used techniques
LST
Technique
4
Week 4. Vegetation2y ago


25 cm
Height
15 hrs
Light Schedule
24 °C
Day Air Temp
6.0
pH
No Smell
Smell
515 PPM
TDS
65 %
Air Humidity
22 °C
Solution Temp
22 °C
Substrate Temp
18 °C
Night Air Temp
15 l
Pot Size
4.5 l
Watering Volume
Nutrients 5
Calcium Magnesium Supplement
1.3 mll
TriPart Bloom
1.125 mll
TriPart Grow
1.5 mll
Smoking_Joe_Frazier Day 29: As my plant is entering the pre-flower stage, I’ve adjusted her nutrition accordingly. To support the stretch, I decided to only use a mix of grow and bloom nutrients. I’m using half the amount recommended in the feeding chart because, in my last grow, one of my plants showed signs of nitrogen toxicity.
Day 30 and 31: The weather has been excellent, promoting rapid growth. She’s growing so quickly that I have to adjust the LST daily. The first pistils are appearing, and the tied-down side branches are shooting upwards again. I still bring her back onto the balcony overnight due to the unusually high number of snails, and I'm tired of doing nightly patrols.still feels weird to walk out of my garden with weed plants without worrying. It's fucking legal 🤟🏽
Day 32: The weather has turned into a mix of heavy rain, thunderstorms, and extreme humidity. In a previous grow, I had to remove two plants due to bud rot, so I’m being extra cautious with this one. While inspecting the undersides of the leaves, I discovered some spider mites. I removed them by hand and brought the plant inside. I then sprayed a solution of 0.5 liters of water mixed with 1.5 ml of neem oil on and under the leaves. I plan to repeat this treatment tomorrow, which should resolve the issue. Since the buds are still in early development, the neem oil should not cause any problems.
Day 34: The weather was really nice today with no rain, just a little wind. I adjusted the LST once again as she's getting very bushy. I had to remove a few leaves to ensure the lower branches receive enough light. Before going to bed, I sprayed her all over with neem oil one last time. No more neem oil after that because I don't want to fuck up the taste.
likes
comments
Share
Used techniques
LST
Technique
5
Week 5. Flowering2y ago


25 cm
Height
15 hrs
Light Schedule
26 °C
Day Air Temp
6.0
pH
No Smell
Smell
515 PPM
TDS
65 %
Air Humidity
22 °C
Solution Temp
22 °C
Substrate Temp
18 °C
Night Air Temp
15 l
Pot Size
4.5 l
Watering Volume
Nutrients 4
Calcium Magnesium Supplement
1.3 mll
TriPart Bloom
1.5 mll
TriPart Grow
0.5 mll
Smoking_Joe_Frazier Day 36: The temperature is on the rise again, with a promising forecast averaging 26°C. Perfect conditions for a stellar growth spurt during the final stretch! I've now fully switched to bloom nutrients, giving her 2/3 of the recommended amount according to the feeding chart. Let's watch her flourish in these ideal conditions and bring those buds to their full potential!
Day 38: Nothing new to say. I feed her and adjusted the LST. I hope she will stretch some more and keeps producing many colas. I'm aiming for a nice even canopy.
Day 40: The weather has been improving lately, and the plant is really thriving as a result. Today, I gave her another feeding, and she’s visibly bulking up. The sugar leaves are beginning to show their first signs of resin production, and there’s a light but noticeable aroma developing.
Looking ahead, I’m hopeful that if this growth continues for another two weeks, she’ll turn out to be a great yielder. To support this, I plan to perform a light defoliation in the coming days to improve airflow and reduce the risk of mildew, something I’ve had to deal with in the past.
Overall, things are progressing well, and I’m excited to see how she continues to develop!
1 like
comments
Share
Used techniques
LST
Technique
Defoliation
Technique
6
Week 6. Flowering2y ago


25 cm
Height
15 hrs
Light Schedule
22 °C
Day Air Temp
6.0
pH
Normal
Smell
515 PPM
TDS
65 %
Air Humidity
22 °C
Solution Temp
22 °C
Substrate Temp
18 °C
Night Air Temp
14.99 l
Pot Size
4.5 l
Watering Volume
Nutrients 4
Calcium Magnesium Supplement
1.3 mll
TriPart Bloom
1.5 mll
TriPart Grow
0.5 mll
Smoking_Joe_Frazier Day 43:
The smell is really kicking up now, and the resin production is ramping up too—sticky fingers all around! I adjusted the LST on all the branches long enough to be tied down, and I’ve been defoliating regularly to maintain good airflow without stressing her to much.
In Germany, the weather has been decent, but the humidity is off the charts. Humidity levels are hovering around 65%, sometimes even at nightime spiking to 80%. This kind of moisture in the air is a perfect breeding ground for mildew, so I’m keeping a close eye on her. Today marked the first bit of rain we’ve had in a while, so I'll be extra vigilant in the coming days to keep everything in check.
Day 45:
With rain in the forecast, I'll need to make sure she stays dry to avoid any risk of mold. The temperatures are expected to drop to 23°C over the next few days, but thankfully without any rain—sounds perfect to me.
After doing some research on the Coco for Cannabis website, I've decided to tweak my watering strategy. They recommend watering every day, ensuring the coco never gets dry at all. This approach supposedly reduces the risk of nutrient burn, which might have been the culprit in my previous grow. I've started following this advice, and I'm eager to see how it impacts her growth.
Day 48:
Since adopting my new watering strategy, I’ve noticed a completely stable runoff pH of 5.9. In my previous grow, I struggled a bit because I often let the coco dry out too much. Lesson learned! 🤟🏽
She’s thriving with the daily watering—no signs of stress at all. In fact, she looks fantastic and healthy. You can practically see the growth day by day. I’m hoping she has another week to bulk up before the stretch is over.
3 likes
3 comments
Share
Used techniques
LST
Technique
Defoliation
Technique
Grow Questions

Smoking_Joe_Frazierstarted grow question 2y ago
Hi Growmies,during my monitoring routine I found some brown spots on the leaves. Not many but on some leaves the brown spots have become transparent and I can see through the leaves. Any ideas what could have caused the brown spots? Perhaps not enough CalMag? Rest looks healthy.


Solved
Leaves. Color - Dark-brown
likes

Nicogreenanswered grow question 2y ago
Kunne være tegn på mangel calcium eller hvis du har ramt dem når du vander m gødning og ik spray det af igen
7
Week 7. Flowering2y ago


25 cm
Height
15 hrs
Light Schedule
22 °C
Day Air Temp
6.0
pH
Normal
Smell
515 PPM
TDS
65 %
Air Humidity
22 °C
Solution Temp
22 °C
Substrate Temp
18 °C
Night Air Temp
14.99 l
Pot Size
4.5 l
Watering Volume
Nutrients 4
Calcium Magnesium Supplement
1.3 mll
TriPart Bloom
1.5 mll
TriPart Grow
0.5 mll
Smoking_Joe_Frazier Day 52:
The weather has been decent over the past few days, with occasional rain showers. To protect her, I've been bringing her indoors overnight to prevent any moisture from settling on her. Despite these precautions, I unfortunately discovered a mold spot on the largest top today. This means I'll have to monitor her even more carefully, keeping a close eye on every inch of the plant.
On a brighter note, she's responding incredibly well to the daily watering, with explosive bud development that's really picking up speed. The scent around her is intense and unmistakably Orange Bud—it's truly mouthwatering.
Given the high risk of mildew, I’m seriously considering switching to FinalPart after this week to accelerate the ripening process. This could be essential to avoid any further mold issues.
I've also noticed that her large fan leaves are starting to turn yellow, which is a good sign that she’s channeling all her energy into bud production. It’s clear that she's in the home stretch, and I’m excited to see how she progresses.
Day 56:
The weather has been absolutely perfect the last few days, with temperatures hovering around 30°C and no rain in sight. It looks like we’re in for more of the same, which is great for her development. To keep mold at bay, I’m still bringing her indoors at night.
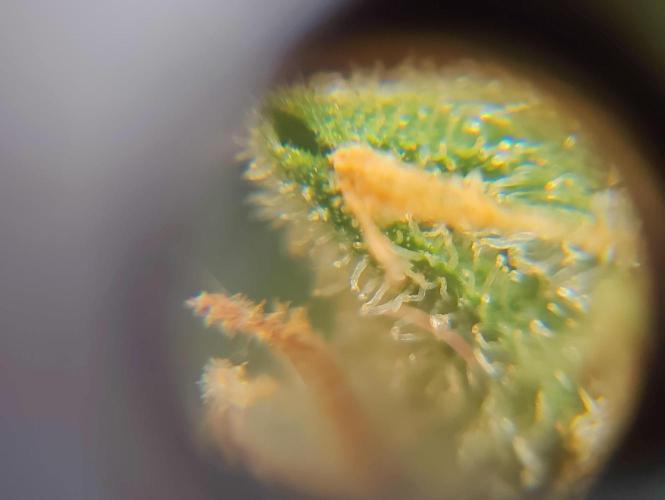
She’s really taken off, and the buds are looking nice and fat. However, I’ve noticed that the light distribution on this topped plant isn’t as good as it is on the girls where I only used LST. The lower buds aren’t getting nearly as much sunlight, so I’m planning to harvest in two stages, just like I did with my Tangie plant. That strategy really paid off last time, and I’m hoping for similar results here.
The trichomes on the top buds are almost completely cloudy now, so as we move into Week 8, I’m planning to switch her feeding schedule to FinalPart. This should help bulk up those buds even more and speed up the ripening process.
That wraps up Week 8, folks! Stay tuned for more updates next week.
3 likes
5 comments
Share
8
Week 8. Flowering2y ago


25 cm
Height
15 hrs
Light Schedule
30 °C
Day Air Temp
6.0
pH
Normal
Smell
520 PPM
TDS
65 %
Air Humidity
22 °C
Solution Temp
24 °C
Substrate Temp
19 °C
Night Air Temp
3.97 l
Pot Size
1.17 l
Watering Volume
Nutrients 1

FinalPart
5 mll
Smoking_Joe_Frazier Day 65:
More and more of the big fan leaves are turning yellow, a clear sign that she’s channeling all her energy into those buds. I checked the trichomes under the microscope again, and there hasn’t been much change yet. Since switching the feeding to only FinalPart, I’ve noticed it’s working well, just like it did in my last grow. Now, it’s all about getting this lady to the finish line.
Mold is still a big concern, especially with the hot and humid weather we’re having here in good old Germany. I’m staying vigilant, but it’s definitely a challenge.
I’m planning to harvest in about 10 to 14 days, depending on how quickly those trichomes hit that sweet spot of 30% amber. It’s all about patience now, but I’m confident we’re getting close!
Day 68:
Today, I discovered two buds with a small amount of mildew. Luckily, I caught it very early, so I didn’t have to remove much. Unfortunately, it was the two upper colas—the ripest ones—so I had to sacrifice them. Thankfully, the damage was minimal.
The weather forecast is predicting occasional rain, so I’ll be extra cautious. I plan to bring her indoors to keep the buds from getting soaked, as that would almost certainly lead to more mold issues. It’s all about protecting what’s left and ensuring a successful harvest.
1 like
5 comments
Share
9
Week 9. Flowering2y ago


25 cm
Height
15 hrs
Light Schedule
12 °C
Day Air Temp
6.0
pH
Strong
Smell
520 PPM
TDS
75 %
Air Humidity
22 °C
Solution Temp
22 °C
Substrate Temp
8 °C
Night Air Temp
3.97 l
Pot Size
1.17 l
Watering Volume
Nutrients 1
FinalPart
5 mll
Smoking_Joe_Frazier Day 70:
We’re heading into the last week of this grow, and the weather isn’t making it easy. It’s been rainy, cloudy, and incredibly humid the entire time. To combat the threat of mold, I’ve been bringing her inside during rain and overnight. So far, this strategy is working well, though I did have to remove a small top where mold had started to spread. On the bright side, my apartment now has this amazing aroma, like fresh orange peels.
The buds are swelling up beautifully, turning into dense, hard nugs. More pistils are turning orange, giving her that classic Orange Bud appearance. Since switching to FinalPart, the buds have nearly doubled in size—this stuff is seriously awesome.
The trichomes haven’t changed much in color, so I’m guessing she still has at least another week to go. I’m also considering doing a two-part harvest like I did in my last grow. My plan is to harvest only the fully ripe buds first and let the rest mature a bit longer. It’s like picking apples—you only take the ripe ones and let the others continue to ripen. I’m applying the same principle here because, in the end, it’s all about quality.
Day 76:
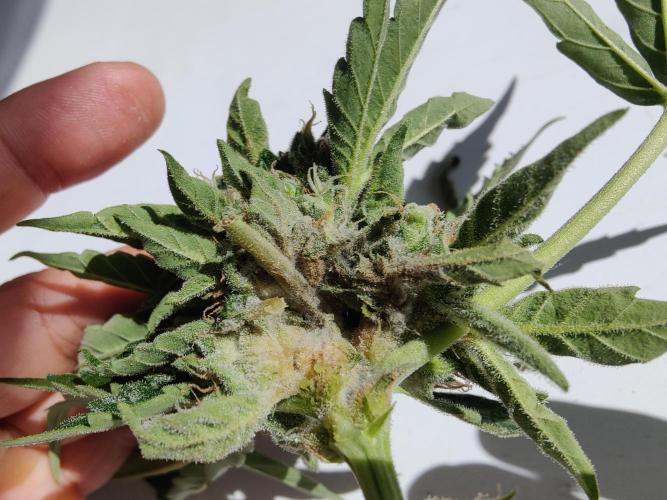
During my daily routine today, I discovered a big spot of mold on the largest bud. This led me to thoroughly inspect the entire plant, and unfortunately, I found that most of the biggest colas had at least small spots of mold. After checking the trichomes, I noticed that around 20% had turned amber, signaling that it was time to act.
I decided to harvest those affected buds completely and carefully took them apart, ensuring I didn’t miss any moldy spots. The largest cola required a significant amount of trimming, while the other harvested buds only had minor spots. I cleaned my scissors with isopropanol after each cut to prevent contamination and gave the buds a nice wet trim to promote faster drying, which I hope will prevent mold during the drying process.
I ended up harvesting about 40% of the plant, focusing on the upper colas where the mold had taken hold. The lower bud sites, however, are far from being ripe—only about 10% of the pistils have turned orange. I’m planning to give those lower buds at least another week to fully mature before considering their harvest.
Tomorrow, I’ll post some pictures of the harvested buds to show how they turned out. Stay tuned!
2 likes
comments
Share
10
Week 10. Flowering2y ago


25 cm
Height
13 hrs
Light Schedule
12 °C
Day Air Temp
6.0
pH
Strong
Smell
520 PPM
TDS
75 %
Air Humidity
22 °C
Solution Temp
22 °C
Substrate Temp
8 °C
Night Air Temp
3.97 l
Pot Size
1.17 l
Watering Volume
Nutrients 1
FinalPart
5 mll
Smoking_Joe_Frazier Day 77:
Like I mentioned yesterday, I had to harvest the fully ripe buds because I detected some mildew again in almost all the big buds. Thankfully, it was only small spots, so I carefully took everything apart to avoid missing any mold. The buds look and smell beautiful, and I’m really looking forward to trying them once they’re fully dried.
I estimate that I’ve harvested around 15-20 grams so far. The remaining buds on the plant should yield about another 20 grams, as long as there are no further losses to mold.
With anything over 30 grams of high-quality Orange Bud, I’d be really happy. Even if it ends up being a little less, I’d be content—especially since my jars are already full! 😁
2 likes
comments
Share
11
Week 11. Harvest2y ago
Happy Harvest Day!


10/10
Rated
Orange Bud Auto Strain Review
Having wrapped up my latest grow of Orange Bud Auto, it's time to reflect on how this autoflowering version stacks up against its photoperiod counterpart and overall performance.
Growing Experience
Growing Orange Bud Auto was a solid experience. The plant showed impressive vigor and resilience, making it suitable for both beginners and experienced growers. However, in hindsight, topping this strain might not have been the best approach. If I were to grow it again, I’d stick to low-stress training (LST) up until the preflower stage. This technique better supports light penetration and airflow without the potential yield dip I observed with topping.
Aroma and Flavor
The scent profile of Orange Bud Auto is pleasant and recognizable, though it didn’t quite reach the aromatic depth of the Tangie from my Fastbuds outdoor grow. The fragrance leans towards sweet, with subtle citrus and floral notes, but the true highlight is in its taste. On the palate, you can expect a classic citrus zest mingled with earthy undertones, delivering a flavorful smoke that’s enjoyable yet understated compared to some more pungent strains.
Effects and High
The high from Orange Bud Auto strikes a balanced chord between uplifting sativa and calming indica influences. It delivers a smooth, long-lasting buzz that keeps you engaged and upbeat without veering into couch-lock territory. It isn’t overly racy, making it an excellent strain for daytime and evening use. The high is mellow enough for creative pursuits, listening to music, or socializing with friends.
Potency and Suitability
This isn’t a powerhouse strain, so if you’re a heavy smoker with a high tolerance, it might not hit the mark for intensity. However, it’s perfect for those looking for an easy-going high that doesn’t overwhelm. The effects are best described as a pleasant, sustained euphoria with a clear head and a relaxed body—a great option for those who prefer a balanced, mild experience over the hard-hitting strains.
Final Thoughts
Orange Bud Auto is an appealing strain for those who appreciate a nuanced, sociable high and are looking for an everyday strain that can transition seamlessly from afternoon activities to evening relaxation. It may not be as terpene-rich as some of the more modern varieties, but it brings a solid, enjoyable experience that pays homage to the original Orange Bud lineage.
Show more
Translate
Spent 72 days
Ger Veg Flo Har
47 g
Bud wet weight per plant
47 g
Bud dry weight per plant
1
Plants
Normal
Difficulty
Height
Day air temperature
Air humidity
PPM
PH
Light schedule
Solution temperature
Night air temperature
Substrate temperature
Pot size


Smoking_Joe_Frazier Despite my best efforts to let my lady reach full ripeness, I discovered more mold spots in the largest buds as the week came to a close. With heavy rain forecasted in the coming days and knowing that even the covered balcony wouldn’t be enough to fend off further mold issues, I made the tough decision to bring out the axe and harvest the remaining tops. It was the right call to save as much of the crop as possible and prevent any more losses.
Upon examining the trichomes under the microscope, I found that about 10% had turned amber. That would have to be good enough. Once again, I meticulously broke down each bud, ensuring I didn’t miss any mold that could potentially ruin the entire batch during the curing phase in the jars.
Once dried and cured, I ended up with a total of 47 grams—14 grams from the initial harvest and 33 grams from the final one. Although I had to discard around 15 grams due to mold spots, I’m genuinely satisfied with the outcome. The buds look fantastic, and the quality of the smoke is just as I had hoped.
All in all, it was a successful grow, and I’m pleased with the results. Thanks for following along, and I'll see you next season! 🤘
4 likes
2 comments
Share
Equipment Reviews


18 comments
Sort by
popularity
popularity
newest
oldest

Mrs_Larimar commentedweek 32y ago
Still looking great.
Mine get waren by thrips ,leafminers etc. I Always say live and let live.✌️😊
likes 3

nonick123 commentedweek 82y ago
A tope con esa recta final! 👏
likes 2
Smoking_Joe_Frazier commented2y ago
@nonick123,
Hi Buddy🏽, now she completely stopped growing. She's putting everything in bud and resin production. I hope I can prevent mold this time.
like 1
nonick123 commentedweek 72y ago
Nice lady man!
likes 2
Smoking_Joe_Frazier commented2y ago
@nonick123, Thanks my friend, she's gorgeous for sure. Orange bud was always one of my favorite strains since I first tried it in 1996. So I'm really looking forward for a nice tasty yield 😉 Dutch passion did a great job with this Autoflower 💪🏽
like 1

Aedaone commentedweek 72y ago
Your plant looks great. I hope she makes big buds 🌱💚
likes 2
Smoking_Joe_Frazier commented2y ago
@Aedaone, Thanks my Lady, I hope so too. When I bring her inside overnight my whole living room is filled with a mouth watering smell. The size of the yield doesn't matter for me as my jars are filled from my other grow. I'm only looking for the good smoke 🤟🏽
likes

Legendaryseedthumb commentedweek 62y ago
Hello, nice to see your page! Good luck with everything!
If you have any time to spare please come by my page I just started a new journal!!🙌🏼😶🌫️
likes 2
Smoking_Joe_Frazier commented2y ago
@Legendaryseedthumb, Thanks for checking out my diary. I will surely check out yours.
like 1

KanOrganics commentedweek 02y ago
Good luck and happy growing! 😁
like 1
Smoking_Joe_Frazier commented2y ago
@KanOrganics,
Thanks mate, let's hope for a good weather period for the second half of summer here in Germany. Not quite sure if I can finish her completely outdoor. We'll see and hope the best
like 1

Sejanus21 commentedweek 112y ago
Great harvest and diary. Thank you very much. I am even more eager now to harvest my Auto Orange Bud in a few weeks.
likes

DutchFarmer commentedweek 112y ago
💪
likes

the end.
Enjoying this diary? Follow for more updates!


Prefer the old Diary view?
Go back to the old Diary view