
Bruce Banner (Hempire Seeds), 9x8=72(-1)

Hempire Bruce Banner


VEG
Fission 300W Light Emitting Diodes/150W
Custom
FLO
Fission 300W Light Emitting Diodes/600W
Custom

Soil
Custom

Indoor
Room Type
HST
weeks Technique
Topping
weeks Technique
Main-Lining
weeks Technique
Defoliation
weeks Technique
11 l
Pot Size
Start at Harvest
1
Week 1. Vegetation8y ago


6 cm
Height
24 hrs
Light Schedule
27 °C
Day Air Temp
7.0
pH
No Smell
Smell
200 PPM
TDS
47 %
Air Humidity
22 °C
Night Air Temp
1 l
Pot Size
0.03 l
Watering Volume
30 cm
Lamp Distance
Budcrack Week 1, concluding first week of vegetating:
The first week of 2019 turned out to be a very busy week! Not only did I start this new Bruce Banner round, but also my OG Kush from 3 different seed houses needed harvesting. Please feel free to check out my harvest-report on them later, it is due to come after this report. I hope to finish it today (Sunday) or else tomorrow. The O.G. wil be drying for the upcoming 2 weeks so please come back after to check on the final results. I wil be signing-up for the newbie of the month January, i just really hope you like my grow diary!
First week is already a fact! Many to go, but let’s not dwell on that fact. In fact, i have a deadline this breeding season. Experience learns that the months June, July and August are a no-go in terms of flowering at my place. But I had a false start when my season started September 2018, because off home-improvement I had to wait until end of the month. So ideally i would start germinating and pre-grow somewhere in august (in the pop-up tent downstairs, much cooler there), so that the first round of the season can go 12/12 in my tent beginning September. So that means my season this time is at least 1,5 month shorter, which means that i will be finishing flowering the next round in June 2019! Not ideal, I hope I can manage to keep temperature below 28 then.
This also learned me that it’s not going to be easy to reach my second objective, that is harvesting 4 rounds in the breeding season of 9 months. But I will keep improving the best i can, so we’ll see! I effectively need 672 grams each year, and if i can produce that amount with my setup in just 3 rounds i’m cool with it.
So, the Bruce Banners come up nice! I have another 2 weeks on 24Hrs for pre-growth starting tomorrow. My plan is to transfer them into the 11 liter pots and in my tent on 21th of January. I hope by then the tops will be far enough to be able to FIM them properly. FIMming stresses plants a lot less than Topping. In fact, within the same day after FIMming they will be good to go again. So my plan is to do this on the same day, before transplanting. This way i can use the fact that plants tend to go into a grow-spurt after being planted into bigger pots as leverage to reach the desired height when they really start flowering. Also this same 21th of January they will be put on 12/12. This will all result in a total grow period of just 5 weeks before flowering starts. If this all works out, and the yield is ok, this will be a method to use more often. Again, time will tell and so we’ll see about it!
You can also see in the pictures that i came up with what I will call henceforth the mainline-adapter. I always look for the most efficient, least expensive, easy method’s to establish my goals. I guess this is also a product of that thought. Only thing is that i maybe was a little bit early to install them, because i won’t be using them until after the 21th. But maybe at least i don’t risk to destroy anything vital by installing them afterwards? The idea is to be able to mainline after FIMming into 4 branches. The little piece off straw can slide along with the growing plant while keeping the branches in line. I can also replace the short prickers with longer ones when needed (and the plant can carry the extra weight). Again, time will learn wether or not this is the way to go.
I hope everyone following me will enjoy this diary as much as I do growing the Bruce Banners. If you do please don’t forget to like! And hopefully we’ll meet next week again for another update? Thank you and happy growing!
Budcrack.
*Older comments starting this round here below:*
Almost new year, new round, new chance to reach the 1 gram per watt led-light. Well, you gotta pursuit your dreams! Last round i'd use 16 plants inside 6 liter pots to form a SoG. Last year, before my adventures on Growdiaries started, i also used this method on 16 C-Banana's and 10 Gorilla Glue #4 and 16 Girl Scout Cookies (see pictures). All of wich delivered nice harvests, but nowhere near that 1gr/watt. I hope my efforts with the OG Kush and this same approach wil get me closer, it looks promising. We'll see!
This round i want to create a nice SoB (sea of buds), by topping or fimming the plants early as possible, and use main-lining to spread the stems even over the surface. HighTV advised me to use a minimum of 2 main stems per plant, i decided to use 4 because it will reduce the stretching even more, and fill's more efficient. I will trim every branch back to the main-stem, so the light can spread nice and even between the stems to also create some nice popcorn-buds underneath the main tops.
I hope this will all in the end lead to a bigger yield. Before i had 16 main buds + popcorn buds, now that will increase to 9 plants x 4 main buds/plant = 36 buds. The volume of soil will be approx. the same as 16 x 6 liter pots. Using less volume, like 9 x 6 liter pots, instead of 9 x 11 liter pots contradicts my goal to reach a larger yield, because plants need the same ammount of root below the surface to support the plantvolume above. The size of the yield is not the only objective, because i want to use the 9 months in wich i'm able to grow inside my tent optimal, and try to reach 4 harvests in that period. I know you can use 6 pots, 4 pots or even 1 pot to fill that space, but the pre-grow time will be longer so that's not an option. I have to find the sweetspot wich hopefully get's me close to 1 gram/watt and 4 harvests in 9 months time. Only this way i'll be able to stay medicated and cover the 3 months in wich i can't grow inside my tent.
Ok, enough strategy, on saturday 29th of December i'd started germinating 10 selected Bruce Banner seeds, using the 100% foolproof coffeefilter/ziplockbag-method. I don't know if the appearance of the seed mathers anything, but i tried to select the most uniform looking seeds. They'll be pre-growing inside my pop-up tent (see pictures) because the OG Kush is flushing for a while longer and they also need to dry inside the tent. I bought 4 LED fixtures, each delivering 1600 lumens at 20 watt, color is 6000k. Together with the previous 45 watt grow-LED's they will hopefully grow my plants with short internode space and firm stems who can support their own weight later in the cyclus. Let's hope this works out!
Let's see after this weekend how germinating those little sprouts goes!
5 likes
21 comments
Share
Grow Questions

Budcrackstarted grow question 8y ago
Hi! I want to ask you guys to look at my plan and give your thought's and suggestions on it? Sorry for the long read, i tried to be detailed on it. I hope it's worth the effort. Thank you very much in advance for your input!
Solved
Techniques. Defoliation
likes

CRiSPrGrowanswered grow question 8y ago
hey there budcrack hard to input based on a plan, but what i can see straight away is that you're not optimal on your vapour pressure deficit, VPD. VPD basically regulates the metabolism of the plant and if you want to optimise your grow time especially veg time, you'll want to tune that in. what you want to do right away is to get the humidity up and temperature about 1°C lower by using a dome, or a PET bottle cut in half over each of the seedlings to keep the moisture in. i see you're using coco nutrients and bloom boosters on day one... why? dont do that bro, you're gonna stress or maybe even kill these seedlings like that. Right now what you want to be doing is promoting ROOT growth, how ? kelp extract and micronutrients... combine them in a foliar spray spray once every 2 or 3 days until dripping wet for the first four weeks or so. that will help keeping the humidity up at least a bit as well. you're already using vitalize, which can be part of that spray... I see you got those LEDs and spectrums tuned in real nice : warm white is perfect, you got it ! a few last things ... your lamp to plant distance should be no more than 12 inches, currently you're at 17+ dial that in otherwise your plants will stretch all wrong. 7 PH is actually way too high ! what's the PH of rain water? 5.5 why is that important ? different nutrients get absorbed at different PHs, you want to lower the PH to at least 6 or even 5.8 if you can. i know it's a lot, but that's my best advice ! hope this helps ! 🚀
2
Week 2. Vegetation8y ago


7 cm
Height
24 hrs
Light Schedule
28 °C
Day Air Temp
6.0
pH
No Smell
Smell
200 PPM
TDS
48 %
Air Humidity
24 °C
Night Air Temp
1 l
Pot Size
0.01 l
Watering Volume
30 cm
Lamp Distance
Budcrack Week 2, concluding second week of vegetating:
Ok, there is that, even after four years i'd make a decision that almost kills my seedlings. I was even warned that this would happen. I freaked out seeing that the color was fading quick within the bottles on friday, saturdaymorning i gave them a spraynutrients solution and they started to schrivel-up. I'd immediately started spraying acidulated water over them to hopefully wash the nutrients away, but the damage is already done. Later on saturday i turned off the lights and kept spraying them with water. I keep them in the dark for a few days and hopefully they wil recover from this.
I have to admit that i was out of my league with the advise i've got last weekend. That made me remember that i have to keep to my own method, and don't make to rigorous changes to quickly. Keep my calm and keep thinking for myself.
So what's my plan B? See this out, keep them in the dark and keep them moist. Watch if they bounce back a bit the comming days. If this goes further south, i will start germinating the other B.B.'s i have left, cry hard and start over!
I'll be keeping u guys up speed! Thanks!
*Older comments earlier this week:*
Hi(gh) Guys! I thought it maybe a good idea to make short update this week: today I’d opened one container to take a good look and a few pictures of course. 10/10 look pretty nice, only one still has a bit of a flimsy stem, but that’s no problem since I only need 9 to flower.
As you can see in the pictures, I find them not green enough, though they look healthy. I’d used an light mix as soil which only contains 2 weeks of nutrients, and it is almost end of the second week, so I thought it maybe a good idea to give a very conservative amount of grow nutes?
Anybody’s maybe sees something else? You’d think they'd be ready to FIM in another week (remember, I’m on a tight schedule!)?
3 likes
8 comments
Share
3
Week 3. Vegetation8y ago


7 cm
Height
24 hrs
Light Schedule
25 °C
Day Air Temp
6.0
pH
No Smell
Smell
200 PPM
TDS
55 %
Air Humidity
21 °C
Night Air Temp
1 l
Pot Size
0.03 l
Watering Volume
30 cm
Lamp Distance
Budcrack Week 3, concluding third week of vegetating:
Hi(gh) Guys! Last weekend was ‘Honey I Shrunk the Kids’ the sequel! Only this time it was about my little plant-kids! In a nutshell explained: The second vegetating week I’d started on Sunday by putting the seedlings under bottomless plastic water bottles to improve the VPD and kickstart their metabolism, that worked fine, only after a few days I started noticing the green color was fading. On Saturday I’d popped the bottles off and noticed color’s way to light green. Only I forgot that after almost a full week under the bottles the leaves are vulnerable, but I sprayed them with a mix of 1ml grow nutrients on 1 liter of water anyway. And soon after the leaves started shriveling up. I’d started spraying them with plain water on Ph 6 right away to hopefully stop them from becoming even more damaged, and not long after that I turned off the light. This was a stressful enough event, for which they need some downtime to recover. I kept spraying normal water until humidity was 100% inside the tent and kept the lights off for the entire night and day. Next Sunday evening I turned only the weaker ledstrips on again, so they have enough time to slowly start again, and on Monday I’d see they were going to be ok! On Tuesday I removed all the damaged leave, and that brought me back to basically the first week, with only a stem and some tiny leaves.
On Wednesday I’d turned on the stronger light again. Also I’d added some more light-mix to the pots. They needed some time underneath the bottles again, and left them on this time until Friday. By that time they were growing strong again. By losing their largest leaves and by the following downtime, and the time they need to grow back to the same size when things went wrong, I think they are at least a week behind now, but maybe that’s not so bad after all. For now I will wait until the right time to FIM them, and then they can go 12/12 until flowering starts.
So maybe next week I’m able to show some progress again? I hope to see you then!
Thanks and don’t forget to like!
Greetings Budcrack ;-)
3 likes
1 comment
Share
4
Week 4. Vegetation8y ago


9 cm
Height
24 hrs
Light Schedule
27 °C
Day Air Temp
6.0
pH
No Smell
Smell
665 PPM
TDS
70 %
Air Humidity
20 °C
Night Air Temp
1 l
Pot Size
0.06 l
Watering Volume
25 cm
Lamp Distance
Nutrients 4

Start-R
0.5 mll

Basis A
0.5 mll

Basis B
0.5 mll
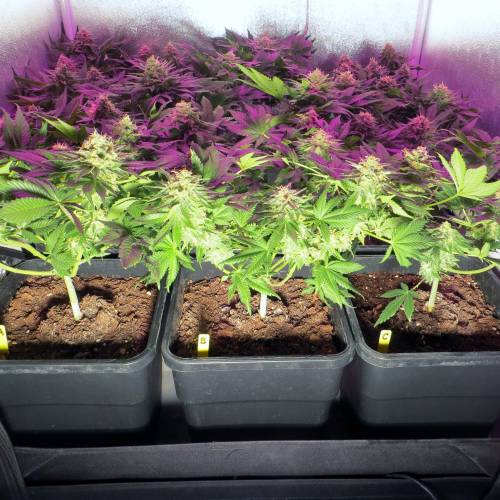
Budcrack Week 4, concluding fourth week of vegetating:
Hi(gh) Guys! There is definitely some progress, although there’s also some definite delay. Take a look at MarkXL’s Hulkberry’s, who didn’t lose all the leave after two weeks, that’s where I could have been! Also remember that my B.B.#3’s stretched too much in the first week, because I was to careful with the new grow lights. After adjusting the height to 12” after the first week, and again to 10” end of the fourth week, I’d see that growing approximately results as MarkXL’s must be possible. Next time I will put the seedlings direct under bottles to kick start growth and place lamp much closer. This time I’d missed that boat which ended up my plants now look like little palm trees! Which brings me to the internode-space which actually is pretty good after adjusting the lights after first week. So we’ll be getting there this time or the next.
This week I’d have to wait until the little plants where far enough to FIM. On Wednesday they got their first nutrients, following Mills schedule. Also the first five plants where ready to FIM. Now there all FIM’med. Also I’d remove the lowest growth this weekend as you can see in last picture.
I have 10 little plants, and only need 9. Looking at the weakest 3 plants in the center on the photo, the left one’s probably the weakest. She is showing hardy any beginning of branching. The other two are behind, but expected to be ok when they have more leaves to provide energy.
I’m going to take at least another week to decide if and when I’m going to place them inside bigger pots inside the tent. Until then please like and feel free to leave comments, stay nice and high!
Greetz Budcrack
4 likes
25 comments
Share
5
Week 5. Vegetation7y ago
10 cm
Height
24 hrs
Light Schedule
27 °C
Day Air Temp
6.0
pH
No Smell
Smell
800 PPM
TDS
75 %
Air Humidity
21 °C
Night Air Temp
1 l
Pot Size
0.06 l
Watering Volume
20 cm
Lamp Distance
Nutrients 4
Start-R
1 mll
Basis A
1 mll
Basis B
1 mll
Budcrack Week 5, concluding fifth week of vegetating:
Hi(gh) Guys! I want to use this opportunity marking time, because I’m going to add another week of vegetating. And to reflect on every decision I made in way people maybe can learn something along the way.
a. I’m ever content about my manner of popping the seeds, called the coffeefilter/ziplockbag-method, so no room for improvement there.
b. During first week my LED was hanging to high, so the seedlings stretched, causing the stems to look lollypopped already. After adjusting this before second week arrived the internode space became perfect, and stretching stopped.
c. End of second week I’d made the mistake causing to lose the lobe-leaves, first set of single serrated leaves, and the set of triple serrated leaves, which after deliberating with HighTV made me realize the mistake made there was not checking Ph. again after adding spray-nutes to already Ph-down water. This left me with an more lollypopped look and an growth retardation. Luckily they didn’t get stunted.
d. Third week of veg is considered lost in terms of progress, oh dear!
e. Fourth week, waiting for right moment to FIM. But considering downtime last week, actually third week. FIMmed first 5 plants on Wednesday, but realize better to wait next time until maybe even fifth week, and they are further developed.
f. End of fourth week I’d also remove the lowest branches on the 8 biggest plants, causing another little grow retardation, but in the end helps to redirect energy to the remaining branches.
g. FIMmed another couple of plants, but can already see only one FIM of the first five succeeded.
h. End of fifth week, had to top almost all FIMmed plants, because only 2 attempt’s actually payed off. Initial idea of FIM was less stress, but I actually caused more stress-moments this way, further retarding grow.
i. On the pictures you see I’d place little flags earlier, with 6 or 8 on them? Right now three of the ‘6’ flags lay flat because they probably end up with 8 branches next week.
j. They now all have 8 branches except one 6. From these branches only the four best will remain. HighTV advised me to lose them around the time right before they show signs of flowering.
k. When 4 branches are left, i will start defoliating to improve airflow and light penetration. And further remove side branching/ lollypopping until i have the desired canopy.
I will take all of these experiences into consideration next time I’m going to apply this technique, and I do want to give it another try to figure out how long it takes when I don’t make all these little mistakes. The most important lesson to learn is if SoG can improve the yield in such way that only 3 grows will suffice to last me year? If after two attempts it shows me this doesn’t work, I’ll be returning to my previous method with 16 plants in 6 liter pots. Only then I’m going to try and buy a different LED for next indoor season. But 4 grows that way are possible with some planning, advanced training doesn't.
Time will tell eventually, please bear with me. Don’t forgot to like if you do (…or like anyway!) ;-)
Grtz, Budcrack
2 likes
comments
Share
Grow Questions
Budcrackstarted grow question 7y ago
My question is what improvements to my basic skills would enhance my plants general health and resistance against plagues and diseases. I want to learn how to improve health because of hydroponic aspirations in the future, where it is key to be able to react on minor changes! ;-)
Solved
Techniques. Defoliation
likes

Stickanswered grow question 7y ago
Hi @Budcrack! I would recommend to consider DIY foliar sprays. In my opinion foliar feeding is an underrated topic, but a good foliar solution can have multiple benefits. Whether you want to speed up the growth, fix an upcoming deficiency, repel/kill pests or prevent an invasion, you can do all of this with 1 DIY foliar solution. I'm currently digging into this "perfect foliar spray quest" and found some surprising results by mixing humic acids, some Nitrogen fertilizer (MegaCrop), crushed garlic, liquid latex and neem oil. Doses should be experimented and adjusted, start with low doses for everything. If you experiment this please share your results with us! Hope this will help, happy growing 👊
6
Week 6. Vegetation7y ago


15 cm
Height
12 hrs
Light Schedule
26 °C
Day Air Temp
6.0
pH
No Smell
Smell
1650 PPM
TDS
70 %
Air Humidity
21 °C
Night Air Temp
11 l
Pot Size
0.11 l
Watering Volume
44 cm
Lamp Distance
Nutrients 4
Start-R
2 mll
Basis A
4 mll
Basis B
4 mll
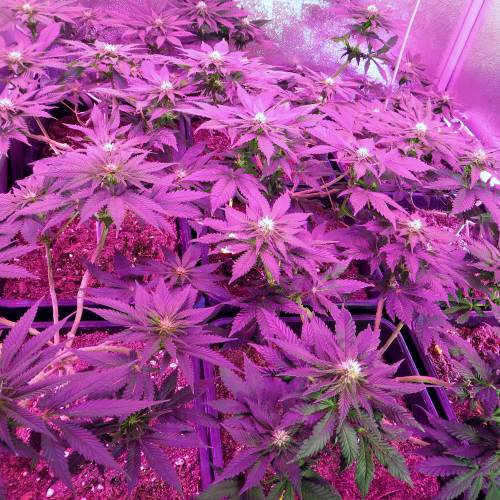
Budcrack Week 6, concluding sixth week of vegetating:
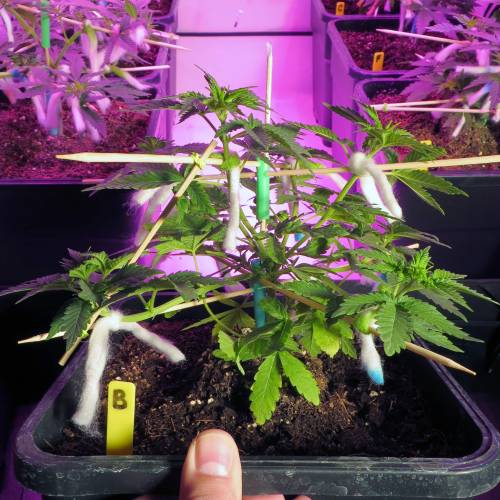
Hi(gh) Guys! This again was a busy week! But definitely some progress made, the plants finally became big enough to apply the mainline-adapters. Some adjustments were made, because last attempt nutrient solution caused the wooden sticks to mold. I couldn’t find any non-wood replacement, so wrapped the sticks plastic foil. Also, the small pickers from last time are replaced by large ones to support the branches. Please refer to the pictures to see how I made and applied them, please come back to learn if they actually work as good as I hope!
Again, next time by the end of week 6, it should be possible to have them showing signs of flowering and tied to a mainline adapter. In that sense I think the total delay became two weeks. I think then I’m going to let them be until there ready to top, and left with 8 side branches. Only next grow will be an R.Q.S. strain that I’d read maybe takes a longer veg time, so we’ll see about that to!
This week the little 80x80x160cm tent got some T.L.C. Big cleaning, replacing the filters on both inlet and outlet. The Hortilight Scroggmaster 450 (V1) finally is properly fixed. One transformer was replaced earlier, only by the wrong one, causing one set of beams to malfunction. It took some sending the transformer back and forth, but I hope I can finally profit from the investment. So, this round I have 450 + 90 (side-fill) = 540 Watts available. Also, this is the first time where I’m going to use 9 x 11liter pots inside the 80x80cm in a real SoG. I’m very hopeful to finally make a better yield pushing the 1 gram/watt/plant.
Next two weeks I’m looking forward to see allot of growing, doing some serious defoliation and selecting the 4 branches per plant good enough to move into flowering. Also not all branches where long enough to tie down now, and the two smallest plants need some growing before receiving the mainline-adapter.
Thanks for your interest in my grow, please don’t forget to like and hope to see you next time!
Grtz, Budcrack
5 likes
2 comments
Share
7
Week 7. Vegetation7y ago


15 cm
Height
12 hrs
Light Schedule
26 °C
Day Air Temp
6.2
pH
Weak
Smell
1315 PPM
TDS
45 %
Air Humidity
16 °C
Night Air Temp
11 l
Pot Size
0.16 l
Watering Volume
25 cm
Lamp Distance
Nutrients 5
Start-R
1 mll
Basis A
2 mll
Basis B
2 mll
Budcrack Week 7, concluding seventh week of vegetating:
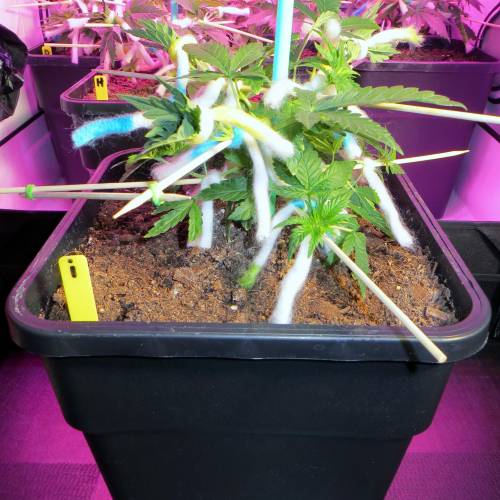
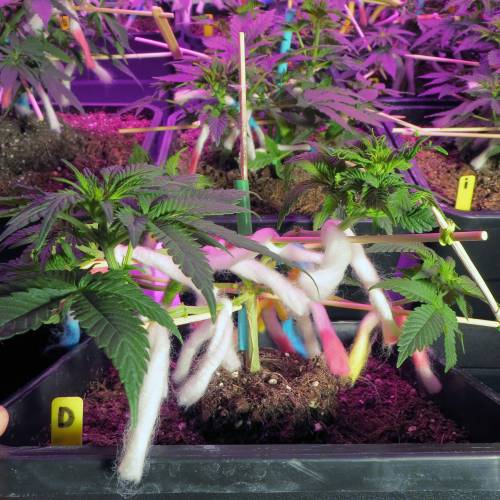
Hi(gh) Guys! Things are turning out better than I hoped, for now! My experimenting with the mainline-adapters is paying off now, it’s working great. I was thinking if this technique doesn’t already exist what I should call it. And in old-Dutch you would call this ‘Houtje-Touwtje’, but since most of you would have trouble pronouncing that, I would call this technique ‘MikaStraw’.
What I found out to be very handy about this method is that, when all 8 branches are attached properly, you can twist the upper part 1/8 turn opposed from the lower part, and that way all 8 branches receive light. I used an additional ½ picker together with a couple off Loom-bands from the kids to fix their position.
The last two years I didn’t do much training to my plants, apart from removing the lowest growth. I pretty much let nature take its course. Now I’m using a fair number of mixed techniques to try and up my yield. I must say that this takes some extra time on a daily base, especially in this phase. But I’m glad that it’s turning out this way. I’d photographed the individual plants on the first three photo’s as they were on this moment, and the fourth photo you can see them being tied down again (I must see to this every day) and I’d ponytailed the top 4 branches to give the lower branches the chance to grow passed them this week. Let’s see how that turns out.
I’m going to see how each branch develops, and the lesser ones are going to be removed. I added ‘9x4=36’ in the title, but i decided to select the best branches per plant, and if this means that a plant keeps more branches so be it. I’m not planning on removing good branches.
Also, plant G is the other plant that suffered from stress, and I’d remove it temporarily from the tent. The 10th plant (still residing in the pop-up tent downstairs) is turning out better than this plant, so I’m planning on changing them out. Another pro about that swap is that it was the only plant with 6 branches, so changing them out means all of the plants then got 8 branches.
Steady as it goes, next week more of this. I already notice a faint smell developing.
If you enjoy my post, and the ‘MikaStraw’-technique, please like my post!!
2 likes
comments
Share
8
Week 8. Vegetation7y ago


17.5 cm
Height
12 hrs
Light Schedule
25 °C
Day Air Temp
5.9
pH
Weak
Smell
1065 PPM
TDS
42 %
Air Humidity
16 °C
Night Air Temp
11 l
Pot Size
0.09 l
Watering Volume
15 cm
Lamp Distance
Nutrients 5
Start-R
1 mll
Basis A
2 mll
Basis B
2 mll
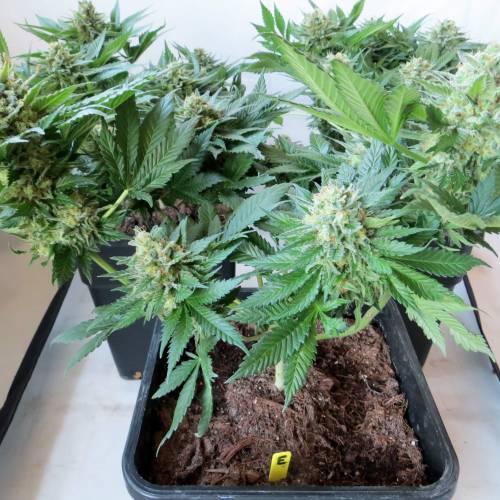
Budcrack Week 8, concluding eight week of vegetating:
Timing is everything, that must be the bottom-line lesson to be learned for me this grow. Every time my timing was off. Starting with installing those mainline-adapters, next time when those plants move to bigger pots is early enough for that. Then I waited too long to move the light closer to the seedlings, causing them to stretch a bit. With a little help from you guys I managed to properly kick start the metabolism with help of some plastic bottles, only to be removed to late causing the seedlings to lose too much color (and what I did after that ;-) Then I’d try to FIM to early, causing only two to succeed properly, and the rest to be topped later anyway. Did I mention that when you use 1 liter Airpots, you should give a little bit of water every day? I skipped one day before transplanting them into 11 liter pots, almost killed two plant along the way. Then I tried to ponytail the top branches, only next time I’d better try that before there almost started flowering. All things considered I think you got the point, timing really is everything. So these are all valuable experiences improving most of all the upcoming grows, I hope! Maybe not all is lost this grow, all depending on how much the now defoliated branch tips are going to grow during flowering.
This time again a lot of pictures, the first set shows how the plants looked after 5 days of pony tailing, and how they looked after the strings where removed. Much too light to my opinion, so I’d gave them two days and some foliar spray to catch up (again!) Then how they turned out after, right before the big defoliation. Then how every individual plant came out of defoliation, and the trim removed per plant. And finally how they now sit inside my little tent, waiting what more torment awaits…
Thanks for stopping by, and please don't forget to like (if you do). Next weekend wil conclude the first week of flowering, can't wait!! ;-)
3 likes
comments
Share
9
Week 9. Flowering7y ago


23 cm
Height
12 hrs
Light Schedule
27 °C
Day Air Temp
6.0
pH
Weak
Smell
1175 PPM
TDS
43 %
Air Humidity
16 °C
Night Air Temp
11 l
Pot Size
0.13 l
Watering Volume
10 cm
Lamp Distance
Nutrients 5
Start-R
1 mll
Basis A
2.5 mll
Basis B
2.5 mll
Budcrack Week 9, concluding first week of flowering:
Hi(gh) guys! Finally some time to sit back and wait for what’s coming. So this is going to be a lazy report, and certainly not 50+ pics this time. There really isn’t much to see, except for anticipation of what’s coming next. Is this turning out into my first hallelujah moment, or a bust? (I think the former ;-)
I think I already have all the answers I need: my journey up until now was a lot of trial and error but I know now that I’m reaching the point where I need to be. There is a four part article on a website where I learned a lot of the basics. This article is about the perfect canopy, and how to reach it. Since they released it in four parts, I saved it for later. And last week I’d read it. And, it made me smile! Because most of the things I figured out for myself already, and some things I learned from the article actually will make my life easier next grows. For instance they talked about Topping methods to reach the perfect canopy like; the Chandelier, the V8 and the Plateau. Next time I think I’m going to use the V8. This grow i’d came already close to it myself, but I think this technique only is going to make life easier.
last week I was summing up all off the timing mistakes I made, and surely I’d made a few more since then. I also took the liberty to change the titel, because this has not become a real SoG. And maybe I’m going to remove some branches but I’m going to stick with what I have for now. Let’s hope they will grow a little bit this upcoming week. Last report’s foliage removal caused them to retard last week, but I think the tent will grow full anyway before stretching stops. Since last week the canopy already did grow, so I think I’m good.
If the buds all grow into, maybe a little bit smaller than normal main buds, then I will be happy. The perfect canopy method is about getting only top-shelf product, and no B-quality lower buds. The idea is to get every bud inside the sweet spot. My Scroggmaster lamp actually makes that easier for me, because I can use it as close as only 5 centimeters from the canopy. Currently my canopy is between 10 and 15 centimeters from the lamp, and it’s the first time I was able to do this.
Next grow I will surely have an even better result, in two weeks shorter grow time, good times!
See you next week, thanks!
3 likes
1 comment
Share
10
Week 10. Flowering7y ago


23 cm
Height
12 hrs
Light Schedule
25 °C
Day Air Temp
6.0
pH
Weak
Smell
1230 PPM
TDS
49 %
Air Humidity
17 °C
Night Air Temp
11 l
Pot Size
0.14 l
Watering Volume
7 cm
Lamp Distance
Nutrients 5
Basis A
3 mll
Basis B
3 mll

Vitalize
0.2 mll
Budcrack Week 10, concluding second week of flowering:
Hi(g)h Guys! Back again, with an lazy report. Not much to do except giving nutrient-solutions, showers and I’d spend some time using Nico-Rolls (Jojo’s) to LST the branches to the same height. This works great, I have them to support during the end of flowering, back when I had long and thin stems. But since the’re spring loaded you can let them pull on a branch for 24 hours and then it will remain that way, and you can switch. Well, you can see what it did to the canopy. Only two plants, that where behind from the start, are a little bit lower.
Oh, and 10 weeks ago I’d started with 10 seedlings? The remaining plant found it’s place, well see for yourself!
;-) Hope to see you next week! ;-)
2 likes
2 comments
Share
11
Week 11. Flowering7y ago
25 cm
Height
12 hrs
Light Schedule
24 °C
Day Air Temp
6.1
pH
Weak
Smell
1260 PPM
TDS
45 %
Air Humidity
17 °C
Night Air Temp
11 l
Pot Size
0.11 l
Watering Volume
7 cm
Lamp Distance
Nutrients 4
Basis A
3 mll
Basis B
3 mll
Vitalize
0.2 mll
Budcrack Hi(gh) Guys! Week 11, concluding third week of flowering.
w'sup?
Not much here, only wait and TLC.
Next weekend i'm starting the new round with the R.Q.S. Honey Cream 🙌
That way they can go into the tent allready flowering. That would be somewhere starting May, and then i hope to finish half June with that round. They take at least the time of flowering to pre-grow, so i'd start next weekend.
Hope to see you next week! Thank's for your support.
3 likes
comments
Share
12
Week 12. Flowering7y ago


26 cm
Height
12 hrs
Light Schedule
25 °C
Day Air Temp
5.9
pH
Normal
Smell
965 PPM
TDS
47 %
Air Humidity
17 °C
Night Air Temp
11 l
Pot Size
0.1 l
Watering Volume
6 cm
Lamp Distance
Nutrients 4
Basis A
3 mll
Basis B
3 mll
Vitalize
0.2 mll
Budcrack Hi(gh) Guys! Week 12, concluding fourth week of flowering.
w'sup?
Yadiyadiyadi,
Blablabla,
Cool info??!
Hope to see you next week! Thank's for your support.
3 likes
comments
Share
13
Week 13. Flowering7y ago


27 cm
Height
12 hrs
Light Schedule
26 °C
Day Air Temp
5.9
pH
Normal
Smell
1098.5 PPM
TDS
44 %
Air Humidity
18 °C
Night Air Temp
11 l
Pot Size
0.11 l
Watering Volume
5 cm
Lamp Distance
Nutrients 4
Basis A
3.5 mll
Basis B
3.5 mll
Vitalize
0.2 mll
Budcrack Week 13, concluding fifth week of flowering:
Hi(gh) guys, last two weeks I’d not have any news worth mentioning, except maybe that last week I’d start a new round. I’ll update on that after this week’s report, so please check on that later to see what’s up!
Before the current round, I’d also bought a new Ph-meter. Only forgot about the calibration fluid. Before the new round, I’d bought some and calibrated the meter. I found out it was 1,5 point to high, so happy to have corrected it now.
As for the Bruce Banners, I know I’d made quite a few mistakes that make this round not flawless. But I’m trying how this method works. They have five full weeks ahead in which I expect them to fatten-up nicely! With that in mind I’m very excited to see how this turns out in the end.
Please bear with me!
;-) Hope to see you next week! ;-)
5 likes
comments
Share
14
Week 14. Flowering7y ago


27 cm
Height
12 hrs
Light Schedule
24 °C
Day Air Temp
5.9
pH
Normal
Smell
1090 PPM
TDS
44 %
Air Humidity
18 °C
Night Air Temp
11 l
Pot Size
0.04 l
Watering Volume
5 cm
Lamp Distance
Nutrients 5
Basis A
3.5 mll
Basis B
3.5 mll
Vitalize
0.2 mll
Budcrack Week 14, concluding sixth week of flowering:
Hi(gh) Guys,
I’d perform a little flushing last week with down Ph’d water and added enzyme-concentrate. Heard they break down build-up salt and that way conditioning the soil quality. I wander what happens if I also do this at the end, would the soil be already better conditioned to be re-used? (DNA/Mills soil is not exactly cheap, so would be nice!)
Also, a little setback: one off the two light bars from the side fill lighting broke down! Aargh! These things keep happening with this fixtures. Going to email my contact again, see if it can be fixed again soon.
After the flushing I’d started with a little PK, for the finish is close now. Let see if they get a little bit fatter by next week? Hope to see you again!
;-) Grtz, Budcrack ;-)
3 likes
1 comment
Share
15
Week 15. Flowering7y ago


27 cm
Height
12 hrs
Light Schedule
24 °C
Day Air Temp
5.9
pH
Strong
Smell
1072.5 PPM
TDS
40 %
Air Humidity
16 °C
Night Air Temp
11 l
Pot Size
0.14 l
Watering Volume
5 cm
Lamp Distance
Nutrients 5
Basis A
3.25 mll
Basis B
3.25 mll
Vitalize
0.2 mll
Budcrack Week 15, concluding seventh week of flowering:
Hi(gh) Guys,
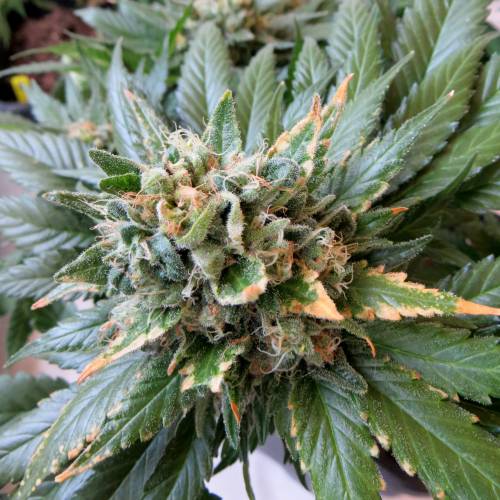
Finally this round is coming to an conclusion. I can’t wait to see the end result, but I will see this through the right way. The plants have slightly burned tips because I took them to the limit of what nutes they can handle. The DNA/Mills soil contains enough to flower a round, and only use a finishing product in the end. But I’d chose to stick to the Mills schedule, and tune back if it would turn out not. Luckily it all turns out just fine, and there is some serious bud to behold! ;-)
I would like to re-use the soil for my strawberries, so I’m planning on taking my time to properly flush them. Is it true that adding enzymes to the water helps breaking down salts and improve soil quality?
Harvest is planned on fifth of May, so I have enough time left.
;-) Grtz, Budcrack ;-)
5 likes
3 comments
Share
Grow Questions
Budcrackstarted grow question 7y ago
If you'd please look at the pictures with 'question' stated below them? This is actually the biggest bud, only it is showing these strange edges. There is (for now) no budrot, i checked. The leaves are firmly attached. What should i do, harvest it? The other buds don't show this.
Solved
Leaves. Edges burnt
likes

Adrenalizedanswered grow question 7y ago
Still feeding this late in flowering? Don't forget to cut the nutes 2 weeks before harvest and just water them untill you Chop. Looks like a problem with over- or underfeeding. Check this link out and try to deduct what you've been feeding and when and what you could be lacking or overdoing on.
https://www.royalqueenseeds.com/blog-cannabis-nutrient-and-deficiency-table-n88
16
Week 16. Flowering7y ago


27 cm
Height
12 hrs
Light Schedule
25 °C
Day Air Temp
5.9
pH
Strong
Smell
200 PPM
TDS
37 %
Air Humidity
16 °C
Night Air Temp
11 l
Pot Size
0.14 l
Watering Volume
8 cm
Lamp Distance
Budcrack Week 16, concluding eight week of flowering:
Hi(gh) Guys,
It’s really great! I’m excited to learn how much I’m going to yield from this grow. Friday I’d harvested the Non-focus tenth plant, it yielded a real cool 199 gram’s wet. I’m not even counting the 4 buds I’d already harvested last week, which I’d already vaped last Eastern weekend and are gone! Really great buds, and great taste and effect! Even though they didn’t even get any curing time, you can taste this is great stuff.
So, I was thinking: last 4 grows before this I’d had 16 plants where I didn’t apply any training on. I was happy to yield 10 grams per plant dry, and most times the lower buds where not useable because they were outside of the sweet spot. The main-buds where yielding 8 grams average dry weight. Lets say right now they are a bit smaller, like 5 grams dry? My yield must be somewhere around 9x8x5=360 grams dry, and that is great news! I think it could be even more by the look of it, but let’s not get ahead. Anyway I’m happy.
The biggest bud must have a little light burn, but the lamp is a little bit further away now so it is ok for now.
Harvest is planned on fifth of May, but I’m having slight timing decisions to make; the plants don’t show any signs of Autumn yet. That 10th plant was a bit further, I think because I’d let it underneath blue lights during flowering a few weeks longer. I’m going to experiment with that some more in the future. ;-)
By next weekend, if they don’t show signs of Autumn yet, I think I’m going to wait a week longer. That gives me some air with the upcoming grow, because I want to wait to switch to 12/12 a little bit longer.
If there are no issues to count in, waiting a bit longer is always better because they can gain a lot of weight during these last days. So harvesting early can cost you some cool grams, and that’s not really cool, is it??!
;-) Grtz, Budcrack ;-)
5 likes
comments
Share
17
Week 17. Flowering7y ago


27 cm
Height
12 hrs
Light Schedule
26 °C
Day Air Temp
6.1
pH
Strong
Smell
200 PPM
TDS
40 %
Air Humidity
19 °C
Night Air Temp
11 l
Pot Size
0.2 l
Watering Volume
10 cm
Lamp Distance
Budcrack Week 17, concluding ninth week of flowering:
Hi(gh) Guys,
I’ve been a little confusing maybe last post, the Bruce typically needs between 63 and 70 days from first signs of flowering to mature. And I’d planned harvest on day 70, because growing underneath LED’s learned me they need a little longer usually. Day 70 would be on 5th off May. I’m still aiming to harvest, well, 4 may, and unless the trichomes show something different I hope to harvest then.
Those high pressure lamps deliver fair amounts of radiated heath to the plants, what helps them kick in gear metabolism and finish their cycle a few weeks quicker. I’ve been contemplating on why the ‘Upperdecker’ (read: plant 10 ;-) finished 2 weeks earlier by the look of it? I thought last week that plant 10 started flowering underneath the blue growing LED’s for two weeks and then moved to the tent. But I now realize that the temperature must play the part to!
Off course I hope to pull it off again, the upperdeckers that is! We will see…
Not much info this week, just going steady as it goes. I’ll try and make some nice budporn next week before harvest. Get your towels ready…
;-) Grtz, Budcrack ;-)
2 likes
comments
Share
18
Week 18. Flowering7y ago


27 cm
Height
12 hrs
Light Schedule
23 °C
Day Air Temp
5.8
pH
Strong
Smell
200 PPM
TDS
46 %
Air Humidity
17 °C
Night Air Temp
11 l
Pot Size
0.07 l
Watering Volume
10 cm
Lamp Distance
Budcrack Week 18, concluding tenth week of flowering:
Hi(gh) Guys,
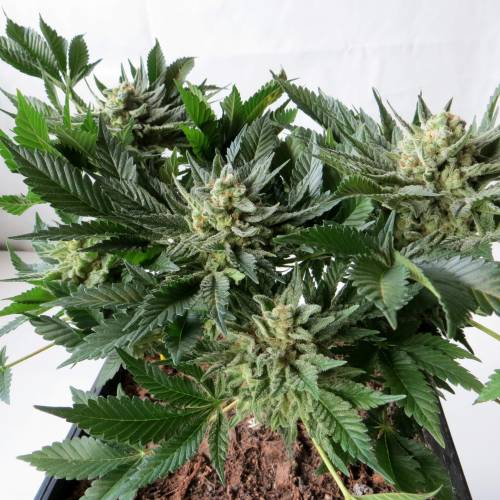
Last update on the last week! Not much up this week for the Bruce Banners, they got there last 0,5 liter water last Sunday, this week they were drying out before harvest. Trichomes are all milky and 10% is already amber. Tried to make some nice photos from the buds and the trichs, hope you guys enjoy!
Please come back for the harvest report, and hope to see you back on my new diaries. Thanks for your support, and feel free to ask if you have questions.
Bye, bye!!
;-) Grtz, Budcrack ;-)
2 likes
comments
Share
19
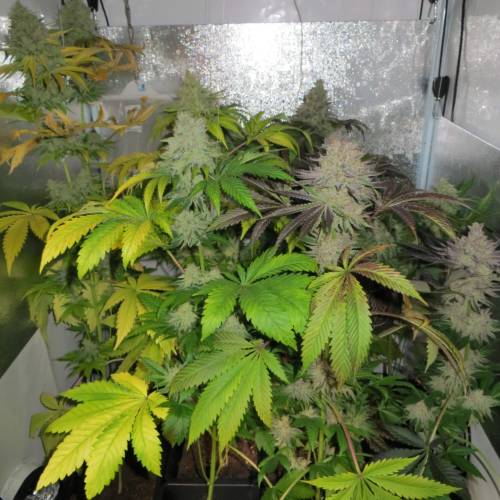
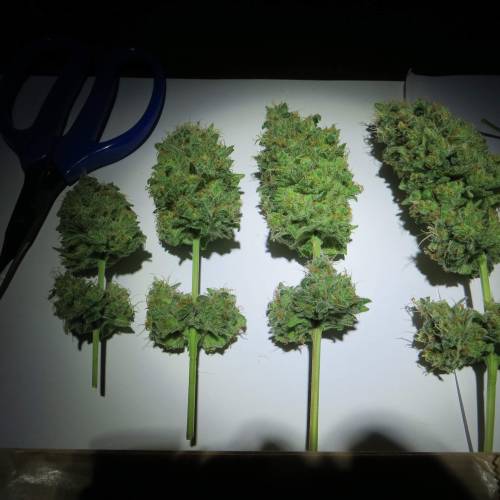
Week 19. Harvest7y ago
Happy Harvest Day!

9/10
Rated
This is really a strain i want to grow more often. It's easy to grow, forgiving. The effect is on the fysical side but it does give a nice but short headbuzz. The taste is promising, there is at least one pheno that gives a strong grapefruit smell and taste. There is more bud that gives a kiwi taste, even more than the kiwi strain i tasted from a dispensary a while back. I have a 4 liter C-Vault that's filled for 3/4 now with the main buds. I'm going to wait untill the curing proces had his way. I think it's going to be even better once properly cured.
Show more
Translate
Spent 127 days
Ger Veg Flo Har
151 g
Bud wet weight per plant
25.67 g
Bud dry weight per plant
9
Plants
0.64 m²
Grow Room size
Easy
Difficulty

Happy, Hungry, Relaxed
Positive effects

Dry mouth
Negative effects

Diesel, Fruity, Sour
Taste
Height
Day air temperature
Air humidity
PPM
PH
Light schedule
Night air temperature
Pot size
Lamp distance


Budcrack This was the first grow i went heavy on training and that doesn't disappoint, although there is much more to gain when i manage to improve the techniques. And let's not forget that the endresult depends heavy on the drying and curing proces. I think i'd maybe overdried the buds a little. The Boveda-packs wil add moisture again what hopefully corrects this. The downside is the somewhat underwhelming endweight, that must improve also. It started almost at 52% and is currently risen to 56%. The average buds are between 3 and 4 gram, lower than the 5 grams i hoped for. Maybe next grow i must remove these underdeveloped branches to give the others more energy to grow big, and hopefully up these results next time.
6 likes
3 comments
Share
Equipment Reviews


67 comments
Sort by
popularity
popularity
newest
oldest
Budcrack commentedweek 28y ago
Hi Bulbi, brought down Ph with acid, thus acidulated.
likes 2
CRiSPrGrow commented8y ago
@Budcrack, gotcha... only two reasons i can tell the leaves would turn yellow like that is if they dont like spray with pH much lower than 5.5 or higher than 6.5 or they dont like nutes in their spray; second reason is kind of strange but it happens with clones very often : so basically with everything dialed in perfectly, the metabolism is in overdrive due to the crazy light schedule so the plant wants to grow crazy fast and since it's too young it has less root mass and doesnt have enough roots to suck out the nutrients it needs from the soil so it starts cannabalising its leaves. cut the lights down to a still very intense 18/6 and see if that helps?
like 1
Budcrack commented8y ago
@CRiSPrGrow, they are back under the bottles now to hopefully restart metabolism. The lights are all on again on 24Hrs. I hope by the end of the week they continued growing.
like 1
CRiSPrGrow commented8y ago
@Budcrack, hope so too - let's see ! bottles can probaly come off, check the VPD, maybe put a thermometer and hygrometer in there and double check maybe it's hotter than you think
like 1
Budcrack commentedweek 157y ago
@Adrenalized, Thanks for your input. This is 1/71 buds, and it's the only one showing this (and it's the biggest). The rest ony has little burned tips. This week concluded the seventh week of flowering under LED. They need 9 weeks flowering in total, and i started flushing beginning the eight week, so no probs there!! And LED usually takes a little bit longer, but i will check on those trichs.
likes 2
Adrenalized commented7y ago
@Budcrack, well if it isn't the nutes my second guess would be lightburn. I see the lights are pretty close to the plant, and probably the biggest bud gets closest to the lights? Anyway the rest of your girls are looking Very Tasty. I hope I'll get Nice plants like you 🙂
like 1
Budcrack commented7y ago
@Adrenalized, well that would explain there is no sign off budrot. This lamp can be used as close as 5cm. Guess that bud came to close then! Thanks 😊
likes 2
CRiSPrGrow commentedweek 48y ago
😨 why are you removing the side branches on these ? usually you want to promote the side branches, hence pinching ...
like 1

LockDownGrow commented8y ago
@Budcrack, only 4 bramches ? Mine have 8 or 9 ,
Leave the branches on
likes 2
CRiSPrGrow commented8y ago
@LockDownGrow, let your truth shine brother👊 bring us the light 🙌
like 1
LockDownGrow commented8y ago
@CRiSPrGrow, what light u want me too bring ? Lol
likes 2
Show More (19)

Mrtony commentedweek 197y ago
you lost 40oz after dry bro😮
likes 2
Budcrack commented7y ago
@Mrtony, Yeah, i'm taking my time drying trough and trough because otherwise the inside of the bud is to wet and i can't get the moisture down inside the container. This way the right amount of moisture is added by the Boveda packs, easier to get it up than down. But it's true, it's not a big plus for the endweight.
I can assure you though, this was one of the best tasting bud i'd ever had, and it lasted me untill two weeks before the Honey Cream was ready, so it was almost enough. ;-)
likes 2
Mrtony commented7y ago
@Budcrack,NICE AS long as it done the job😉
likes
CRiSPrGrow commentedweek 18y ago
hey man, great plan ! awesome description, following this diary is gonna be an absolute pleasure ! here's more information on VPD complete with charts : https://www.alchimiaweb.com/blogen/vapor-pressure-deficit-cannabis-cultivation/ hope this helps ! let me know if you have any more questions ! 🚀
like 1
Budcrack commented8y ago
@CRiSPrGrow, no CFL it is all LED. That's why i was carefull with distance, the lights are quite intens.
likes 2
Budcrack commented8y ago
@CRiSPrGrow, hi Bulbi 👋! two days further, and the seedlings where up for another spray. So i went through them one by one, and FUUU...😠 totally forgot about the fact that the spray would cause the wooden sticks to mold!! So immediately removed the sticks along with the mold, i hope the seedlings won't be affected by it!
Ok, the seedlings where sprayed for the first time on Sunday, today they look as if growth took a few steps up! Great! The stems didn't grow any longer, but the leaves definitely are positively affected by the spray. I was scared as hell to do this, to be honest. But you already knew that from our chats.
What would be a good time to remove the bottles, and maybe start with a mild nutrient solution?
Thanks man!
like 1
Budcrack commented8y ago
@CRiSPrGrow, hi Bulbi 👋! It seems that they stopped stretching and directed their energy to foliage development, it looks great. I'd learn that only young clones need high humidity because their root systems handicapped. Where now only 10 days on the way since i'd planted them, and i can see now that this really makes a difference. I also see that there is so much contradicting information to come by, although my initial source is a good one! I learned all my basic skills from it. Anyway, thanks man!
likes 2
Show More (10)

GreenHouseLab commentedweek 107y ago
Coming along well 👍
likes 2

The_Projexx commentedweek 28y ago
Looking like you're well on you're way ! Wishing you the best of luck on you're grow !
-Happy Growing!😎
like 1
Budcrack commented8y ago
@The_Projexx, thanks mate! Your doing very well yourself! Let's see what this round's got in store for me. Grtz, Budcrack
likes 2
The_Projexx commented8y ago
@Budcrack, Im very exicited for mine to come down man the patience shes wearing low lol lol but I going to be good and wait almost at the end now !
Thanks for responding homie
-Happy Growing!😎
like 1

Athos commentedweek 18y ago
To answer your question:
They look great, although there's two things I want to point out. They are stretchy, try puting them closer to the light. Second, you are feeding too early, you risk burning them, diecisiete if you are going to transplant them to 11 liter pots later, let them feed on the soil.
like 1
Budcrack commented8y ago
@@Athos, first i will put them closer to the light right away, i was careful because the new LED's are much more intense than the previous lights (Which where only the LED-strips). I hope that end of next week they will show better response on being closer to the light. Second, i was planning on giving the stated amount of nutrients this evening, divided by the 10 seedlings in 1 liter water. Up until now they only got plain water. So i will wait to give them nutrients longer. Thanks for your input!
like 1
Budcrack commented8y ago
@@Athos, reduced height from 45 to 30 cm's (see last picture). I now must see that they don't become to hot, closer to the lamps. Deleted planned nutrient to give this evening, will continue with plain water.
likes 2
GreenHouseLab commentedweek 97y ago
I wouldnt complain many would envy to be having your current grow. It takes years to master growing methods and you only really learn once youve done it for yourself 👍 No popcorn buds here!
like 1
Budcrack commented7y ago
@GreenHouseLab, can't argue with that! I'm now growing for five years, of which the first two almost didn't yield anything smokable (but maybe that's because i started growing sativa on hydro in a 160x80x80?) !! But i'm not complaining, i just want to try to do a perfect job, and try to keep you guys informed how. Happy growing mate!
likes 2

stephandjo commentedweek 67y ago
Great technique 👌 I know I will learn a lot of stuff 👌
like 1
Budcrack commented7y ago
@stephandjo, not to fast, this is also my first time this way. You'll have to wait this one out to see if it works! To the 1 gram/watt/plant! 👊
likes 2
LockDownGrow commentedweek 48y ago
And being generous on the skill lol but hey I did the end result , so couldn't ask for more
like 1
Budcrack commented8y ago
@LockDownGrow,
Thanks for your quick response! I will take a look at your diaries. I have time to think it all over stil, so would you mind me asking some more questions? Grtz, Budcrack
like 1

Experimentgreen commentedweek 18y ago
Hey budCrack definitely get in with newbie of the month if you can! Theres only 8 diaries in so far....and the likes will add up quick and before you know it you wont qualify for newbie anymore...thats what happened to me. My outdoor took 6 months, so by the time it was harvest i had somehow made it to master status even though i do not feel that way at all...so no newbie of the month for me. 😥
like 1
Budcrack commented8y ago
@Experimentgreen, hi ExGREEN 👋! I'd finally find a moment for a proper reaction to your comment, notice that i also asked you another question on chat. First, thanks for your kind words, if one would start its first grow, and try to take into account everything that helps to finish that round perfectly, I think your heads going to explode. I think in practice starting something like this takes almost everyone to make a lot of mistakes and learn a lot! I’m at it now for more than 4 years, of which the first two years delivered me hardly something useable!! Last indoor season (2017-2018) I was finally confident enough about my skills to plan and try to make 3 overlapping rounds, of which the results are seen here in the pictures (before Growdiaries). So now not only the base-skills but also the routine is there. So this season (2018-2019) its time to put the dots on the i (is that a saying in English?)
Ok, first I want to tackle your comment on popcorn buds, for the last year i'd started using lower additional LED-bars for lighting these lower buds, and they are actually useable now. You can see from the pictures from last season that my plants always where very stretchy, what will now hopefully changes along with the help from Growdiaries growers. Do you suggest to remove everything apart from the mainsite? When you look at the pictures from last rounds harvesting R.Q.S. O.G. Kush, what would be the part you would have removed?
As for the hot months, and whether or not to use an airco, that would be to expensive and stressful. I had a mobile airco in the bedroom in my last place, but there was always something with that thing. And I like to have a break that period to relax a bit and renew inspiration for next indoor season. The place where my tent sits is far from ideal, but the other 9 months suffice.
Thanks for your input! 👍
like 1

Mrs_Larimar commentedweek 18y ago
What should i say, respect. you are well prepared and expierienced.and i agree in seed selection, i always try to pic the most homogen ones. Successful and happy growing
like 1
Budcrack commented8y ago
@Mrs_Larimar, yeah well the xp does'nt come overnight, but if you take a little step towards your goal every time it should go better and better! Thanks for your kind words, and happy growing to you to! ;-)
likes 3

DailyBread commentedweek 147y ago
Nice top job
like 1
CRiSPrGrow commentedweek 38y ago
great work rescuing these babies hopefully they wont be stunted ! i like the thinking though, great description !
like 1
CRiSPrGrow commentedweek 28y ago
what is acidulated water?
like 1

the end.
Enjoying this diary? Follow for more updates!


Prefer the old Diary view?
Go back to the old Diary view