
Project Broiler


FLO
Full spectrum Light Emitting Diodes/220W
Custom
VEG
Full spectrum Light Emitting Diodes/220W
Custom
FLO
Adlite DR30 Light Emitting Diodes/30W
FLO
Adlite UV30 Light Emitting Diodes/30W
FLO
Adlite IR15 Light Emitting Diodes/15W


Fan
145-180m3/h
Cornwall


Contr
Raspberry pi 5 + Home Assistant
Hand made

CO2
Automatic CO2 with sensor
Hand made

Coco Coir
Custom

Perlite
Custom
Indoor
Room Type
ScrOG
weeks 6-10
Defoliation
weeks 7-12
20 l
Pot Size
3 l
Watering
Start at Harvest
6
Week 6. Vegetation2y ago


25 cm
Height
18 hrs
Light Schedule
26 °C
Day Air Temp
5.8
pH
Weak
Smell
1100 PPM
TDS
54 %
Air Humidity
20 °C
Solution Temp
23 °C
Substrate Temp
21 °C
Night Air Temp
20 l
Pot Size
1 l
Watering Volume
60 cm
Lamp Distance
400 PPM
CO₂ Level
Nutrients 7
Kelp/wakame tea
3 mll
Aloe juice
10 mll
Coconut water
15 mll
TyRun Skipping previous weeks, the latest veg phase condition.
Started transition to flowering phase.
likes
comments
Share
Used techniques
ScrOG
Technique
7
Week 7. Flowering2y ago


30 cm
Height
12 hrs
Light Schedule
26 °C
Day Air Temp
5.8
pH
Weak
Smell
1250 PPM
TDS
55 %
Air Humidity
20 °C
Solution Temp
23 °C
Substrate Temp
21 °C
Night Air Temp
20 l
Pot Size
1 l
Watering Volume
60 cm
Lamp Distance
400 PPM
CO₂ Level
Nutrients 15
Kelp/wakame tea
4 mll
Aloe juice
10 mll
Coconut water
15 mll
TyRun So 7 week was the transition to the 12/12. Changed nutrients solution for 1st week of flowering phase.
The plant started surge grow, keep going and cant wait for the first flowers )
likes
comments
Share
Used techniques
Defoliation
Technique
ScrOG
Technique
8
Week 8. Flowering2y ago


40 cm
Height
12 hrs
Light Schedule
26 °C
Day Air Temp
5.8
pH
Weak
Smell
1250 PPM
TDS
50 %
Air Humidity
20 °C
Solution Temp
23 °C
Substrate Temp
20 °C
Night Air Temp
20 l
Pot Size
1.5 l
Watering Volume
55 cm
Lamp Distance
900 PPM
CO₂ Level
Nutrients 12
Kelp/wakame tea
4 mll
Aloe juice
10 mll
Coconut water
15 mll
TyRun First week of 12/12 passed!
Finally applied alternate magnetic field to the pot, will see how it works in future.
Set up the controller dashboard in HA and made automation for lights and field.
Light schedule:
UV 5min each hour at light period
DR full 12 H
IR 15 before and after main light
Main light is on full power now.
Great potential overall.
likes
comments
Share
Used techniques
ScrOG
Technique
Defoliation
Technique
9
Week 9. Flowering2y ago


45 cm
Height
12 hrs
Light Schedule
28 °C
Day Air Temp
5.8
pH
Weak
Smell
1400 PPM
TDS
60 %
Air Humidity
20 °C
Solution Temp
20 °C
Substrate Temp
20 °C
Night Air Temp
20 l
Pot Size
2 l
Watering Volume
50 cm
Lamp Distance
1500 PPM
CO₂ Level
Nutrients 14
Kelp/wakame tea
4 mll
Aloe juice
10 mll
Coconut water
15 mll
TyRun Second week passed, setup fully completed. Added the CO2 injection this week.
20 minutes in total per hour for 12 hours of light period with 1500-1600 ppm
1 like
comments
Share
Used techniques
ScrOG
Technique
Defoliation
Technique
10
Week 10. Flowering2y ago


48 cm
Height
12 hrs
Light Schedule
29 °C
Day Air Temp
5.8
pH
Normal
Smell
1600 PPM
TDS
60 %
Air Humidity
20 °C
Solution Temp
20 °C
Substrate Temp
20 °C
Night Air Temp
20 l
Pot Size
2.8 l
Watering Volume
47 cm
Lamp Distance
1500 PPM
CO₂ Level
Nutrients 14
Kelp/wakame tea
4 mll
Aloe juice
10 mll
Coconut water
15 mll
TyRun Going good, leading to 4th week. Buds appeared on the second day of the week and getting bigger each day.
EC level of nutrients solution increased significantly, from 2.5 to 3.2 with runoff pH 5.8 EC 4.1
Removed SCROG net, made some stretches with wire. Branches are so hard so I barely can bend them.
Made defoliation to light up lower buds and improve ventilation.
See ya next week)
1 like
comments
Share
Used techniques
Defoliation
Technique
ScrOG
Technique
11
Week 11. Flowering2y ago


49 cm
Height
12 hrs
Light Schedule
29 °C
Day Air Temp
5.9
pH
Normal
Smell
900 PPM
TDS
60 %
Air Humidity
20 °C
Solution Temp
20 °C
Substrate Temp
20 °C
Night Air Temp
20 l
Pot Size
3 l
Watering Volume
46 cm
Lamp Distance
1500 PPM
CO₂ Level
Nutrients 12
Aloe juice
5 mll

pH Perfect Grow
2 mll

pH Perfect Micro
2 mll
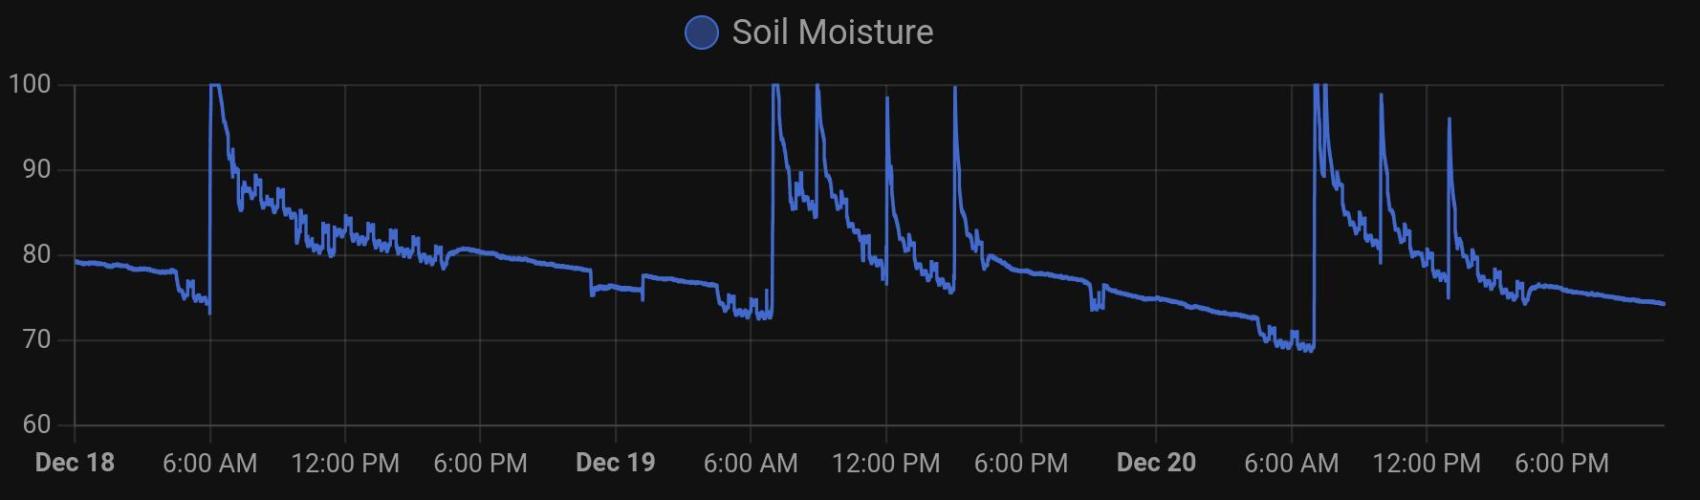
TyRun It seems that my setup (or genetics) can't handle full-strength nutrients.
For two days, I watered without runoff, and I noticed on the soil moisture chart that the plant started drinking less and more slowly. Growth was barely noticeable on the timelapse. That’s when I realized something was wrong. I flushed with 3 liters of RO water.
Runoff EC was a staggering 5.3.
Without much hesitation, I flushed with another 2 liters, and the EC finally dropped to 1.6, while the pH remained stable at 5.9.
After that, I halved the base nutrient dosage (from 4 ml to 2 ml per liter). Watering was done in two parts:
First: 2L with EC 1.4 and pH 5.7–5.8.
Second: 1L with EC 0.45 and pH 6.2.
Now, the charts show improvement, and the runoff has stabilized. The plant is back to feeding, and EC is holding at 1.3. From now on, I’ll adjust feeding based on runoff dynamics, as the manufacturer's feeding chart clearly doesn't suit my grow. I’ll monitor the EC difference between input and runoff to fine-tune the nutrient dosage.
By the way, signs of nutrient burn (slightly burnt tips) have appeared, confirming an overdose. However, I think the plant handled the stress quite well, and my timely reaction—thanks to sensors and monitoring—prevented further issues.
---
Big Update: Nutrient Replacement
I discovered (don’t remember how) that my base nutrients are actually pretty basic, designed for beginners. For experienced growers with advanced setups (I barely fit into this category, but still), there’s the Connoisseur line. It includes extra elements like amino acids, fulvic acids, and other fancy additives. Moreover, there’s a special coco formula with reduced potassium and increased magnesium and calcium, eliminating the need for CalMag. Shut up and take my money!
But not so fast—after browsing through half the grow shops in the EU, I found that the full Connoisseur lineup was out of stock everywhere. Then I stumbled upon a store with an outdated, plain design offering cash-on-delivery. I took the risk and placed an order. Surprisingly, it arrived within two days. As they say, don’t judge a book by its cover.
---
Miscellaneous Updates
CO₂ management isn’t running smoothly, possibly due to overlapping automation scripts or an issue with the valve. Since it happens early in the morning, I can’t always respond quickly. I’ve already used up another tank, but I’ve tweaked the automation. Now, I’ve got three scripts for CO₂ control:
1. Injection: Runs for 10 minutes with support every 2 minutes. The first injection lasts 5 seconds, followed by alternating 2-second and 1-second injections.
2. Temperature Protection: Activates the vent for 5 seconds if the grow box gets too warm and turns it off if the injection process is ongoing.
3. CO₂ Level Protection: Activates the vent for 10 seconds if CO₂ levels exceed the target and turns it off if the injection process is ongoing.
Quick note: CO₂ sensors aren’t perfect and should be used as a general guide. I’m using the SCD41, which is considered accurate but has a lag time of 15 seconds. In that time, CO₂ injection can easily overshoot the target. That’s why time-based automation is far more reliable.
Lastly, there was an issue with the camera: waves and distortions appeared, possibly due to vibrations, which means I’ll have to cut three days of timelapse footage. I’ve secured the camera better now, and everything seems fine.
---
That’s the week! Stay tuned for more updates!
likes
comments
Share
Used techniques
Defoliation
Technique
12
Week 12. Flowering2y ago


49 cm
Height
12 hrs
Light Schedule
29 °C
Day Air Temp
5.9
pH
Normal
Smell
900 PPM
TDS
60 %
Air Humidity
20 °C
Solution Temp
20 °C
Substrate Temp
20 °C
Night Air Temp
20 l
Pot Size
3 l
Watering Volume
46 cm
Lamp Distance
1500 PPM
CO₂ Level
Nutrients 10
Aloe juice
5 mll

Bud Candy
2 mll

Bud Factor X
2 mll
TyRun Not a day without adventures!
The more complex the setup, the harder it is to fine-tune. At the beginning of the week, everything was smooth, except for the rising outdoor humidity. It was truly the calm before the storm—everything seemed stable until, suddenly, by the end of the week, nearly all the tops started showing bronze spots, and growth stalled (timelapse are really helpful, you can see the daily growth pace). The drainage EC spiked to 3.5. I also noticed that one day, naturally while I was away, the humidity shot up to 75+.
Main suspects:
1. High humidity and temperature during CO2 injection when the exhaust system isn’t running.
2. Excessive lighting intensity.
3. Root issues.
4. New nutrients.
5. Your theory?
In Europe, humidity is a common problem, especially in winter. Last year, there was mold in the house, and this year, for some reason, I ignored it—big mistake. Hopefully, a dehumidifier will help.
I never thought I’d see light overexposure (usually there’s never enough light), but I came across an article describing my exact case—leaves pointing upwards, almost “praying,” which indicates excessive lighting.
Here’s my theory: the plant was already at the limit for light, nutrients, and humidity. The final straw was the increased humidity, which disrupted transpiration and thus slowed metabolism, leading to burns on the leaves closest to the light source.
Based on these clues and matching them to common issues, I decided to reduce lighting intensity by 20%, cut the base nutrient dosage in half for a couple of days until the drainage EC drops, and ordered a Meaco Dry Arete Two 20L dehumidifier, which should, in theory, handle the entire apartment.
It looks like this grow will be more of a trial run for the new setup—tweaks, adjustments, and observations—rather than a max yield as initially planned. Oh well... still, what an experience! Next time, I’ll be ready.
Until next week...
P.S. Don’t trust temperature and humidity sensors—they lie, especially the black ones (not racism, they just overheat from the light).
likes
comments
Share
Used techniques
Defoliation
Technique
13
Week 13. Flowering2y ago


50 cm
Height
12 hrs
Light Schedule
29 °C
Day Air Temp
5.9
pH
Normal
Smell
1700 PPM
TDS
60 %
Air Humidity
20 °C
Solution Temp
20 °C
Substrate Temp
20 °C
Night Air Temp
20 l
Pot Size
3 l
Watering Volume
46 cm
Lamp Distance
1500 PPM
CO₂ Level
Nutrients 10
Aloe juice
5 mll
Bud Candy
2 mll
Bud Factor X
2 mll
TyRun Like a shovel to the head
That's how the plant reacted to the last stress—lost appetite and growth slowed significantly.
To reset things, I flushed it with 10 liters of RO water because EC started climbing again. Within 2-3 days, potassium deficiency showed up.
I grilled the chatGPT on the reasons for salt buildup, why it’s happening, and the ideal temperature and humidity for CO2 injection. The AI came up with this theory: when CO2 levels are high and exhaust fans are off, temperature rises, causing the plant to uptake more water but fewer nutrients. This led to a quest for a precise watering recipe to address the problem and adapt to magnetic field influences. The AI resisted—mixing up fertilizers, timings, and volumes—but we finally agreed on this schedule:
Watering Schedule:
3 days base nutrients, 1 day boosters, 2 days base nutrients, 1 day boosters
Base Nutrient Days:
1. Morning feeding (7:00 AM), 1.5L:
Connoisseur Coco Bloom A: 6 ml
Connoisseur Coco Bloom B: 6 ml
2. Second watering (10:00 AM), 0.5L:
RO water
3. Third watering (1:00 PM), 0.5L:
RO water
Booster Days:
1. Morning feeding (7:00 AM), 1.5L:
Rhino Skin: 3 ml
Bud Candy: 3 ml
Big Bud: 3 ml
Tasty Terpens: 3 ml
B-52: 3 ml
Bud Factor X: 3 ml
Sensi Zym: 3 ml
2. Second watering (10:00 AM), 0.5L:
RO water
3. Third watering (1:00 PM), 0.5L:
RO water
The timing aligns with the magnetic field's influence to maximize nutrient uptake during peak demand.
Arguments for this schedule:
Achieving 10-15% runoff from the morning feed
Stabilizing EC by avoiding overloading the plant with a full "cocktail" of nutrients
Allowing the plant to freely consume base nutrients without booster overload
Insights from Advanced Nutrients support: They suggested using Bud Factor X only once a week for optimal use, which inspired splitting the "cocktail" components into separate days.
Current observations:
On the first day, there was no runoff after applying 1.5 + 0.5 + 0.5 liters. Previously, I watered 2.5L once daily, yielding 20-25% (around 420 ml) runoff.
On the second day, I used only base nutrients (2 + 0.5 + 0.5L), and the plant still consumed about 25%, with runoff at 200 ml. EC hasn’t improved yet (still at 3.4), so I’ll keep monitoring.
Progress:
The plant is slowly recovering, with new white stigmas appearing. Amber trichomes are still sparse, so I’ll give it another week or two before switching from Big Bud to Overdrive for two weeks, then finish with a Flawless Finish flush.
Personal goal:
Maximize learning from this grow, force this "Shaitan machine" to work synergistically for the plant, and master coco cultivation and nutrient management.
1 like
comments
Share
14
Week 14. Flowering2y ago


51 cm
Height
24 hrs
Light Schedule
27 °C
Day Air Temp
5.9
pH
Normal
Smell
5 PPM
TDS
60 %
Air Humidity
19 °C
Solution Temp
20 °C
Substrate Temp
20 °C
Night Air Temp
20 l
Pot Size
3 l
Watering Volume
36 cm
Lamp Distance
1500 PPM
CO₂ Level
Nutrients 10
Aloe juice
5 mll
Bud Candy
2 mll
Bud Factor X
2 mll
TyRun During the 7th week, I tested a new irrigation scheme. Things didn't get worse, but the EC in the runoff didn't decrease much—it stayed around 3-3.3. At least it’s not increasing, so that’s a plus. The plant has pretty much stopped growing visually, with only a slight stretch in the colas. It feels like it's focusing more on trichome production now.
This week, I’ll continue the same approach but will use half the dose of base nutrients—2 ml/L. I’ve swapped BigBud for Overdrive.
Despite everything, the buds have started maturing, so I’ll likely give it one more week before flushing. I’m itching to start a new run and aim for a grow without overfeeding. The long break from growing and the new setup have definitely affected the results. It’s not a total mess though—there’s plenty of frost, and American strains aren’t exactly known for massive buds anyway. Still, I feel it could’ve been better.
The smell is strong but pretty standard. It starts off with a chemical-gasoline punch, then transitions into a citrusy aroma, closer to grapefruit. It’s not your typical scent, but I personally prefer more fruity-candy profiles.
likes
comments
Share
15
Week 15. Flowering2y ago


51 cm
Height
12 hrs
Light Schedule
27 °C
Day Air Temp
5.9
pH
Normal
Smell
1150 PPM
TDS
60 %
Air Humidity
19 °C
Solution Temp
20 °C
Substrate Temp
20 °C
Night Air Temp
20 l
Pot Size
3 l
Watering Volume
36 cm
Lamp Distance
1500 PPM
CO₂ Level
Nutrients 10
Aloe juice
5 mll
Bud Candy
2 mll
Bud Factor X
2 mll
TyRun Change big bud for overdrive this week.
It looks ripe enough so next week I'll perform flush with flawless finish and harvest.
2 likes
3 comments
Share
16
Week 16. Flowering2y ago


51 cm
Height
12 hrs
Light Schedule
27 °C
Day Air Temp
5.9
pH
Normal
Smell
1150 PPM
TDS
60 %
Air Humidity
19 °C
Solution Temp
20 °C
Substrate Temp
20 °C
Night Air Temp
20 l
Pot Size
3 l
Watering Volume
36 cm
Lamp Distance
1500 PPM
CO₂ Level
Nutrients 1

Flawless Finish
2 mll
TyRun Intermediate Results
Overview
This grow was intense! Setting up the grow consumed so much of my time and focus that I started slacking at work, and it took me a month to get back on track. But hey, what’s the point of a job if it gets in the way of growing? 😉 In the end, everything worked out, and I gained invaluable experience.
This was my first grow using coco coir. At first, I didn’t get it, but then it just clicked! Now I’m hooked: "I’m here to stay." Coco is more controlled than soil, flushes easily, and you can introduce beneficial microbes, which thrive in it. My main takeaway from this grow? If you buy coco, don’t forget CalMag!
Next time, I’ll definitely install HEPA filters at the intake. The amount of dust was insane, and the grow box pulls air like a vacuum cleaner. Watching the timelapse, you can see the box sucking in every bit of dust. I vacuumed the intake filters weekly. The plant was incredibly sticky, but that also meant it caught a lot of lint and fibers between trichomes, especially visible under a microscope. Smoking microplastics? No, thank you!
---
On CO2
CO2 only works if everything else is dialed in. If the plant experiences stress from deficiencies or overfeeding, you can forget about it. Since CO2 supplementation requires turning off the exhaust fan, it’s hard to manage temperature and humidity. The plant releases so much moisture that RH jumps to 80% within minutes. It’s doable, but definitely a challenge.
---
On Magnetic Fields
No clue what’s happening here yet, but it’s fascinating! I’ll test again with a control sample.
---
Nutrients
Dreams do come true—I’ve tested almost everything Advanced Nutrients offers. It wasn’t all smooth sailing; their feeding charts need adjustments for your conditions, and you usually need to feed less than recommended. Overall, I’d say the nutrients performed 100%, and I see no reason to switch. I’ll stick with them for future grows.
---
Strain
This strain is reliable, though not the most productive. It flowered exactly as advertised and delivered a frosty finish. It tolerated all my mistakes like a champ—especially mold. Despite an abandoned SCROG plan turning the plant into a bouquet, there wasn’t a single mold spot, even in the densely packed lower buds that got almost no light. Zero mold issues!
---
Aroma
As advertised: pine, wood, and citrus. At first, I thought it smelled like grapefruit, but now I’m leaning toward bergamot. Bergamot with a classic weed aroma—a recognizable twist on the usual scent. During the grow, the smell was strong, but the carbon filter handled it perfectly.
---
Flavor
It’s too early to say, but the flavor is definitely there! Embarrassingly, all my past harvests tasted the same—like nothing. Just smoke. This one has a distinct sour taste. I’m excited to see how it develops after curing.
---
Effect
Too early for a full review, but I love what I’ve tried so far. The high lasts about three hours, with euphoria and relaxation. It’s the perfect evening strain. I’ve smoked a lot over the years, but I’ve never experienced true euphoria—until now. Guess I’ve been stuck with garbage and ditch weed before. 😅 It’s not a strain for productivity or chores, but it’s perfect for chilling, watching something, or chatting. No anxiety, just great vibes. It feels like having a beer after a long day: you relax, and life feels good again.
---
Roots
The roots were healthy—maybe too healthy! While the AirPot (20L) prevented root circling, it didn’t eliminate it entirely. There were dead zones at the bottom where roots circled around the perimeter. A dense root mat formed at the bottom (so dense you couldn’t poke a finger through it), which likely contributed to salt buildup. Breaking through that mat required more water, and I suspect this caused EC to spike 1.5x the next day if there was no runoff. Next time, I’ll mix some pumice with the substrate at the bottom, about 3–4 cm deep.
---
Timelapse
I only got the timelapse running after the switch to flowering, so it’s not from the beginning. Still, it’s an incredibly useful tool for understanding growth rates. I’ll definitely use it for future grows. Comparing yesterday to today is one thing, but rewinding a week to see how things were is game-changing. I recommend it! You can even use an old phone with a timelapse app if your camera doesn’t support it by default.
---
What’s Next
I’ve grown fat buds before, but I’ve always neglected curing. This time, I’m doing it by the book with full control. Drying in the grow box with RH controlled at 50–60% (averaging 55%) for a slow, even dry. Temps are kept between 20–23°C, with frequent venting to keep it below 21°C for terpene preservation. After 7–10 days, when small stems snap with a characteristic sound, I’ll trim and jar them with humidity sensors. For the first two weeks, I’ll burp the jars twice daily, then reduce to once daily for the next two weeks. After that, I’ll monitor the RH sensors and adjust as needed. I’ll share the details after curing is complete.
After drying, I’ll weigh the buds, take photos, and share another post in a month or two after curing to report on the flavor and aroma.
For now, I’m taking a breather, fine-tuning my setup, and preparing for my next grow: Wizard Trees - Zangria S1.
likes
3 comments
Share
17
Week 17. Harvest2y ago
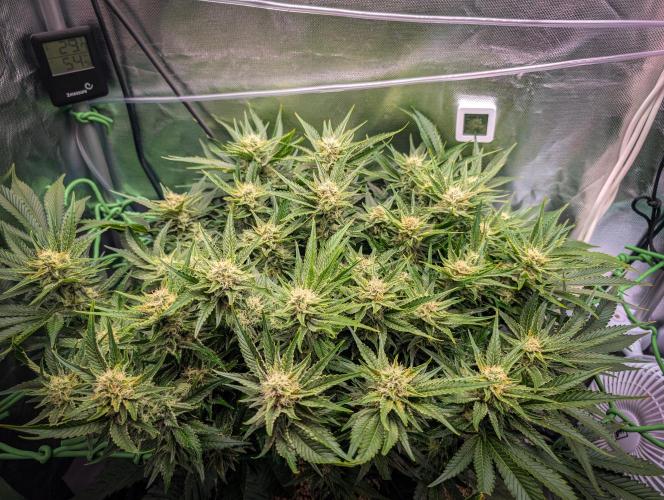
Happy Harvest Day!


8/10
Rated
The overall profile remained intact: pine, chem/fuel notes, and a citrusy nuance (still convinced it’s bergamot) all in place.
Through a vape, the vapor is smooth, with a pronounced sour aftertaste.
The effects, however, became noticeably stronger after curing. Right after a hit, it’s clear how heavy the vapor feels in the lungs—a good sign, I thought. While I’m not claiming 30% THC, there’s definitely around 20-25%.
The high kicks in within 5 minutes, pulling you through a hyperspace of playful thoughts, ideas, and entertaining nonsense. Throughout the trip, I was in a great mood, feeling creative and curious, all while snacking (the munchies weren’t overwhelming, but everything just tasted better).
Had a blast playing with my kid—completely immersed in the moment. About two hours in, I made the mistake of sitting on the couch, where I got stuck between the cushions for about 30 minutes. That’s when the high wraps you in a lazy blanket, gradually fading away.
Overall, the experience lasts around 3.5-4 hours. No negative side effects—no dry mouth (just a bit), paranoia, or anxiety. You might feel a slight mental fog if smoked in the evening, but nothing critical.
Show more
Translate
Spent 78 days
Ger Veg Flo Har
1000 g
Bud wet weight per plant
190 g
Bud dry weight per plant
1
Plants
0.32 m²
Grow Room size
Normal
Difficulty

Creative, Euphoric, Relaxed
Positive effects

Dry mouth
Negative effects

Depression, Stress
Medical effects

Citrus, Pine, Woody
Taste
Height
Day air temperature
Air humidity
PPM
PH
CO2
Light schedule
Solution temperature
Night air temperature
Substrate temperature
Pot size
Lamp distance


TyRun Placing a dehumidifier or humidifier in the grow box turned out to be ineffective when both devices have their own automated settings. For instance, a humidifier set to 55% humidity works within a ±5% range, meaning it waits until the humidity drops below 50% to turn on and runs until it hits 60%. Since its sensor refreshes every 30 seconds, it might show 54% one moment and jump to 61% the next—not exactly stable at 55%. The dehumidifier behaves similarly.
To achieve more consistent results, it’s better to rely on a hygrometer inside the grow box and use “dumb” devices that simply turn on when powered. Connecting these devices to smart outlets provides more precise control.
For manual control, I maintained around 55% humidity by turning the humidifier and exhaust fan on and off via phone. Most moisture and aroma are released during the first three days, then taper off. The common rule of “when thin branches snap, it’s dry” led me to overdry my buds. A more reliable method is to monitor the hygrometer. When humidity stabilizes after the initial rise, wait one more day and then jar the buds.
Rehydrating Overdried Buds:
Overdried buds can be revived with a small piece of mandarin (or orange) peel, about 2.5x2.5 cm. Thoroughly wash the peel (even sanitize it if needed), cut a square, and place it on top of the buds in the jar. In my experience, this brought the humidity from 46% to 62% within 4 hours. Afterward, burp the jars for 15 minutes and monitor the hygrometer. If the humidity drops below 55%, return the peel for a few more hours. Once stable at 60-62%, remove the peel and continue curing, burping the jars twice daily for 15 minutes.
As for humidity packs like Integra Boost or Boveda, I used them because I had some lying around. These packs are designed for 12 grams of product, so they don’t make a big difference in larger jars. If you burp jars daily and gently rotate the buds, they’re not really necessary.
Trimming and Results:
After 7 days of drying, I decided to trim dry this time. It turned out to be somewhat more convenient—everything gets covered in resin anyway, but the remaining leaves easily fall off, speeding up the process. I went for a tight trim, removing as much as possible. During the process, I felt disappointed seeing how little remained on the branches. The buds turned out airy and small, and I started cursing American genetics halfway through the trim.
However, when it came to weighing, the results were surprisingly decent.
Considering the buds' poor appearance, they’re not going to impress anyone visually, so it might have been easier to shred everything and use it for extraction. I don’t have extraction equipment, so I’ll make cannabutter from the trim, and the buds can rest in jars for now.
Takeaways:
Use a proper hygrometer for humidity control, not built-in sensors on humidifiers or dehumidifiers.
Overdried buds can be easily rehydrated with citrus peel.
Daily burping and rotation are sufficient for curing without humidity packs.
Dry trimming can be faster and more convenient but may highlight issues with bud density.
Despite underwhelming appearance, high resin content makes the strain great for extraction.
5 likes
comments
Share
Equipment Reviews


6 comments
Sort by
popularity
popularity
newest
oldest

GroloCup commentedweek 161y ago
Little late to the game, but this is a great diary and phenominal looking grow
like 1

TyRun commented1y ago
@GroloCup, glad you liked it ) Hope I'll find time to post a new one (finished)
like 1

SEGA_Y_Griega commentedweek 152y ago
looks amazing! UV lamp does the trick!!!
like 1
TyRun commented2y ago
@SEGA_Y_Griega, Thx! Actually I was using so much of stuff so can't determine which one exactly does the trick ))
like 1

Gingercannacat commentedweek 161y ago
Good work. happy harvest 👏
like 1

the end.
Enjoying this diary? Follow for more updates!


Prefer the old Diary view?
Go back to the old Diary view