
Zamnesia Pink Rozay


Soil
Obi Grow Light

Perlite
Pumice
Indoor
Room Type
12-12
weeks 1, 7
Topping
weeks 5
Defoliation
weeks 6, 9-10, 15
12 l
Pot Size
0.7 l
Watering
Start at Harvest
G
Germination1y ago


Nutrients 3

PH- Powder
1 mll

Living Organics
5 mll

Humic Acid Plus
1 mll
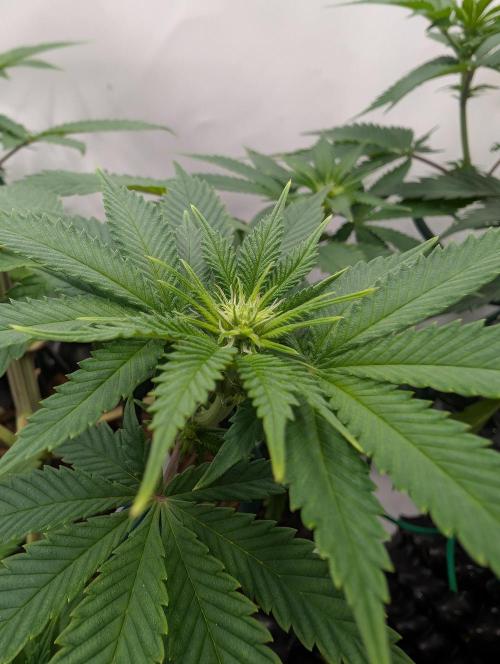
kohlrabi I've heard good things about this strain - Zamnesia Pink Rozay - and I'm curious to see whether my plant will also take on a slightly pink colour. The strain is indica-dominant and is said to have a fruity flavour.
With this grow circle, I want to use up the liquid fertiliser stocks I still have - ideally use all of them up before the start of summer. So this time I'm fertilising with the Greenbuzz line again. Luckily, all three seeds I planted germinated at exactly the same time - so I only have to make the same mixture once a day for all three plants.
For me, it works best to soak the seeds for 24 hours in distilled water with a few drops of humic acid and then germinate directly into a Root Riot Cube in the final pot. I'm not particularly good at repotting tender plants. And with this method, I can almost set the clock for the plants to poke their heads out of the soil after 4 days.
The soil is ‘Grow’ from Obi, the Light Mix. It mainly consists of coconut fibres. I have mixed approx. 20% pumice with it. I sprinkled ‘Living Organics’ around and into the growing cube to start the exchange of microorganisms with the roots.
12 likes
6 comments
Share
Used method
Directly In Substrate
Germination Method
1
Week 1. Vegetation1y ago


5 cm
Height
18 hrs
Light Schedule
23 °C
Day Air Temp
12 l
Pot Size
0.33 l
Watering Volume
60 cm
Lamp Distance
Nutrients 3

More Roots
2 mll

Growzyme
5 mll
Humic Acid Plus
5 mll
kohlrabi Pink rozay – to my horror, there is almost nothing pink in my Lego collection. And certainly not wine. So I improvised, please bear with me...
All my plants saw the light of day (or at least the light of the grow box) on the same day (day 4). So far, everything is going perfectly according to plan!
The seedlings will receive 2ml ‘More Roots’, 5ml Growzyme and 5ml humic acid per litre in the first week, in line with the Greenbuzz cultivation scheme.
Unfortunately, I'm dealing with fungus gnats again. Nematodes are already on their way. I could slowly start my own breeding programme; that would probably be cheaper in the long run.
Speaking of making things cheaper: At least I've now set up a recycling system for soil. I produce organic waste ferment (bokashi), which I store for two weeks with the used soil from the last grow circle and then later add earthworms. In theory, it should be usable soil again after three months. I'm excited to see how it turns out.
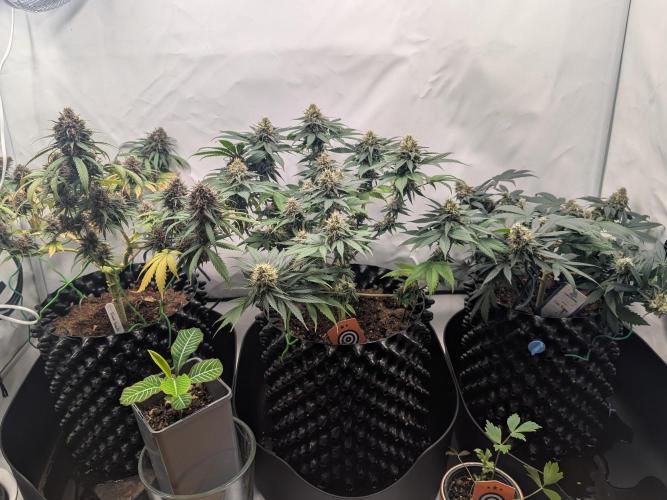
Let's see which of my three varieties stretches the most – that one will be used for mainlining. Hopefully without too much stress for the plant this time.
16 likes
13 comments
Share
Used techniques
12-12
Technique
2
Week 2. Vegetation1y ago


6 cm
Height
18 hrs
Light Schedule
23 °C
Day Air Temp
No Smell
Smell
12 l
Pot Size
0.33 l
Watering Volume
60 cm
Lamp Distance
Nutrients 6
More Roots
3 mll
Growzyme
2 mll
Humic Acid Plus
2 mll
kohlrabi Three updates in just one week? Indeed. And that was because I had difficulty creating new journals in GD. Ultimately, it was probably due to the (too long?) titles that kept causing a non-specific error message to appear. That's why my three latest diaries have such boring titles.
I'll take the liberty of writing the same text for all three strains, because they're all the same: on day 8, they were exactly 6 cm tall and all of them look healthy.
In the meantime, they have received their dose of nematodes to combat fungus gnats. This problem has not yet been resolved.
The plants will now receive the following Greenbuzz additions per liter:
1 ml Grow
3 ml Roots
5 ml Fast Buds
2 ml Humic Acid
2 ml Growzyme
5 ml CalMag
Since I was asked in a short message how I recycle my old soil and what ‘bokashi’ is, there are also two (somewhat disgusting?) pictures.
In short, this is what I do:
I chop up my organic waste and put it in a bokashi bucket with special microorganisms. Unlike traditional compost, you can also use citrus fruits, cooked food and even meat. (Photo 1 shows the bucket before it is closed.)
The microorganisms ferment the organic waste in the absence of air. After about four weeks, I have approximately 19 litres of fermented material. (Photo 2 shows the material after fermentation.)
Now I mix this material with ordinary soil. Within another two weeks, the waste has (almost) completely turned into soil. It already contains many nutrients – more than ordinary compost. And now I add this mixture to a large container with my lovely little earthworms. The worms must not be added too early, otherwise it will be too acidic for them. And then the soil is soon ready for the next plants.
By the way, this substrate is then so nutrient-rich that you should only fertilise very sparingly. For the delicate plants at the beginning, you need soil that contains fewer nutrients.
See you again next week!
14 likes
2 comments
Share
3
Week 3. Vegetation1y ago


9 cm
Height
18 hrs
Light Schedule
23 °C
Day Air Temp
No Smell
Smell
12 l
Pot Size
0.33 l
Watering Volume
60 cm
Lamp Distance
Nutrients 5
More Roots
4 mll
Growzyme
3 mll
Humic Acid Plus
3 mll
kohlrabi Everything is going well, not much to report. I should clean the bottle.
Even the pest is under control again.
See you next week!
17 likes
6 comments
Share
4
Week 4. Vegetation1y ago


16 cm
Height
18 hrs
Light Schedule
23 °C
Day Air Temp
No Smell
Smell
12 l
Pot Size
0.33 l
Watering Volume
60 cm
Lamp Distance
Nutrients 5
More Roots
4 mll
Growzyme
3 mll
Humic Acid Plus
3 mll
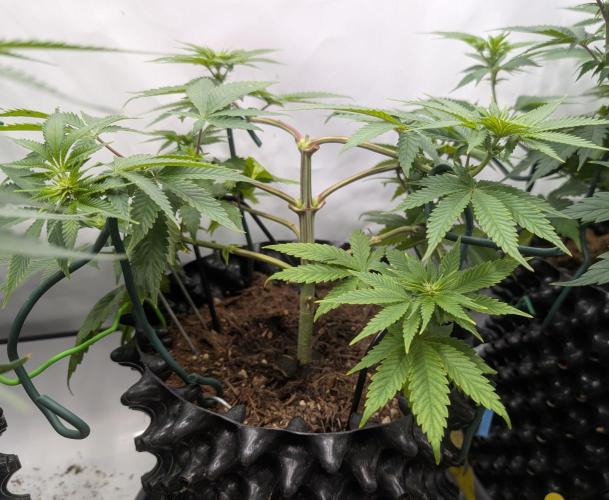
kohlrabi Of the three plants, Pink Rozay is the smallest, but it too has five pairs of leaves. To be fair, it's worth mentioning that her pot is also the smallest – although I don't know if that's decisive at this early stage.
It's fun to compare the growth of the three plants, as they sprouted on exactly the same day and have very similar conditions. Tomorrow I will top this plant and then there will only be a little LST left. My free time is limited and I don't want to overdo it with the training.
I may have been too quick to celebrate: the fungus gnats are still not completely gone. Normally, I add nematodes to the water as soon as I spot the first tiny flies. This time, I had to order some first, and the retailer kept me waiting for a whole week and a half. The creatures made good use of those weeks. (A female can lay up to 1,000 eggs!) I'll keep an eye on it and order some more nematodes soon. If that doesn't help, I'll try neem oil. The plants don't seem to be suffering too much, but it's not nice to see flies buzzing around every time I open the grow box.
At least I managed to clean the watering bottles. I hope you appreciate that.
13 likes
10 comments
Share
5
Week 5. Vegetation1y ago


25 cm
Height
18 hrs
Light Schedule
23 °C
Day Air Temp
No Smell
Smell
12 l
Pot Size
0.33 l
Watering Volume
60 cm
Lamp Distance
Nutrients 5
More Roots
4 mll
Growzyme
3 mll
Humic Acid Plus
3 mll
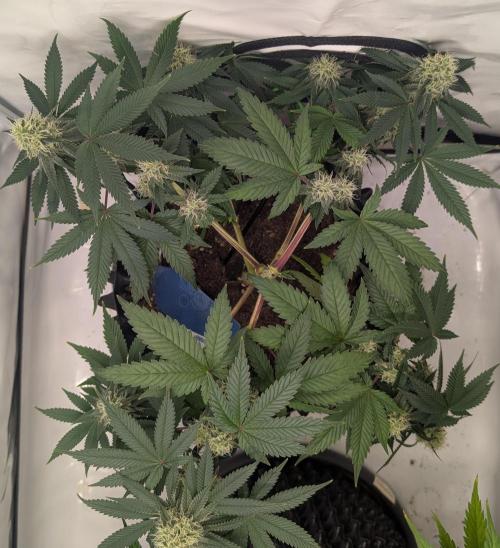
kohlrabi As you can clearly see from above, the leaves of the plant are coloured in a way that is usually caused by a nutrient imbalance. So far, I have been able to control this by adding CalMag, but this time there has been no change. It is also surprising that it is the only plant to react in this way, as the other two plants are being fertilised with exactly the same mixture.
On day 25, she was topped, which is now hardly visible as everything has grown back so well. I am trying to treat the branches with LST, but I don't usually have the time to do it properly.
For the first time in my time as a plant mum, I was unable to control the fungus gnats with nematodes. Either I started too late, or perhaps the worms from this delivery were already dead, because nothing has changed even after the second watering with nematodes. So, on day 26, I sprayed the plants with a mixture of water and neem oil and also watered the soil with it. This spray has worked wonders in repelling aphids in my small garden, and it remains to be seen how it will affect those pesky little flies.
12 likes
comments
Share
Used techniques
Topping
Technique
6
Week 6. Vegetation1y ago


25 cm
Height
18 hrs
Light Schedule
23 °C
Day Air Temp
No Smell
Smell
12 l
Pot Size
0.5 l
Watering Volume
60 cm
Lamp Distance
Nutrients 5
More Roots
4 mll
Growzyme
3 mll
Humic Acid Plus
3 mll
kohlrabi This little plant is still worrying me. I treat it basically the same as my other plants, but something seems to be wrong. My current theory is that I have overwatered it (its pot is smaller than the other pots). I have read that in such cases, you should let the pot dry out and then start watering more sensibly, so I am trying that now. I haven't watered it for two days and started again today with a smaller amount. Keep your fingers crossed that she recovers.
If this plant doesn't make it, it would be a shame, but at least I have two friends who usually benefit from my gardening skills, and I gave them plants for their balconies in the spring. So even if we can only finish two plants by ourselves, there should be a little something left over for us from their grows.
Neem oil was great for the aphids on my garden plants and the fly larvae in my bokashi, but despite watering with it several times, the fungus gnats are completely out of control. I'm now getting 25 million nematodes and hopefully they'll wipe them out. Wish me luck!
Today, on the 36th day of the grow, I'm switching the light to 12/12, and when we meet again next week, hopefully we'll see the first signs of buds. See you soon!
16 likes
comments
Share
Used techniques
Defoliation
Technique
7
Week 7. Vegetation1y ago


25 cm
Height
12 hrs
Light Schedule
23 °C
Day Air Temp
No Smell
Smell
12 l
Pot Size
0.7 l
Watering Volume
60 cm
Lamp Distance
Nutrients 6
More Roots
2 mll
Growzyme
4 mll
Humic Acid Plus
4 mll
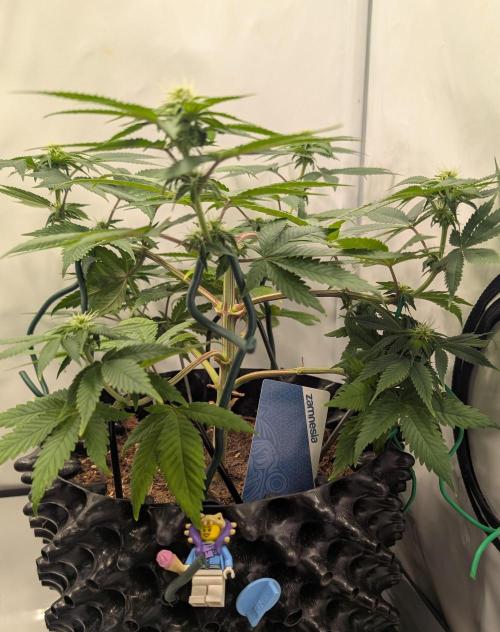
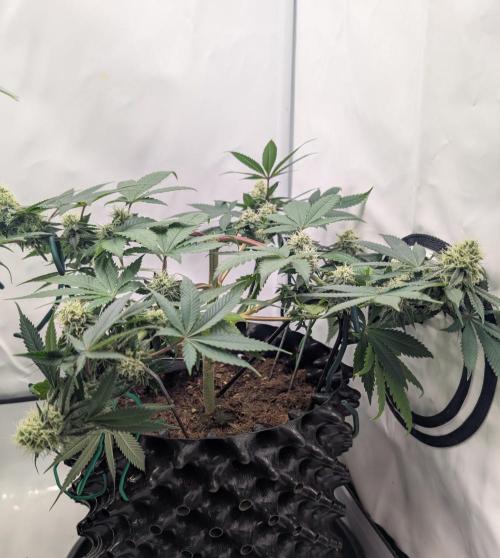
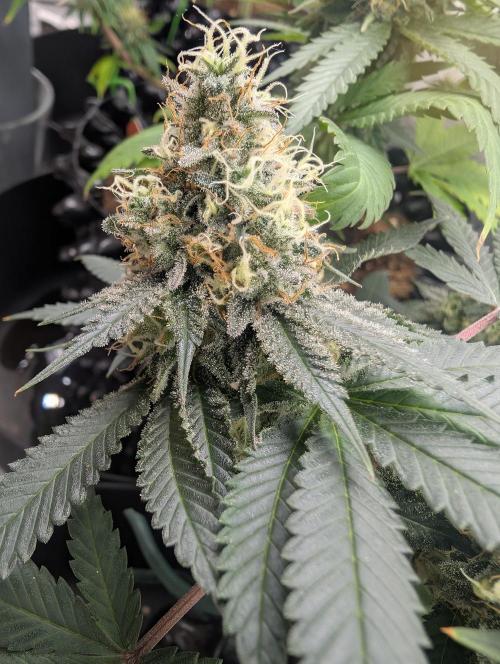
kohlrabi Anyone who remembers my 'Pink Rozay' from last week may be surprised at how different the plant looks now. First of all, the problem really seems to have been overwatering. After letting the soil dry out completely and then watering more carefully, it has not developed any further noticeable spots. But it suffered quite a bit before that. I removed some yellow leaves, and what remains is a delicate little plant that is now supposed to start flowering. Poor thing. Let's just see what she does with it.
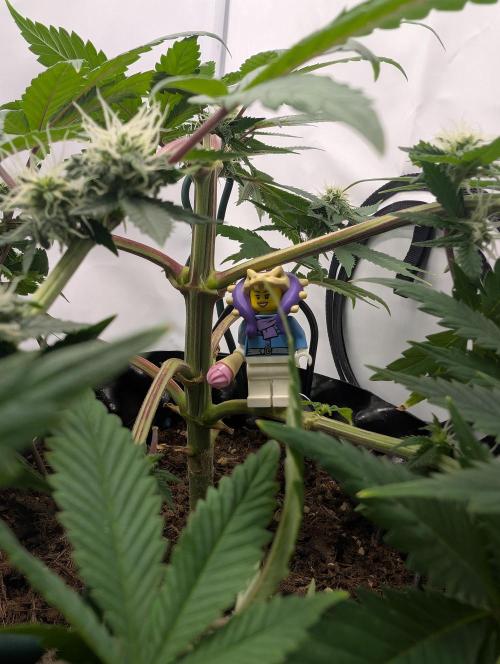
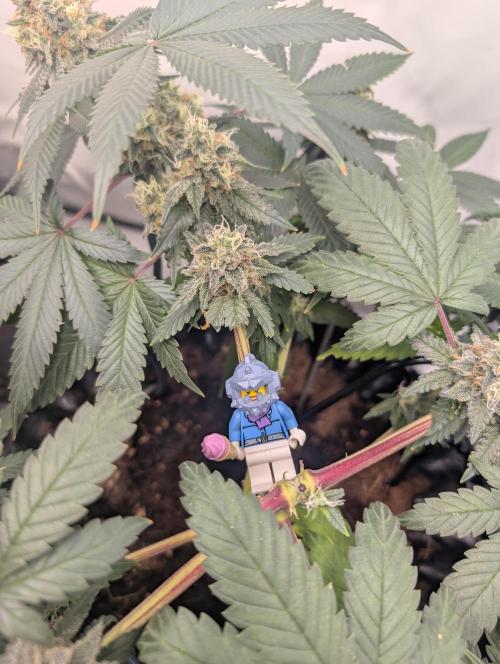
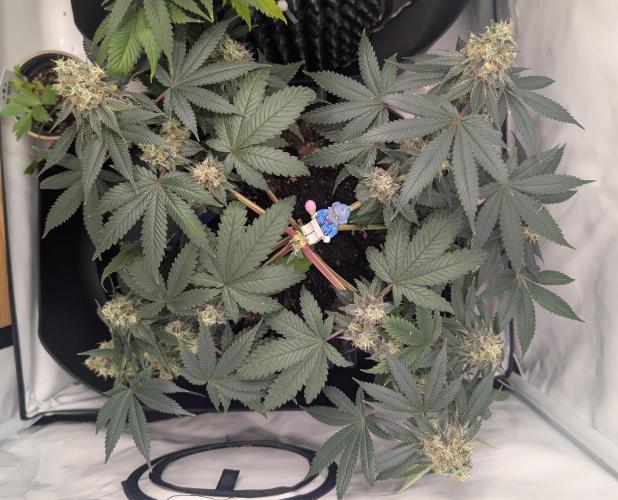
As is now tradition, every year around the Mary Jane I meet love_2_grow, whom I got to know through this platform. And this year he actually went to a Lego store and recreated me. How funny is that?! So I have a new profile picture. Note the extra-short legs...
The first week of the 12/12 cycle has passed, and I think you can see the beginning of the flowering phase on at least one plant. But since I wouldn't normally switch to ‘flowering week 1’ at the stage I'm seeing here, we're still in the growth phase, week 7, in this diary. Unfortunately, I already switched the nutrients to flowering last week, which probably wasn't a very smart move.
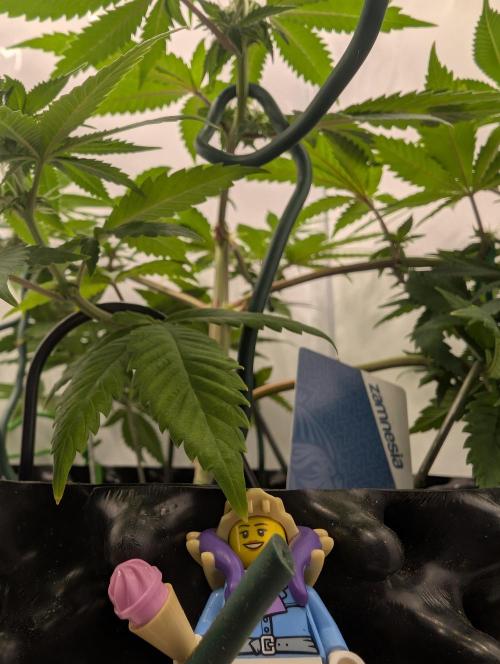
Since I bend it so much, the information about the size of the plant is not very meaningful. It has grown, but you can't tell by its height.
Now that neem oil seems to be working after ages, I'm going to finish off the fungus gnats with nematodes... I hope.
14 likes
1 comment
Share
Used techniques
12-12
Technique
8
Week 8. Flowering1y ago

28 cm
Height
12 hrs
Light Schedule
23 °C
Day Air Temp
No Smell
Smell
12 l
Pot Size
0.7 l
Watering Volume
60 cm
Lamp Distance
Nutrients 5
Growzyme
4 mll
Humic Acid Plus
4 mll

Big Fruits
4 mll
kohlrabi Welcome back! And I'm not just saying that to my readers, but also to this little plant here. It has recovered. After being overwatered and infested with fungus gnats, it has finally regained some of its darker colour and is no longer losing leaves. It probably won't yield much, but I'm grateful that it didn't give up.
I took in a little plant for a friend and promptly had fungus gnats again. So the nematodes are back in action.
I read that fungus gnats don't actually cause much damage themselves, as they tend to feed on dead roots. The reason for their proliferation is overwatering. I obviously still haven't found the right level for watering. I had considered getting some chinchilla sand to cover the surface of the pots – this should prevent the fungus gnats from laying new eggs in the soil. However, I then remembered that I use Airpots, which means that the fungus gnats can also come out through the side holes. I love these Airpots, but that would probably be a reason to switch to felt pots after all. However, I would then have to learn how to water them all over again... Do I need an AutoPot, or will I learn how to do it at some point?
Apart from that, we've had a pleasantly uneventful week.
13 likes
7 comments
Share
9
Week 9. Flowering1y ago

28 cm
Height
12 hrs
Light Schedule
23 °C
Day Air Temp
Weak
Smell
12 l
Pot Size
0.7 l
Watering Volume
60 cm
Lamp Distance
Nutrients 5
Growzyme
4 mll
Humic Acid Plus
4 mll
Big Fruits
4 mll
kohlrabi It's hedgehog season! The plant is developing wonderfully. I have changed my watering habits – many thanks to nonick123 for the tips!
Actually, I could have figured it out myself: don't water according to a schedule, but assess each plant individually. But sometimes you just can't see the forest for the trees. And I am honestly surprised at how differently my three plants consume water.
14 likes
comments
Share
Used techniques
Defoliation
Technique
10
Week 10. Flowering1y ago

28 cm
Height
12 hrs
Light Schedule
23 °C
Day Air Temp
Weak
Smell
12 l
Pot Size
0.5 l
Watering Volume
60 cm
Lamp Distance
Nutrients 5
Growzyme
4 mll
Humic Acid Plus
4 mll
Big Fruits
4 mll
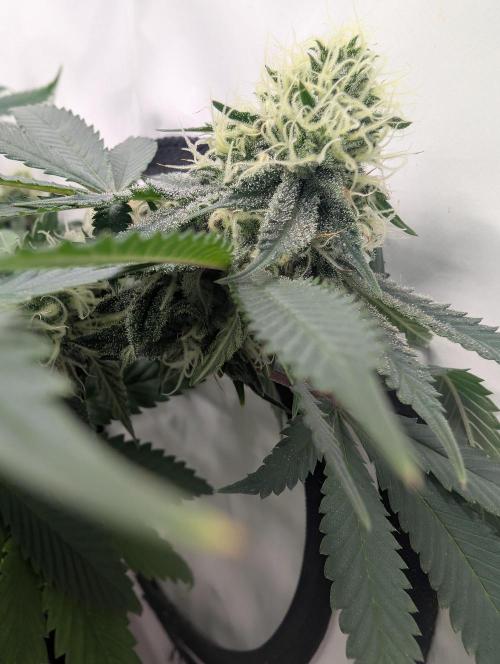
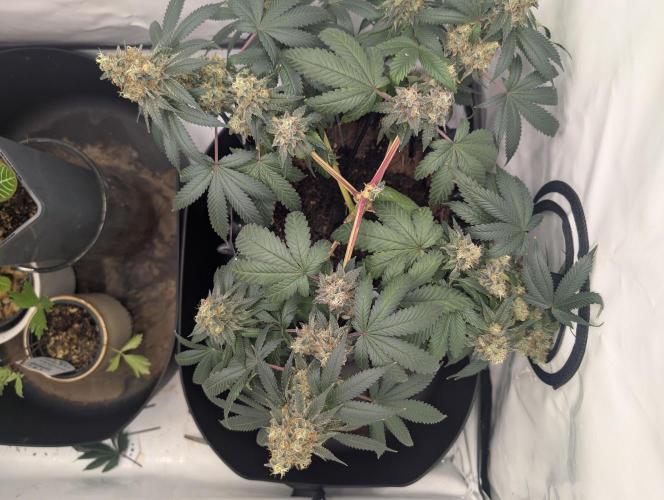
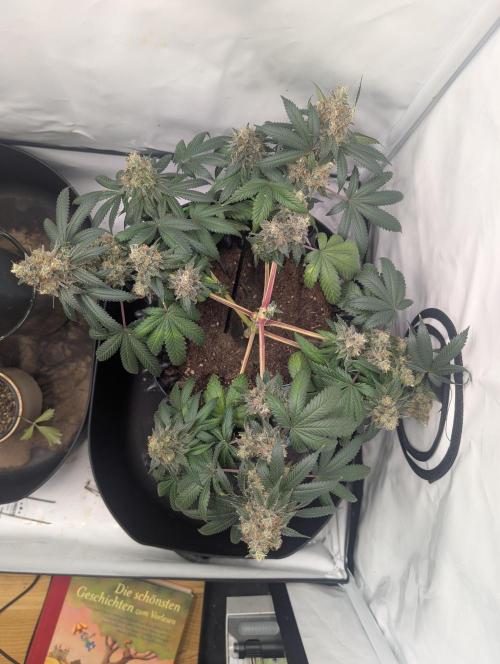
kohlrabi After my negligent treatment a few weeks ago, the Zamnezia plant is lagging behind the other two plants, but I am pleased that there are no further problems. Even the fungus gnats have finally disappeared. I am delighted with the small flowers and am excited to see how far it will go.
My watering has improved, but I must admit I'm considering Autopots. As always, it's a question of money, so it will probably take a few more growing cycles before I'm ready. And who knows, maybe I'll have mastered watering by then?
Otherwise, there is little to report. All my plants have started flowering vigorously and I'm curious to see how long it takes before the first one is ready to be harvested.
13 likes
3 comments
Share
Used techniques
Defoliation
Technique
11
Week 11. Flowering1y ago
28 cm
Height
12 hrs
Light Schedule
23 °C
Day Air Temp
Weak
Smell
12 l
Pot Size
0.5 l
Watering Volume
60 cm
Lamp Distance
Nutrients 5
Growzyme
4 mll
Humic Acid Plus
4 mll
Big Fruits
4 mll
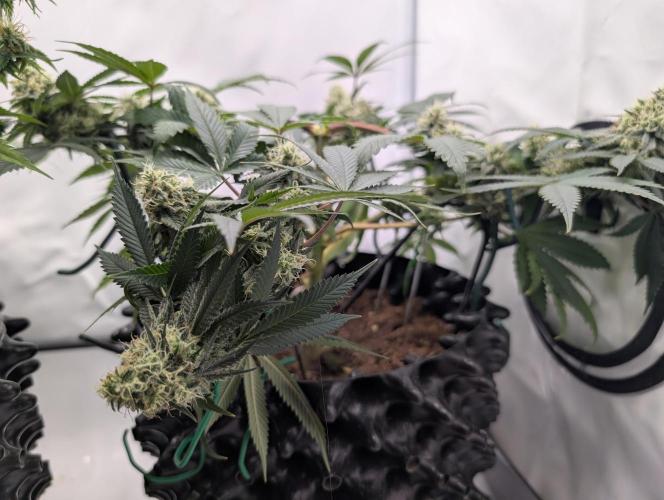
kohlrabi This small plant has managed without stretching and has not developed any significant side branches. However, the flowers on the existing branches are quite impressive.
12 likes
comments
Share
12
Week 12. Flowering1y ago

28 cm
Height
12 hrs
Light Schedule
23 °C
Day Air Temp
Normal
Smell
12 l
Pot Size
0.7 l
Watering Volume
60 cm
Lamp Distance
Nutrients 5
Growzyme
4 mll
Humic Acid Plus
4 mll
Big Fruits
4 mll
kohlrabi The plants are growing excellently and there isn't much to report, so today I'm writing about a slightly different topic:
I was a little sad that I couldn't afford Autopots at the moment, but Mrs Larimar cheered me up by pointing out that the principle is similar to watering from below. I also like the root formation in my Airpots – and since you can position their bottom anywhere you like, they are actually ideal for watering from below. I've done this before with moderate enthusiasm, but never really consistently watered from below.
Now I've seen a video that I'd like to imitate in parts:
https://www.youtube.com/watch?v=wL5yLMzd7JQ
If you have time, please let me know what you think. In any case, I would fertilise with Biotabs and not with minerals. I also need to find a suitable container for the water reservoir. But otherwise, I'm excited to see how it works out. So far, I've only used fabric strips for watering, but I think I'll invest in proper watering wicks.
16 likes
comments
Share
13
Week 13. Flowering1y ago

28 cm
Height
12 hrs
Light Schedule
23 °C
Day Air Temp
Normal
Smell
12 l
Pot Size
0.7 l
Watering Volume
60 cm
Lamp Distance
Nutrients 5
Growzyme
4 mll
Humic Acid Plus
4 mll
Big Fruits
4 mll
kohlrabi ‘Pink Rozay’ will certainly take the longest, and its flowers are still a bit puny. As I said before, this has to do with watering mistakes. I expect another 3 weeks until harvest, which will probably be the longest I've ever waited for harvest. I'm always amazed at Growmies who sometimes spend 30 or more weeks caring for a plant.
In preparation for my upcoming irrigation system (please bear with me until the next grow, I have to do it too), each plant has been given its own litter tray. Yes, literally: Ikea sold out cat litter trays for just under €4 that are perfect for my pots and future irrigation plans. It was a bargain! This made me very happy.
11 likes
comments
Share
14
Week 14. Flowering1y ago
28 cm
Height
12 hrs
Light Schedule
23 °C
Day Air Temp
Normal
Smell
12 l
Pot Size
0.7 l
Watering Volume
60 cm
Lamp Distance
kohlrabi Super short update: nothing happened, I'm reducing the feeding now and will probably mostly add water this last week.
14 likes
comments
Share
15
Week 15. Flowering1y ago

28 cm
Height
12 hrs
Light Schedule
23 °C
Day Air Temp
Normal
Smell
12 l
Pot Size
0.7 l
Watering Volume
60 cm
Lamp Distance
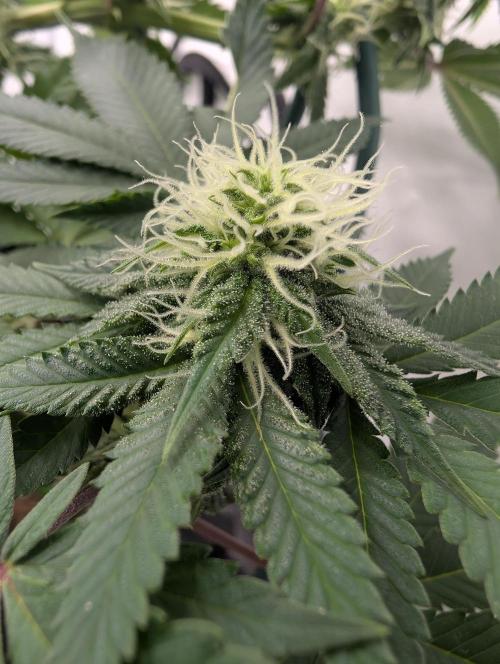
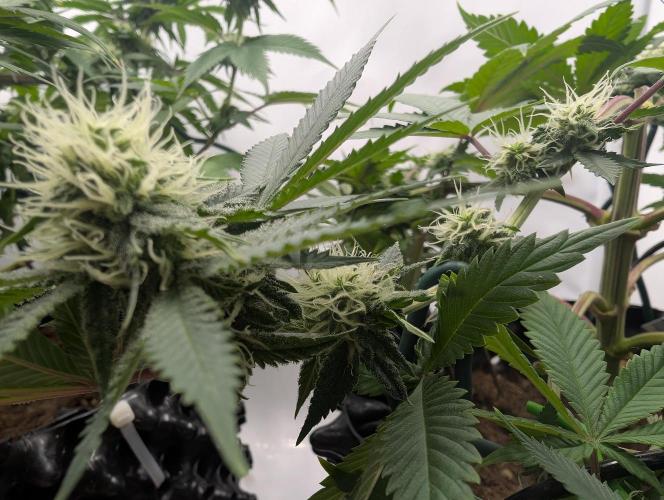
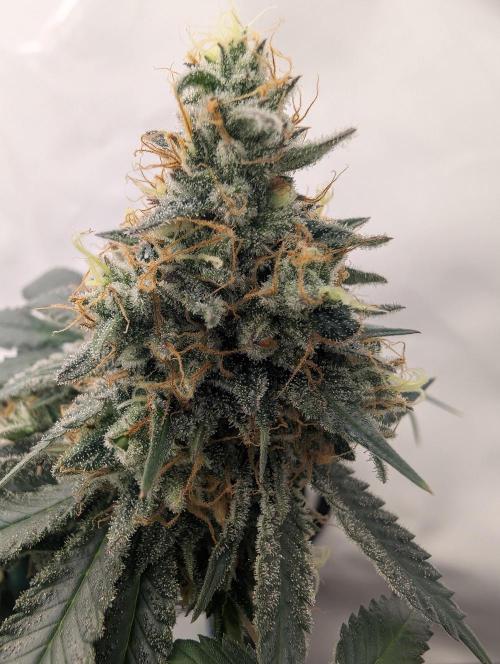
kohlrabi I'm already realizing that photosynthetic plants aren't for me. We're almost at day 100 and I check the trichomes every day, hoping that my grow box will finally be empty—but they're almost all still clear or cloudy, with no amber color in sight. So I'll just continue with the plan.
I removed a lot of wilted leaves, which this time weren't dried out, but simply already in the autumn stage. Otherwise, I'm forced to remain patient.
14 likes
1 comment
Share
Used techniques
Defoliation
Technique
16
Week 16. Harvest1y ago
Happy Harvest Day!


8/10
Rated
It was really high time. Today, after taking a look through the microscope, I decided to call it quits. 102 days! The next grow will be with automatics again.
The harvest isn't particularly large (119g wet), but it should be mentioned again that the stunted growth of this plant is entirely due to my overwatering at the beginning of the grow. So I wouldn't draw any conclusions about the general potential of this strain from this diary.
Show more
Translate
Spent 107 days
Ger Veg Flo Har
119 g
Bud wet weight per plant
1
Plants
0.5 m²
Grow Room size
Normal
Difficulty
Height
Day air temperature
Light schedule
Pot size
Lamp distance
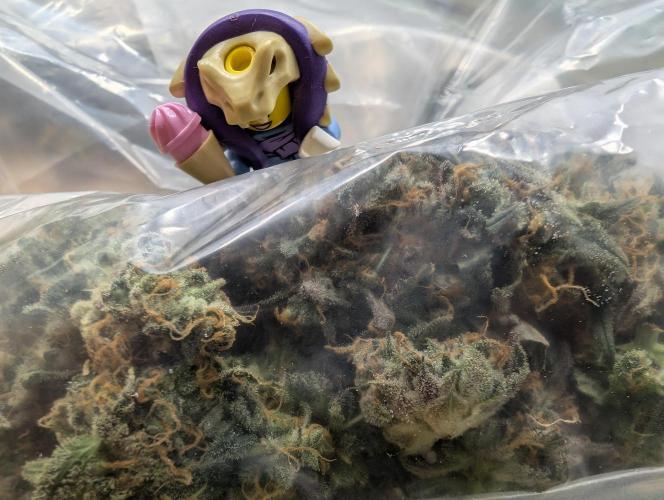
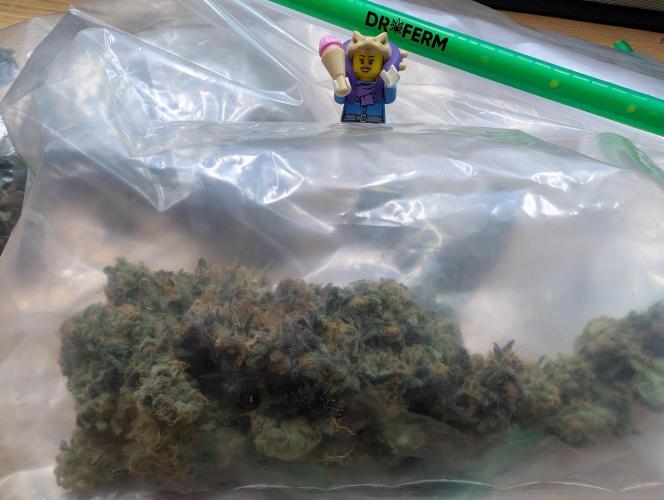

kohlrabi I used Dryferm bags for the first time for “Apples & Bananas” and am very happy with the result. The drying process is more even than in the air or in the grow box, and there is no smell. Unfortunately, when I bought them, I didn't realize how little you can put in such a huge bag. I wanted to buy more, but the prices are a bit insane. (I bought mine reduced at the Mary Jane.) Fortunately, the drying process for A&B is nearly finished, that's why you can see my new harvest in the bags.
I was grateful that this plant didn't die on me! And now I'm looking forward to try it. See you again in two weeks with the smoke review - and hopefully even earlier with three brand new diaries. :) Cheers!
11 likes
6 comments
Share
Equipment Reviews


55 comments
Sort by
popularity
popularity
newest
oldest

Patricia_Zamnesia  commentedweek 01y ago
Have fun growing, I hope she will show some of her pink trademarks 💪💙!
likes 7

kohlrabi commented1y ago
@Patricia_Zamnesia, that would be nice! For me, the colour is not as important, but a friend recommended that strain for its taste, and I am curious to find out.
likes 6
Patricia_Zamnesia commented1y ago
@kohlrabi, I must have patience then, but I will be around during this grow, and I hope you will love her taste.
likes 3

GhostTerpZ commentedweek 21y ago
Looking Really good !
likes 6
kohlrabi commented1y ago
@GhostTerpZ, thank you :)
like 1

BarneyRumble420 commentedweek 01y ago
All the best with this run mate 👌
likes 6
kohlrabi commented1y ago
@BarneyRumble420, thank you!
likes 6

RasendeRollo92 commentedweek 11y ago
Wish I had such a plant next to my Lego figures when I was a child 😂
Enjoy your journey 👊🍀
likes 6
kohlrabi commented1y ago
@RasendeRollo92, I think as a child that would be not the best plants to play with! :D
But it lets us adults be children for a bit, and that's nice.
likes 6

love_2_grow commentedweek 01y ago
Let's hope the pink lady does right by you.
likes 6
kohlrabi commented1y ago
@love_2_grow, let's find out! If not, two other strains as a backup.
likes 5

MonyetDiablero commentedweek 01y ago
Good luck with her !👏👏 em sending her a big hug 😊
likes 5
kohlrabi commented1y ago
@MonyetDiablero, haha, yes, but don't crush her!
likes 5
MonyetDiablero commented1y ago
@kohlrabi, 🤣🤣🤣 you know me !!! Im always careful
likes 4

Cyrusdavirus commentedweek 11y ago
Good luck on the new babies 🤞🤞🌴🌴 and happy growing
likes 5
kohlrabi commented1y ago
@Cyrusdavirus, thank you! :)
likes 3

yan402 commentedweek 01y ago
🤞🍀♥️
likes 5
kohlrabi commented1y ago
@yan402,
likes 6

nonick123 commentedweek 81y ago
Hola amigo. Regar no es dificil
Te cuento mi técnica que funciona muy bien después de 25 años cultivando:
Cuando vayas a hacer el transplante y tengas la maceta definitiva llena de tierra ANTES de regarla: pesa la maceta, y tendrás tu "peso en seco"
Pesa la maceta en una bascula de personas y también levantala con tus manos para "sentir" el peso de la maceta ANTES de regarla
Después haz el transplante, haz el primer riego despacio y con un volumen de agua de aproximandamente el 15-20% del volumen de la maceta. Por ejemplo, en una maceta de 11 litros de tierra, haz un riego con 1.5 - 2 litros de agua
A continuación vuelve a pesar la maceta: en una bascula y levantala con tus manos para "sentir" el peso de la maceta y COMPARARLO con el peso anterior
Y ahora viene el truco: Solo tienes que volver a regar CUANDO la maceta tenga un peso aproximado o ligeramente superior al de maceta con "peso en seco"
Cuando hagas esto varias veces, irás aprendiendo a "sentir" el peso solo con levantar la maceta
Notarás que a la maceta "le pesa el culo" cuando está humeda, y se siente ligera cuando está "seca"
Espero que te sea de utilidad mi técnica!
likes 3

Natrona commented1y ago
@nonick123, Hi Nonick, thanks for the detailed very good process for checking water needs.
likes 3
kohlrabi commented1y ago
@nonick123, Thank you very much for the tips. I will implement them immediately, even in this grow. I think I already have a rough idea of how much the weight difference should be. And only watering when it is no longer soaked is actually very obvious – but for some reason I didn't do that. Maybe because I watered too little a few times in the past and wanted to avoid that... Oh well. You learn something new every day!
likes 3
yan402 commented1y ago
@nonick123, Nice tip growmie, especially for soil growers, master class 👌❤️✌️
likes 2
Natrona commentedweek 41y ago
I'm going to do an organic grow with super soil.
My tap come out at 8.5 and must ph when I use fertilizer. Do you ph your water using your natural bokashi method?
likes 3
kohlrabi commented1y ago
@Natrona, when I use biotabs, hard water is not a problem. With the liquid fertilizers I use in this grow, one always mixes in some humic acid. The bigger problem is often the lack of CalMag, and judging from the colour of the leaves, I'll need to add some, soon.
likes 2
MonyetDiablero commentedweek 31y ago
looking great sis 💪🏼 healty and green 💚
likes 3
kohlrabi commented1y ago
@MonyetDiablero, thank you! So far, so good.
likes 3

GERGrowDesigns commentedweek 31y ago
Good Luck 🌱
likes 3
kohlrabi commented1y ago
@GERGrowDesigns, thank you! I will need it, I'm planning to do some high stress training this round.
likes 2
Natrona commentedweek 11y ago
I'll share my wine with you.

likes 2
kohlrabi commented1y ago
@Natrona, hahaha, thank you. This one is not home made, it is it?
likes 2
Natrona commented1y ago
@kohlrabi, No I buy at the wine shop.
like 1
Natrona commentedweek 11y ago
I reuse my soil too 👍
likes 2
kohlrabi commented1y ago
@Natrona, very cool! What method do you use? Or did you write about it here already? Then I'll take a look!
likes 2
Natrona commented1y ago
@kohlrabi, after use, I add earthworm or mushroom compost and dehydrated egg shells. Let sit 2weeks or so.
like 1

Mr_und_Ms_Lue_Roots commentedweek 161y ago
Herzlichen Glückwunsch von uns zur Ernte! :-)
likes 2
kohlrabi commented1y ago
@Mr_und_Ms_Lue_Roots, danke schön!
like 1
Natrona commentedweek 151y ago
I know that stress. Ive seen photos here 22 weeks. I am not that patient but I do want to grow at some time to train and control the veg period and see the harvest.
likes 2
kohlrabi commented1y ago
@Natrona, I was really getting impatient by the end - I had new projects in planning, but the waiting seemed endless.... Finally.
likes 2
Natrona commentedweek 81y ago
Look what I came across today and thought about you 💫


likes 2
kohlrabi commented1y ago
@Natrona, haha, thank you! I have never seen such a shop, but if I find one, I'll definitely spend a bunch of money. :D
like 1
Natrona commentedweek 01y ago
Happy growing 🌱.
I just grew Pink Rozay. I didn't achieve pinks but it is fruity and mellow but not couch lock.
likes 2
kohlrabi commented1y ago
@Natrona, thanks for telling me, I'll read your diary. :)
likes 2
MonyetDiablero commentedweek 11y ago
Good luck with these ! Soon you have a nice smelling forest 💚
likes 2
kohlrabi commented1y ago
@MonyetDiablero, I hope so! That reminds me, I need new filters.
likes 2
Natrona commentedweek 161y ago
Congratulations on your harvest 🎉
likes 2

the end.
Enjoying this diary? Follow for more updates!


Prefer the old Diary view?
Go back to the old Diary view