


FBT012 #1



VEG
Lampwin Light Emitting Diodes/300W
Lampwin
FLO
Lampwin Light Emitting Diodes/300W
Lampwin

Soil
Custom

Indoor
Room Type
LST
weeks 3-5
Defoliation
weeks 5, 7
10 liters
Pot Size
Start at Harvest
1
Week 1. Vegetation7y ago




5 cm
Height
24 hrs
Light Schedule
25 °C
Day Air Temp
6.3
pH
70 %
Air Humidity
22 °C
Solution Temp
23 °C
Night Air Temp
10 liters
Pot Size
0.1 liters
Watering Volume
90 cm
Lamp Distance
Nutrients 3

BioBloom
3 mll

BioGrow
3 mll

BioEnhancer
0.6 mll
Master_weeda Hello to all the padawans and Jedi masters
First of all, thanks to FastBuds for allowing me to be part of the testers for their new autoflowering genetics, and to Greenhouse for letting me do this grow by providing the Greenhouse feeding and seeds.
I remind you that I'm simultaneously growing 9 pots of 10 and 11 liters in a box designed for 4, and that I only use the bare minimum of equipment necessary for a proper grow at the lowest possible cost.
EQUIPMENT CONFIGURATION
Box 80×80×160
Lamp led Lampwin 300 watts ×2
Clip fan 15 watts
Xiaomi Deerma humidifiers 5L
Hygrometer thermometer
Extractor PROFAN 107 m3/h - 100
Programmable electronic socket ×2
1 black square pot 10 liters
Greenhouse feeding enhancer
Greenhouse feeding biobloom
Greenhouse feeding biogrow
Biobizz lightmix substrate
Wire and cutting pliers
Microscope
Small precision scale
GROW STEP BY STEP
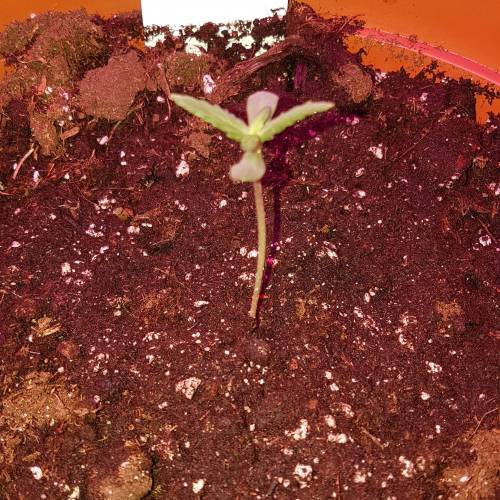
I first germinated my seed with the Easy Start from Royal Queen Seeds and I’m pleasantly surprised because honestly the success rate is very high (17 seeds out of 19), easy to use, and very effective.
Once the seedling is out and about 2 or 3 centimeters tall, I gently take it and place it directly into its final pot. I recommend pots ranging from 10 liters to 15 liters for autoflowers grown indoors.
The pot will have been previously prepared (video in diary) with 30 grams of Greenhouse feeding biobloom and 30 grams of Greenhouse feeding biogrow, which is the equivalent of 3 grams per liter of substrate.
I then place the seedling in its final pot, cover it a bit with soil, lightly compact it, and water to keep the substrate moist, no more.
I place my 300-watt LED lamp about 90 centimeters from the seedling with a light cycle of 24/24 for a week. At the beginning of week 2, the light cycle will switch to 20/4 thanks to a timer, as this is the light cycle that offers the best yield for an autoflower.
Day 1: light watering
Day 2: light watering
Day 3: the seedling starts to be more vigorous, setting up ventilation to increase its root mass and light watering
Day 4: watering with one and a half liters of water pH 6.3 to which I added 0.9 grams of Greenhouse feeding enhancer (so 0.6 grams per liter of water)
Day 5: no special technique
Day 6: no special technique
A pleasantly calm week with no apparent problems or deficiencies
May the force be with you!
14 likes
4 comments
Share
2
Week 2. Vegetation7y ago


7 cm
Height
20 hrs
Light Schedule
24 °C
Day Air Temp
6.3
pH
70 %
Air Humidity
22 °C
Solution Temp
23 °C
Night Air Temp
10 liters
Pot Size
0.1 liters
Watering Volume
90 cm
Lamp Distance
Nutrients 3
BioBloom
3 mll
BioGrow
3 mll
BioEnhancer
0.6 mll
Master_weeda Hello to all the padawans and Jedi masters
For this week 2, no techniques practiced, I just monitored that the humidity stays at a rate of 70%. I did a light watering until day 10 because the fact that the autoflowering plants are transplanted into their final pots increases the risk of overwatering the substrate. 🤐
To mitigate this risk, it's better to water with 10 or 20 centiliters of water at pH 6.3 during the first 10 days of the seedling. On day 11, I water my pot normally with a quarter of its volume in water (for a 10-liter pot, 2.5 liters) still with a pH of 6.3, I add to this water 0.6 grams of greenhouse feeding enhancer per liter of water. 👍
Enhancer is a mix of humic acids, seaweed extracts, strains of Trichoderma harzianum, and Bacillus subtilis.
It increases the vitality of the plant, improves nutrient absorption, and enhances soil quality. 👍
I will do a similar watering in 2 weeks
May the force be with you 💪
12 likes
comments
Share
3
Week 3. Vegetation7y ago


9 cm
Height
20 hrs
Light Schedule
24 °C
Day Air Temp
6.3
pH
70 %
Air Humidity
22 °C
Solution Temp
23 °C
Night Air Temp
10 liters
Pot Size
0.1 liters
Watering Volume
90 cm
Lamp Distance
Nutrients 3
BioBloom
3 mll
BioGrow
3 mll
BioEnhancer
0.6 mll
Master_weeda Hello to all the padawans and Jedi masters!
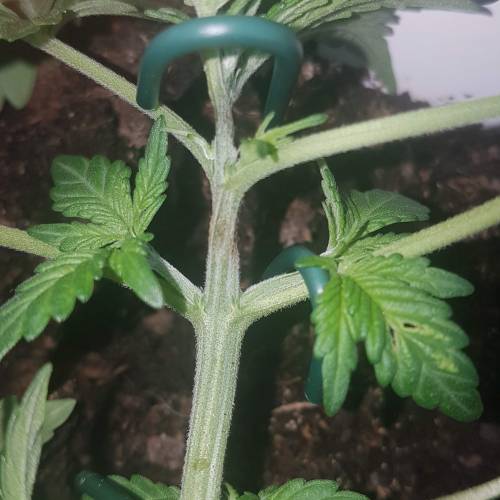
For this week 3 on day 19, my plant is 16 centimeters tall and its sixth node is appearing, so I decided to practice some LST on my plant.
For this, I'm using galvanized wire that I plant directly into the substrate, being careful not to damage the roots because let's not forget that what grows above also grows below.
Day 17, I'm spraying a solution made of one teaspoon of soft black soap diluted in a liter of water as a preventive measure against potential pests.
I'm adjusting my LST according to my plant's growth...
May the force be with you!
12 likes
2 comments
Share
Used techniques
LST
Technique
4
Week 4. Vegetation7y ago


9 cm
Height
20 hrs
Light Schedule
24 °C
Day Air Temp
6.3
pH
70 %
Air Humidity
22 °C
Solution Temp
23 °C
Night Air Temp
10 liters
Pot Size
0.1 liters
Watering Volume
90 cm
Lamp Distance
Nutrients 3
BioBloom
3 mll
BioGrow
3 mll
BioEnhancer
0.6 mll
Master_weeda Hello to all the padawans and Jedi masters
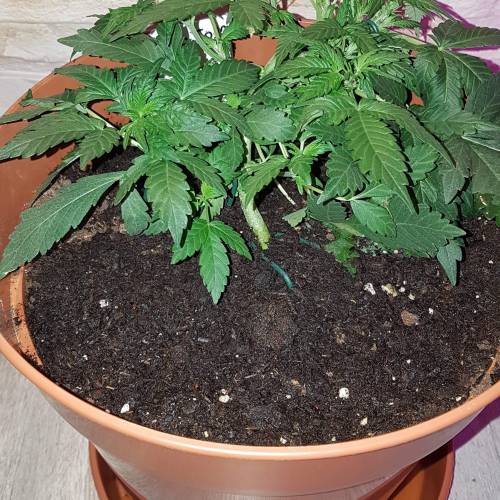
For this week 4, I'm fine-tuning my LST and trying not to stress my plant before it enters flowering. I'm combining LST with Apex pinching to strengthen the secondary branches of my plant. I'm weighing my pots to monitor my plant's water needs. I'll water at the right time with a quarter of the pot volume using pH 6.3 water, and I'll add 0.7 grams of greenhouse feeding feeding enhancer per liter to it. Day 25 watering.
A little reminder of what Apex pinching is:
Pinching cannabis plants
Close to the principle of apex pruning, this technique has several advantages, the main one being to maintain the large central bud of the plant, with maximum production and quality.
Pinching cannabis plants
Apex pinching (the top of the plant) simply involves gently pinching the stem of the last tier of the plant between the thumb and index finger until you feel the fiber crush under your fingers with a characteristic little crunch sound. If the available space on the stem of the last tier doesn't comfortably allow you to place your fingers, you should pinch the tier below instead.
Pinching will significantly slow the vertical growth of the plant while stimulating the development of the secondary branches, thus giving the plant a bushy shape. The plant will take a few days to repair this pinching, forming a knot at that spot, and will then continue its growth normally. Pinching can then be repeated if necessary on the newly formed next tier, as well as on any secondary branches that might exceed the apex.
Pinching is therefore an excellent technique for achieving a nice, uniform green wave canopy. By regularly pinching the apex of the larger plants in your space during the growth phase and at the beginning of flowering (stretch), you'll easily get plants of uniform height in full bloom, which will facilitate cultivation and increase final production, especially if you're simultaneously growing multiple marijuana varieties.
With a little practice, pinching can be done as quickly as effectively. In case of pinching too violently resulting in a torn apex, it will simply produce the same results as a classic apex pruning, which won't be dramatic.
Apex pinching and LST are, for me, two inseparable techniques; they will allow you a more homogeneous canopy, thus better light penetration and consequently better yield.
May the force be with you.
12 likes
1 comment
Share
Used techniques
LST
Technique
5
Week 5. Vegetation7y ago




9 cm
Height
20 hrs
Light Schedule
24 °C
Day Air Temp
6.3
pH
70 %
Air Humidity
22 °C
Solution Temp
23 °C
Night Air Temp
10 liters
Pot Size
0.1 liters
Watering Volume
90 cm
Lamp Distance
Nutrients 4

Top-Max
0.5 mll
BioBloom
3 mll
BioGrow
3 mll
11 likes
comments
Share
Used techniques
LST
Technique
Defoliation
Technique
6
Week 6. Flowering7y ago


16 cm
Height
20 hrs
Light Schedule
24 °C
Day Air Temp
6.3
pH
70 %
Air Humidity
22 °C
Solution Temp
23 °C
Night Air Temp
10 liters
Pot Size
0.1 liters
Watering Volume
60 cm
Lamp Distance
Nutrients 5
Top-Max
0.5 mll

Bio-Bloom
1 mll
BioBloom
3 mll
11 likes
3 comments
Share
7
Week 7. Flowering7y ago


24 cm
Height
20 hrs
Light Schedule
24 °C
Day Air Temp
6.3
pH
55 %
Air Humidity
22 °C
Solution Temp
23 °C
Night Air Temp
10 liters
Pot Size
0.1 liters
Watering Volume
60 cm
Lamp Distance
Nutrients 5
Top-Max
0.5 mll
Bio-Bloom
1 mll
BioBloom
3 mll
Master_weeda Day 47 watering with 2 liters of water pH 6.3 to which I add 1 gram of greenhouse feeding enhancer per liter of water.
13 likes
3 comments
Share
Used techniques
Defoliation
Technique
8
Week 8. Flowering7y ago


24 cm
Height
20 hrs
Light Schedule
24 °C
Day Air Temp
6.3
pH
50 %
Air Humidity
22 °C
Solution Temp
23 °C
Night Air Temp
10 liters
Pot Size
0.1 liters
Watering Volume
60 cm
Lamp Distance
Nutrients 5
Top-Max
0.5 mll
Bio-Bloom
1 mll
BioBloom
3 mll
Master_weeda Day 52 watering with 2 liters of water pH 6.3
11 likes
comments
Share
9
Week 9. Flowering7y ago


37 cm
Height
20 hrs
Light Schedule
24 °C
Day Air Temp
6.3
pH
Normal
Smell
50 %
Air Humidity
22 °C
Solution Temp
23 °C
Night Air Temp
10 liters
Pot Size
0.1 liters
Watering Volume
60 cm
Lamp Distance
Nutrients 5
Top-Max
0.5 mll
Bio-Bloom
1 mll
BioBloom
3 mll
Master_weeda + 13centimeters Day56
Day56 watering with two liters of water ph6.3 adding 6 grams of greenhouse feeding biobloom while scratching the soil
Day59 watering with two liters of water ph6.3 to which I add 4ml per liter of water of topmax biobizz
Double branch and disproportionate secondary branch
11 likes
comments
Share
10
Week 10. Flowering7y ago


45 cm
Height
20 hrs
Light Schedule
24 °C
Day Air Temp
6.3
pH
Normal
Smell
50 %
Air Humidity
22 °C
Solution Temp
23 °C
Night Air Temp
10 liters
Pot Size
0.1 liters
Watering Volume
60 cm
Lamp Distance
Nutrients 5
Top-Max
0.5 mll
Bio-Bloom
1 mll
BioBloom
3 mll
Master_weeda Stretch 8 centimeters
Day 63 watering with one liter of water
Day 66 defoliation and watering with two liters of water pH 6.3 to which I add one gram per liter of water of feeding enhancer greenhouse
7 likes
2 comments
Share
11
Week 11. Flowering7y ago


45 cm
Height
20 hrs
Light Schedule
24 °C
Day Air Temp
6.3
pH
Normal
Smell
50 %
Air Humidity
22 °C
Solution Temp
23 °C
Night Air Temp
10 liters
Pot Size
0.1 liters
Watering Volume
60 cm
Lamp Distance
Nutrients 5
Top-Max
0.5 mll
Bio-Bloom
1 mll
BioBloom
3 mll
14 likes
comments
Share
12
Week 12. Flowering7y ago


45 cm
Height
20 hrs
Light Schedule
24 °C
Day Air Temp
6.3
pH
Normal
Smell
50 %
Air Humidity
22 °C
Solution Temp
23 °C
Night Air Temp
10 liters
Pot Size
0.1 liters
Watering Volume
60 cm
Lamp Distance
Nutrients 5
Top-Max
0.5 mll
Bio-Bloom
1 mll
BioBloom
3 mll
Master_weeda Day 77 watering with 2 liters of water pH 6.3
Day 82 watering with 2 liters of water pH 6.3
12 likes
3 comments
Share
13
Week 13. Flowering7y ago


45 cm
Height
20 hrs
Light Schedule
24 °C
Day Air Temp
6.3
pH
Strong
Smell
50 %
Air Humidity
22 °C
Solution Temp
23 °C
Night Air Temp
10 liters
Pot Size
0.1 liters
Watering Volume
60 cm
Lamp Distance
Nutrients 5
Top-Max
0.5 mll
Bio-Bloom
1 mll
BioBloom
3 mll
Master_weeda Hello to all the padawans and Jedi masters
Day 84 watering with 2 liters of water pH 6.3
10 likes
comments
Share
14
Week 14. Flowering7y ago


45 cm
Height
20 hrs
Light Schedule
24 °C
Day Air Temp
6.3
pH
Strong
Smell
50 %
Air Humidity
22 °C
Solution Temp
23 °C
Night Air Temp
10 liters
Pot Size
0.1 liters
Watering Volume
60 cm
Lamp Distance
Nutrients 5
Top-Max
0.5 mll
Bio-Bloom
1 mll
BioBloom
3 mll
14 likes
3 comments
Share
15
Week 15. Flowering7y ago


45 cm
Height
20 hrs
Light Schedule
24 °C
Day Air Temp
6.3
pH
Strong
Smell
50 %
Air Humidity
22 °C
Solution Temp
23 °C
Night Air Temp
10 liters
Pot Size
1 liters
Watering Volume
60 cm
Lamp Distance
Nutrients 5
Top-Max
0.5 mll
Bio-Bloom
1 mll
BioBloom
3 mll
Master_weeda Hello to all the padawans and jedi masters
Day 105 watering with 2 liters of water ph6.3
12 likes
comments
Share
16
Week 16. Flowering7y ago


45 cm
Height
20 hrs
Light Schedule
24 °C
Day Air Temp
6.3
pH
Strong
Smell
50 %
Air Humidity
22 °C
Solution Temp
23 °C
Night Air Temp
10 liters
Pot Size
1 liters
Watering Volume
60 cm
Lamp Distance
Nutrients 5
Top-Max
0.5 mll
Bio-Bloom
1 mll
BioBloom
3 mll
Master_weeda Hello to all the padawans and Jedi masters
Day 113 watering with 2 liters of water pH 6.3
Day 116 watering with 2 liters of water pH 6.3
11 likes
comments
Share
17
Week 17. Flowering7y ago


45 cm
Height
20 hrs
Light Schedule
24 °C
Day Air Temp
6.3
pH
Strong
Smell
50 %
Air Humidity
22 °C
Solution Temp
23 °C
Night Air Temp
10 liters
Pot Size
1 liters
Watering Volume
60 cm
Lamp Distance
Nutrients 5
Top-Max
0.5 mll
Bio-Bloom
1 mll
BioBloom
3 mll
Master_weeda Hello to all the padawans and Jedi masters
Day 119 watering with 2 liters of water pH 6.3
13 likes
comments
Share
17
Week 17. Harvest7y ago
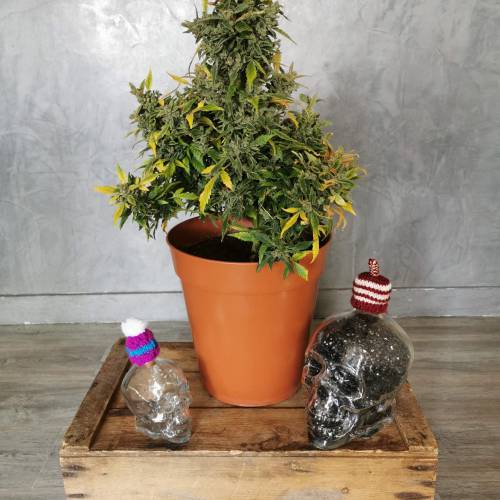
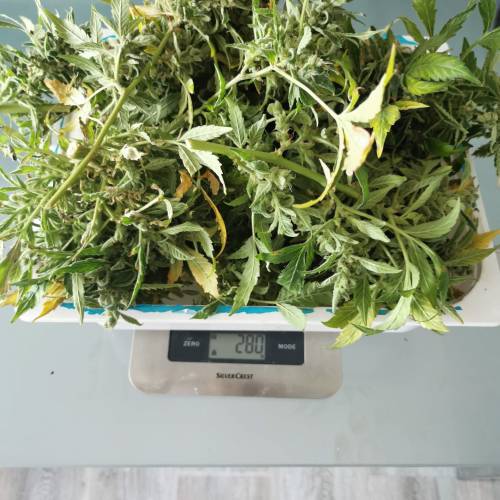
Happy Harvest Day!


8/10
Rated
Hello to all the padawans and jedi masters
Flavor
A very unique taste that resembles a sweet cherry pie, with notes of berries, earth, and candy. Original Auto Russian is a mouthwatering combination of fruity and floral terps, which could be described as a cherry aftertaste.
Show more
Original
Spent 120 days
Ger Veg Flo Har
280 g
Bud wet weight per plant
64.5 g
Bud dry weight per plant
1
Plants
0.8 m²
Grow Room size
Normal
Difficulty

Relaxed, Sleepy
Positive effects

Dry eyes
Negative effects

Berries, Earthy, Sweet
Taste
Height
Day air temperature
Air humidity
PH
Light schedule
Solution temperature
Night air temperature
Pot size
Lamp distance






16 likes
7 comments
Share
Equipment Reviews





28 comments
Sort by
popularity
popularity
newest
oldest

Castafunk commentedweek 127y ago
Superb
likes 3

Master_weeda commented7y ago
@CastaFunk, thanks to my Breton friend 👍 🙏 🙏 🙏 🙏
likes 4

Bouleuss commented7y ago
@Master_weeda, 👍 👍 🙏 🏻 🙏 🏻
like 1

Fast_Buds  commentedweek 177y ago
Hey there,
Well done on your grow.
We hope you have enjoyed growing our genetics !!
Keep up the good work!
Happy harvest!!! 🌾
likes 3
Master_weeda commented6y ago
@Fast_Buds,thank you team 💚
likes 2
Castafunk commentedweek 67y ago
Nice, let the strength be with you 💪
likes 3
Bouleuss commented7y ago
@Castafunk, 💪 💪 💪
like 1

Mr_Weeds_Autos commentedweek 67y ago
Loving the structure of the plant ... Just posted my week 1 entry of the same strain hope it does as good as yours is doing
likes 3
Master_weeda commented7y ago
@Mr_Weeds_Autos, Thank you my friend I will see your work now 😉 may the force be with you 💪
likes 6

CRiSPrGrow commentedweek 17y ago
Testers ! very nice growmie ! Bonne chance ! 🚀
likes 3
Master_weeda commented7y ago
Rpllabossanova, thank you amigo it's you the boss here!
You hold the 💪 force
likes 4

Bashgrowsitall1989 commentedweek 127y ago
Plants are looking great, Do you find any techniques that helped you? I super cropped mine this time or others call it mainlining, Zkittlez from fastbuds has exploded in growth since I did this. Check my diaries out if you get a chance. Happy growing
likes 2

JP148 commented7y ago
@Bashgrowsitall1989, just wanted to let you know that mainlining and super cropping are two totally different techniques. Super cropping is when you squeeze and crush the inside pulp of stem without breaking. Then bending it down. This releases hormones to heal wound and sets off reactions that can boost overall growth. Plus it shortens a too tall cola
likes 2
Master_weeda commented7y ago
@JP148, 👏 👏 👏 That's my brother. 👍
likes 4
Bashgrowsitall1989 commented7y ago
@JP148, See I thought they were the same technique, so when u super crop u break the fibers but dont break it off, let it heal and carry on? Where as mainlining is taking thst main stem out too let the other colas take charge and then you get more uniformity within you're Colas
like 1
Mr_Weeds_Autos commentedweek 107y ago
Wow, she grew up fast ... It looks different from mine.
likes 2
Master_weeda commented7y ago
@Mr_Weeds_Autos, I managed to make him a branch almost as big as the trunk
likes 6

Crazyweedpt commentedweek 77y ago
Bushy one 😅 looks a litle eden!
likes 2
Master_weeda commented7y ago
@CrazyWeedPT, 😊
likes 5

Ganjaman420UK commentedweek 37y ago
Congratulations on
Grower of the month 👌 💪 👏 🙌
HAPPY GROWING AND GOODLUCK 🌱 😎 👊 👍 ✌️
likes 2
Master_weeda commented7y ago
@Ganjaman420UK, 🙏 🙏 🙏 THX bro 👍
May the force be with you 💪
likes 7
Fast_Buds commentedweek 17y ago
Thanks again for doing some testing for us 🙌 🏼
Let us know if you need any assistance
Happy Growing! 💚 🌱
likes 2
Master_weeda commented7y ago
@Fast_Buds, it's an honor 🙏
likes 6

AcidTundra commentedweek 47y ago
A Nice morning to read Your apex pinching TEK.Sweet 👽 😽
likes 2

EZgrower commentedweek 77y ago
Happy New Year. I wish to collect more buds in the new year than in the previous.4-20! 😜
likes 2

DoDrugs420 commentedweek 175y ago
Amazing grow featuring Russian Auto in its best form.
like 1
Master_weeda commented5y ago
@DoDrugs420, thanks you buddy ❤️ 🙏 👍
likes
Bouleuss commentedweek 177y ago
Pretty work my friends 😊 🙏 🏻 🙏 🏻
like 1

the end.
Enjoying this diary? Follow for more updates!

Prefer the old Diary view?
Go back to the old Diary view