
Double Grape - HLG QB V2 R-Spec


VEG
HLG Light Emitting Diodes/135W
HLG
FLO
HLG Light Emitting Diodes/135W
HLG

Soil
Custom
Indoor
Room Type
LST
weeks 3-7, 9
Defoliation
weeks 4, 6-7
11 l
Pot Size
Start at Harvest
1
Week 1. Vegetation7y ago


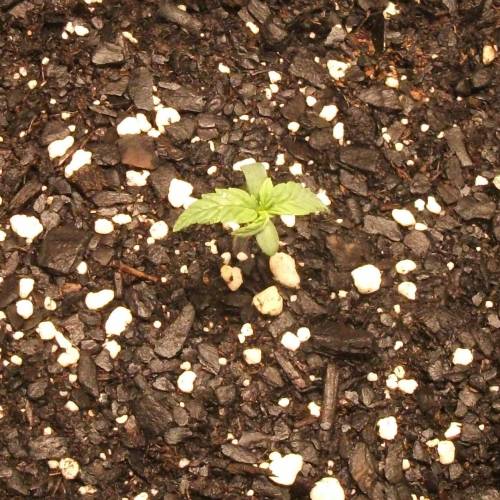


3.81 cm
Height
18 hrs
Light Schedule
27 °C
Day Air Temp
6.5
pH
No Smell
Smell
50 %
Air Humidity
21 °C
Night Air Temp
11 l
Pot Size
0.25 l
Watering Volume
63.5 cm
Lamp Distance
Nutrients 2

Great White
0.163 mll
Great White
0.156 mll
BladeCutter ~~~~~~~~~~~~~~~~~~~~~~~~~~~~~~~~~~~~~~~~~~~~~~~~~~~~~~~~~~~
==> Comments From Other "Living Soil/Super Soil" Growers Are Always Welcome <==
~~~~~~~~~~~~~~~~~~~~~~~~~~~~~~~~~~~~~~~~~~~~~~~~~~~~~~~~~~~
INTRODUCTION
I am very excited about this grow as it is the first time with a new setup. I have added a new light and am going to try a super soil grow for the first time. I have a Mephisto Genetics Double Grape between paper towels and waiting to sprout. The space is about 18 inches by 24 inches. The ceiling slopes down, so I don't have much room at the rear of the space. For medium I am using Fox Farms Happy Frog augmented with perlite. The bottom third contains 0.5 pounds autoflower blend of a "super soil" additive from Nature's Living Soil. (https://amzn.to/2PUHc6k) I am using three-gallon cloth pots. The light is a Horticulture Lighting Group 135W QB V2 R-Spec LED kit.
NUTRIENTS
Tap water pH’d to 6.5. pH lowered using 1.5 TBS unsulfured blackstrap molasses and apple cider vinegar. One-half TBS of vinegar lowered pH about 0.5 points.
The medium was very dry. Slowly watered to allow the moisture to be equal throughout the soil
ISSUES
My while I have yet to put the seed in the dirt, I am concerned about temperatures. They are currently running at about 86F. I would like to get it down to about 80F.
DAILY LOG
DAY -2: STARTED SEED
* Started seed in my traditional manner. Between paper towels soaked in 5% bleach solution, 0.25 tsp/0.5 Cup water. Temp 82F.
DAY -1: ACTION
*The smallest of tip has appeared. Will put in soil in a few hours.
Day 0: SEED PLANTED.
* Refrigerator filtered water. pH 6.5. 1 cup (250ml) added very carefully.
* Covered with humidity dome.
* Light from Soil: 32.5”
* Temperature: 82F
DAY 1: SPROUT
The sprouted seed has shown itself above the soil. A nice Christmas morning surprise. Now I can start counting the days.
* Watered with about 200ml of water at pH 6.5. Used apple cider vinegar to lower the tap water pH.
* I was pleased to find that my tap water does not contain chloramine. I was reading bad things about chloramine and "living soil." It can kill beneficial microorganisms. All I did was ask my water company and they replied saying "we found no mention of chloramine use in the system:" Just what I wanted to hear.
* After looking at other diaries using 250W LEDs, I moved my light down to 25 inches.
DAY 2: NO WATER FOR YOU
* No watering today. There is plenty of water in the soil and I want the roots to stretch and work.
* Working on increasing the humidity and getting more control over the temperature.
DAY 3: WATER PLANT, NOT POT. ADDED MYCORRHIZAE.
* Following the GrowWeedEasy watering suggestions for Kind Soil
* 500ml water at 6.5 pH, around the plant and not across the full 3-gallon bag.
* The fan gently moves the seedling to keep it strong.
* Had minor unexpected run-off. I hope to avoid that in the future.
* Added 1/8 tsp Great White Mycorrhizae dissolved in 100 ml of 50 ml water/50 ml molasses mix. Did not pH as it is such a small amount of solution compares to the watering earlier today.
DAY 4: NO WATER, NO PICTURE
* Nothing really new. So no reason for a picture.
* The soil is dry on top, but the bottom of the pot is still damp. So I will watch it, but I don't expect to water today.
* Adding a small intake fan has dropped the temps to about 82F, I think they can live with that.
* A humidifier arrives tomorrow and I think that will be my last step to improve the environment.
DAY 5: 500ml WATER, LOOKING GOOD
* The plant is looking good. The second set of true leaves has a bend, but nothing to worry about.
DAY 6: 500ml WATER. NEW HUMIDIFIER
* It wasn't really necessary to water today, but I did simply to stay on the schedule I am using.
* Given the lightness of the soil and the moving air, I don't anticipate any problems.
* Added a humidifier yesterday evening. It's bringing the humidity up, but I need to keep the space closed and I'm a bit concerned about having to provide it with distilled water frequently.
~~~~~~~~~~~~~~~
WEEK ONE IN REVIEW
~~~~~~~~~~~~~~~
* Watered with 750 ml pH's tap water. Watered slowly to avoid any runoff.
* The plant is looking very healthy. It looks as if the roots are really starting to work as the plant is darker green.
* Balancing temperature and humidity is tricky, but I think I will be able to get it stabilized with a bit more work.
* Target Relative Humidity: Seedlings - 65-70; Vegging - 40-70; Flowering - 40-50
==> Beginning Next Week I Will Only Post Twice A Week, Mid-week And End Of The Week. <==
3 likes
11 comments
Share
2
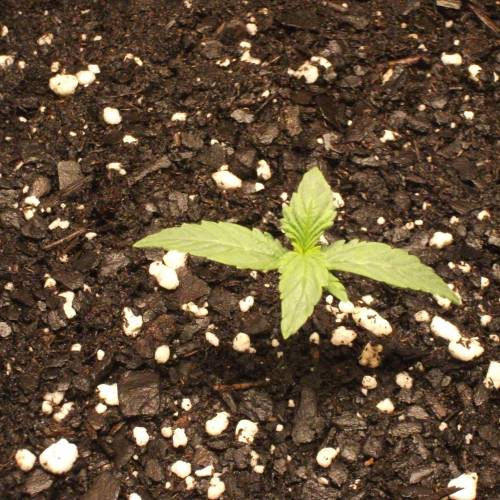
Week 2. Vegetation7y ago


5.08 cm
Height
18 hrs
Light Schedule
27 °C
Day Air Temp
6.5
pH
55 %
Air Humidity
18 °C
Night Air Temp
11 l
Pot Size
0.25 l
Watering Volume
60.96 cm
Lamp Distance
BladeCutter ~~~~~~~~~~~~~~~~~~~~~~~~~~~~~~~~~~~~~~~~~~~~~~~~~~~~~~~~~~~
==> Comments From Other "Living Soil/Super Soil" Growers Are Always Welcome <==
~~~~~~~~~~~~~~~~~~~~~~~~~~~~~~~~~~~~~~~~~~~~~~~~~~~~~~~~~~~
DAILY LOG
DAY 9: CHECKING IN
* No significant developments today, but I seem to be dialing in the temps and the humidity. I can keep the temps hovering around 80F and the humidity is about 50%. Both are good signs.
* My target is 80F daytime temps and RH between 40 and 70 percent while not having to add water to the humidifier reservoir more than daily. Since they affect one another, it is an interesting dance.
DAY 12: MID-WEEK UPDATE
* The plant is looking good, but I am slightly concerned about the ridges on the leaves. It may be a sign of a pH imbalance. But I don't plan on doing anything about it unless it doesn't clear up in a week or so. I don't trust cheap soil pH meters and the good ones can cost $200!
~~~~~~~~~~~~~~~~~~~~~~~~~~~~~~~~~~~~~~~~~~~~~~~~~~~~~~~~~~~~~~~~~~~
==> I would love to hear your suggestions on testing soil pH when you are trying to avoid run off. <==
~~~~~~~~~~~~~~~~~~~~~~~~~~~~~~~~~~~~~~~~~~~~~~~~~~~~~~~~~~~~~~~~~~~
* Watered with 750 ml of 6.5 pH tap water on day 11. Next watering, Day 14.
* I'm using clean newsprint as a mulch to minimize surface evaporation. It seems to work well, but it kind of messes with the color balance in pictures. I'll remove it before taking the next round of pictures.
* I'm waiting for the plant to really start taking off. Maybe by the end of the week?
* The temp and humidity seem to be in control. Today I get a remote humidity gauge so I don't have to open the grow space to check humidity. Opening the door lowers humidity immediately.
* I asked Nature's Living Soil about when to top-dress. This was the reply: "Once flowering begins, ideally water with a un-sulfured molasses mix (1-2 TBS/gal). As far as frequency, around once every 2 weeks should be more than enough." I expect to top-dress every three weeks.
~~~~~~~~~~~~~~~~~~~~~~~~~~~~~~~~~~~~~~~~~~~~~~~~~~~~~~~~~~~~~~~~~~~~~~~
==> My Only Concern Is The Apparent "Clawing" Visible On The Larger Leaves. Any Reason For Concern? <==
~~~~~~~~~~~~~~~~~~~~~~~~~~~~~~~~~~~~~~~~~~~~~~~~~~~~~~~~~~~~~~~~~~~~~~~
~~~~~~~~~~~~~~~~~~~~~~~~~~~~~~~~~~
WEEK TWO IN REVIEW - WAITING FOR THE STRETCH
~~~~~~~~~~~~~~~~~~~~~~~~~~~~~~~~~~
* Watered with 1L 6.5 pH tap water on day 15. The newsprint controls evaporation well. Expect next watering in 3-to-4 days. I wait until the bottom of the pot is no longer damp.
* The 135W QB is 24" above the plant. That should provide about 400 PPFD. Good for the veg stage. No signs of stretching.
* Just added an external humidity gauge. It reads about 5 percent higher than the one next to the plant, but it is great to know the temp and humidity without having to open the chamber. For example, I just checked it and it was down to 43 percent! I forgot to turn the humidifier on after my last time in the garden. I caught it within an hour rather than a day! Highly recommended. They are very cheap on Amazon.
2 likes
comments
Share
3
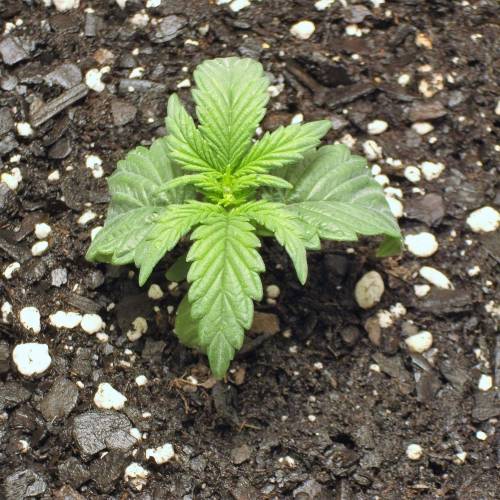
Week 3. Vegetation7y ago


11.43 cm
Height
18 hrs
Light Schedule
27 °C
Day Air Temp
6.5
pH
55 %
Air Humidity
18 °C
Night Air Temp
11 l
Pot Size
1 l
Watering Volume
57.15 cm
Lamp Distance
BladeCutter WEEK 3 BEGINS
* Got a little confused about how often to post, so this week is starting a bit late. I now have it figured out.
* Just posted a temporary picture of my growing library. As you can see, they go back to 1978! What's on your shelf?
* "Marijuana Garden Saver" is highly recommended. It is my go-to book for any problem I may have. I see that there is now an updated version available on Amazon (https://amzn.to/39YDmkT).
DAY 17: THE GARDEN CALLS
* Do you also find it a challenge to stay out of the garden? I know it doesn't need anything more than topping up the humidity tank, but I still visit very often.
* After checking the humidifier and if it needs water, I am resolved to keep it closed until tomorrow morning.
* These things happen when you enjoy your hobby.
DAY 18: WATERING DAY
* Watered with 1L tap water pH'd to 6.5. Three days since the last watering. The pot was essentially dry, the bottom was only slightly damp.
* I used my 500 ml squeeze watering bottle, see the picture. I use this because it gives me better control over where the water goes. Since no runoff is one of the key principles of Super Soil, I water over a period about an hour-long, while doing other things. The result is evenly saturated soil with no runoff.
* I am very pleased with the ability to see the temperature and humidity without opening the grow chamber. This means fewer fluctuations in temp and humidity.
* ==> I am waiting for it to really take off. It looks very healthy, but it not exploding by any stretch of the imagination. Waiting is difficult. When it does get a bit bigger I will start LST. <==
* I am allowing the plant to grow to the light. I haven't moved it since I moved it down to 24 inches early in the grow. Based on published data, this should give me about 470 PPFD, appropriate for vegetative growth.
~~~~~~~~~~~~~~~~~~~~~~~~~~~
PPFD REQUIREMENT BY PLANT STAGE
Source: Horticulture Lighting Group
Max: ~1,000
Flowering: 400-800
Extended Veg: 350-500
Vegetation: 150-400
Seedlings: <100
Source: MIGRO Video
Too High: 1,000-1,500
High Growth: 750-1,000
Medium Growth: 500-750
Low Growth: 250-500
No Growth: 0-250
~~~~~~~~~~~~~~~~~~~~~~~~~~~
DAY 20: CRITICAL ADJUSTMENT TO THE LIGHT
* I highly recommend this video: "Cannabis Lighting Myths and FAQs with Dr. Bruce Bugbee" found on YouTube at https://youtu.be/ID9rE5JewVg
* Another great short video is this one from MIGRO: "Best Grow Room Conditions For Maximum Yield - Light (PAR), Temperature and Air (CO2)," also on YouTube https://youtu.be/0WzwQkeY-nE
* Since my temperature and humidity are under control, I lowered my light from 24" to 18" and watched the plant closely. I estimated that the PPFD would increase from about 400 to nearly 700 PPFD. In particular, I was looking for any signs that the lower and therefore stronger light was causing problems. Indicators would be:
=> Upraised leaves
=> Tip burn
=> Yellowing at the top of the plant
=> "Nutrient deficiency" due to the plant "overeating." (See the first video for an explanation.)
* In less than 18 hours I noticed tip burn on the upper leaves, so I moved the light up to 22" and the problem did not get any worse. The lesson? Adjust the light with great care.
* Humidity is stable in the range of 53% during the day to about 70% at night. (The night figure is a little high.) For my own reference, to get these readings the machine is set at 70% with a speed of 2. I will lower the RH once the plant gets into the bloom cycle.
* I am excited to see that the plant is starting to grow rapidly. In the last 24 hours, it has put on nearly an inch. It is now about 4.5 inches tall.
DAY 21: JUST 1 LITER TAP WATER, pH 6.45
~~~~~~~~~~~~~~~~~~~~~~~~~
WEEK THREE IN REVIEW - LST BEGINS
~~~~~~~~~~~~~~~~~~~~~~~~~
* The plant has the shortest internodal distance that I have ever seen in a plant. It is only about 4.5 inches tall but has about four nodes on it. Not sure what to make of it.
* I just started LST today, Day 22. I am using an aluminum stake that I crafted for this purpose. I'm looking forward to seeing the plant's response.
* I am not as excited about the external humidity gauge as I was when I first installed it. It simply doesn't seem to provide meaningful readings. If it was consistently a fixed percent off from the internal readings, I could deal with that. But it seems to be all over the place. I'll continue to watch to see if it will add value to the grow or not.
~~~~~~~~~~~~~~~~~~~~~~~~~~~~~~~~~~~~~~~~~~~~~~~~~~~~~~~~~~~~~~~
==> Am I seeing the beginning of flowers? When do Double Grapes normally start to bud? <==
~~~~~~~~~~~~~~~~~~~~~~~~~~~~~~~~~~~~~~~~~~~~~~~~~~~~~~~~~~~~~~~
> I'll be back this weekend with the first report from week 4.
2 likes
comments
Share
Used techniques
LST
Technique
4
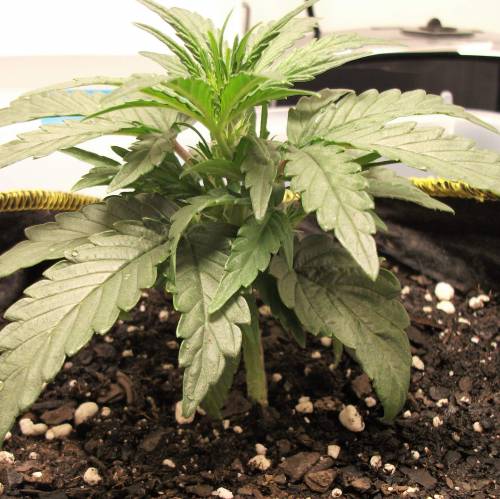
Week 4. Vegetation7y ago


10.16 cm
Height
24 hrs
Light Schedule
25 °C
Day Air Temp
6.4
pH
50 %
Air Humidity
25 °C
Night Air Temp
11 l
Pot Size
1.5 l
Watering Volume
71.12 cm
Lamp Distance
Nutrients 3
Nature's Living Soil
15.625 mll
Great White
0.326 mll
Great White
0.326 mll
BladeCutter WEEK 4: A NEW BEGINNING
==> DISCUSSION <==
For the first three weeks, I was doing everything I could to enhance the growing environment and maximize the about of light to the plants. I plotted PPFD. I started calculating "Vapor Pressure Deficit" (VPD) using a great spreadsheet I found online. I moved my light closer to the plant to increase the "Daily Light Integral" (DLI). Basically, I geeked out. However, I was still not totally pleased with the result. While the plant was healthy, it was very short and dense. I'd never seen a plant like it and many other plants of the same age were much taller and the branches were much more visible. Its compact size made it very difficult to even count the nodes, much less perform any kind of LST. Just placing a hold-down spike put me in danger of damaging the compact plant.
Wondering why my plant was so short, I turned to the wonderful community on the MephHeads sub-Reddit. There I could get advice from a number of growers who were not only more experienced than me but had experience with the very same strain. From that discussion (found here: http://bit.ly/35Wx1TJ) I decided to move my light as high as I could get it, at least for the next week or two. So I moved the light from about 20 inches above the plant to 27 inches above the plant. A number of the Double Grape growers there suggested that I make this move to encourage the plant to stretch and expand its reach. Attempting to induce a plant to stretch was a problem that I had never experienced before. But apparently it is not uncommon for first-time users of Quantum Boards and top-shelf genetics!
The second thing I changed was to remove the tie-downs and stop the LST started just yesterday. I want to let the plant get a few inches taller before I start any training.
The third and final change was a move to a 24/0 light cycle. I don't have any problems at this time maintaining the temperature and the humidity, so there are no structural reasons not to do it. And, I think there is a very good reason to do it, Mephisto Genetics suggests this is a great way to grow and actually cut a few days off of the cycle time.
~~~~~~~~~~~~~~~~~~~~~~~~~~~~~~~~~~~~~~
HERE'S WHAT THE MEPHISTO 2017 GROW GUIDE SAYS ...
"Some people want to save electricity costs, or ‘give their plants a break’ which is fine thinking, however, we typically run 24/0 more often than not, we find it gives no reduction in quality, plants always seem happy, and in our experience development is quicker and shaves some days off the overall cycle time. However. Please draw your own conclusions and see what works best for you."
~~~~~~~~~~~~~~~~~~~~~~~~~~~~~~~~~~~~~
DAY 24: WAITING FOR THE STRETCH
* I can't say the I am impressed by the stretch yet, but my time will come.
* Tried a new LST technique that I had not heard of previously, ponytailing. It simply involves bundling the top leaves into a "ponytail" to allow better light penetration to the lower leaves. Most suggest that you limit it to about six hours for a couple of days. We'll see what happens. You can see how I did it in the D24 pictures.
* Watered with 1.5 liters of tap water pH's to 6.45. I noticed that the pH seems to drift up during storage, so I thought I'd start with a slightly lower pH. I adjust one gallon at a time, so I get two-to-three waterings out of each gallon.
DAY 25: I'M AS FRUSTRATED AS HELL AND I'M NOT GOING TO TAKE THIS ANYMORE
* Many may not recognize the above as a near quote from the classic 1976 movie "Network." Here's a link to help you out: https://youtu.be/rGIY5Vyj4YM
* In my case, I am frustrated by a plant that had decided to become a bush, but not in a good way. If you've ever trimmed bushes you know that once you get past the outer green layer they are dead inside! That seemed to be the direction of my little Double Grape.
* To avoid this I went to the extreme. First, I defoliated. Something that is often controversial, but if the lower branches can't get light, they will never grow. So, I removed a total of TEN(!) leaves. I should have left the smallest one, cut from the top of the plant on the plant. But what is done is done.
* Then I applied some LST and moved lower branches into the light and gently bent the top over.
* As I write this it's been about three hours since I put her back in the grow room. I can already see that she is responding to her new shape and structure. I expect good things.
DAY 26: TOP DRESSING AND RETRAINING
* I decided it was time to do a bit of top dressing. First, I pulled the stakes that were holding the plant in place and gathered into one big ponytail using a pipe cleaner to hold it together. I didn't want to have to get the plant wet and dirty while top dressing.
* I added about 12 tsp (4 TBS) of Nature's Living Soil for Autoflowers to the top of the soil. I mixed this into the top half-inch or so of the soil so it was evenly distributed.
* I then added 0.25 tsp of Great White to 500 ml of water containing about 1.5 TBS/gal of non-sulfured blackstrap molasses. I used this to water in the Nature's Living Soil and the Great White Mycorrhizae.
* This was followed by 1 L of tap water pH'd to 6.4, in order to "flush" all of the applied nutrients into the rest of soil.
* Finally, I carefully staked each branch out so that it was able to receive the maximum light possible.
* I don't plan on making any additional adjustments for at least a few days. I hope to see the plant take off and start to reveal its final shape.
DAY 29: HEALTHY BUT REFUSES TO ACTUALLY GROW!
* Watered with 1.5L of tap water pH'd to 6.4. No significant runoff.
* I've been monitoring temperature, humidity and leaf temperature twice a day. The VPD remains stable at 1.2. This is slightly high so I will up the humidity slightly to see if I can lower it just a few tenths of a point.
* While I've always been a hobbyist and never a master, in my 40+ years of growing I've never seen a plant like this. It simply refuses to stretch. I've tried moving the light up, but that hasn't really had an effect. Even the LST and defoliation of a few days ago has not caused significant growth. The plant is recovering well and the leaves continue to grow, but the branches are not getting any longer. No stretch at all.
* I'm hoping to see it take off this week. But who knows?
* I'm considering starting a second plant, but that is going to require some significant changes to the grow space, so I may not be able to do it as soon as I might like.
==> I'll be back this weekend with a progress report of week 5. <==
4 likes
3 comments
Share
Used techniques
LST
Technique
Defoliation
Technique
5
Week 5. Flowering7y ago


10.16 cm
Height
24 hrs
Light Schedule
25 °C
Day Air Temp
6.4
pH
53 %
Air Humidity
25 °C
Night Air Temp
11 l
Pot Size
1.5 l
Watering Volume
58.42 cm
Lamp Distance
Nutrients 2
Nature's Living Soil
0.264 mll
Nature's Living Soil
0.264 mll
BladeCutter WEEK 5: GROWING A RUG!
==> DISCUSSION <==
Starting a new grow with a new light, new nutrients and new genetics is turning out to be much more challenging than I expected. I thought if you go with "the best" you will get "the best." But I found that is true only if you are growing at your best as well! I'm not at my best. Still so much to learn.
I picked Double Grape because it was a short plant, but this takes short to a whole new level. After letting it grow with no training for a few weeks it was packed so tight that I couldn't even see the inner branches. So I moved my light up hoping to induce stretch. It didn't. Next, it was a round of defoliation and some LST. While that opened up the canopy, it didn't do a thing to get the plant to grow any taller.
Making a U-turn I then started two lower my light again, bringing it down to 23 inches. It will stay until there is some compelling reason to raise it.
DAY 32: JUST WAITING
* Watered with tap water pH'd to 6.4.
* The VPD is 1.47. Significantly high. I've set the humidifier up to increase its output. I hope that this fixes the problem. I find it is very sensitive to changes in temperature. In this case, I moved the light down and this increased the temps in the grow room and at the canopy. Both of these factored into the increased VPD. More heat requires more humidity to get the right VPD, at least that's my current understanding. I guess it's back to YouTube for a refresher course.
D36: HAPPY 5th WEEK BIRTHDAY!
* I've been waiting two days between waterings. Each has been 1.5L of tap water pH'd to 6.4. I'm going to watch it closely as I think it may need to be watered every other day soon.
* I seem to have the VPD stabilized. It seems that the factor that the calculation is most sensitive to is leaf temperature. When the leaf temp went up from 71-72F to 74-76F the VPD increased substantially. The plant was "sweating" and couldn't cool itself down. I moved the fan slightly to keep the canopy a bit cooler and I was able to stabilize the VPD. The last two readings have been a "perfect" 1.0.
* I've accepted the fact that this plant is not going to stretch and get much taller. I think it is pretty obvious that it is blooming, but there was no real stretch.
* I just keep using LST to spread it out like a rug. You can see the difference in the pictures. I'll get some buds out of it. But I hope to start my next plant early so I can get it in its final pot as soon as this one is ready for harvest.
* I have not added any nutrients other than the top dressing on day 26. GrowDiaries doesn't really have a way of showing that one is growing in Living Soil and not regularly adding nutes. That's something I hope they change sometime.
==> I'll be back this weekend with a mid-week progress report for week 6. <==
3 likes
1 comment
Share
Used techniques
LST
Technique
6
Week 6. Flowering6y ago


12.7 cm
Height
24 hrs
Light Schedule
28 °C
Day Air Temp
6.4
pH
No Smell
Smell
46 %
Air Humidity
24 °C
Night Air Temp
11 l
Pot Size
2 l
Watering Volume
48.26 cm
Lamp Distance
Nutrients 1
Nature's Living Soil
0.264 mll
BladeCutter WEEK 6: LET HER GROW
DAY 37: RE-PINNED AND WATERED
* It took a full 2L of pH'd tap water today without any runoff. I'd love to see an X-ray view of the roots. I bet they are really starting to fill the pot.
* I removed all the pins that I use for LST and this allowed me to get under the plant, water around the main stem and remove some of the smaller lower leaves.
* I did some light defoliation and pinned all the branches that I could out as far as they would go. It's spreading out rather than growing up. I can live with that.
* Lowered the light a bit over 1 inch. It is now 21 inches above the canopy. It should be getting 500-600 PPFD, which I understand is good for flowering. I'll keep an eye on it for any hint of stress.
* I continue to monitor VPD. The temperature is 77F, the humidity at 55 and the leaf temp is 72F. This gives me a solid VPD of 0.94. It's been stable there for a few days now.
DAY 40: TOP DRESSED AND ENVIRONMENT OUT OF CONTROL
* I thought the plants looked a little nutrient imbalanced, so I top dressed.
* Based on the advice from the makers of Nature's Living Soil I topped dressed today with a bit more of their mix and a dusting of Mycrohizae. They suggested doing it every two weeks during bloom. Scratched it into the top of the soil and watered in with about 500ml of molasses water.
* Total watering of 2L tap water pH'd to 6.4.
* My Vivosun oscillating fan failed yesterday. Don't know why. Just unplugged it and it refused to run when I plugged it back in. But, Vivosun provided a great response and in less than 24-hours a new one is on the way. I purchased from Amazon and provided the order number. A good reason to buy from an authorized dealer.
* I installed a piece of shelving to the ceiling today. It allows me a lot of flexibility in how I hang my light and anything else. I've turned my light 90-degrees. I think that will even out the footprint for an 18 x 18 grow area where I should be able to keep two plants growing and get into harvesting every 30-to-40 days.
* The fan failure and change in my house temperature has really thrown my environment out of control.
* l lowered the light to 20-inches above the plants. I will wait a few more days and move it down another inch. I will stop lowering it when I get to 18 inches above the plants. This is based on published PPFD charts from HLG and some reviewers. I am always watching for signs that the light is getting too low.
~~~~~~~~~~~~~~~~~~~~~~~~~~~~~~~~~~~~~~~~~~~~~~~~~~~~~~~~~~~~~~~~~~~~~~~~~
TOP TIP: Only use one meter to measure anything. I had two thermometers and two humidity gauges. They never
agreed! Neither was accurate enough to provide the same reading. Just caused confusion.
Your mileage may vary!
~~~~~~~~~~~~~~~~~~~~~~~~~~~~~~~~~~~~~~~~~~~~~~~~~~~~~~~~~~~~~~~~~~~~~~~~~
DAY 43: STILL BLOOMING
* Nothing significant to report. No watering since my last report.
* Since my fan failed it was difficult to get the VPD stable, but I think I have it. I am currently maintaining it at about 1.0. I will let it creep up over the next week or so.
* My replacement fan should be here by the end of the week.
==> Back this weekend for my first Week 7 report. <==
2 likes
2 comments
Share
Used techniques
LST
Technique
Defoliation
Technique
7
Week 7. Flowering6y ago


12.7 cm
Height
24 hrs
Light Schedule
10 °C
Day Air Temp
6.4
pH
Weak
Smell
47 %
Air Humidity
10 °C
Night Air Temp
11 l
Pot Size
2 l
Watering Volume
48.26 cm
Lamp Distance
Nutrients 1
Nature's Living Soil
0.264 mll
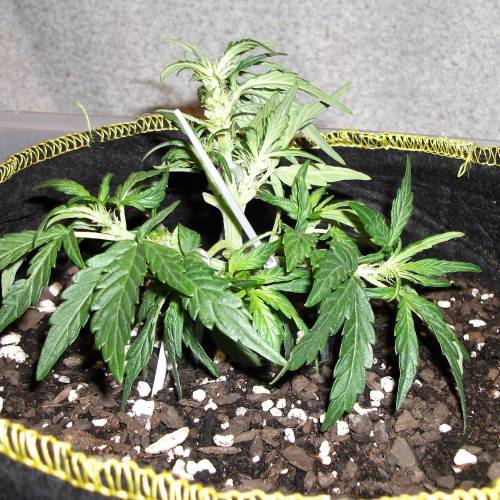
BladeCutter WEEK 7: IT IS WHAT IT IS
OK, I am growing A carpet and not a Christmas tree! The buds that have formed are the buds that I will have. I just need to take care of them and let them mature. I'm not going to set any records, but I am learning a lot about how to optimize the growing environment.
DAY 46: TAKE IT EASY ON THE WATERING
* Based on new research, I am lightening up a bit on watering. The last time I watered was six days ago and this time I only used 1.5L rather than the 2L that I saturated the soil with earlier. Don't know if it will make a difference. I've never watered to runoff.
* Vivosun has replaced my defective fan and the new one is now in place. It has helped stabilize the environment.
* CALCULATING VPD: Temperature: 80-81F; RH: 55%; Leaf Temperature: 75-77F; VPD: 1.08-1.18. This is in just where I want it, the low end of the target range for mid-late flowering of 1.2-1.6.
DAY 49: A GIRL IN HER ADOLESCENCE
* Closing out the week a day early.
* She has about 20 days to go, but I can see that she is filling out.
* Gave her 1.5L of plain tap water pH'd to ~6.4.
* When I gave her 2L of water it took six days to dry out. With 1.5L she was very light just two days later. I will continue with the lighter watering.
* I think it was on Grow Week Easy where I read that when you have to water your plant every day, that is the time to up the amount of watering. I have not yet reached that point.
* The environment seems stable at 84F, leaf temp of 76F and an RH of 44%. This makes the VPD 1.3, great for early to mid flowering.
* It's interesting what watering did to the environment. It dropped the temp to 77F and the RH jumped to 82%! I suspect it will level out by the end of the day, once the topsoil dries a bit.
DAY 51: NOTHING EXCITING
* Watered with 1.5L pH's tap water.
* VPD has stabilized. I'm letting it creep up as I get later into the bloom cycle. This, in turn, is responsible for more frequent watering. Think of it as a person working hard and sweating. That water needs to be replaced.
* The grow room adjustments are coming along. I hope to run two plants in about and 18" x 18" area for the next grow.
D52: "LOLLLYPOPPING" A CARPET
* I dug into the plant today and effectively "lollypopped" the small branches and buds. Under the top visible growth, there is a layer of small under-developed branches and buds. I worked with the plant to remove these energy suckers. They were not getting enough light to fully mature yet they require water and nutrients. Removing these branches and buds also improves the airflow around the plant. Given how compact this plant is, that is important to avoid potential mold problems.
* Watered with just 0.5L of molasses water.
D53: MORE WATER, MORE ROOM PREP
* While I have been watering more lightly lately, after watching it get thirsty again after just two days, I decided to go back to 1.5L of tap water at a pH of ~6.5. I water carefully and ensure that there is never any runoff.
* I also working on the grow area and prepping it for a two-pot grow. Each pot a three-gallon smart pot.
* I am using a try from a dog crate for the floor. It will contain any small spills. It fills the available area and I will be able to have an effective footprint of 18" x 18".
* On top of the tray, I am placing a piece of shelving leftover from another project. This gets the pots off of the floor. When complete, I will have a new mount for the fan so the bucket doesn't take so much room.
* I've started mixing my soil. I am looking forward to getting the pots layered and letting them start to cook.
D56: STANDARD WATERING
* Watered with 1.5L of tap water pH'd to ~6.4.
D58: RUNNING TOWARD THE FINISH LINE
* Plant seems to be showing some cal-mag and phosphorus shortages. I topped dressed the pot with Nature's Living Soil, Great White Mycorrhizae and Home Grown Bokashi Veg Castings Mix'Ins. This was watered in with 500ml of molasses water.
* Watered with an additional 1L of tap water pH'd to ~6.4.
~~~~~~~~~~~~~~~~~~~~~~~~~~~~
GROW ROOM IMPROVEMENTS INSTALLED
~~~~~~~~~~~~~~~~~~~~~~~~~~~~
Installed a tray designed to fit a large dog carrier on the floor. It has an inch-high rim that should prevent any type of water overflow. On top of that, I put a piece of wire shelving. This keeps the plants off of the cold floor and gives them room to drain. Finally, I was able to epoxy a 1-inch PVC pipe in the corner of the shelf, drastically increasing the space available for plants. It will now be easy to get two 3-gallon smart pots in the space. Looking forward to my next round.
~~~~~~~~~~~~~~~~~~
THE NEXT ROUND - EDITED
~~~~~~~~~~~~~~~~~~
I've been spending a lot of my time focusing on my next growing effort. I need to take what I've learned from this round, my first with Mephisto Genetics, a Quantum Board and using organics, and apply them to my next crop. Here are some of the things I've learned:
1. Start with the light far from the seedlings. Allow them to grow to the light. Dim the light if necessary.
2. Water much more lightly, especially early in the plant's life cycle. Kind Soil offers some very good advice here: http://www.kindsoil.com/seed-starting.html
3. Don't get too OCD over the pH. Anything in the range of 6.4-to-6.7 is going to be fine in an organic grow.
* I'll be using 50L of Biobizz Light-Mix, purchased through Walmart, as my base. I will amend it with about two gallons of worm castings.
* The top third of the pot will be only Light-Mix and worm castings.
* For nutrients, I will be incorporating Nature's Living Soil in the "Living Soil" configuration. I will then create layers of soil using the Home Grown Bokashi 10 oz Seed To Harvest Pro Bokashi Set. (https://www.homegrownbokashi.com/p/10oz-seed-to-harvest-pro-bokashi-set) It will be some work to get this set up, but I've heard good things and I think it is fun to fuss with soil! 😊
* I will be running two 3-gallon pots at a time.
==>Back in a few days for the beginning of the Week 9 report. <==
likes
comments
Share
Used techniques
LST
Technique
Defoliation
Technique
8
Week 8. Flowering6y ago

12.7 cm
Height
24 hrs
Light Schedule
27 °C
Day Air Temp
6.4
pH
Weak
Smell
47 %
Air Humidity
27 °C
Night Air Temp
11 l
Pot Size
2 l
Watering Volume
48.26 cm
Lamp Distance
Nutrients 1
Nature's Living Soil
0.264 mll
BladeCutter This is just a place holder for the week I missed. But, it is a picture of the plant in the middle of week 8 at D53.
1 like
comments
Share
9
Week 9. Flowering6y ago


12.7 cm
Height
24 hrs
Light Schedule
10 °C
Day Air Temp
6.4
pH
Weak
Smell
47 %
Air Humidity
10 °C
Night Air Temp
11 l
Pot Size
2 l
Watering Volume
48.26 cm
Lamp Distance
Nutrients 1
Nature's Living Soil
0.264 mll
BladeCutter ~~~~~~~~~~~~~~~~~~~~~~~~~~~~~~~~~~~~~~~~~~~~~~~~~~~~~~~~~~~~~~~~~~~~~~~~~~~~~~~~~~~~~~~~~~~~~~~~
HELP: I CAN'T GET IT TO SAVE THE CORRECT TEMPERATURE! IT'S 83 F DURING THE DAY AND 80 F AT NIGHT. BUT IT INSISTS ON SHOWING IT AT 50.
~~~~~~~~~~~~~~~~~~~~~~~~~~~~~~~~~~~~~~~~~~~~~~~~~~~~~~~~~~~~~~~~~~~~~~~~~~~~~~~~~~~~~~~~~~~~~~~~
WEEK 9: WHAT HAPPENED TO WEEK 8?
Somehow, I forgot to start a new week and ended up running Week 7 for 14-days! So all the days are here, but somehow I missed starting Week 8. Too lazy to go back and redo it all. So, here we are in Week 9! Welcome.
DAY 60: MORE WATERING
* Since the top dressing just two days ago, I naturally haven't seen any significant differences yet.
* Watered with 1.5L tap water pH'd to ~ 6.5.
* If she needs watering again tomorrow, I will up the amount to 2 liters.
* While all the trichomes are still clear, I'm thinking I'll give her about 10 more days. By then I should be ready to move in my new plants. Even if she needs a bit longer, I can probably find room for three pots temporarily.
DAY 62: MORE WATERING
* Upped the amount of water by half-a-liter. Watered with 2L tap water pH'd to ~ 6.5. Yesterday I gave it a short 0.5 L.
* For the first time I watered using a watering can rather than my little squirt bottle. The result was more runoff than I had at any other time in the grow. You can see it in the pictures. It wasn't a matter of overwatering, simply added the water too quickly.
* The plant is yellowing quickly. I don't plan on doing anything about it, other than harvesting in about a week.
DAY 64: ONE LAST FEEDING ... FOR THE MICROBES
* One last molasses feeding for my little subterranean friends. Just 500 ml followed by 1.5L of tap water pH'd to 6.5.
* Coming down soon. You can see that she is ripening by the day. I'll give her another week.
* I hope to start two sisters sometime this weekend.
2 likes
2 comments
Share
Used techniques
LST
Technique
10
Week 10. Flowering6y ago


12.7 cm
Height
24 hrs
Light Schedule
28 °C
Day Air Temp
6.4
pH
Weak
Smell
47 %
Air Humidity
25 °C
Night Air Temp
11 l
Pot Size
2 l
Watering Volume
48.26 cm
Lamp Distance
Nutrients 1
Nature's Living Soil
0.264 mll
BladeCutter ~~~~~~~~~~~~~~~~~~~~~~~~~~~~~~~~~~
HARVEST WEEK. POSTING HARVEST REPORT SOON.
~~~~~~~~~~~~~~~~~~~~~~~~~~~~~~~~~~
DAY 66: JUST PICTURES
* Nothing more today. I just took a couple of pictures.
DAY 68: LAST REPORT BEFORE HARVEST
* Gave it two liters of tap water pH'd to ~6.5
* It is showing signs of old age. I will harvest at Day 70.
likes
comments
Share
10
Week 10. Harvest6y ago
Happy Harvest Day!


8/10
Rated
This is my first time for Double Grape, organic growing and a new HLG 135W Quantum board. So I can't really judge the genetics at this point. I've just started my second round with Double Grape. Details in my new diary, when I post it.
Show more
Translate
Spent 71 days
Ger Veg Flo Har
93 g
Bud wet weight per plant
23 g
Bud dry weight per plant
1
Plants
0.21 m²
Grow Room size
Normal
Difficulty

Hungry, Relaxed
Positive effects

Dry mouth
Negative effects

Berries, Fruity, Woody
Taste
Height
Day air temperature
Air humidity
PH
Light schedule
Night air temperature
Pot size
Lamp distance


BladeCutter GrowDiaries seems to miscalculate grow room size. Mine is 2.25 square feet.
~~~~~~~~~~~~~~
HARVEST ON DAY 70!
~~~~~~~~~~~~~~
I've really learned a lot from this grow. It was my first time with Mephisto Genetics, my HLG 135W QB V2 R-Spec light and organic growing with Nature's Living Soil. I've learned:
* I watered far too much far too early. I will cut back dramatically on my next grow.
* I dropped the light too soon. Next time, the light stays up high during the seedling stage and maybe even dim it some.
* Controlling Vapor Pressure Deficit (VPD) is very difficult. You have to balance humidity, temperature and ventilation. After a few weeks, I learned how to stabilize the environment.
* Wet weight, including some stems, comes to 93 grams. If I lose 75% in drying, it should put my final dry weight at about 23 grams.
* I was very surprised that I could get this much production from a plant that never broke 6-inches in height!
* Can't comment on the quality until it is dried. (Yes, I've been cheating a little, but don't want to review something that hasn't matured.)
2 likes
3 comments
Share
Equipment Reviews

22 comments
Sort by
popularity
popularity
newest
oldest

Gr33nFi3ld commentedweek 17y ago
Love the stealth setup you've got going.
Good luck with your grow!
like 1
Gr33nFi3ld commented7y ago
@BladeCutter, jesus! How did the dwc and aeroponics bud quality compare to soil? I see some people can get some massive yields doing the former but I'm chasing quality mainly.
likes

BladeCutter commented7y ago
@Gr33nFi3ld, it's so long ago that I really don't recall. But I do know that I was able to produce a big crop.
like 1
Gr33nFi3ld commented7y ago
@BladeCutter, cool. I reckon it'd be a bit too complex to try but I'm happy with the soil results so far.
likes
Show More (4)

PrairieFrostGrow commentedweek 66y ago
Nice grow! Environment dialled in!! Hope she is fire!😃
like 1
BladeCutter commented6y ago
@PrairieFrostGrow, I hope so too. Today I'm going to make some changes in how I use my space and I should be able to grow at least two plants at a time. Don't expect to start a second plant until later this month, but I'm getting it set up. I'm going to move and reorient my light a little bit. That should give me good coverage of an 18-inch by 18-inch square on the floor. With some luck, I can harvest every 30-45 days. 😁
likes

Cheeba_Inu commentedweek 57y ago
You have a nice little plant. Every grow is a learning experience and it looks like this one has been very useful. I am sure she's going to yield you some nice quality buds 👍🔥
like 1

raptor65 commentedweek 47y ago
Looking great mate 👍, All the best in your grow and the new year,😉Hope you have a great harvest 😎🙏
like 1

amazongrow commentedweek 17y ago
looks like they got the perfect conditions like temp and humidity! that is awesome! tasty buds I guess =)
likes
amazongrow commented7y ago
@BladeCutter, if you can manipulate your conditions, choosing the best vpd is a must, good for you! For us mortals (LOL) we get to measure once and settle with what we got... thankfully, it is ok around here. =)
Thanks again for the detailed diary.
Btw, I am on my third diary, if you care to visit... be my guest! =)
Tchau, do Brazil
like 1
BladeCutter commented7y ago
@amazongrow, I'm glad that my detailed diary is appreciated. I've kept personal diaries in the past, but this is the first time online. If there is any other information that you would find useful, please let me know. I'll be posting again in detail Saturday or Sunday. I will also comment on your diaries in that timeframe. Good Times. Good Grow. Um abraço (I hope I have that right.)
like 1
amazongrow commented7y ago
@BladeCutter, thannks bro. yes, you got it right.
Tchau, do Brazil! =)
likes
Show More (1)

Denzul commentedweek 106y ago
Some beautiful looking buds. Congrats on the successful harvest.
likes
BladeCutter commented6y ago
@Denzul, thanks. I was surprised that such a small plant could produce even 20g (dry estimate). I just started two more Double Grapes and hope to increase the yield significantly. When I hear Mr. Cannuck of Mr. Cannuck's Grow on YouTube say that his Auto target is 1g/watt it really gives me something to shoot for. That means I need to increase my production by at least 6 times! That's going to take some more gardens to get that kind of yield. I hope to start two more diaries in the next few days.
like 1
Denzul commented6y ago
@BladeCutter, some lofty goals but I wish you luck. Keep following great growers like mr Canucks and you'll be there in no Time. You got the right mindset. Just keep learning and keep trying and you'll get there
likes

Bashgrowsitall1989 commentedweek 96y ago
You're plants look like thier doing really well, I'm also doing a Mephisto genetics strain - Auto S.O.D.K . I've defoliated it and it's doing pretty well tbf. Its pre flowering/ pre flower stretching. Happy growing
likes
BladeCutter commented6y ago
@Bashgrowsitall1989, she's a tight knot of buds. I've learned a lot and hope to get a bit more stretch out of my next attempt.
likes

the end.
Enjoying this diary? Follow for more updates!


Prefer the old Diary view?
Go back to the old Diary view