
Utopia Haze on coco under LED


Coco Coir
Custom

Perlite
Custom
Indoor
Room Type
ScrOG
weeks 7-10
Topping
weeks 3, 5
Main-Lining
weeks 3-5
LST
weeks 5-7
Defoliation
weeks 5-10
25 l
Pot Size
Start at Harvest
G
Germination6y ago


8 cm
Height
18 hrs
Light Schedule
25 °C
Day Air Temp
5.8
pH
No Smell
Smell
450 PPM
TDS
60 %
Air Humidity
20 °C
Solution Temp
20 °C
Substrate Temp
21 °C
Night Air Temp
1 l
Pot Size
0.2 l
Watering Volume
68 cm
Lamp Distance
Nutrients 5

TriPart Grow
0.25 mll

TriPart Micro
0.25 mll

TriPart Bloom
0.25 mll
ActioPauliana Long before I started growing, I already fantasized about growing a true sativa dominant strain. So, with 2 grows experience, I selected Barney’s Farm Utopia Haze. A 90% sativa dominant strain and, as the name suggest, delivering a “long lasting cerebral Sativa high”. The biggest challenge this grow will be to keep their height in check.
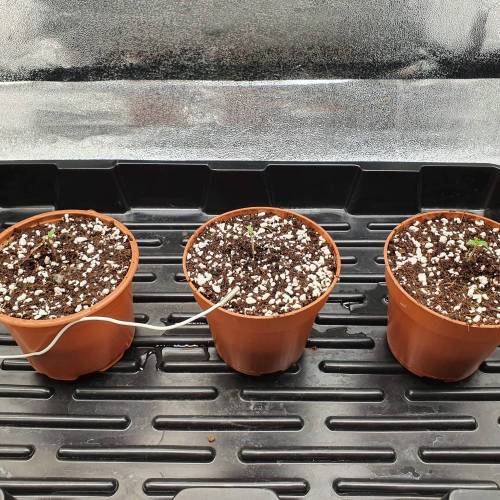
So welcome to my grow! On Tuesday, September 22, I dropped three seeds into Jiffy pellets, putted those into the propagator and three days later, on Friday, they were all up and running. Friday September 25 is day 1.
**********************************************************************************************************************************
Main setup:
Tent: Secret Jardin DS120W R4.0 Darkstreet;
Lights: Mars Hydro TSL 2000 (both panels fully dimmed: 82 watt, maximum usage: 320 watt);
Relay timer: Davin Hobby Timer DV-400 W 1x 400W (not necessary with LED grow, but better safe than sorry);
Exhaust: Vents TT 125 UnR1 (280 m2/hr, temperature controlled, buildin dimmer);
Intake: 2 passive intakes on both sides of the tent with Secret Jardin DF16 Ducting Flanges and Secret Jardin DF16LB R4.00 Light Baffles;
Ducting: Sonoconnect ducting (sound insulated);
Filter: CAN Original Filter (200 m2/hr, not installed yet);
Ventilation: Secret Jardin Monkey Fan 16W;
Ventilation 2: Secret Jardin Monkey Fan Oscillating 20W (not installed yet).
Measurement equipment:
Temp & RH: 2 no-brand thermo/hygro meters (one outside the tent, one inside);
Energy: EcoSavers Energy meter (I use this to get both panels of the light dimmed equally);
EC & pH: Bluelab Conductivity Pen and pH Pen;
Cleaning: Bluelab probe and conductivity cleaner;
Calibration: Bluelab EC 2.77, pH 4.0 and 7.0;
Storage: Bluelab KCI storage solution.
Medium equipment and products:
Final Pots: 25L AirRap pots;
Early veg pots: 1L plastic pots;
Germination medium: Jiffy peat pellets;
Medium: Canna Coco Professional mixed with 35% perlite (about 75% is being re-used from last grow, fully rinsed and rebuffered);
Nutrients: see above in the dedicated nutrients section from the diary.
Miscellaneous:
Fire safety 1: Smartwares RM520 Smoke detector (above the tent)
Fire safety 2: Fire Knock Out 1.6 (automatic fire extinguisher directly above the tent, will activate if in contact with fire);
Electricity 1: 1,5 mm IP44 connection cord to power the relay (and thus the lights, plugged in a socked that’s on an empty group);
Electricity 2: Brennenstuhl power strip 8-way with switch (all other equipment is on this socket);
Hygiene 1: Sensicare Silk Nitrile gloves;
Hygiene 2: Isopropanol Alcohol 99,9% (I dilute this to 70% for disinfecting);
Hygiene 3: Ecolab P3-Ansep Chlorine Tablets (ideal for disinfecting the tent, just 1 tablet on 10L water);
Syringes: BD Emerald syringe 10ml and 1ml (both sizes with 100 pieces in a box, will last me a lifetime);
Pressure sprayer: Gardena Pressure Sprayer - 5 Liter;
Siphon pump: Eurom Electric Siphon Pump;
Propagator: ROOTiT Propagator;
Lab glass work: Wanddefol Borosilicate Glass Cup Set;
Binding wire: GreenForrest Flexi Tie;
Sticks: Silverline bamboo sticks 300 mm.
And off course a load of typical household items are used during this grow, such as buckets, clips, towels, a pair of Ikebana scissors for dry trimming after harvest, mason jars for curing and a bunch of mini hygrometers. To protect my eyes, I use a good pair of Ski Goggles when working in the tent with lights on. I use a camping washing machine and Bubblebagdudes Bubble Bags 5 Gallon 8 Bag Set for hash making.
*****************************************************************************************************
Strain info (from breeder):
“UTOPIA HAZE is the result from generations of backcrossing and selection from a prized Brazilian landrace. In its first Cannabis cup the UTOPIA HAZE took both Cannabis and Sativa cups, and was called the overall favourite of the event. This is a tall mould and disease resistant plant, growing up to 130cm, and boasts a high yield of 650g per square metre. It bursts with citrus and mint flavours, and will give you a long lasting cerebral Sativa high.”
6 likes
comments
Share
Used method
Peat Pellet
Germination Method
1
Week 1. Vegetation6y ago


5 cm
Height
18 hrs
Light Schedule
25 °C
Day Air Temp
6.1
pH
No Smell
Smell
400 PPM
TDS
60 %
Air Humidity
20 °C
Solution Temp
20 °C
Substrate Temp
21 °C
Night Air Temp
1.5 l
Pot Size
0.25 l
Watering Volume
70 cm
Lamp Distance
Nutrients 5
TriPart Grow
0.35 mll
TriPart Micro
0.35 mll
TriPart Bloom
0.35 mll
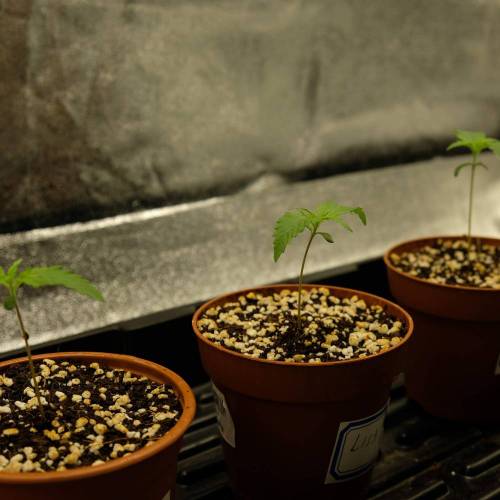
ActioPauliana The seedlings are developing fast and are actually bigger than the seedlings of my two first grow. During this week, I slowly increased EC of the fertigation mix and dropped the lights a bit. I also increased the power of the lights from 82 watts (lowest setting) tot 107 watts.
Only two of the seedlings will be transferred to their final pots. My first two grows I cultivated three plants, but it was always a bit crowdy. With this sativa strain, I prefer to have room to train the plants sideways, hence, only two plants this time.
So, good start, nothing to complain. Thanks for your visit and feel free to ask any questions or give remarks. Stay healthy, keep growing and enjoy the weekend!
**********************************************************************************************************************************
Main setup:
Tent: Secret Jardin DS120W R4.0 Darkstreet;
Lights: Mars Hydro TSL 2000 (both panels fully dimmed: 82 watt, maximum usage: 320 watt);
Relay timer: Davin Hobby Timer DV-400 W 1x 400W (not necessary with LED grow, but better safe than sorry);
Exhaust: Vents TT 125 UnR1 (280 m2/hr, temperature controlled, buildin dimmer);
Intake: 2 passive intakes on both sides of the tent with Secret Jardin DF16 Ducting Flanges and Secret Jardin DF16LB R4.00 Light Baffles;
Ducting: Sonoconnect ducting (sound insulated);
Filter: CAN Original Filter (200 m2/hr, not installed yet);
Ventilation: Secret Jardin Monkey Fan 16W;
Ventilation 2: Secret Jardin Monkey Fan Oscillating 20W (not installed yet).
Measurement equipment:
Temp & RH: 2 no-brand thermo/hygro meters (one outside the tent, one inside);
Energy: EcoSavers Energy meter (I use this to get both panels of the light dimmed equally);
EC & pH: Bluelab Conductivity Pen and pH Pen;
Cleaning: Bluelab probe and conductivity cleaner;
Calibration: Bluelab EC 2.77, pH 4.0 and 7.0;
Storage: Bluelab KCI storage solution.
Medium equipment and products:
Final Pots: 25L AirRap pots;
Early veg pots: 1L plastic pots;
Germination medium: Jiffy peat pellets;
Medium: Canna Coco Professional mixed with 35% perlite (about 75% is being re-used from last grow, fully rinsed and rebuffered);
Nutrients: see above in the dedicated nutrients section from the diary.
Miscellaneous:
Fire safety 1: Smartwares RM520 Smoke detector (above the tent)
Fire safety 2: Fire Knock Out 1.6 (automatic fire extinguisher directly above the tent, will activate if in contact with fire);
Electricity 1: 1,5 mm IP44 connection cord to power the relay (and thus the lights, plugged in a socked that’s on an empty group);
Electricity 2: Brennenstuhl power strip 8-way with switch (all other equipment is on this socket);
Hygiene 1: Sensicare Silk Nitrile gloves;
Hygiene 2: Isopropanol Alcohol 99,9% (I dilute this to 70% for disinfecting);
Hygiene 3: Ecolab P3-Ansep Chlorine Tablets (ideal for disinfecting the tent, just 1 tablet on 10L water);
Syringes: BD Emerald syringe 10ml and 1ml (both sizes with 100 pieces in a box, will last me a lifetime);
Pressure sprayer: Gardena Pressure Sprayer - 5 Liter;
Siphon pump: Eurom Electric Siphon Pump;
Propagator: ROOTiT Propagator;
Lab glass work: Wanddefol Borosilicate Glass Cup Set;
Binding wire: GreenForrest Flexi Tie;
Sticks: Silverline bamboo sticks 300 mm.
And off course a load of typical household items are used during this grow, such as buckets, clips, towels, a pair of Ikebana scissors for dry trimming after harvest, mason jars for curing and a bunch of mini hygrometers. To protect my eyes, I use a good pair of Ski Goggles when working in the tent with lights on. I use a camping washing machine and Bubblebagdudes Bubble Bags 5 Gallon 8 Bag Set for hash making.
*****************************************************************************************************
Strain info (from breeder):
“UTOPIA HAZE is the result from generations of backcrossing and selection from a prized Brazilian landrace. In its first Cannabis cup the UTOPIA HAZE took both Cannabis and Sativa cups, and was called the overall favourite of the event. This is a tall mould and disease resistant plant, growing up to 130cm, and boasts a high yield of 650g per square metre. It bursts with citrus and mint flavours, and will give you a long lasting cerebral Sativa high.”
2 likes
comments
Share
2
Week 2. Vegetation6y ago


10 cm
Height
18 hrs
Light Schedule
24 °C
Day Air Temp
5.9
pH
No Smell
Smell
550 PPM
TDS
55 %
Air Humidity
20 °C
Solution Temp
19 °C
Substrate Temp
20 °C
Night Air Temp
25 l
Pot Size
0.5 l
Watering Volume
60 cm
Lamp Distance
Nutrients 5
TriPart Grow
0.65 mll
TriPart Micro
0.5 mll
TriPart Bloom
0.2 mll
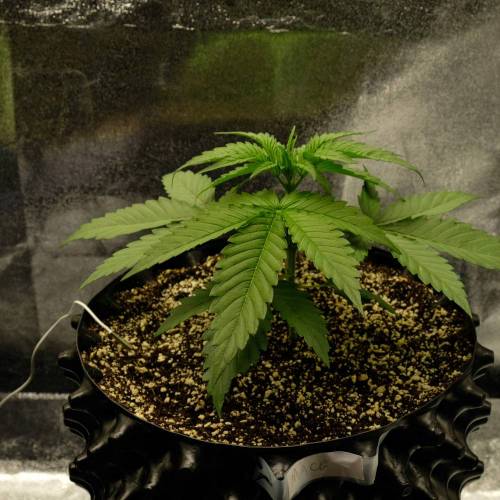
ActioPauliana Day 12: transplant day. The girls were clearly growing out of their small 1L pots. I selected the two most promising girls to transplant into their final containers. The first one was easy: Mace. She’s been the fastest, biggest and healthiest growing of the three seedlings since the beginning. The other choice was tough: Lisa and Nora were almost exactly the same. I ended up selecting Lisa, she was just a tad bit bigger than Nora.
Transplant went a lot smoother compared to transplanting from fabric pots. During transplant I noticed the roots of both girls were well developed and especially Mace was close to being rootbound. They were transplanted to 25L AirRap pots. I don’t know what I was thinking when I ordered them. I the 20L or even 15L pots had been a better choice. Obviously, the pots are way to big for these small seedlings, but I didn’t want to go through multiple stages of transplanting. The size of the pots forces me to use a wet/slightly dry cycle to prevent drowning the girls.
The girls are still a bit droopy since transplant. Mace has kept on growing, Lisa seems to have slowed down a bit. Both are working on their 4th node. Hopefully, next week they’ll settle into their new homes and pickup a fast grow rate. In that case, I might be able to do their first topping somewhere at the end of the week.
Thanks for stopping by and enjoy the weekend!
************************************************************************************
For a full overview of the equipment and products used during this grow, consult week 1 of the diary.
************************************************************************************
Strain info (from breeder):
“UTOPIA HAZE is the result from generations of backcrossing and selection from a prized Brazilian landrace. In its first Cannabis cup the UTOPIA HAZE took both Cannabis and Sativa cups, and was called the overall favourite of the event. This is a tall mould and disease resistant plant, growing up to 130cm, and boasts a high yield of 650g per square metre. It bursts with citrus and mint flavours, and will give you a long lasting cerebral Sativa high.”
5 likes
1 comment
Share
3
Week 3. Vegetation6y ago


20 cm
Height
18 hrs
Light Schedule
24 °C
Day Air Temp
5.9
pH
No Smell
Smell
625 PPM
TDS
50 %
Air Humidity
20 °C
Solution Temp
19 °C
Substrate Temp
20 °C
Night Air Temp
25 l
Pot Size
0.5 l
Watering Volume
60 cm
Lamp Distance
Nutrients 5
TriPart Grow
0.81 mll
TriPart Micro
0.54 mll
TriPart Bloom
0.27 mll
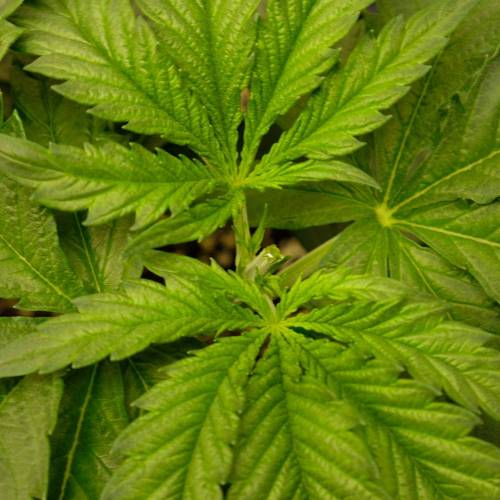
ActioPauliana Three weeks into the grow already and it is going smooth. The girls were droopy from time to time (specifically the first 24-36 hours after fertigation), but after transplanting to pots that are way too big, that was expected. Despite the droopiness, the plants grew really fast this week and they seem to be settled in their new houses.
The big pots are an advantage for a lazy stoner like me: I didn’t have to do much this week. I fertigated on day 15 and once more on day 18. The next fertigation will probably be tomorrow and in the coming weeks I’ll probably have to increase fertigation frequency. The plants just kept on growing fast and were at their 6th node at the end of the week.
The side branches on the first and second node were already well developed, but I don’t want to keep ‘m. I’m planning a Scrog grow, but I’ll start with creating 4 main cola’s on each plant, to grow in 4 directions under the net. Hence, on day 20, yesterday, I removed the growth tips from the first and second nodes from both plants. I kept the leaves, they will be removed later. Right now, the leaves will help to power the growth of the remaining growth tips.
After pruning off the lower growth tips, I left the plants alone to see how they react. Today, day 21, they were a bit droopy just after the lights went on, but I decided to proceed with the topping and cut above the 3th node. I left a considerable amount of stem above the 3th node, to prevent splitting later on.
A few hours later, the plants looked great: the leaves were praying upwards and the 2 growth tips on each plants already looked bigger. It’s almost like they actually appreciated to be beheaded. Weird.
If the grow continues this way, I think I’ll be topping them (and stripping lower growth tips again) for the second time at the end of next week. The resulting 4 cola’s on each plant, will be spread out under the net.
One last thing: Lisa is considerably different from Mace. Mace seems to be much more of a indica pheno, with big fat fingers on the leaves and short nodes. Lisa’s leaves are thinner, more like sativa’s. That said, Lisa doesn’t look as healthy as Mace to me. They get exactly the same treatment, but until now, Mace seems to like life a bit more. But it is still early in the grow, so let’s see how these girls grow out.
Thanks for stopping by, stay safe, keep growing!
5 likes
3 comments
Share
Used techniques
Topping
Technique
Main-Lining
Technique
4
Week 4. Vegetation6y ago


22 cm
Height
18 hrs
Light Schedule
24 °C
Day Air Temp
5.9
pH
No Smell
Smell
650 PPM
TDS
50 %
Air Humidity
20 °C
Solution Temp
19 °C
Substrate Temp
20 °C
Night Air Temp
25 l
Pot Size
0.75 l
Watering Volume
55 cm
Lamp Distance
Nutrients 5
TriPart Grow
0.81 mll
TriPart Micro
0.54 mll
TriPart Bloom
0.27 mll
ActioPauliana This week, the small grow tips developed quite rapidly and they are now working on their 4th node. I was already able to remove the side branches in the first nodes, but the internodal space between the 3rd and 4th node is still too small to perform the second topping. Hence, I’ll wait another day or two before the second topping. After the second topping, I’ll have 4 main branches on each plant.
Despite a nice week of vegetative growth, I’m not entirely satisfied with the way things are going right now. Lisa is growing in a weird way: thin, small, twisted leaves, especially new growth. Mace looks a lot better, but seems to be more of an indica pheno. Anyway, Lisa is getting the exact same treatment as Mace, but she looks entirely differently.
Also, Lisa started to develop side branches at the cotyledons! I have never seen that before, but after searching on the internet, I found some other growers who had the same mutation. I’m pretty sure it was triggered by the pruning and topping of the grow tips last week. Anyway, I removed these weird grow tips. Taken her general appearance into account, Lisa seems far from being a top pheno and quite unstable. However, things can change drastically later in the grow, so who knows what Lisa is capable of.
Both plants tend to droop a lot. I think I underestimated the effects of not using a transplant strategy. Something to consider next grow. Also: both plants show the first signs of nitrogen excess: dark green leaves and clawing leave tips. Next fertigation, I’ll add a reduced amount of the FloraTrio Gro compartment into the fertigation mix.
Next week, the plants will be topped for the second time and I’ll start training the branches to develop a flat canopy.
Thanks for stopping by and keep on growing!
5 likes
1 comment
Share
Used techniques
Main-Lining
Technique
5
Week 5. Vegetation6y ago


24 cm
Height
18 hrs
Light Schedule
24 °C
Day Air Temp
5.9
pH
No Smell
Smell
550 PPM
TDS
50 %
Air Humidity
20 °C
Solution Temp
19 °C
Substrate Temp
20 °C
Night Air Temp
25 l
Pot Size
1 l
Watering Volume
55 cm
Lamp Distance
Nutrients 5
TriPart Grow
0.48 mll
TriPart Micro
0.48 mll
TriPart Bloom
0.24 mll
ActioPauliana This week I tied the girls up, bending and shaping their grow. I also topped them for the second time.
Day 29: first LST. Both plants had two grow tips and I bended them both to the sides, like a wishbone. Carefully and not the maximum possible amount. From this day on, I bended them a little further every day. I also removed the 2 lowest pairs of leaves, because they were lying on the substrate most of the time. I left all other leaves on the plants, to power the growth of the small grow tips.
Day 30: second topping. There was now enough space between the 3rd and 4th nodes, hence it was time for their second topping. After the second topping, every plant has 4 main cola’s and all the lower grow tips were already removed. The 4 leftovers on each plant were tiny, but they started to develop almost immediately. A few days later, I noticed one or two grow tips developing on lower nodes, which I had already removed. I was wondering what would happen if you remove all the grow tips from the plant: I think I have my answer. Life always finds a way.
Day 34: the tiny grow tips grew and their stems became long enough to bend them down. This young growth is still very flexible and easy to bend almost horizontally.
This week, I reduced the amount of the FloraTrio Gro compartment in the fertigation mix, as the plants were showing signs of N excess. I also reduced the EC of the feeding mix (to 1.1 instead of 1.3). This seemed to have a positive impact, as the plants were less droopy this week and especially Lisa started to look much better. Also, I noticed the girls started to drink a lot more. The pots dried out a lot faster this week.
However, today the plants were quite droopy again. I lifted the pots and was able to look under the pot, which is just some kind of raster. There were roots poking through all over the raster. The roots have colonized the whole pot. Hence, I’m pretty sure a lack of oxygen due to the size of the pots, is not a big issue anymore, the droopiness has something to do with the overfeeding.
Since the roots are well developed, I’ll throw the root stimulator out of the fertigation mix. There is some N in it and I’m worried it might be over the expiration date. It’s an organic supplement and the bottle has been open for over 8 months. Runoff EC is at 0.8-0.9 and runoff pH is around 5.9, so there’s no problem there. All-in-all: this strain seem to require less nutrients, especially less N, which is common for sativa’s.
Last, both plants already show a preflower here and there: pistils! They are definitly girls.
Thanks for stopping by and keep growing!
4 likes
comments
Share
Used techniques
LST
Technique
Topping
Technique
Main-Lining
Technique
Defoliation
Technique
6
Week 6. Vegetation6y ago


26 cm
Height
18 hrs
Light Schedule
24 °C
Day Air Temp
6.0
pH
No Smell
Smell
500 PPM
TDS
60 %
Air Humidity
20 °C
Solution Temp
19 °C
Substrate Temp
20 °C
Night Air Temp
25 l
Pot Size
0.75 l
Watering Volume
50 cm
Lamp Distance
Nutrients 5
TriPart Grow
0.2 mll
TriPart Micro
0.3 mll
TriPart Bloom
0.2 mll
ActioPauliana ROOT ROT IN COCO?!
First, sorry for the late update: a busy schedule last week kept me from taking care of my plants and updating timely. However, it’s been one of the worst weeks in (almost) a year of growing. I already talked about the droopiness in previous updates, but this week it became much, much worse. I was planning on fertigation again yesterday, but since they were looking so horrific, I decided to postpone. The nitrogen excess was clearly solved, all seemed to be in check. But the droopiness persisted and, as I already mentioned in my previous update, I started to worry it might be a problem with the medium. After I trained and defoliated a few days ago, they became more droopy every day and also growth slowed down.
Today I also noticed some leaves with a bunch of brown spots. I decided to open up the pots and as you can see from the pictures: not all roots are looking healthy. A bunch of them, especially near the bottom of the pot, were brown. The other plant (I didn’t take rootzone photo’s of that one) was looking worse. Basically all the root tips poking through the raster at the bottom of the pot were brown. It smelled like wet clothes left in the washing machine with the door closed for 48 hours.
WHAT CAUSED IT?
I reused my coco from last grow, while there were still old roots in it. I had it dry out for 2,5 months, than rinsed it using a sieve to get rid of the coco dust. Where I completely sanitize the tent and all the equipment with a 300 ppm active chlorine solution (sodium dichloroisocyanurate), I didn’t do anything to get rid of pathogens in the old coco.
Before I started this grow, I had the rinsed coco already in the pots for about 2 weeks and I ‘fed’ the coco a CalMag supplement that’s also high in N to buffer it. It was basically wet (and quite warm, as it was still summer temperatures at that time) during that period of time. When I transferred my seedlings into it, the seedlings were way too small for the big pots. Even though I fertigated only twice a week, the coco stayed wet during long periods of times. Another factor was the N excess (see week 4 of this diary): pathogens like N-rich mediums.
Also, the pots were standing in plant bowls. I always removed runoff water from the bowls, but off course, the pots keep dripping out for a while and fill the boll a bit long after fertigation. The bottom of the pots inside the AirRap pots are a little bit raised, so I was never worried by it. However, the outer plate wrapped around the bottom of the airRap pots basically form a shield for air to get under the pot. There’s just I tiny split between the bowl and the wrap of the pots. If there’s water there, it will be completely still, no air movement and dark. Moreover, due to the lights and the fact that both the pots and the bowls are black/dark, I suspect temperature within that space can easily reach 25c, if not higher. And last, I used to fertigate with a water temperature around 22c, which is on the high side.
Hence, without really realizing it, I created the perfect environment for the fungus to thrive and multiply. Especially directly under the pot in the bowls, were the outer wrap of the pots creates a enclosed spaced were RH is probably above 90% and temperature 25c or higher. Training and topping them in the last weeks weakened them and there you go. The evil pathogens can take hold of the plant. However, this doesn’t seem like a lost case to me. At least 80% of the roots still look healthy, although I don’t know how they look deeper into the coco.
TREATMENT
1
In order to give them a fighting chance, I first need to kill as many spores as possible. Hence, I flushed both plants with at least 5 liters of active chlorine mix at 150 ppm per plant. I pH the water down to 6.8 (our tap water is around 8). This way I’ll prevent a pH spike in the medium, but the water isn’t too acid to react with the chlorine transforming into the dangerous chlorine gas. I used my pressure sprayer for it, so I could make sure that the mix was distributed everywhere in the pot. I also sprayed underneath the pot, to get all the roots poking out the raster cleaned. I also sprayed the sides of the pots, a lot of regular used equipment and the bottom of the tent. The plants were completely soaked with the chlorine solution and I let them sit (outside the tent) for about 30 minutes. In the meantime I cleaned the tent and regularly used equipment, first with the chlorine and then with plain water.
2
Now it was time to get the chlorine out of the system. I flushed both plants in the bathroom with 10L of plain, pH’ed water. I also rinsed the sides of the pots and the plant bowls with tapwater. Last, with the pressure sprayer, I rinsed the leaves of the plants with plain pH’ed water, to get rid of any excess chlorine that might have gotten on the leaves.
3
After leaking out for a while, I fertigated with a light feeding mix, but with my regular dose of CalMag (which is already 50% of the recommended dose on the bottle), since I probably flushed some of the buffer away. I also added 1.5 times the recommended dose of CannaZym (which is designed to ‘eat dead roots’ and prevent fungus from taking over). It resulted in an EC of 1.0 and I pH’ed it down to around 6.0. The temperature of the water at all 3 steps was exactly 18 degrees.
4
I placed the plants back in the tent, but I elevated the pots above the bowls with a raster (just look at the pictures). I also placed a fan really low, so it could blow under the pots. I can now feel wind under the pots. I reduced light strength significantly. It’s now just as intense as it usually is during the second week of my grow (small seedlings). If the plants improve, I’ll slowly increase the light. I also putted a oscillating fan directly on the leaves to blow them dry. After an hour or so, the leaves were dry and I slowed the fan a bit to normal setting (nice, gentle breeze for the girls).
TIME WILL TELL
For now, I’m just really, really curious to see what is going to happen. At the moment, a few hours after the treatment, the plants have perked up a bit, especially Mace: her grow tips are praying and I haven’t seen that the last 5 days or so. It’s probably been refreshing for them. However, to complicate things, I I’m out of town for a week from next Friday. I was actually planning on automating fertigation before my absence, but I can’t do that right now (have to make sure the coco dries a bit before every fertigation to prevent new root rot to occur). I’ll probably have someone hand water them once or twice during my week of absence. I’ll have the coco dry out a few days between every fertigation, until the plants fully recover. If the plants recover at all. For now, all I can do is pray to the Ganjagods to spare my girls.
Thanks for stopping by and happy growing!
1 like
comments
Share
Used techniques
LST
Technique
Defoliation
Technique
7
Week 7. Vegetation6y ago


29 cm
Height
18 hrs
Light Schedule
23 °C
Day Air Temp
5.8
pH
No Smell
Smell
500 PPM
TDS
60 %
Air Humidity
18 °C
Solution Temp
20 °C
Substrate Temp
20 °C
Night Air Temp
25 l
Pot Size
0.75 l
Watering Volume
50 cm
Lamp Distance
Nutrients 5
TriPart Grow
0.3 mll
TriPart Micro
0.4 mll
TriPart Bloom
0.2 mll
ActioPauliana Due to a very busy personal schedule followed by a trip out of town for a week, I haven’t been able to update for a while. However, at day 49, I took the pictures, so while already another week has passed, I will first fill in this week 7 and add week 8 tomorrow or so. In this update, I’ll be writing as if it is still day 49 and the future is still unknown 😊.
This update will revolve around two themes: the results of my last week’s attempt to fight the problems in the rootzone and the installation of an automated fertigation system.
As discussed in week 6, I encountered on some problems in the root zone, especially lower roots seemed to be unhealthy brown. I flushed the coco with a 150 ppm active chlorine solution. The day after the treatment, the plants started to perk up. They weren’t growing fast, but were at least not as droopy as they were before. Also, the algae growing on the top of the coco was gone. And last: the brown spots on the leaves weren’t spreading anymore. Unfortunately, I only had day 46 to 49 to monitor the recovery, since I am going to be out of town for a week and leaving at day 49.
Because of my upcoming absence, I had to install my automatic fertigation system. I had been planning it for a while and most of the supplies were already in my possession, I was just delaying the work because of work and college obligations. Anyway, this week, I had a few days to install everything and get it working properly.
The fertigation mix sits in a 50L vessel. A powerful submersible pump sits on the bottom of the vessel, which is connected to 13mm tubing. This tubing goes through a flange into the tent, where it’s manifolded into 2 directions: one for each plant. On each tube, 2 sprinklers are connected. Since the sprinklers are always above the water level in the vessel, I don’t have to worry about the siphon effect. A digital timer regulates the pump in the vessel. I have found that the sprinklers deliver around 1.2L per minute if the pump is running. With the digital timer, I can precisely control the time the pump is on and thus deliver the right amount of water to get 10-20% run off.
The drain is collected in the plant saucers where the AirRap pots are sitting on. I elevated these saucers with carriage bolts (around 10 cm): that construction was actually quite flimsy, but at that time I felt quite sure it wouldn’t collapse. I drilled a hole in the saucer and used some kind of filterbox with a mesh screen (to prevent dirt and debris clogging up the tubing) and a 10mm tube to connect it to a small bucket in the tent. Due to the siphon effect, the runoff will drain into the bucket. In the bucket, I installed a cheap, small circulation pump, connected to a 13mm tube that goes through the flange and delivers the drain outside the tent into a plastic jerry can. This small pump is regulated by a relay that uses two sensors. If the max sensor is touched by the water, the relay will close and activate the pump. If the water then drops below the min sensor, the power of the pump is cut off again. This way, whenever the amount of drain reaches a certain level in the bucket, it will be pumped outside of the tent. The min sensor makes sure that the pump won’t run dry.
So, as you can imagine, it took quite some time to figure everything out and get everything to work properly. I also installed some plastic screens (just take a look at the photo’s) to prevent water being sprinkled outside of the pots.
Anyway, it all seemed to work fine. I also installed my self made SCroG net and was ready for my week of absence. I had arranged a caretaker: he was going to come by twice during my week of absence to push the growing tips under the net.
I was really curious to see if the automated fertigation would work properly during a week of absence. In my next update, I’ll show you if it worked, so stay tuned 😊.
Thanks for stopping by and keep growing!
FULL LIST OF EQUIPMENT FOR AUTOMATED FERTIGATION
* Elho plant saucers (diameter 41 cm);
* Black 10mm tubing (connected from saucer to drain bucket);
* Bunch of rubber rings/flanges to watertight tubing going through the side of the drain bucket;
* Sicce circulationpump nova 800L/Hr (in drain bucket, connected to a 13mm tubing that transports the drain outside of the tent);
* H-Tronic 1114620 water level sensor (to control the pump in the drain bucket);
* Hozelock Easy Drip Universal Watering Kit (includes 13mm tubing, mini sprinklers, connection pieces, end pieces, etc. Also a quick garden hose connection set that is compatible with the connection on the pump in the fertigation vessel);
* FlexiTank 50L (fertigation vessel, the top can be closed with a zipper);
* Gardena Classic Clear Water Submersible Pump 7000/C (7000 L/Hr, around .6 bar, which is enough to make the sprinklers sprinkle [instead of dripping]): the main pump to deliver the goods at the plants 😊 ;
* Digital timer to regulate the feeding pump.
Still on the list: another small circulation pump to sit in the fertigation vessel and run 15 minutes of every hour, to keep the fertigation mix a bit oxygenated and well mixed.
4 likes
comments
Share
Used techniques
LST
Technique
ScrOG
Technique
Defoliation
Technique
8
Week 8. Vegetation6y ago


35 cm
Height
18 hrs
Light Schedule
23 °C
Day Air Temp
5.7
pH
Weak
Smell
600 PPM
TDS
60 %
Air Humidity
18 °C
Solution Temp
20 °C
Substrate Temp
19 °C
Night Air Temp
25 l
Pot Size
1.25 l
Watering Volume
50 cm
Lamp Distance
Nutrients 5
TriPart Grow
0.48 mll
TriPart Micro
0.48 mll
TriPart Bloom
0.24 mll
ActioPauliana After last update, I left out of town for a week. A caretakes came by twice during that week, to push the tips under the net. When I arrived home after my week of absence on day 56, I was curious to see how the girls were doing. Remember my last update where I wrote that I: “elevated the saucers with carriage bolts (around 10 cm): that construction was actually quite flimsy, but at that time I felt quite sure it wouldn’t collapse.” Well, funny thing, they didn’t hold. The construction collapsed and the plants were tortured by the net and the side of the walls due to the increasing pressure of the slowly failing carriage bolts. Especially the sides of the plants that were pushed against the wall of tent, had very red stems. They were really drooping and a whole bunch of leaves and growing tips were deformed or damaged. I had no other option than to remove the net and rebuild the elevated self draining saucers.
However, on a positive note: the plants looked like they had grown quite a bit and they developed a whole bunch of side nodes. The coco was still wet, the automated fertigation had functioned properly. The plants were a bit pale though, probably because the feeding mix was so light.
I took the plants out of their torturous positions and removed the most damaged leaves and untangled all the leaves and stems. I also removed all LST binding wires. After that, I fertigated with a slightly stronger mix at EC 1.1 and made sure there was a lot of drain. I putted them back in the tent, but without the elevated saucers (thus lower light intensity) and without the net. To my own surprise, they were completely perked up the next day.
That next day, I elevated saucers again, but this time I made it solid. During those 24 hours of free growing, the plant gained some serious height (it’s like all the downwards bended stems, suddenly move up if they are unrestrained for 24 hours). When placing the net back, I had to push them down a bit, otherwise the net would be too high. Again, this stressed them out, hence they became droopy once again.
However, right now, a few days later, I’m fertigating daily and finally the plants are looking healthier with the day. Less droopy and growing pretty fast. Today I was bending and waving the grow tips down again. A few hours later and the tips were already pointing up: a strong sign that the plants are healthy. A few weeks back, even slight LST resulted in droopy plants (if they weren’t already). Also the top of the coco looks really clean; since the chlorine treatment, there’s no algae growing anymore.
Because the net was already filled for 75%, I switched to 12/12 yesterday. Is all the trouble over now? Can I finally start enjoying some beautiful, healthy and vigorous growing cannabis plants? Did I successfully overcome all the mistakes I made? Time will tell.
Thanks for stopping by, stay safe and keep on growing!
5 likes
2 comments
Share
Used techniques
ScrOG
Technique
Defoliation
Technique
9
Week 9. Flowering6y ago


37 cm
Height
12 hrs
Light Schedule
23 °C
Day Air Temp
5.9
pH
Weak
Smell
650 PPM
TDS
60 %
Air Humidity
18 °C
Solution Temp
19 °C
Substrate Temp
19 °C
Night Air Temp
25 l
Pot Size
2 l
Watering Volume
50 cm
Lamp Distance
Nutrients 5
TriPart Grow
0.6 mll
TriPart Micro
0.6 mll
TriPart Bloom
0.45 mll
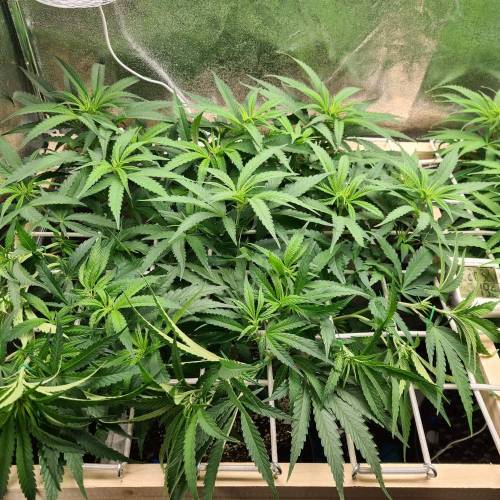
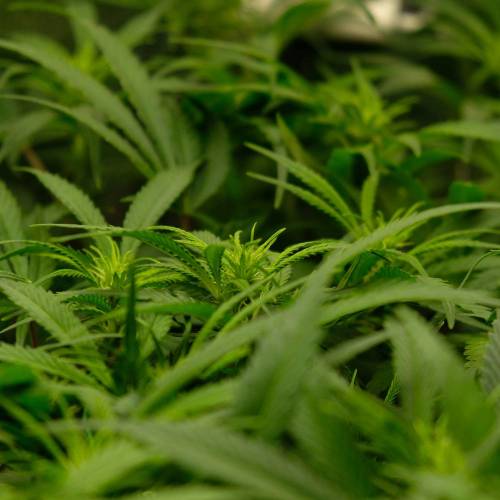
ActioPauliana Total growth explosion. Finally a week without any problems and just a lot of growth. They are flipped to 12/12 for a little over a week now and the girls are now in full stretch modus. I’ve been bending, binding and waving their shoots to and through the net daily. After a training session, the growth tips are pointing up towards the light after just a few hours. The girls are drinking more and more, but the automatic watering system works like a charm and is dialed in nicely, producing a bit of run off every day.
I’ve defoliated quite a bit, to keep enough room for the shoots to develop and improve light penetration and airflow. Under the net, most of the leaves are already removed. I also removed very small growth tips under the net, that will never make it to the top of the canopy.
Lisa is growing like a sative: thin fingers on the leaves and a lot of side shoots. She has a lot of growth tips at the top of the canopy that will develop into buds within a few weeks. Mace has more indica characteristics: fatter leaves, less internodal space and more bushy in general. Therefor, she has a little less growth tips, but I think her buds will become a little fatter.
For now, I continue to train for a day or 5. At that time, flower stretching will be around halfway, maybe a little further (based on grow reports of other growers) and the net will probably be completely full. They can still grow 20 to 30cm upwards and thus develop nice long buds.
Thanks for stopping by and keep on growing!
2 likes
comments
Share
Used techniques
ScrOG
Technique
Defoliation
Technique
10
Week 10. Flowering6y ago


45 cm
Height
12 hrs
Light Schedule
24 °C
Day Air Temp
6.1
pH
Weak
Smell
700 PPM
TDS
60 %
Air Humidity
18 °C
Solution Temp
19 °C
Substrate Temp
18 °C
Night Air Temp
25 l
Pot Size
2.5 l
Watering Volume
45 cm
Lamp Distance
Nutrients 4
TriPart Grow
0.7 mll
TriPart Micro
0.7 mll
TriPart Bloom
0.52 mll
ActioPauliana One of the (dis)advantages of being a grower and keeping a diary of the grow, is that it confronts you with the fact of how fast time is flying by. I’m ten weeks into this grow already and it has been over a year since I popped my first cannabis seeds. That first grow with fast autoflowers only took 10 weeks in total, but with my current grow, I’m not even close to harvest and probably have to exercise patience for another 10 weeks. But still, it’s going so fast!
This week most of the ScrOG net filled up. I trained both plants one more time quite extensive (meaning bending down all the grow tips as far as possible, but since a few days I only re-arrange shoots (to spread them evenly in the available space) and bend down the longest shoots a bit (to get an even canopy). The ones at the edges/corners are allowed to grow a little longer (as light intensity is much lower at those spots).
Lisa has produced a lot of side shoots that made it to the canopy and as a consequence, she has a lot of grow tips that will develop into (hopefully) qualitative buds. Mace has a little less grow tips that made it to the top of the canopy. As said in earlier updates, she grows more like an indica.
I failed to make a perfectly even canopy, there are some differences in height, but overall, the canopy is relatively flat. From now on, they can gain some vertical height, but hopefully, they won’t stretch too much anymore. Maybe 10-15 centimeters would be ideal. The number of pistils is increasing fast and within the grow tips, the little buds are starting to form. The plants entered the early flower stage.
Besides training the plants, I removed most of the growth below the net. Leaves, but especially all the super small grow tips that will produce nothing bud larf buds. At the top of the canopy, I had to remove a lot of big and medium-sized leaves, because it had become a jungle. Hence, to prevent wet spots (leaves lying on top of each other), increase light penetration and airflow and make space for training them, heavy defoliation was needed and I had to remove a lot of leaves during the week. The plants didn’t bother and kept on growing, looking healthy and happy.
Thanks for stopping by and keep on growing!
12 likes
3 comments
Share
Used techniques
ScrOG
Technique
Defoliation
Technique
20
Week 20. Harvest4y ago
Happy Harvest Day!


8/10
Rated
This review is written 1,5 year after harvest, but I still wanted to end this diary.
This was a great strain to grow and smoke, even though I had some problems during the grow. This grow resulted in my biggest yield until now. The 320 grams is a (conservative) estimate, as I don’t have the exact numbers anymore (it was way over 300 grams). So, the strain is definitely a big yielder. The tops were heavy, but a little bit airy here and there, as sativa buds usually are.
Both plants developed very different. One was clearly an indica pheno and did not yield nearly as much as the sativa pheno. The latter was also significantly bigger and took more space in the tent.
As for smell, taste and effect, both plants also differed a lot. The sativa pheno smelled great: a strong, skunky odor, with fresh, mint-like tones. The indica pheno smelled like ‘home grown’. Not really like hay, but it lacked the real weed odor we’re all familiar with and it had a kind of dull smell. As for the taste, the same can be said. The sativa pheno was a smooth smoke, while the indica pheno was a bit harsh, but after a few months of curing, it improved a little bit. Both plants were grown and dried under exactly the same circumstances, so these differences must be genetic.
The same goes for the effect: the sativa pheno gave a really energetic, creative and active high, the indica pheno had a more relaxing, sometimes sleepy effect.
I really like the sativa pheno, but the indica pheno… not so much. I’d give the sativa pheno a 10/10 and the indica pheno a 6/10. Therefor, I rate this strain with 8 out of 10.
Show more
Translate
Spent 72 days
Ger Veg Flo Har
250 g
Bud wet weight per plant
160 g
Bud dry weight per plant
2
Plants
0.74 m²
Grow Room size
Normal
Difficulty

Creative, Energetic, Euphoric
Positive effects

Dry mouth
Negative effects

Earthy, Mint, Tropical
Taste
Height
Day air temperature
Air humidity
PPM
PH
Light schedule
Solution temperature
Night air temperature
Substrate temperature
Pot size
Lamp distance


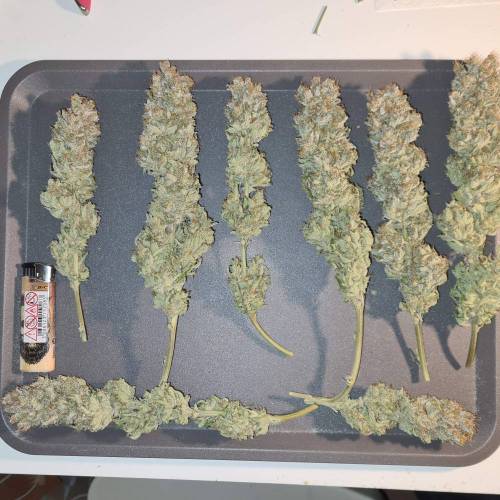


ActioPauliana So it’s almost been 1,5 year since I harvested and I smoked the harvest almost daily for like a year. Harvest took place 136 days after germinating the seeds and it took almost 11 weeks (76 days) to flower. The last two days, the girls were left in the dark and on harvest day, I removed the bigger fan leaves. Both plants were kept in one piece and hanged upside down in the tent.
I remember the drying conditions were quite reasonable. Temperature was between 18 to 19 degrees Celsius and relative humidity around 55%. Not optimal, but I didn’t have a humidifier (and neither an air conditioner). It took 12-13 days to dry. After trimming, I jarred the buds and the RH within the jars stabilized fast at 55 to 60%. I burped every day during the first week and from there on less and less frequently.
A lot of fluff buds and trim was also put in the fridge for hash making. On harvest day, I also separated some freshly fluff buds to freeze immediately, for some ‘live hash’.
Harvest of smokable buds was way over 300 grams, the 320 grams reported here is a bit conservative. This also does not include the fluff buds and trim. Amazing yield!
Thanks for reading my diary and happy growing!
3 likes
2 comments
Share
Equipment Reviews


12 comments
Sort by
popularity
popularity
newest
oldest

Belverde commentedweek 36y ago
You work precise , I like it 😉👌
And I think you will be happy with this two ladyes 🌱🌱
Have fun ✌️
likes 2

ActioPauliana commented6y ago
@Belverde, thanks! I had your utopia haze grow already bookmarked, congrats on the harvest.
likes 2
Belverde commented6y ago
Thank you so much @ActioPauliana 🙂
I have to get Barney's paid if I convinced you 😎😁
Happy growing 😉🌱
likes 2

amon_grows commentedweek 46y ago
@ActioPauliana, your girls are looking happy and loved! Nice setup!
likes 2

Stealthsheduk commentedweek 204y ago
Smoked this from barneys last dam trip and it ripped me and the missis a new 1 high as hell sat outside bar people watching for hours.. Glad it grew well may try some day
like 1

DreamOn commentedweek 86y ago
Nice job, looks great!
Good luck further and have fun! 🌱😎
like 1

DreamIT commentedweek 86y ago
Enjoy Growth 😎👽🤟🍀
like 1

Ferenc commentedweek 26y ago
Good Luck! @ActioPauliana
like 1

DIMITRI_GREEN commentedweek 204y ago
😇
likes

DoDrugs420 commentedweek 105y ago
When can Utopia Haze and I run away toghether into the horizon?
likes
DoDrugs420 commentedweek 105y ago
Holy, that's some serious Utopia Haze!
likes

heizen commentedweek 106y ago
Nice grow mate, plants are looking good, keep it up, imma follow this one upclose.
likes

the end.
Enjoying this diary? Follow for more updates!


Prefer the old Diary view?
Go back to the old Diary view