By continuing to use the website or clicking Accept you consent to our cookies and personal data policy and confirm that you are at least 18 year old. For details please see Privacy Policy and Terms
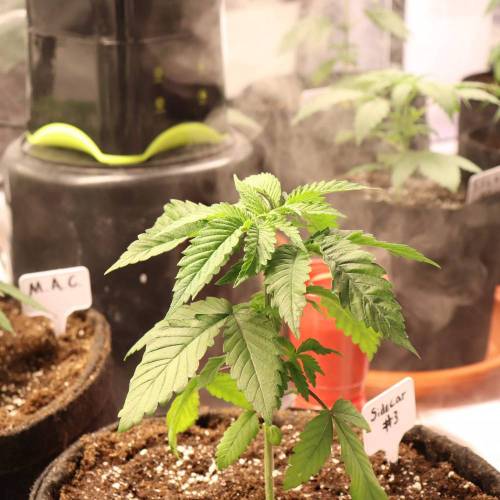
Mr_Motalovah Sidecar
Strain description from breeder:
Genetic Background: Strawberry#13 x Mimosa
Type: Feminized
Sativa 60% Indica 40%
THC:
CBD:
Yield Indoor : gr/m2
Height Indoor: 0 - 0 cm
Flowering time: 8 - 9 weeks ( 58 - 65 days)
Aroma: Effect:
Expectations and training method:
I know these genetics are a bit delicate so I’ll be taking things very easy.
The breeder suggests topping and training the branches because she can grow fast and tall.
By what I’ve seen from the local growers, she can produce some savory chunky buds which is what I’m aiming for. I’ll follow the breeder’s suggestion and Top/LST which is what I’ll be doing to almost all my other strains as well on this run.
As for the yields I’m not expecting much given the numbers I got from local growers. No more than 40 grams per plant but always aiming for more.
I’ve already smoked this strain grown by the breeder and other local breeders, which is what made me want to grow it myself. I expect nothing but trichomes and terps from these ladies.
Equipment used in this cycle:
Tent: Dutch Masters 120x240x220cm
Lights:
1 x EasyGrow S800v2
1 x Mars Hydro TSW2000
1 x Mars Hydro FC3000
Ventilation:
Garden HighPro - ProFan TT Extractor Fan - 150mm
Garden Highpro - ProActiv Carbon Filter - 150mm
Garden Highpro - ProFan Oscilating Clip Fans - 25cm
Blauburg - Inline Fan - 125mm
Humidifier:
Garden Highpro - Humipro Digital Humidifier - 4 liters
Pots: Garden Highpro 11L Fabric pots
Medium: Biobizz Light Mix
Nutrients:
Grotek - Mycrorizo
Plagron- Alga grow, Alga Bloom, green sensation and royal sugar.
PH down
Calmag
Measuring instruments:
Hygrometer/Thermometer - Govee:
EC Meter - HM Digital: COM-80S Hydrotester
PH Meter - Vanguard Hydroponics
Happy Growing! 😃
1 like
comments
Share
Used method
Paper Towel
Germination Method
1
Week 1. Vegetation
4y ago
More photos +4
9 cm
18 hrs
27 °C
6
No Smell
300 PPM
70 %
20 °C
20 °C
20 °C
1 L
0 L
70 cm
Nutrients 2
ph down 0.25 mll
Synergy 0.25 mll
Mr_Motalovah End of week one and seedlings are looking good.
Sprouted fast, stretched a bit because the light was too far but that was fixed by the end of the week.
Leaves are opening up and spreading out fast.
Some roots are already showing up on the sides of the cup.
I placed the seeds in 500ml cups with BioBizz Light Mix soil, beforehand I mixed 1 gram of Synergy per 4 liters of soil.
These are live microbes called Mycorrhiza which live in symbiotic association with the roots.
My idea is to leave them in this container for about 14-21 days until the roots develop correctly then transplant them to their final pot which will be an 11L fabric pot.
As the light mix soil comes blended for at least two week of life, no nutrients will be added until after the transplant.
Happy Growing!😃 🌱 🌿 🌲
1 like
comments
Share
2
Week 2. Vegetation
4y ago
More photos +7
15 cm
18 hrs
27 °C
6
No Smell
300 PPM
70 %
20 °C
20 °C
20 °C
1 L
0 L
60 cm
Nutrients 2
ph down 0.25 mll
Synergy 0.25 mll
Mr_Motalovah Week two went good there was a bit of underwatering on my part, these ladies drink!
The breeder did warn me about that though, another thing he warned me about this strain is that when she's comfortable she'll grow quite fast.
I have definitely noticed that.
Next week they'll be transplanted to final 11L fabric pots.
Happy Growing!
2 likes
1 comment
Share
3
Week 3. Vegetation
4y ago
More photos +11
20 cm
18 hrs
26 °C
5.8
No Smell
300 PPM
70 %
22 °C
20 °C
20 °C
1 L
0 L
60 cm
Nutrients 2
ph down 0.25 mll
Synergy 0.25 mll
Mr_Motalovah Hello Growers & Tokers!
Roots, roots, roots.
At the beginning of the week they got transplanted into their final pot, 11L fabric.
Medium used was Light Mix from BioBizz.
Synergy from Grotek nutrients was blended in the medium to help out the roots.
They were a bit down after transplanting but by the end of the week they were doing better.
I'll leave her be for a week then I'll be topping to spread that canopy out and have loads of colas.
Or at least that's the idea but two of them seem to be growing faster than the others so I might have to die those tops down.
Take care out there and happy growing!
likes
comments
Share
4
Week 4. Vegetation
4y ago
More photos +8
33 cm
18 hrs
26 °C
5.8
No Smell
700 PPM
70 %
22 °C
20 °C
20 °C
11 L
1 L
60 cm
Nutrients 3
ph down 0.25 mll
Alga Grow 2 mll
Synergy 0.25 mll
Mr_Motalovah Hello Growers & Tokers!
One week after transplanting and the progress is okay.
They seem to be a bit droopy so I'll wait till next week to top them.
One of them is growing faster but not much of a difference in height.
I started adding nutrients this week as well, I'm starting with half of the recommended dose.
Upping the amount of water almost every feed about 200ml.
That's about it for this week.
Take care out there and happy growing!
likes
comments
Share
5
Week 5. Vegetation
4y ago
More photos +28
40 cm
18 hrs
26 °C
5.8
No Smell
700 PPM
70 %
22 °C
20 °C
20 °C
11 L
1 L
60 cm
Nutrients 4
ph down 0.25 mll
Alga Grow 3 mll
ATA Calmag 0.15 mll
Mr_Motalovah Hello Growers & Tokers!
Tops off!
Let's break that apical dominance and spread these ladies out.
I topped them at the sixth node to have 8-10 colas as an even canopy.
I'm sure they won't even notice being topped. Lots of growth going on with these ladies.
I'll have let them be this week but when I defoliate them before flower those top branches will be folding down.
Upped the amount of nutes and added a bit of calmag only once.
Take care out there and happy growing!
likes
comments
Share
Used techniques
Topping
Technique
6
Week 6. Vegetation
4y ago
More photos +24
54 cm
18 hrs
26 °C
5.8
No Smell
700 PPM
70 %
22 °C
20 °C
20 °C
11 L
1 L
60 cm
Nutrients 2
ph down 0.25 mll
Alga Grow 4 mll
Mr_Motalovah Hello Growers & Tokers!
Ladies suffer no stress from being topped.
This is the last week of vegetation so I defoliated them before making the switch to 12/12.
Taking away the big fan leaves from the middle and cleaning the bottom of the plants.
As you can see these leaves are thick so taking them away will definitely give more light penetration.
I take of the first node off and on the second and third node; I take off the first and second nodes.
I also bent to top branches of one because she was a bit taller.
No need to add support yet but I'm it'll be necessary throughout these next weeks.
Take care out there and happy growing!