
Likes
Comments
Share


@Farmerskr
Follow
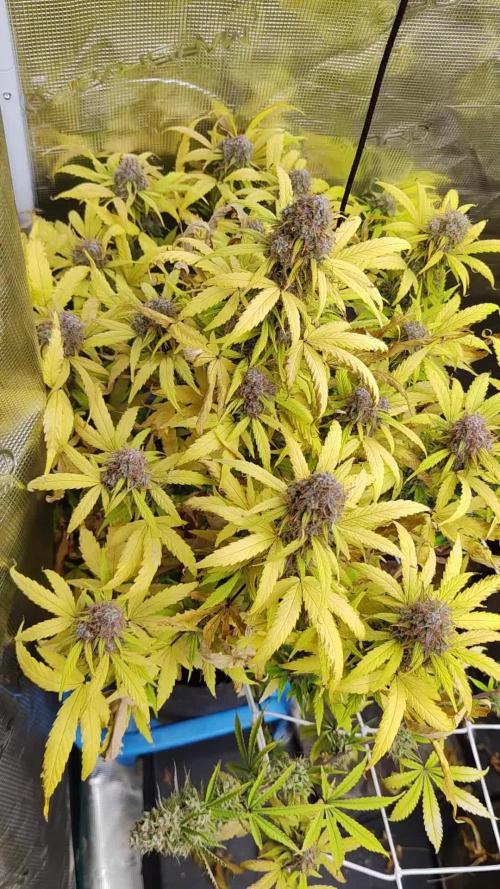
Así van las 2 Gorilla Rainbow y las 2 Gorilla White de BSF SEEDS terminando la 3ra semana, se realizó el trasplante a maceta definitiva de 11 lts y posteriormente una poda apical a cada una de ellas. (Se vienen más apicales)
Se viene bueno esto, estimados!!! Nos fuimos🤙🤙💨💨


Likes
14
Share


@the_canna_scientist
Follow
Gave them a bit of super diluted Roots Organics Terp Tea - Grow at the end of the week and they really took off. Really pleased with the fast buds stuff, comes out of the gate fast growing.

Processing
Likes
27
Share


@Ganjagrandaddy
Follow
Week 6 . These ladies have certainly got with it this week and all been busy root building. They have all hit the bottoms with ice thick roots , ready for all that food coming. The Gorilla Glue#4 has been pushing so many new growth tips it will be sad to strip them out again
Wedding cake is similar with a lot of height gains ( but encouraged to stay low again with some stem bending and bruising/crushing. This should make it easier to bend them once in the nft trays. her growth tips are numerous now too.
Ghost of is another matter altogether, she has been struggling to catch up and now has at least drawn level with a recent newer growing. I have ow stripped it back to the 3rs and 4th node but oddly there were no real paired nodes. She seems to be growing more like a clone at this point???.
I know once they hit the nft pace they will fly so I am hoping to flip them at about week 8 so I can keep them managable during their stretch.
Have a great week Growmies.

Likes
4
Share


@hinataxrose
Follow
This week was cool I did do a compost tea like I planned to. Took them out of the greenhouse for a couple days and I’m guessing that’s how the pollen got stuck on them.
P.S I be outside having whole photo shoots with them 😂

Likes
48
Share


@Rodamis_Prime
Follow
Has been a very big week in the Rando clone tent . Massive amounts of growth going on here and already getting trichomeson all the leaves . This is the same strain as my gifted plant diary. I am doing things a bit different and so far it's working . Lots of size increase on the buds and this plant is finally getting a bit of smell to it . These 4 plants I believe are way healthier that my big plant ever was and its already showing in the flower development. I dropped the nutrients to a 1/3 of the charts and haven't got any nutrient burns on the upper bud leaves . I think I hit this plants sweet spot and that's 750 to 800 ppm . Anyways they tripled in size this week so I am expecting some big things from this tent . Keep watching its just going to get better lol.
Likes
23
Share


@WolverineGreens
Follow
Rains giving the plants a good boost. Everything looks to b good. Starting to increase the amount I feed and they all are responding nicely.
The Skywalker is turning into an awesome little bush while the momma headband is just goin crazy. Took clones late but almost done and should get almost 2 weeks of veg b4 I flip em. Should have been done weeks ago.


Likes
18
Share


@YungSmoke
Follow
Buds are not as big as I'd hoped going into the 6th week of flowering. Not sure if it's got anything to do with it, but it's been quite warm this week. It's cooling down next few days so hopefully can get the temp back down below 30c with the lights on. A couple more of the lower leaves have yellowed and dropped off, and now there's a clear canopy area between the leaves at the base of the colas and medium, which should help with airflow. There's been no noticeable vertical growth beyond colas getting taller so I've dialed the biogrow back a bit more, and will probably stop using it all together from next week onwards.

Likes
51
Share


@Dunk_Junk
Follow
She's looking lovely this week! 😍 Also..... she is absolutely huge... 😲
Processing
Likes
18
Share


@Manic
Follow
Easiest week so far, no problems just growing. I did spray some neem oil on my soil a few days a go to keep pests out of the fox farm soil. Week 4 will bring in topping after the next node grows in, should be 2 or 3 days. Also towards the end of the week after she recovers from topping I will begin LST. Will provide pics throughout the week
Posted first vid in real light not my 600 watt LED. Mainly for health purposes. This will be so interesting to see how blueberry will develop after an accidental FIMing lol.
Personal Note: Wait to top when there is a full mainstem and not barely new growth. Meaning wait til the new growth has 2 fan leafs spread out, and not when they are just leafs barley sprouted from the main stem. Rookie mistake number 1 so far at the end of week 3. Or maybe time will tell if blueberry will be gracious enough to be a beautiful big buded tree. I read where FIMing can develop up to 4 extra colas and still grow beautifully. Fingers crossed.
Likes
12
Share


@SupremeJay
Follow
This plant has been pretty easy. No real problems throughout entire grow. Now waiting to cure for 4 weeks before i try it out.

Likes
37
Share


@masterofsmeagol
Follow
8/19 Rained again last night. No damage but medium is drenched. The 9lb kush I've been struggling with seems to be improving. I spent a lot of time on her yesterday and at least an hour this morning defoliating and pruning her. New growth and flowers look promising. I'm cautiously optimistic. I defoliated what needed it. I needcto qpplyvorganocide again. I can see random signs of septoria leaf spot. I really have been off my fame lately. I'm back on it now. This week the garden will be rearranged and I'll pull that big GDP back and better support the blueberry for flower. That NYCSA is a beast. It's resilient as all hell and just continues getting bigger and fuller. Despite pr9blems in the garden this girl seems absolutely fine. At least I don't have that defeated feeling anymore. I've got flowers on a few different plants. I'll try to get a couple pictures. I may take rapacaps advice and add a cheap plastic roof for later flower. I'm not sure if the explosive flower growth is due to the liquid kool bloom but I think I'm going to switch back to tiger bloom as it works better with the other nutes. I'll jeep this updated but I've got work to do.
8/20 Well it Rained again last night. This is getting discouraging. Now my other 9lb kush has the bottom branch all droopy like there's a borer or something. Realistically with the temp swings and the weather I think it's a firm of root rot or pythiym damage which isn't good. I posted pictures of the stalks and would be grateful if anyone has any advice. I'm go8ng back down to look again for a borer hole but i didn't see one. What it looks like to me is that the petroleum jelly I put on the stalks (to battle ear wigs) seems to keep them moist or something inviting mold or fungus. I'm kind of at a loss. I don't really know where to go from here. I don't know if I should just replant the severely damaged plant away from the rest of the grow, bag it and get rid of it or leave it be and hope for the best. I certainly don't want anything spreading. I'm getting tigerbloom today as my plants still need to eat and I'm nervous about the liquid kool bloom. It's probably fine but still. I'll update after I put in more work and research more today. Any advice helps. UPDATE: No borer holes. The stalk looks fucking horrible. It's supposed to rain today. I'm going to give it one more day then I'll amputate that branch and get rid of the other plant if I don't see an improvement. Perhaps I'll plant it in the ground. Don't really know what to do. Family bar b que today so my options are limited.
8/21 FED TWO GALLONS TO THE GARDEN. ONLY USED .5TSP/GAL OF LIQUID KOOL BLOOM. Did not feed dieing plant. Back to super hot weather 80° at 9am. Did a lot of research last night. I also went to several commercial growers and asked advice. What I came up with was a fusarium infection of pythiym infection
(Crown rot). I looked at all my stalks and they all have bark and are darker where I applied the petroleum jelly. I'm also NEVER using DE again. It fucking ridiculous amounts of water. Everyone swears by it bit it's not going in my garden again. Since use I can just watch water sit right on the GD soil. I tried to get some examples of what I'm talking about with the stems. I amputated that lowest bottom branch I trained (which was huge). I didn't have time to dispose of the other plant before my wife's doctor's appointment. I'll update when I go back over. I'm sure this won't help and may hurt but I used Bee Safe 3 in 1 on the wound and around the stalks of the plants I saw discoloration on. I didn't touch the NYCSA even though I see some discoloration. I may just be seeing things. That plant I'd super healthy and I don't want to risk losing it. It doesn't seem to have the stem rot like the others. At least I'm not the only one having problems. I hears some pretty bad stories. Still. I'm heart broken. I'll keep this updated after I go back over. FUCK. I MAY just go back to indoor. UPDATE: Got back from the appointment and the rest of the plant was all droopy just like the other 9lb kush (and the branch amputated). I wondered about that because other branches looked worse. I got the totally dead 9lb kush out and found some root rot. AFTER wheeling the bag out I found earwigs and other insects where the bag had been. Awesome. I used h202 to try to wipe down anything that looked Fingal in the stem. It sucks because it seems like that liquid kool bloom pushed them over the edge into flower. Cotton balls where there was nothing. So that's both my 9lb kush plants and the largest plant of the year the GDP that have all bit the dust. If you grow cannabis you know how I'm feeling. I KEEP TRY8NGVTO UPLOAD THE MINUTE VIDEO I TOOK BUT I CLICK ON SOMETHING ELSE AND IT DISAPPEARS. WIFI SLOW. HAVE TO WAIT FOR 5G
8/22 What do I say? Fusarium? Pythium? Stem rot? I'm going to have to get a tent to do some indoor to get the medicine I need for me and my wife. I took the last 9lb kush out and disposed of it. Well it's still in the bag. I'm hoping maybe it might come out of it (beyond hope and far away from the others (but I'm going to toss it today). This blows so hard. Flowers are just starting to develop. I like the liquid kool bloom. It seems to make flowers explode when there was none before. At least on the plants I have left. Actually even the dieing ones started flowering. I'm really concerned considering that one plant (at least) has septoria and every plant has that petroleum jelly on it. Cautio to people that use that. It seems thats where the rot started or is. In spots I spread the petroleum jelly. Anyway my NYCSA has the smallest amount of "funky looking stuff on the stem" so I'm hoping it will make it. Cotton balls starting to appear. If I lose the whole fucking crop I'm gonna go ape shit. UPDATE: Spoke with a few others and did more research. I removed my braces on the bottom of all the plants. It looks like the pjelly and the brace allowed for some type of contaminate. Other growers think I'm being too bleak. They think things will turn out okay. They are more knowledgeable about cannabis than me but I'm with these particular plants everyday. They're probably right and my anxiety is just getting g to me. It's scary seeing a healthy plant completely die in such a short time. After removing the other 9lb kush I could easily see extreme rootbound roots still too the size of the 1 gallon they came in. The bag was PACKED FULL of tight roots so they definitely made it down. The plant however just fell over when I pushed it. I had roughed it up a big before. Anyway I'm praying to the cannabis gods to not take what I have left.
8/23 Fucking pouring again. This sucks. I've gotten loads of advice and made another friend on here. I forgot my phone so I couldn't take pictures this morning. My spirits are up a little seeing that others are at least attempting to help. I'm headed to the grow shop after a night of research to grab supplies to battle this. I'll update later. EDIT: I picked up plant doctor at the grow shop. It was 50% off and I couldn't find anything with trichodermia. However, I've heard good things about this plant doctor. It's systemic and can be used as a root drench and a foliar spray. BIGGEST selling point for me is that it SPECIFICALLY lists fusarium, grey mold. Pythiym crown rot, black mold and all kinds of other shit. The thing that sucks is it's raining and it's not supposed to stop for a few days. That's going to make application more difficult. Oh well. I think I may do a root drench on the one plant that has a wilted bottom branch. I'll keep this updated. Thank you everyone who reached out. Especially growing grannies and my commercial buddy who is always here for me. However he has no experience with this so I'm kinda on my own here. EDIT: I couldn't find trichodermia and I don't have time to wait around and order. I found plant doctor which literally lists it treats all the possibly pathogens my issue could be. Even has a section for medical Marijuana. I did a root drench on the plant up front in the middle AND I did a foliar spray. Might as well get the septoria too. It's systemic but it gets in faster through the leaves I guess. It started sprinkling and I want to test this stuff out before I go ham with it. I did give some to the to other plants bit left my best AND THE TWO SMALLER ONES alone for now. I'm not seeing those issues on the NYCSA and I don't want to risk damaging it. I chose tge root drench as it's raining and the instructions for fusarium WAS a root drench. Thank you all for your help. I will close out tge question once I know it's figured out. Wish me luck. DID A SHORT VIDEO BUT WIFI IS SUPER SLOW SO I NEED TO WAIT TO UPLOAD IT. Went back over. Finished foliar spraying the other two and left the NYCSA and two Littles alone. Hopefully this works. I did I short video. Who knows if it uploads. UPDATE: Went back over and finished foliar spraying. Took a bunch of pictures and did a video but it didn't upload. I'm hoping this will do it. Plants actually look good. And they're flowering nicely! It's too bad I had to do a foliar bug this us supposed to combat PM and septoria as well.
8/24 It Rained last night but hasn't Rained today yet. It's supposed to and uts overcast. I'm really considering putting a roof on my grow (like rapacap suggested) for flower to decrease mold chances. Plants looked happy. I saw no negative effects from the Plant Doctor. I even sprayed a branch of the NYCSA and the stem and a little around tge roots. I finally feel like I can take a breath. I've been working so hard and worrying about losing g everything. I may have been able to save that 9lbkush but I don't think bit was worth taking the chance. The sun is peaking out now. My buddy at the grow shop called and set a side general hydroponics armor si 0-0-4 silica supplement cause it was 90% off. I pad like a buck sixty lol. I'll incorporate that next feed or water. Whatever comes first but it will be good to get it in the regimen. I was worried plant doctor might hurt but the girls seemed to kike it and I went ham on the worst plant. I mixed according to medical Marijuana guidelines on the label
(Theres another label on the internet, it's not on this one, it's at the very bottom and just recommdations from commercial growers. I hope this stuff works. Things look better already though. That liquid kool bloom is the bees knees. That's making flowers pop up like crazy! I think I'll stick with it. I was going to use beastie bloom and cha ching later on (and still might) but I hate the lockout bullshit. I've done a bunch of videos but most don't get uploaded as i forget to upload when I leave and wifi is slow here. Anyway at least I've got a few good ones left and pleating the words of my commercial poll buddy, "barring anything catastrophic you should be fine. I know your anxiety gets the better of you sometimes." Couldn't be a truer statement. I'm still getting a tent and doing indoor though. I'm going to need to.
8/25 Did some slight defoliation. I think today I'm going to reorganize my grow space. Things are looking better though. Plants look healthier. Flower is on and they are going to beat hell. I'm glad I took a cutting from NY 9lb kush. I also took one from the NYCSA. THose are tge little ones. The 9lb kush is flowering pretty good. Too bad it's just on a 3 gal. The NYCSA us in a 10 gal grow bag though and is doing amazing. I still see septoria on the leaves. I'm sure I'll need to reapply plant doctor but thus far I'm impressed. Things LOOK better. I don't even remember the last time I watered. It Rained last night. Looks sunny today. I'm going to feed tomorrow. I want the soil to dry out though. We usually don't get consistent rain like this. It's a first for me. I'll update later if I get stuff done.still wondering if I should amputate that wilted branch or give it a bit. It's still attached right now. I'll get some sealant and do some more research.


Likes
107
Share


@Tropicannibis_Todd
Follow
ALRIGHTY THEN GROWMIES 😎
REMINDER I DO 2 UPDATES PER WEEK 👉WEEKLYROUNDUP👈👉MIDWEEKLY UPDATE👈
We just hit week 11 and all is well , have to admit she's just killing it super happy with how shes coming along 😃 ....... 45 days into flowering
👉Had to bring out the Bamboo sticks last week as she's putting on the weight 👈
I'm still training her with LST and it's looking good 👌 And she's filling out the pot perfectly👌 Lots of tops 👈
👉NutriNPK NUTRIENTS USED FOR FEEDING 👈rain water to be used entire growth👈
Lights being readjusted and chart updated .........👍
I GOT MULTIPLE DIARIES ON THE GO 😱 please check them out 😎
THANKS FOR TAKING THE TIME TO GO OVER MY DIARIES 👍
👉IF ANYONE IS LOOKING FOR A PLACE TO HANGOUT VIA GROWDIARIES AND TALK GROWING AND JUST CHILL AND WHATEVER .....👈
👉I CREATED GROWDIARIES DISCORD SERVER !!!!!!!!!!!👈
LINK IS 👉
https://discord.gg/zQmTHkbejs
AND SEE HOW IT PLAYS OUT !!!!!!!


Likes
29
Share

@Greenkush420
Follow
Cosechamos la purple bud la más pequeña y compacta, solo 1 ejemplar de esta variedad, las hojas no se han vuelto purpura pero si los cogollos con algunos matices rosas púrpuras y rojizos muy bonitos y con muy buen aroma


Likes
27
Share


@Potgoblin
Follow
So she's getting pretty close to being finished I reckon guys!!
She's had pretty much straight water for a month or so now with only a few little feeds
Her buds are feeling dense and have developed a beautiful purple colour (which I am trying my hardest to enhance!) They also have a beautiful citrus smell with some earthy overtones and are looking frosty!! Trichomes are still cloudy no amber!
It's Tuesday 12/10/21 day 55 of flower and her next drink will be tonight and she will be getting a weak dose of feed, 1 maybe 2 more then flush!!!!


Likes
7
Share


@OwlGang_Uk
Follow
Week 1 - Solid Foundation. Just Sowed Up Some Gorilla Glue Auto From Fast Buds. The Girls Are Looking Nice And Healthy For Their First Week In Seedling Stage.
Processing
Likes
73
Share


@Fibro_Witch
Follow
Alright, so I want you to ignore what I said in this video about harvest speculation. Looking at the trichs, it looks like Gen 2 is coming down this weekend because she does have some amber right now, but Rogue One will probably need another week.
All I know is I'm getting worried with how close everyone is getting here at the end. I won't have time for anything else. GAH! 😵
But Gen 2 looks beautiful and Rogue One is Gawgeous! (channeling my inner JVN) The top cola on Rogue One is going to be huge and I am praying that it doesn't get any mold or inchworms because it will be a sight to behold! I just can't believe the improvement it's had in the past few weeks. She has risen like a phoenix, and she is fierce!
