
Likes
Comments
Share


@Original_Growers
Follow
Day 21 of flowerig going great. Gelato strain was too much bushy, so we had to defoliate it. Now all the works are done, only have to wait buds to get fat 😁.


Likes
1
Share


@FrostyLeafs
Follow
"The 3rd day in flowering. I give 2.2 liters of water every 2 days. I'm still experimenting with how long the timer needs to run to give enough water.
😎✌️
BT6
The stretch is strong and i have no space left 👀
5weeks Vegi was to long

Likes
7
Share


@Zuppler
Follow
Week 7 - Second Week of Flower
The Donutz squad is deep into the stretch phase, and the tent is buzzing with energy. The plants are loving the Greenhouse Feeding Bloom nutrients, responding with healthy, vibrant growth and an impressive stretch. The SOG canopy is coming together beautifully, and adjustments are being made to keep everything dialed in for maximum light penetration and efficiency.
Key Updates:
Stretch in Full Swing: The plants are stretching aggressively, shooting upwards and making their presence known. The increased height is filling out the tent and setting the stage for a dense canopy of colas.
Strategic Defoliation: Early in the week, I took a close look at the plants and spotted plenty of leaves and lower growth around the net level that would never get sufficient light. Those unnecessary leaves and weak shoots were removed, allowing for significantly better light penetration and airflow. The difference was immediate — the canopy now looks cleaner, and light is reaching the lower sections more effectively.
Nutrients & Care:
Flowering Nutrients: The Greenhouse Feeding Bloom continues to work its magic. The plants are showing no signs of deficiencies or stress, and their growth is vigorous and healthy.
Watering: Still keeping it chill with reverse osmosis (RO) water, ensuring clean and balanced hydration.
Observations:
The canopy is filling out evenly, with strong, uniform growth across all plants.
The lollipopping and defoliation have paid off, creating a clean and efficient canopy where every bud site is getting its share of light.
Looking Ahead:
As the stretch continues, I’ll keep monitoring the plants closely for any additional defoliation needs. The second net is on standby for when the nugs start stacking to provide support and maintain an even canopy. With the light intensity gradually increasing, the plants are poised for explosive bud production in the coming weeks.
The Florida Gang vibes are strong — this tent is on its way to producing some serious heat!

Likes
31
Share


@pifflestikkz
Follow
Day 113
21/10/24 Monday
Last Flush today using de-chlorinated tap water and flawless finish at pH 6.
300ml again.
Seeing leaves fade and trichomes really popping out now 😋
Picture and video update 📸✌️💚
Day 114
22/10/24 Tuesday
Decided to run one last flush through using de-chlorinated tap water and flawless finish at pH 6.
The Orange Bud and Melonade Runtz will enter 24 hours dark 🌑 tomorrow with the other 2 litres in my other micro diary ✌️💚


Processing
Likes
1
Share


@Nvchods3
Follow
se realizo una 2da poda apical a una de las plants la otra solo quedara con la poda apical inicial y se transplanto a maceteros de 11lts.

Likes
39
Share

@Dr_Green_Thumb87
Follow
Almost an Automatic Run no issues,.thanks to fast Buds really nice Strain 🏻
Bio Tabs and bionova is also a perfect Match, the ladies never suffered 🏻🏻
To be updated once everything is dried.
Thanks to everyone having an eye on my diaries❤️❤️❤️


Likes
8
Share


@LACREME
Follow
E aí vamos nós!
Quero agradecer a toda a equipe da Fastbuds por me mandar essas seeds.
Em meu país é muito difícil encontrar genética boa de verdade, então foi uma benção para mim.
Essa Kosher eu resolvi fazer no kokostec e usarei GH com Fórmula de Lucas, knf e micorrizas. Nesse inicinho aplico apenas enzimas e microorganismos benéficos para a raíz.
Enfim, acompanhe, e qualquer sugestão ou critica, fala comigo!
Likes
10
Share


@Waveychoppa96
Follow
Started this diary in the 6th week. Have been following this website for a while now but finally decided to post. Now entering the 6th week of Veg Here i have 5x Marmalade which looks lovely and absolutely brolic. Really easy to handle and responds well to the enviroment. They stand at rougly 22-25 inches tall wheras the blue gelato stands at around 18inches. Will flip later on this week. This is my first in coco usually i use the rdwc rush system. But enjoying being hands on with the coco.
Using spider farmers SF 4000 currently on 100%

Likes
3
Share

@Ninjabuds
Follow
It’s day 27 from seed for all the plants in the photo sea of green. Let’s call it the battle of the strains summer 2025. All of the plants are starting to have visible differences. I’m already starting to tell witch plants are more sensitive than others.
Processing
Likes
2
Share


@Ab_87
Follow
1- getting nice and thick with a stronger smell. Watered with flowering chemicals. Tent at 24.6°C and RH at 47% today
Away for the weekend. Can’t wait to see how she will look when I get back
5- Came back to fairly dry soil and somehow forgot to turn my dehumidifier back on after emptying it. So the RH was at 77% when I got back. I got everything back within the range I want it now. 24.5°C and 46% RH.
Watered plant with flowering nutrients.
7- Just amazed by how fast it grows. Seems like every time I look at it, it keeps getting thicker. I have some sort of fascination with the main cola. Just love taking pictures of it. I ordered a USB microscope that I should be getting today. Looking forward to see those trichomes magnified.
Likes
14
Share


@Silverback_Guerilla
Follow
TUESDAY 9/3:
She's slow, but steadily putting on the pistils. Looks happy...👍
WEDNESDAY:
I fed her about a half-gallon of water with bembe, big bloom, tiger bloom, beastie bloomz, armor si, and terpinator.
I was at the site for several hours today, so I was able to move her into direct sunshine for an extra couple hours.😎
THURSDAY, FRIDAY, SATURDAY, SUNDAY:
I was sick as a dog . 2-day stomach virus, followed by an acute pancreatitis attack...
😷
MONDAY:
I gave her about a half-gallon of aquarium water with some bembe, beastie bloomz, and tiger bloom. I ordered a little grow light that should arrive tomorrow. It just pulls 210w at the wall, but is 3500k with a lot of extra 660nm diodes and gets pretty good PPFD numbers. I'm gonna finish her in my closet as close to that new light as I can..along with maybe 2 of my shortest stealthy outdoor hybrid girls...maybe increasing the PAR a bunch will hurry them the f!#$k up..
Likes
18
Share


@Grower_Of_Persia
Follow
week intel:
its time for second pruning they grew up too fast and need second pruning as below :
first i remove big fan leaves and only leaves then let them rest for 1 day then the second part of pruning will get done that is removing branches based on these conditions:
1-if the branch is very low and never can make it to the top ,
2- if branch is in shade even after pruning fan leaves ,
3- if there are too many branches at the small space then non of them will get resources so if there is no space for branch then , they must get remove.
everything is perfect!
stresses :
pruning big fan leaves and lower branches + a little E.C stress around 1.7 once a week
feeding:
i feed them 3 times this week with this order :
day 1 : i feed them heavy with silicate +base nutrients(calcium & micros + Bloom) about 884 ppm - 1.7 e.c to cause a little stress.
day 3 : i feed them low dose of Feeding Booster + Karbo Boost around 325 ppm - 0.6 e.c to let them recover a little but not fully recover still a little stress will caused.
day 5 : i feed them with low dose of Top-Max + B-52 around 213 ppm - 0.4 e.c to let them recover the stresses to get ready for another stress next week.
guide of the week :
no more stresses from now on till the end and from next week i'll reduce the amount of nitrogen and calcium to below half to the end.

Likes
170
Share


@Green_Man_420
Follow
Yo yo yo!
Day 8
The start of week 2 growth seems ok. Although as always I’m very impatient at this point. Watered with plain water today. Let’s see what this week holds for us. Below is a link to RQS if you would like to have a look at there selection. ✌️
Day 10, added a little heater into the mix as night time temps were dropping, seems to have done the job. Plodding along. ✌️
Day 11, gone to 18/6 DLI 34 watered with plain water tonight.
Day 14, not a lot to report. Girls are doing ok. Some good growth this week. Watered last night. ✌️
⭐️⭐️⭐️https://www.royalqueenseeds.com/uk/autoflowering-cannabis-seeds/633-wedding-cake-automatic.html⭐️⭐️⭐️
Likes
20
Share


@Hawkbo
Follow
This is doing good just swelling up. Its gunna have some fat buds it looks like. Some of these never fully recovered from being stunted from the cold. I added some microbe life photosynthesis plus to the mix.
Likes
134
Share


@Sparkles
Follow
Boom Day 28 after flip.
She’s showing off big time.
Cleaned her up real good on day 21 before lights out and will defol a lil bit here and there. Feeding really hard cuz it’s hammer time, some stuff like calcium and Bloom Khaos is almost double what is recommended on the feeding chart. And giving strong teas in between with Flower Finisher (1-5-7) and CytoPlus (0-0-7.5) for that extra kick of K.
Bti for the win! I’ve been brewing AquaBac (in a tea ball) for 24hrs in ph’d water before adding stuff for ‘instant tea’ …I’m seeing one or two fungus gnats flying around and maybe like 3-4 new lil fuckheads on the sticky traps compared to 10-15 before. Was gonna get some nematodes and/or spray the top soil/cover crop with neem oil but I don’t think I have to (for now).
Lights are blasting at 95% and about 13” away and she smells so good.
That’s all for now. Thanks for stopping by and happy gardening 🌱🌱
Likes
28
Share


@Salgeezi
Follow
As usual my grows take forever. Healthy... just slow growth.
Ph is good.
Runoff EC is good.
Lights 150w at 17".
Humidity 59
Temps 79

Likes
17
Share


@leliantu
Follow
Hola. No había actualizado estas plantas, aquí va. Semana 18. Las plantas ya llevan alrededor de 13 días en riego solo con Flawless Finish, las flores pegaron una ultima engordada y ya están madurando, ambas variedades han adoptado tonalidades muy linda.
Processing
Likes
6
Share


@ProfDoty
Follow
This actually marks the first week from breaking through top soil.
My ladies are taking the somewhat high temps very well, doing my best to keep it down around 79-81(Day) and (72-75) at night. They say the colors really pop at lower temps so hopefully I can work my way down even more to achieve those colors in the end. I’m using the Batch 64 Moonshine (super coco), haven’t heard a lot about, but my hydroponics shop recommended and it looks like it’s treating the ladies right. GP started to lean over on Day 4 and just couldn’t get up , so I propped her up with a twist tie and she’s doing great now 😎Anybody have a clue as to why she just slumped over in the first place? I haven’t ph my water at all but I will this next week coming up and will also be adding in some small doses of Terpinator each watering. I will be Ph (ing) my water between 6.2-6.6 this coming week and will be observing how the plants respond to the watering. Hopefully another great week is ahead filled with lots of growth. All comments welcomed HELP ME !!! or jus say what’s up ha ✋

Likes
4
Share


@Forrbiddenterpz
Follow
Switched the autoflowers to another tent to give them 300 watts of led everything is growing fine

Likes
1
Share


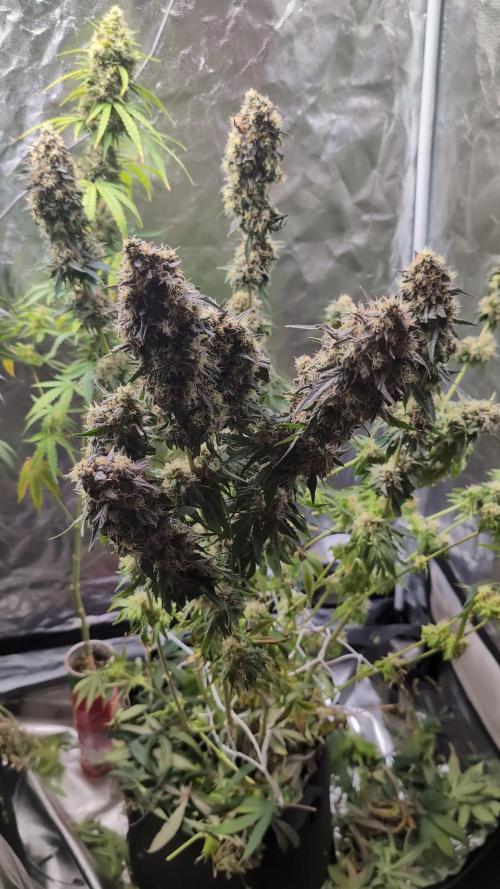
@SzkolaZiola
Follow
Yet another beautiful creation from Humboldt Seed Company. Huge trichome heads, amazing, complex aroma.
Oh and did I mention magnificent leaf and bud colouration? They are purple AF 💪
I love them sooo much 😍😍😍