
Likes
Comments
Share


@Prototype0181
Follow
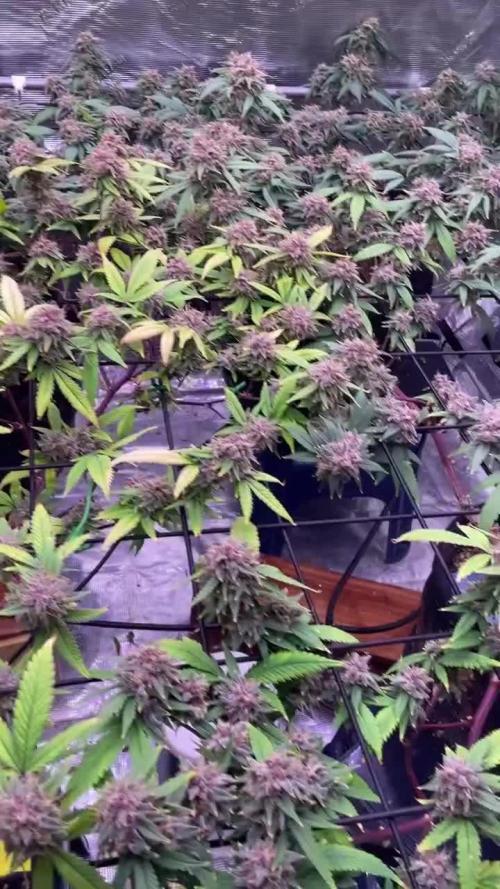
I'm really happy with how they are doing. This strain or pheno's i got are stacking like crazy, and there's already a Distinct smell around these two. I'm tempted to do a full run of these badgirls in the near future.
Rock on Growmies 🌱

Likes
6
Share


@DeepRootsGrowTrees
Follow
Week #10 Gnomo Auto By Kannabia
Week#10 Dec.30th-Jan.6th
Gnomo Auto had stayed true to the indica genetics she has she's a shorter plant that's stocky with tight dense buds that are covered in trichomes. She's been a easy grow due to her genetics No real issues. I highly recommend if you like to grow indica or have limited space!


Likes
29
Share


@CannbellFarms
Follow
Mon 06/12/22
- defoliated majorly again, hopefully for the last time this time haha, looking good though! Heavy nug production begins!
Tuesday
- uploaded video 24 hours after defoliation all plants look amazing!


Likes
6
Share

@cdxxbuds
Follow
Week7 done. Harvest will be soon in a day or two.
1st two plants will come down and after a few days the other two will also come down. The Buds are rock hard. Trichomes and the aroma is just sweet and pungent. All buds purpled up nicely.
Cheers yall.

Likes
4
Share

@UnorthadoxDude
Follow
UnorthadoxDude Week eight! Bunny is has stopped stretching for the light but is about to begin her flowering stretch.
Day 50 - Fertigated 5l
Day 51 - Phorotraphed
Day 52 - Fertigated 5l
Day 54 - Tried to super crop and messed it up, so I removed top where it snapped, and stripped down to attempt to clone.
Day 56 - Photographed.
Special thanks to St Aubins Genetics for providing the seeds for this grow. Check them out at www.staubingenetics.com
P.S. Come and find me on X.com! @Unorthadoxdude
Processing
Likes
6
Share


@Moss420
Follow
Got a new light this week, it's basically a HLG 260 R-Spec except locally manufactured using the same Samsung LEDs. Big Mumma got her 60x60cm tent today and will go in there under one Viparspectra 300W blurple (130w from the wall). I trimmed her, super cropped her main stem and added a scrog net in preparation of flowering her in the next couple of days.
Because my other plants were getting up past 75cm after 7 days of flower (100cm is my absolute max) , I decided to supercrop the canopy back down to about 60-65cm - it was pretty scary and I definitely broke the outer stem on some of them. Also gave them a good trim. Fortunately most bounced back strong the next day which are the most up-to-date photos you see (17/4/20).

Likes
62
Share


@Reyden
Follow
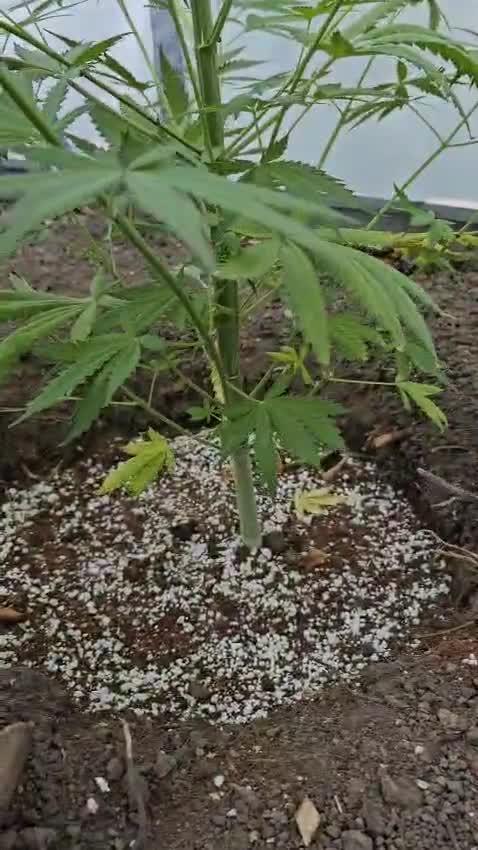
Riparto con un altro ciclo only @Fast_Buds con 2 loro Fast Flowering e 2 Auto Fiorenti di cui una CBD 20:1🙌la SF2000 lavora al 60% della sua potenza con una distanza dalla punta delle piante di circa 30cm. Ieri ho effettuato la miscelazione del terriccio con il 4 componenti Dogma Organics che è una miscela di diversi guani, letame bovino, rocce triturate meccanicamente, ceneri arboree e febacee tritate, acidi umidi e fulvici, kierisite e fosfato nat. Tenero,


Likes
9
Share


@andrewkeed
Follow
Everything goin very smooth. will update soon on other changes that may come up

Processing
Likes
5
Share


@dutchMASTAkilla
Follow
Added frame to keep tent from being sucked in by filter fan.

Likes
9
Share


@Growlecule
Follow
Hi budds and buddettez how is it growing?😁👍
A little greenhouse update today!
Bin a while and the Runtz has grown insanely, i lolipopped her al the way up, supercropped/HST'ed her once every 2 days and still she is unstopable😁🙌
The soil is just spot on, i can see it on all my species of plants, they are really thriving, all the hard work of my dad and myself is paying off with lots of high quality veg and a little sidedish... FLOWERS, i love flowers, dense ones, rock hard covered in trichomes and bright orange pistils with insane oddours that want to make you clap your hands of but you cant cause your hands are glued together, those buds i ador.
Oh yeah about those😂.. the Runtz is slowly showing of some pistils, and the Pineapple Glue? She is getting fatter and fatter last weeks, i fed her some extra nutes, Plagron👍 alga Bloom and some BIO Enchancer from the mighty Greenhouse👌 both bio and work like a charm, first time i fed her extra nutes and the last i recon, she doesnt seem to need it but i wanted to boost her a little to increase bud density and mass😁👌
Have a great week all and happy growing!!😁👊

Processing
Likes
45
Share


@LovelyT
Follow
Killer purp has a very skunky odor. This smell is growing stronger everyday. Ive been using terpinator and its really bringing out the aroma much more now. I also noticed some purple on the buds as well since last week. So far so good.👐


Likes
8
Share


@Canna055
Follow
Flower day 29
So 4 weeks done in flower the cherry Poppers are doing fantastic could lollipop them a bit more tbh but they’ve got yesterday the last topdess feeding till harvest just pure water
The HerzOG plants are 2 completly different phenos the one to the left seems to be more sativa dominant & the one to the Right more like a indica- hybrid
At least 5-6 weeks to go from now till harvest


Likes
3
Share

@birdmountain
Follow
Eine Woche mit viel Regen, wechselhaftem Wetter, aber auch etwas Sonne ist zu Ende gegangen. Eine den Nacktschnecken sehr entgegekommende Woche. Die Rainbow Road nahm es gelassen, sie im Topf angekommen und zeigt dies mit einem sehr guten Zuwachs in dieer Woche.
Die Rainbow Road hätte auch, wenn sie Augen hätte ihren Namensgeber "Rainbow" in dieser Woche nach einem starken Platzregen am Himmel entdecken können. Leider an der falschen Position, so dass kein Foto mit Pflanze und Regenbogen zusammen möglich war.

Likes
12
Share


@Sundance
Follow
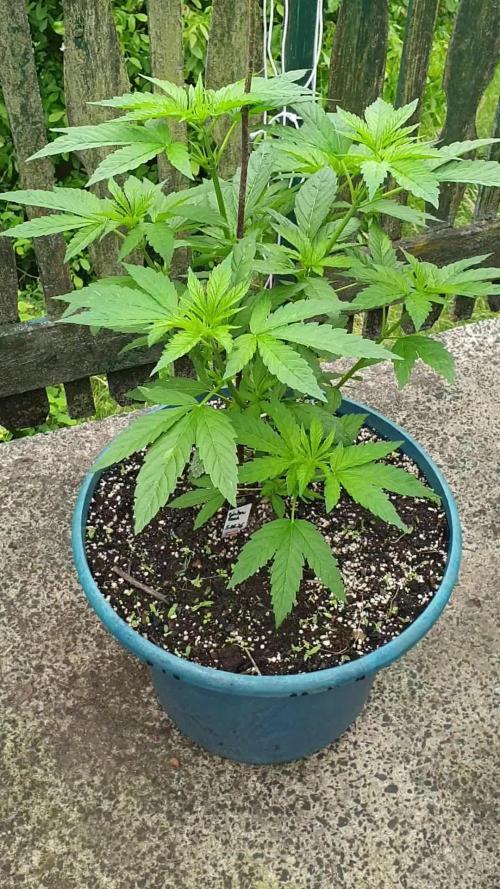
The weak plant is small and sick. The healthy plant is beautiful even I expected a little bigger plant. Leaves and flowers started to be purple.
Likes
3
Share


@TheGanjaGrower
Follow
It's time to harvest them but this I wasn't there for last 2 weeks had humidity issues causing bud rot


Likes
50
Share


@Mr_Motalovah
Follow
Hello growers and tokers! 👋 👩🌾 🧑🌾.🔥💨
There has been much change this week!!
First there was a big defoliation done, I cleaned the bottom of the plants.
All the growth that wouldn't amount to anything because the light doesn't penetrate that low.
Also took off the biggest fan leaves to give more room for light.
Then finally switched to 12/12..
After just 36 hours after the defoliation there was a major change.
New growth everywhere, colas started stretching upwards fast.
By far the tallest girls in the tent. Her colas are stacking up nice and tight if she keeps that up we'll have some nice dense colas. 😁
Great reaction to the defoliation and 12/12 switch.
I'm still watering every other day, After the defoliation I watered with only Enzymes 2ml/L to clean the roots a bit then started with the nutrientes again.
I dropped the amount of grow nutrients from 3ml/L to 1ml/L and started adding bloom nutrientes 2ml/L for now.
I'll slowly be upping the bloom nutrientes and after week 2 I'll no longer add grow nutrients.
That's it for this week. Stay tuned to see how they flower.
Stay safe!

