


Likes
Comments
Share


@OgNewGrow
Follow
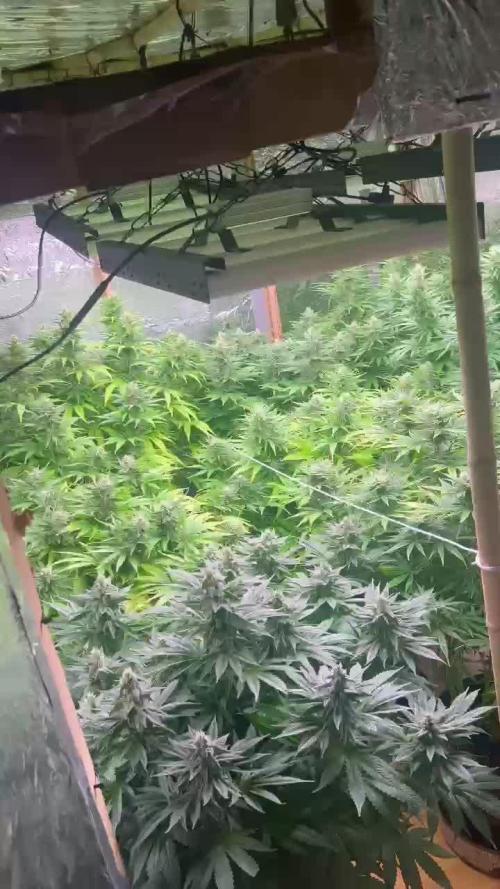
Buds are starting to show their shine!!! Becoming more pungent everyday


Likes
4
Share


@ChiloteAnonimo
Follow
DÍA 1 - CUARTA SEMANA DE VEGETA (26-05-2022)
*Se sigue con el LST
(28-05-2022)
* Se le aplica una poda selectiva a todas
* Tuve un problema de riego con varias
* En su día 31 desde q salió del sustrato, de las 6, hay 3 ya que van bien y han sufrido soportaron mejor el estrés, de las otras 3; hay una Banana y una AK que vienen más bajas que todas, de ramas más cortas y distancia internodal corta a comparación de las otras. Después esta la lemon que se viene recuperando muy bien de estrés y fue la que siempre vino más grande y ramificada :)
DÍA 7 ÚLTIMA SEMANA VEGETA (01-06-2022)
* Último día de la semana de vegetación, ya mañana es su día 1 de flora.
* El día de ayer se le regó lo último con Vegalquimia, y se le añadió 1ml de Alquisweet de LAAOS.
* Estos últimos 2 días he tenido problema de temperaturas muuuy bajas donde vivo, con luz encendida llegan 20 grados con suerte y luz apagada a 12-13 grados. Estoy tratando de jugar con bajar la humedad pero no la puedo bajar a menos de 55% aprox. Espero ya mañana arreglar ese problema de bajas temperaturas.
* Lo que es el cultivo se ve bien dentro de todo. Hay dos enanas que se estresaron en la semana 2 y quedaron pequeñas. A todas se le aplicaron LST, unas resistieron mejor los distintos estrés ya mencionados en semanas anteriores. Pero va bien.
* Hay 3 en pre flora, una de ellas en pre flora avanzada y es una de las más enanas.


Likes
13
Share


@J_diaz420
Follow
Genética muy estable, floración rápida, hermoso color y bastante generosa 💚❤️


Likes
8
Share

@PotusArg
Follow
Semana 6: estoy muy emocionado y contento con el progreso que están teniendo las plantas. Las puntas ya se ven grandes y cubiertas de muchos tricomas. Dentro de poco cortaré las Wedding Gelato. Algunas plantas, principalmente las Desfran y las Wedding Gelato, cargaron tanto peso que varias puntas comenzaron a doblarse, así que tuve que improvisar sobre la marcha y logré mantenerlas erguidas.
Esta semana también comencé a usar Overdrive en las Gelato.
Cualquier comentario o consejo sobre lo que opinan de mis plantas, o cosas a tener en cuenta, será realmente apreciado.
Week 6: I’m very excited and happy with the progress the plants are making. The tops are already looking big and covered with lots of trichomes. I’ll soon be harvesting the Wedding Gelato. Some of the plants, mainly the Desfran and the Wedding Gelato, got so heavy that a few of the tops started to bend, so I had to improvise on the spot and managed to keep them upright.
This week I also started using Overdrive on the Gelato.
Any feedback, advice, or thoughts about my plants, or things I should keep in mind, would be greatly appreciated.


Likes
21
Share


@Compassionate_Gardener
Follow
All 22 plants are doing GREAT in week 11! They have a healthy green color (shows that the BIO TABS nutrients still work well) and develop more and more flowers all over. The buds have started to form HUGE COLAS on some plants and the TRICHOME PRODUCTION Is in full swing now. The plants are GLISTENING with trichomes and some even have RESIN-RAILS on their fan-leaves, its AMAZING TO SEE! My wonderful ladies are SMELLING DELICIOUS now. The STRAWBERRY-SOUR-DIESEL from DevilHarvestOriginal-Seeds has an amazing CITRUS and LEMON aroma. The Mr.Jekyll-Kush from Mr. Hide Seeds has a VERY STRONG KUSH-aroma...it smells gassy and DANK! The SUGAR BLACK ROSE from Delicious Seeds has mildly sweet aroma, which reminds me a little bit of VANILLA. The SERIOUS HAPPINESS from Serious Seeds has a nice BERRY aroma, which is fruity and sweet. The aroma from the Mr. Big Candy from Mr. Hide Seeds is similar to that, fruity and sweet. The BLUE-MINT from Mountain-High-Seeds has a more EARTHY smell to it. The SHORELINE plants from DevilHarvestOriginal-Seeds stays very short and bushy and has a VERY FUNKY aroma...very refreshing, almost like eucalyptus. Until now I LOVE THE SPEEDY DEVELOPMENT UNDER MY SANlight LEDs! The plants are growing healthier and faster and develop more resin under the EVO5-150s than they do under HPS!


Likes
3
Share


@Goldenweeds
Follow
Pflanzen kamen bei mir an.
Alle gesund und haben den Transport gut überstanden.
Selbst in den Tagen darauf keine Anzeichen für Stress.
Bei mir sollen die jetzt nochmal nen Schub machen, getrimmt werden und dann in die Blüte geschickt.
Licht läuft momentan auf R49 W99 B99.
Likes
41
Share


@Skinnytalls420
Follow
Well I have to say even though I had a few temperature issues in the night that I think may have stressed them. They took a lot longer than expected but after drying I don’t know how but I ended up with some fantastic tasty buds a few of the plants even came out purple!! I have to say the purple buds are my favourite 🤩 fastbuds never disappoints!!!!!
Likes
42
Share


@Tropicannibis_Todd
Follow
👉Alrighty Then👈
👉Apple And Banana 👈
So we had some real nice growth this , had to do a little leaf management👈
Started some Low Stress Training to pull the lower branches out ....
Everything is looking good 👍
So ive up'd the nutrients to accommodate the growth .....
Soil by Promix
Nutrients by Cronks
Lights by MarsHydro.ca FC4800 X UR45
Tent 4x4x6.5 & Equipment by MarsHydro.ca
High reflectivity inner mylar
Thick Oxford fabric
Smooth heavy duty zipper
Sturdy metal frame
Zipper blackout cloth
Good anti light leakage performance
The 6in Inline kicks ass moves alot of air
Well this should be fun 🙃
Thanks to all my growmies out there for stopping by its much appreciated 👈
👉Happy Growing👈

Likes
8
Share


@BayAreaGrown
Follow
The plant is starting to show signs of early bud sights, and producing large fan leafs as well as good healthy gassy smell


Likes
27
Share


@eldruida_lamota
Follow
Vamos familia, hora de cosechar estas Biscotti de RoyalQueenSeeds.
No veáis que pinta que tienen las flores están bien formadas y repletas de tricomas.
Después de 70 días de floración obtengo estas flores tan increíbles que huelen pfff.
Es una variedad un poco complicada de cultivar pero, que al final si da sus frutos.
Bastante contento con este primer cultivo de la temporada de indoor.
Dar las gracias a james por las genéticas dé RoyalQueenSeeds, y a todo el equipo de Agrobeta, que sin vosotros parte de estos proyectos no son posibles 🙏
Agrobeta:
https://www.agrobeta.com/agrobetatiendaonline/36-abonos-canamo
Mars hydro:
Code discount: EL420
https://www.mars-hydro.com/
Hasta aquí es todo , espero que lo disfrutéis, buenos humos 💨💨.
Likes
87
Share


@JKent19
Follow
Swapped the plants this week as I realized I could use the 200w light to cover both the smaller plant and the lower canopy of the larger one more effectively. Hopefully this will allow sufficient light to cover more of the plants, as the lower canopy of the larger plant was 30 inches from the light! Now since I can lower the bigger light to accommodate the shorter plant, I can cover the left side of the bigger one, lowering the light to 23 inches, which is definitely better. The buds don't seem to be filling in quite as quickly this time but they are definitely making progress! I am guessing about another month, but who knows? I'm going to let them take their time and let me know when they're ready. Other than that was a pretty uneventful week, as I'm kind of coming into the final stretch I have stopped the lst and only trim the leaves that are blocking bud sites. They definitely appear more stressed than they have been, with a lot of bright purple stems connected to the leaves, but to me they look healthy enough to make it to the finish line!


Processing
Likes
17
Share


@Doobiefumes
Follow
week 2 day 3. maybe 200 ppm is a bit too much im actualy seeing tip burn on 2 of them i might remove 50 % water and add reverse osmosis water tomorow to lower nute concentration to around 100 will see how night goes.did the 50% water change and readjusted ph now everything looks fine. also iv lowered water level to 1 inch above bottom of net pot to promote more root growth i need to buy a par meter asap im scared to lower my veg led lower.some little issue with minor tip burn maybe from stress from power outtage or potassium deficiency from nutrient lock out ph went to 6.7 for a day cant get it stable so far.seems like ph as finaly settle down go check my video from grow room.2 of them are doing really well but 2 are in bad shape newbie mistake my ph pen was way out of range went to 4.8 for 2 days i calibrated it 2 days ago flushed system and ran revive only for 2 days ph has been spot on at 5.8 since flushed again yesterday and started adding nutrient back in very low dose 1/4 strenght plants now seems to thrive as roots entered the system today they already are like 6 inch long light just shut off i might do another foliar spary with revive and sensi cal mag extra and wet betty to help with damaged leafs from bad ph pen mistake next week if they have not fully recovered already in case 1 of them does not make it i have a spare 1 growing in coco whos ready to drop in system im still learning feel free to leave comments


Processing
Likes
12
Share


@LockDownGrow
Follow
So I had absolutely no ill effect on the plants at at all moving from the green buzz veg feed too the house & garden soil a&b feeds,
I did not even given them a water only inbetween the two,
I also went straight in with 50% the recommended dose stated on the house & Gardens bottles this switched happened the day before week 5 none showed any signed of defects or deficiency intact they exploded into life over night and then every day after that, I have been using the green buzz fast buds as a folar spry appied too the leaves of the early flower formation after lights out,
They seemed too love that too and I also kept the note roots going in,
I also started too apply C-RESULT at the fullbl dose stated on the bottle,
The plants live this stuff if you have not tried it do it,
I am not sponcered by c-result I was given this by my local grow store,
It brings all the nutrients straight too the roots it states,
All I know is this stuff triggers the plants too suck the pots dry in 24 hours,
So make sure you have your feed bucket fully in order before adding this stuff as a mistake here could cost you,
But get it right and in 24 hours these little autos doubled in size,
It states too used week one of flower only and smells like a sewer lol
I have today day one of week 6
Started too add house & garden
Bud XL at half strength too increase next week and also I added there top shooter at 1ml per liter of water as 7 as I plan too removed all chemicals exactly as of day 1 of week 7 leaving me week 9 clean, I am training all the shooting tips too my scrog netting the best I can due too very limited space in the grow space,
And am praying for some of the promised purple leaves on the fast buds Web site, I did not too these this time,
I has on lemon pie this round that is 2 weeks behind the rest due too non germination but I am wondering if a staggered planting each plant exactly one week behind each other would give me a little more canapé space and the treat of harvesting a plant every week,
Using the skyline 1000 only
I did not too any of these autos
2 x strawberry cheese cake
2 x lemon pie
4 x fyah
Sounds like a plan too me,
Thanks for reading
Likes
24
Share


@baboone
Follow
Yeah pretty decent this week. It didn't grow loads but it's looking pretty green and healthy.
Changed the nutrients to bloom gradually. I think it's gonna turn into a weed bonzi which will be cool.
She wasn't showing any sign of flowering just yet and is probably transitioning, so I thought Id do a quick defoliation to get the light on the lower bud sites and better air flow.
Any observations, advice or tips are very welcome. Happy to answer questions too. Thanks for looking! Baboon
Likes
96
Share


@The_Projexx
Follow
This is the start of flowering ! Day 5 now! Gave the ladies a light defoliation their tops are shooting up nicely I'm not sure if I'm going to have to train them but they are well on their way to getting me some lovely medicine ! I'd like to thank everyone who comes to the diary to show me their love :D much respect stay tuned folks ! The shows only begun !!! <3
-Happy Growing
