




Likes
3
Share


@Tricomasnqn
Follow
20 días despues, en la semana 8 de vege se ve el gran crecimiento que tuvieron despues del cambio de lampara y el aumento de temperatura, empece a hacer un guiado, sin defoliacion todavía.
Likes
137
Share


@MrJones
Follow
mrjones - Slurricane #7 S1
🌱Slurricane #7 S1
@inhousegenetics_official
👨🌾🏽GD Grower: MrJones
🔹🔹🔹🔹🔹🔹GOALS🔹🔹🔹🔹🔹🔹
🌞Environment - 75/80℉ and 60% Humidity Good Old Mother Nature
💧 Feeding - The Green Sunshine Company - Earth Dust All-Natural Plant Nutrients
⚗️Soil - 35% ProMix MP / 25% Ocean Forest / 20% Tupur Royal Gold / 10% lobster Compost / 10% Additional Perlite
🍃Training / So this girl was 60 Inches and spread her out under a 5x5 Trellis
🕷️ IPM - Will be using Green Cleaner" 1 OZ per Gallon, and CannControl from Mammoth alternating between product each month
🔹🔹🔹🔹🔹🔹🔹🔹🔹🔹🔹🔹🔹🔹🔹
📜 Rambling - Week 1 / So weeks are flying by, sorry for the slow updates, having unusual personal life struggles, but with that said, these outside plants are just doing great, thanks to my partner Mother Nature!!
🔹🔹🔹🔹🔹🔹🔹🔹🔹🔹🔹🔹🔹🔹🔹
▶️ Sunday - 06.06.21 / These plants are on autopilot with Mother Nature at the helm, we have been having gentile summer showers, plenty of sunlight and things are looking great!
▶️ Monday - 06.07.21 / These plants are on autopilot with Mother Nature at the helm, we have been having gentile summer showers, plenty of sunlight and things are looking great!
▶️ Tuesday - 06.08.21 / Finally got to water them today, they are just growing like crazy!
▶️ Wednesday - 06.09.21/ These plants are on autopilot with Mother Nature at the helm, we have been having gentile summer showers, plenty of sunlight and things are looking great!
▶️ Thursday - 06.10.21 / These plants are on autopilot with Mother Nature at the helm, we have been having gentile summer showers, plenty of sunlight and things are looking great!
▶️ Friday - 06.11.21 / These plants are on autopilot with Mother Nature at the helm, we have been having gentile summer showers, plenty of sunlight and things are looking great!
▶️ Saturday - 06.12.21 / These plants are on autopilot with Mother Nature at the helm, we have been having gentile summer showers, plenty of sunlight and things are looking great!
🔹🔹🔹🔹🔹🔹🔹🔹🔹🔹🔹🔹🔹🔹🔹
Earth Dust - DESCRIPTION
🔹Earth Dust is our all-natural plant nutrient designed for indoor and outdoor flowering plant growers. You can grow easily by “just adding water” to your soil for the entire growth cycle. It creates a “living soil” so your plants thrive from seedling all the way through flower and harvest. Earth Dust represents an organic dry amendment method of gardening, it’s made of a natural powder of ingredients.
🔹Because you only need to water your soil with Earth Dust, you can concentrate on caring for your plants and getting a healthy crop “on autopilot”. Now you can grow without spending hours of your life mixing chemical nutrients, and you can do it naturally. What’s more, is you will enjoy the cleanest, most aromatic, and flavorful harvest you’ve ever experienced when a plant grows in a rich, organic web of living soil.
Product Highlights
🔹All-Natural Ingredients – Mostly plant-based – Safe around children and pets.
🔹Packaged in kraft paper bags that are recyclable and compostable.
🔹Easy to Use – Just mix the powder into the soil 3 separate times – then water only.
🔹Packed full of rich microbe food & contains billions of beneficial fungi and bacteria! Creates a resilient, living soil that defends against pests and diseases.
🔹Rich in trace minerals and nutrients for full plant expression. Sourced from rock dust, sea-farmed kelp, and land-grown crops.
🔹Soil Conditioners help balance pH and make nutrients more available in the soil. Achieved with ingredients like bat guano, worm castings, limestone, molasses, and humic acid.
🔹The correct balance of N-P-K nutrients for each stage of growth:
🔹Earth Dust Base (3-1-2) contains key nutrients for sustained vegetative growth. High nitrogen (N), Low Phosphorous (P), and Medium Potassium (K).
🔹Earth Dust Boost (2-3-6) contains accelerated-release nutrients for powerful flowering growth. Low nitrogen (N), Medium Phosphorous (P), and High
Potassium (K).
🔹Re-use soil harvest after harvest by simply adding more Earth Dust Base to begin again. Create your own living soil that gets better every time it’s used.
🔹Go organic, save time, and get predictable, healthy harvests.
🔹🔹🔹🔹🔹🔹🔹🔹🔹🔹🔹🔹🔹🔹🔹
Compost Tea for Vegetative Stage
Water 4 Gallons
3 Cups Composr (Your Favorite Worm)
4 TBL Molasses
4 TBL Seaweed Extract
4 TBL Fish Fertilizer
Use air Stone o the tea for 24/3 hours 70/75F, use at full strength for establishing plants and a half strength for younger plants


Likes
19
Share


@Ferinky
Follow
En esta actualización se incluyen 2 semanas ya que por trabajo me fue imposible añadir la semana anterior.
El día 15 de Agosto recibió la segunda pulverización de Bacillus Thuringiensis para prevenir el ataque de las orugas.
Sigo alternando riego de agua un día con riego de Ascophillum Nodosum al día siguiente. He dejado de regar con Cannazym.

Processing
Likes
142
Share


@MadeInGermany
Follow
Hi everyone :-)
This week a lot of nice things happened in the flower tent :-)
Everyone looks super nice, and is growing stronger and more beautiful week by week 😍👌.
The blue cheese smells like a dream ;-) As usual from this variety 👍.
The kosher tangie is also very, very tasty 👏🏻.
Both got Pk 13/14 this week for the last time :-)
Everyone else is developing very well 👍, That will be the last diary with several strains together :-)
In future everyone will come individually 👌.
I wish you a lot of fun with the videos, have a nice weekend, stay healthy 🙏🏻 and let it grow 😎👌


Likes
8
Share


@JohnnyBarrel
Follow
Week 18
Daylight 12h40 - ☀️7h40/20h20🌙
🌈Weather changed a lot during this 2 week, alternating sun and rain with medium temperature: low in the morning 8°C and 22/24°C the afternoon. Cold wind: Autumn is coming soon! 🍃
This is the middle of the flowering cycle for 2 plants and the beginning for the others; and it’s harder than I imagined. Interminable war against pests: caterpillars and leafminer flies (+ guest :aphids). However the environment is clean, there is some sticky traps, ventilation and preventives treatments (Neem Oil, Garlic/Laurel) but infestation are a recurring problem 😩.
Majors reasons of the proliferation are the hot temperatures in greenhouse, the quasi inexistants natural predators, humidity, plants proximity.
September is the reproduction period of the cabbage looper: a butterfly which lays eggs on plants giving some hungry caterpillars.
Some others pests are attracted by the nitrogen added in soil (batguano)
I did a serious defoliation, continue to check the plants morning and night to catch intruders, sprayed regularly with Neem oil.
For the moment the flowering continues.
-Brake Pad Breath: plant has definitely changed of physiognomy, branches are covered by a lots of resinous flowers with a pretty good smell. Indica dominance. Around 3 or 4 weeks till the harvest. It will be long: the plant is a victim of pests and caterpillars and lots of leaves are damaged.
-Flash Back#2: elegant plant, pretty good flowering since 3 weeks. Globally healthy despite of the pests aggression. Sativa dominance with long internodes distance and a vigorous stretch.
-GMO x Zombie Kush: same difficulties against predators, late flowering, just initiated the flowering process but in a good way.
-Royal Moby: the tallest one; around 170cm, not really adapted to dimensions of the growing space and not discrete. Plants was really shocked during the first wave of pests and after the sunburn. Late flowering, Sativa.
💦Watering : 2L/plants/48h
-grower Master Floraison + Enyme
-grower Master Floraison + pk 13/14
-grower Master Floraison + Cal/Mag

Likes
77
Share


@SooSan
Follow
Dans l'ordre:
1) Afghan Peach x Blue Monkey
2) Gelato Cake
3) Fast Critical Poison
4) Tropical Fuel
5) Hindu Kush
6) (Blueberry x Black Domina) X (Kosher Kush x Mk-Ultra)
7) Blueberry
8) Herz OG
9) (Blueberry x Black Domina) X (Kosher Kush x Mk-Ultra)


Processing
Likes
10
Share

@CrackinBeans
Follow
The mephisto is has bounced back and pushing hard. All the plants still have a high runoff but has been pushing hard this last week or so. Ph run off has been around 7.6 from around 8.4ph😬😬
I kinda gave up on the freeze berry but I started checking it out and I didnt notice how well the branching is on that plant and how frosty it is.
the freeze berry has been getting set up nicely hoping it fills out nicely because the branching and spacing on that one is not too shabby
I'm not sure wth is going on with the big bomb that one decided to just grow like a bush real fast and has soo many bud sites but is flowering super slow.. I started all the seeds at the same time except the mephisto is about a week or two younger than the rest.
The crystal meth is about ready I'm going to start flushing that here sometime this week when I get my new ph pen.


Likes
34
Share


@ertaverd
Follow
everything is fine, the rains have stopped and it seems that the plants are quite mature, I think I will harvest them next week. It has been 2 weeks without watering with fertilizer, making the washing of roots as natural as possible. They have developed a very beautiful purple color in just 2 weeks, because of the stress caused by the cold. I have also found some worm and some rotten bud but usually it is holding very well. I found a leaf of a very powerful pink color, much more than I had ever seen, and that color is not repeated throughout the plant, I leave some photos. chekit

Likes
20
Share


@DaddyPrime2
Follow
5/29 plants are healthy.
6/2 they've definitely been stretching this week. Pistils have shown and the calyx of plant #2 are already showing definite purple. Its obvious even with how little of it showing. #2 was the first to show sex and progression of transitioning. Plant #1 has shown sex but only on half of her node? Plant #3 is still the tallest, with the most stretching happening. She's a lighter green than the rest and she hasn't quit shown a full pistil yet
Likes
21
Share


@Budhunter
Follow
As I did the flushing in day 70 I was watching the trichomes and on day 87 I could see 25-35% amber so I decided to cut it. I cut the whole plant on the base and hang the whole plant to dry. For this reason I will update my findings later when it gets dry and trimmed about yield and numbers. So far really happy with the results. It will probably be the champs of this run yielding nicely 👍🏼.
Likes
28
Share


@Elysian_gardens710
Follow
I'm seeing some definitely fast bud growth this week. Outdoors is keeping right up with indoors. However I didnt put it in the most rich soil and had to top dress with some roots bloom booster and papa's perfect poop.
Indoors we have zero issues. The pheno is just killing it! Stinky too. Smelling like chocolate and coffee. She is the darkest in the tent. Easily.
Indoors is the untrained pheno and there is a couple dominant colas. Like pine cones. Outdoors I trained this one, and she has golf ball nugs everywhere
Likes
22
Share


@Weedbadk
Follow
Día 1 y todas germinaron súper rápido 3 días
Día 5 desde puesta en sustrato
Ya todas están arriba
Estoy solo pulverizando el sustrato
Temperatura 23c humedad 75%
Likes
Comments
Share

@all_about_420
Follow
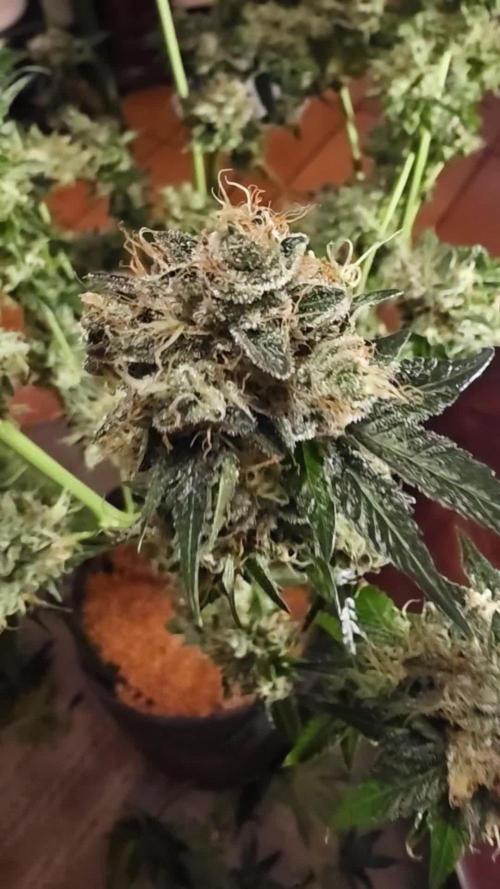
Der Moment der Ernte ist da: Die Booberry Cookies RBX hat ihren Zyklus vollendet und steht im absoluten Reifezenit. Die Blütenstände haben sich zu steinharten, extrem kompakten Nuggets entwickelt. Zwar bilden sie keine meterlangen, durchgehenden Colas, sondern präsentieren sich eher als definierte, mittelgroße Einzelknospen, dafür überzeugen sie mit einer brachialen Dichte und massiver Substanz. Die Trichomschicht ist spektakulär – ein klebriger, dichter Frostteppich bedeckt die Calyxen vollständig. Nach dem sauberen Spülen mit Flawless Finish schließt dieser Run mit einem erstklassigen visuellen wie qualitativen Ergebnis ab.


Likes
269
Share


@JohnnyBlaz3
Follow
Day 92
Day 30 Bloom
42ish days remaining.
Pour some SUGAR on meeeee.........wowzers the sugar is really starting to cake the sugar leaves now. Got tons of healthy bud sites forming and the smell is just delightful. Did another decent defoliation to keep all the buds site in the light. Keeps it nice and clean with great air flow. Speaking of air flow I added an oscillating fan to keep the air moving under the canopy better.
There is a problem forming that I'll need to take care of this week. Another purchase?? 😡 lol
De-humidifier......the humidity is very slow starting to raise. I started with 2 humidifiers on full, then 1 on full, then 1 on min for a bit then no humidifier and now its starting to raise with no humidifier so I'm gonna need to deal with this asap as it will become a very big issue in the future if I let my girls get moldy, but no chance I would let that happen! so i'll be on the search for a decent used one this week or purchase a new one unless I learn something new here, which I probably will.
A question this week too. about Harvest. mayb 2 questions. So I hear alot of tricks regarding harvest. 24-48-72 hours of darkness before harvest then cut them in the "dark" meaning dont let the bloom lights come on again before harvest. different flush times and so on. what works best for you guys?! I'm thinking 7 day flush since thats why my nute sched says and it hasnt led me astray yet. I'm considering doing a tiny mid bloom flush reccomended by a friend, i like the idea to give just pure water for 1-2 days and kind of give the plants a break from the massive ppms i'm putting them through although I might skip this step if not needed either.
2nd part of the question, if the flower time for this strain is 70-75 days, I realize I should harvest when most of the tricones are milky and some clear with very little to no amber ones. but if I flush for a week before harvest, how do I know when to start the flush, how long is my harvest time frame for maximized potency. I'm guessing with experience I'll be able to know my girls and say yup harvest is x days out but for this one not too sure.
40ish days til harvest is bittersweet, feels so long but part of me loves it, how big can/will these buds get with another 42 days!
Thanks again friends for following, this week the sugar came now I wanna see the weight really start being packed on.

