The Grow Awards 2026 🏆 


Likes
Comments
Share
@mperkins37
Follow
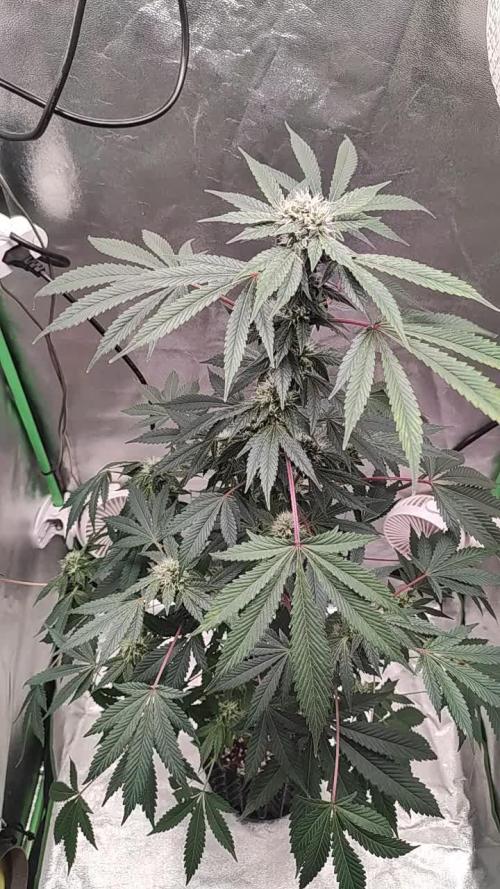
LST, HST and defoliated second time, Fimmed main 1x, fimmed all tops 14 days later, fimmed all resulting tops 3 weeks later. well over 100 tops and counting, removed all tiny branches off the mains. pre loli.. lol Ill let em up in a few days. should be well beyond the 20" circumference of the 20 gal pots. Gonn a flower 2 in the space , and 2 in my newly acquired 48x48x80 tent. Shopping a few Flowering beasts to put in for the next phase. Love to get 2x https://opticledgrowlights.com/products/slim-720s-dimmable-led-grow-light-720w-triple-dimmer-3500k-uv-ir-lh351h-v2. Oh well, we will see. HAppy growing peeps!

Likes
27
Share
@cheetah844
Follow
She's staying shorter, that's her genetics -good old NL. Very excited for the strain, the flower that I currently have is my favorite smelling strain ever. I hope this phenotype smells like that. It's one of those strains that you keep smelling over and over again, it just keeps luring me back with that beautiful smell.

Likes
72
Share
@Roberts
Follow
So, I believe the plant has russet mites. I found some eggs in another grow room. It would explain how the colas are forming. I have had russet mites a long time ago. I have not found them on this plant or any in the room. With being super tiny thus may be the reason. All I can do is rinse her off good. I don't prefer to smoke or ingest any chemicals. I will likely do the smoke report and grind the rest up for infusing. The mites would explain a lot of why it is growing strangely. I treated the walls with neem oil. Once the room is clear I will treat and clean everything good. Thank you Xpert Nutrients, Medic Grow, and Seeds Mafia. 🤜🏻🤛🏻🌱🌱🌱
Thank you grow diaries community for the 👇likes👇, follows, comments, and subscriptions on my YouTube channel👇. ❄️🌱🍻
Happy Growing 🌱🌱🌱
https://youtube.com/channel/UCAhN7yRzWLpcaRHhMIQ7X4g
Likes
8
Share
@Jalfax
Follow
➡️ Bella ragazzi la caramellina cresce e sto cercando di dare una forma circolare anche a lei.
➡️ Tra poco inizierà ad andare in pre fioritura e vedremo cosa ci farà vedere.

Likes
147
Share
@MrJones
Follow
MrJones Black Berry OG
🔹🔹🔹🔹🔹🔹GOALS🔹🔹🔹🔹🔹🔹
🌞Flowering Environment - 75/80℉ and 50% Humidity
💧 Feeding - Advanced Nutrients Bloom Regiment - Great APP!
🍃Training / Added the second trellis last week, it is doing a great job with support, SCROG process makes it hard to defoliate the plants.
🕷️ IPM - Will be using Green Cleaner" 1 OZ per Gallon, and CannControl from Mammoth alternating between product each month for Integrated Pest Management.
💡Mars Hydro LED / Veg TS-1000 / Flower 480W FC 4800, this light is just performing very well!
🔹🔹🔹🔹🔹🔹🔹🔹🔹🔹🔹🔹🔹🔹🔹🔹🔹🔹
📝 Rambling - With week 14 here, will be the last week of nutrients and will be starting with PH H20, the buds continue to get fat!
🔹🔹🔹🔹🔹🔹🔹🔹🔹🔹🔹🔹🔹🔹🔹🔹🔹🔹
▶️ Friday - 04.16.21 / Feeding 40 OZ of Advanced Nutrients
▶️ Saturday - 04.17.21/ Starting to Flush with H20 PH 6.2
▶️ Sunday - 04.18.21/Just feeding H20 PH 6.2
▶️ Monday - 04.19.21/Just feeding H20 PH 6.2
▶️ Tuesday - 04.20.21/Just feeding H20 PH 6.2, the buds are still getting fatter, they are looking amazing!
▶️ Wednesday - 04.21.21/ Just feeding H20 PH 6.2, the buds are still getting fatter, they are looking amazing!
▶️ Thursday - 04.22.21/Just feeding H20 PH 6.2, the buds are still getting fatter, they are looking amazing!🔹🔹🔹🔹🔹🔹🔹🔹🔹🔹🔹🔹🔹🔹🔹🔹🔹🔹
📜 Cultivar Information - We have created this strain by crossing the best Black Domina available with Very Berry and our own Lost Coast OG Kush, this plant produces large colas with a super intense sweet berry flavor with a sweet-smelling aroma that varies from fruit and berries to sweet candy. This lady offers tight internal stacking giving a perfect structure for those super heavy colas, which is perfect for growth both indoors and out, if grown outside she is fairly resistant to mold and powdery mildew which is a real bonus with such large colas.
🔹🔹🔹🔹🔹🔹🔹🔹🔹🔹🔹🔹🔹🔹🔹🔹🔹🔹

Likes
57
Share
@RastaMouse
Follow
Ok start of week 4 of veg. I have topped the front 2 and fim the back 2, not 100% sure if I fim the back too right or got to close and ended up topping lol will have too see. They have responded well to it though. I done it on sat and today (Monday) they already starting to bush more. Will do a defoliate this weekend to get rid of some of the big ass fan leafs but so far all seems to be going great. Happy growing to you all 😁🍻

Likes
18
Share
@valiotoro
Follow
Hello everyone 😎
Day 30
she grew fast with a great structure and with a beautiful green colour on the leaves.
Homemade bloom power for nice buds
Have a great day 👨🌾🏻

Likes
229
Share
@OrganicNature420
Follow
Germination date 🌱 12/07/2021
Day 50 02/09/2021
Strain 🍁 SinCity seeds Frosted Biscotti
(Biscotti Sundae x Whitenightmare)
THC% • Unknown
💡 Mars Hydro FC4800
• Power draw 480W + 5%
• Max coverage 5 x 5
• LED 2070pcsSamsungLM30B1&Osram660nm
• Max Yield 2.5g / watt
• Noise level 0 DB
• Removable Driver +2m cable
• Daisy chain (multiple lights)
https://marshydroled.co.uk/products/mars-hydro-fc-4800-led-grow-light-samsunglm301b-commercial-greenhouse-medical-indoor-kit 🇬🇧
https://www.mars-hydro.com/buy-fc-4800-480w-4x4-energy-saving-full-spectrum-commercial-led-grow-light-mars-hydro-for-sale 🇺🇸
PROMO CODE • (ORG420) DISCOUNT 👍🏻 marshydroled.com
⛺ Mars Hydro 120 x 120 x 200cm
📤📥 AC infinity 6inch
💧 10lt dehumidifier
❄️ 3.1kw air con system
💉 Nutrients GreenBuzzLiquids
Organic Grow Liquid • 1-4ml until 2wk flower
Organic Bloom Liquid • 2-4ml flower stage
Organic More PK • 2-4ml +wk3 of flower
Organic Calmag • 1-2ml/lt whole grow
Fast Plants Spray • first 3days at night lights off
More Roots • 2-5ml veg +2wks flower
Fast Buds • 5ml +wk2 of veg until 1wk flower
Humic Acid Plus • 2-5ml whole grow
Growzyme • 2-5ml whole grow
Big Fruits • 2-5ml flower stage
Clean Fruits • 5ml flush 1wk
Ph powder
Root Gel
Living Organics
https://greenbuzzliquids.com/
PROMO CODE • organicnature420 15% off ✌️🏼
🥥 Growing Media • Coco Coir
Notes 📝
Plants have had a trim up. Not done a full job but all the undergrowth has gone. Given them a top feed of wormcastings as they are now on flower. Look forward to results with both Mars Hydro and GreenBuzzLiquids 💡💚 really can't fault these company's 🙌🏻
Happy growing fam ❤️🌱🍁👍🏻
Discount codes in bio for Mars and GreenBuzzLiquids 👍🏻

Likes
13
Share
@Andres
Follow
a plant very resistant to everything highly recommended...uff .... a knock out plant an earthy taste and pine ... with a dense smoke ...... and of compact and abundant buds ... a 4x4 all-terrain plant ... 100% recommendable ... with their healthy roots....00

Likes
7
Share
@Nikkov
Follow
Well, another week has passed and the end of the second week has come and the pistils have already shown themselves and I continue watering with top crop bloom, first time testing this fertilizer and I'm only using two of them, top veg and top bloom, next cycle I'm going to use General Hydroponics fertilizers because I have a friend who uses them and he's having great results, I still want to talk to my friends about this strain because I think it hasn't grown as it should, but anyway we're studying to improve ourselves for the next ones, the rest is all experience for the next ones it grows. =D
Likes
48
Share
@TheCannaProphet
Follow
~ WEDDING CHEESECAKE FAST FLOWER by FastBuds ~
Well fam, here we go again with another epic strain from FastBuds Fast Flowering stable. After having such tremendous success growing their Gorilla Cookies Fast Flower outdoors last year, I've decided to run another of their fast flowering strains outdoors this year... Wedding Cheesecake Fast Flower!
The best description of this awesome cultivar comes directly from my friends at FastBuds which is as follows:
"A delight for the mind and body: Wedding Cheesecake FF (Fast-Flowering) is a delicious strain that offers XXL yields in a 7-8 weeks flowering cycle. This terpene powerhouse produces loads and loads of mouth-watering vanilla-creamy-cookie-scented terps with hints of citrus and cinnamon. In addition to its delicious aromas, this variety grows very well in both indoor and outdoor setups, yielding up to 650 g/m2 without extra maintenance, making it the ideal strain for beginners as it allows you to maximize yields while minimizing work. This super-fast feminized photoperiod version offers upbeat and energetic yet deeply relaxing effects that are perfect for consumers looking for a heavily focused, motivating, and creative high. It’s the ideal strain for those needing that extra energy boost to start a busy day on the right foot.
Wedding Cheesecake FF boasts chunky, large-sized buds with a thick layer of silvery-white resin and bright orange hairs scattered all over: that just screams ‘quality’. The lime-green flowers sparkle with an array of hues ranging from dark to light green, to magenta and purple, and reek of a delicious aroma that’ll remind you of fresh store-bought cheesecake.
This is an XXL hybrid that grows extremely tall in height, reaching up to 3m with one huge main cola and multiple long side branches that can withstand enormous yields of up to 650 g/m2 with ease. Wedding Cheesecake FF is extremely resilient to the elements and can be grown in almost every climate as long as you’ve got the space and basics covered, making her an excellent choice for those looking for large-scale harvests with a quick turnaround time without much effort."
________________________________________________________________________________________________________________________________________________________________________________________________________________________________________________________________________________________________________________________
The Setup:
This is going to be an outdoor grow, but I have started the Wedding Cheesecake FF indoors as our weather is still too cold to put her outside (nighttime temp's dipping regularly into the 30's℉).
The plan is simple... let her grow inside under a 19/5 light schedule until the nighttime temperatures stay above the mid 40's℉, at which point she'll be moved outside and transplanted into the soil which I have already setup and inoculated with beneficial microbes, and then let the fun begin!🤪💚
________________________________________________________________________________________________________________________________________________________________________________________________________________________________________________________________________________________________________________________
Weekly Updates:
7/20- Sixteen weeks in veg! This huge Wedding Cheesecake Fast Flower by FastBuds has gone crazy and stretched over a foot in a week. There's still no sign of pre-flowering yet but I'm sure it won't be long now as our days are slowly becoming shorter with fall on its way.
It rained all day today, so I skipped watering at all today as the ground got well saturated.
7/22- Our weather continues to be really hot with daytime temp's in the upper 90's Fahrenheit. If it does not rain I am watering everyday with 10g of well water.
7/24- The daily watering routine for the FastBuds Wedding Cheesecake FF continues with 10g of straight well water from the garden hose given at sundown daily with the exception of when we get substantial rain.
7/26- Well there's another week of vegetative growth for the Wedding Cheesecake Fast Flower and, hopefully, she'll be tranitioning into flowering in the next week or two and then thing will be getting a lot more interesting for sure!
Thank you for checking out my diary, your positive comments and support make it all worthwhile! 💚Growers Love!💚😎🙏
Likes
21
Share
@indoorontario
Follow
She's really showing those burn marks from a couple of weeks ago now and is looking pretty well aged because of it. It's unfortunate but she's still fine even though I'm sure she would be absolutely beautiful if I hadn't have burned her. The buds look great and very frosty at this point, some are cloudy now and I'm sure it will only be another week or two before she is done. I will start flushing very soon more than likely.
Likes
66
Share
@Neo09
Follow
Last two days is Just too hot... 30,9 °C. Clima works so much as possible. As you can see, we still have problems with some deficite i think - Just take a Look on leafs.. But! I still happy 😎🤙👽


Likes
21
Share
@ChristianGrower
Follow
Herzlich Willkommen in der Wachstumsphase 🌿
Genau eine Woche nach der Auslieferung! Aus den gelieferten Samen sind nun schon kleine Mini-Pflanzen geworden 🙂
Report Tag 8 :
Ein herzliches Hallo an euch,
wir sind bei Tag 8 des Diaries und bei Tag 1 der Wachstumsphase.
Die Pflanzen haben folgende Größen:
- Z-UP Auto 4,5 cm , Frostbanger Auto 5 cm und die Purple Haze hat auch eine Höhe von 4,5 cm.
Die Beleuchtungsdauer beträgt jetzt 18 Stunden Licht zu 6 Stunden Dunkelheit.
Die Beleuchtungsstärke wurde von 20% auf 40% erhöht.
In diesem Stadium der Pflanzen habe ich so gut wie nichts zu tun, außer euch mit Fotos auf dem Laufenden zu halten.
Tschüß und bis morgen.
Report Tag 9 :
Hey, zusammen!
Tag 2 in der Wachstumsphase 🌿
Die kleinen machen sich gut und sind alle jeweils um 0,5 cm gewachsen.
Frostbanger Auto 5,5 cm.
Z-UP Auto 5 cm.
Purple Haze Auto 5 cm.
Die Beleuchtungsstärke wieder etwas erhöht und zwar von 40% Leistung auf 60% Leistung.
(Keine Sorge es ist die SANlight STIXX 50 Watt)
Bye, bis morgen 👋🏼
Report Tag 10 :
Hi, Miteinander! Wachstumstag Nr. 3 🌿
Leider hatte ich heute einen etwas stressigen Tag und habe somit vergessen Fotos vom Vermessen zu machen. Entschuldigt dies bitte 🙏🏼
Die Pflänzchen wachsen parallel wie die vergangenen Tage. Jeden Tag 0,5 cm.
Frostbanger Auto 6 cm
Z-UP Auto 5,5 cm
Purple Haze Auto 5,5 cm
Nach wie vor nichts zu tun.
Kein Gießen in der ersten Woche, damit die Wurzeln sich auf die Suche nach Wasser machen.
Melde mich morgen zurück.
Report Tag 11 :
Tag 4 des Wachstums 🌿
Hallo Allerseits,
heute war der Tag entspannter und ich habe heute nicht vergessen Fotos vom Vermessen zu machen 😃
Die kleinen machen sich weiterhin gut und wachsen kontinuierlich in 24 Std um 0,5 cm.
Dadruch ergeben sich nun folgende Größen bei den Mädels :
Frostbanger Auto : 6,5 cm
Z-UP Auto : 6 cm
Purple Haze Auto : 5,9 cm
In der ersten Woche zu gießen gehörte nicht zu meinem Plan. Doch da ich in den Kommentaren einen Ratschlag von Bio Tabs erhalten habe, entschloss ich mich heute, die drei Mädels mit etwas chlorfreien Wasser zu gießen.
Dazu bekamen die drei Mädels heute noch eine Dusche mit dem Bio Tabs Boom Boom Spray wie vom Hersteller angeben 5 ml auf einem Liter chlorfreien Wasser. Da ich für die kleinen keinen ganzen Liter benötige, habe ich 1 ml auf 200 ml chlorfreien Wasser gegeben.
Um die kleinen nicht zu verbrennen habe ich nochmals die Leistung der SANlight STIXX 50 von 60% auf 40% gedimmt.
Wünsche euch ein frohes und schönes Wochenende 💚
Report Tag 12 :
Wachstumsphase Tag 5 🌿
Hey und ich wünsche euch einen schönen Samstag,
Am liebsten Tag ruhte Gott von seinen Werken und auch ich habe Samstags meinen Ruhetag.
Die Leistung der Lampe von den gedimmten 40% Leistung aufgrund des Besprühens wieder auf 80% Leistung erhöht, da keine Verbrennungsgefahr mehr besteht.
Höhe der Pflanzen :
Frostbanger Auto : 6,5 cm (unverändert)
Z-UP Auto : 8 cm (hat das Licht gesucht)
Purple Haze Auto: 6,5 cm (wieder 0,5 cm)
Bis morgen 👋🏼
Report Tag 13 :
Wachstumstag No.6 🌿
Grüß Gott!
So langsam geht die erste Woche der Wachstumsphase um.
Und auch die Zeit im Haus des Wachstums neigt sich dem Ende.
Die Mädels müssen dort zwar noch nicht heraus, doch möchte ich, dass jede Pflanze auch von Anfang an ihr volles Potenzial entwickeln kann.
Die Mädels wachsen täglich weiter.
Und haben nun folgende Größen :
Frostbanger Auto : 7 cm
Z-UP Auto : 9 cm
Purple Haze : 7 cm
Um nicht in eine Nährstoff Not zu kommen, habe ich heute auch die organischen Düngetabletten dem Substrat hinzugefügt.
Dazu habe ich jeweils 2 Tabletten pro 18 Liter Topf genommen und sie mittig, jeweils links und rechts zwischen Rand und Stamm 10 cm Tief ins Substrat gesteckt. Die betroffenen Stellen im Substrat habe ich dann nochmal ganz leicht angegossen damit sich die ersten Nährstoffe so langsam freisetzen können und der Pflanze zur Verfügung stehen.
Zusammengefasst: Fotografiert, gemessen, Bio Tabs hinzugefügt, gegossen und zu guter Letzt hier den Bericht geschrieben.
Das war's auch schon wieder.
Report Tag 14 :
Herzlich Willkommen zum letzten Tag der ersten Wachstumswoche. Tag 7 der Wachstumsphase 🌿
Heute schließen die drei Mädels die erste Woche des Wachstums ab.
Ich kann mich bisher nicht wirklich beklagen, alle wachsen ohne Probleme.
Größen der Mädels:
Frostbanger Auto 7,5 cm
Z-UP Auto 9 cm
Purple Haze Auto 8 cm
Und da die Mädchen so artig waren, dürfen sie auch heute schon ins White Castle einziehen.
Die Homebox Ambiente war ja schon gereinigt und desinfiziert, doch um nochmal sicher zu gehen, habe ich nochmals das Zelt mit Desinfektionsmittel behandelt.
Die drei Mädels geschnappt und sie in ihr neues Zuhause geführt.
Jedes Pflänzchen hat sich sofort ihren Platz ausgesucht.
Ich habe dann für die passende Beleuchtung gesorgt und die Maxibright DAYLIGHT 300 Watt
auf 25% Leistung gestellt. Bei einem Abstand von 45cm machen das 270 PPFD Mikromol/m²/sek.
Die Abluft auf das Minimum eingestellt um die Luftfeuchtigkeit bei 70% halten zu können.
Umluftventilator von TroTec auf niedrigste Stufe eingestellt, 360⁰ Funktion eingeschaltet und auch auf und abbewegungen eingestellt, damit die Luft im Zelt zirkuliert wird.
Viel Spaß im neuen Zuhause Mädels 🎉🏰💚
Damit verabschiede ich mich aus Woche 1 des Wachstums. Wir sehen uns in Woche 2 👋🏼
Ich wünsche allen Gärtnern ein gesegnetes Growen möge der Herr euch mit reichlich Früchten segnen. Amen. 🙏🏼
Processing
Likes
7
Share
@Mrg7667
Follow
(Week 36) installed another oscillating fan to dry up top soil faster. Started getting allot of knats also realized that vacummingnuo my stagnant water is definitely the way to go.
Finally feel like im getting back to normal!

Likes
16
Share
@GRow_M8s
Follow
* All plants had one feed last week with some PK soluble ( SODK one more feed this week). The rest of waterings are tap water with some microorganisms in.
* No new deficiencies spotted (except stomper#1 & 2 from last week), PK gives us the last boost.
* Buds progressing well with a lot of crystals, smells are medium and so glad about that, promising though after curing properly.
* Lights at 35k - 40k Lux.
* humidity 45% - 60%, temps 20C° - 25C°.
* D53 --> Fixing the canopy with a bit more aggressive LST to all the plants, except the main stem of stomper #3 (the stressed one).
* D56 -> Final day of week 8 and the most mature plant is the stomper#1 (the plant with the early LST and most affected by N toxicity in early stage.
- Trichomes are looking like 10 days before harvest, letting the other 5 plants enjoy more light.
Week 8 --> finished ✅

Likes
67
Share
@Only4passion
Follow
Crazy smells i already smoke 💨 this strains so I know what to expect from those buds and they are getting bigger👌😋

Processing
Likes
225
Share
@The_Projexx
Follow
So we are now in week 5 of veg !!! 4 weeks left until I flip the lights ! Everything is going well they have grown exponentially in 1 week !! <3 <3 I can deff tell the structure will be much different then the Obi's . They've seem to have adapted well to their new homes and are loving every minute of it! Gonna be topping these young ladies in the very near future !
I'd like to thank everyone for their support so far you guys have been awesome .Stay tuned and remember folks check my diaries daily for updates ! <3 <3
-Happy Growing!

Likes
13
Share
@raulmoat123
Follow
The girls are getting on fine week 4 flower
Strawberry banana are packing on loads and loads on weight
Slurricane wow just wow
Dolato is slightly slower but smells amazing
Wedding cake is limited edition Black Friday from seedsman is the most gas weed I have ever grown just amazing
Larry bird kush doing wonderful
I will take a proper picture and video of the girls when I have time out of the tent


Likes
49
Share
@masterofsmeagol
Follow
5/24 Woke up on payday to find that my father is in the hospital. My house was robbed a few days before so I guess the hits keep coming. The plants are doing good though. I'm glad I kept them in as we had a frost last night. I moved my cage yesterday onto the asphalt and put the big pallet in. I just need to sanitize the others before they go in the cage. I'm being super cautious. I think tomorrow will be the day I make the switch to the garage while they fill out these 3's.OK.
5/25 Plants were all moved to the garage with the door open for indirect light. It's 54 degrees. At night I'll pull them back in and give them a few more hours under the hps which will also help with heat. Knocked a stem sideways but it'll pop back. Feels good to get things moving. HST seems to being going good.
UPDATE: Went back over at one and noticed that the plant I hit with a wire (or something I didn't see what happened) was almost sideways and really loose. I had tied it to a clip with flagging. That didn't work. I asked a friend and I ended up pinching off the first true leaves then mounded happy drug up around it to keep it upright. It LOOKS much happier. Of course that shit happens to your biggest healthiest plants. Oh well all the 10th planet are doing phenomenal. Can't wait to move these girls to there final homes. Plants went under lights at seven. I'm acclimenting them to the right light schedule. I don't want to jump from 18/6 to 15 hours. They did really good in the cold Temps and wind. The big one I had to fix looks like it's doing great. Once they are hardened and fill these pots they go in their final home.
5/26 Plants did great being in direct sunlight for a few hours and staying in the garage at night. They look super healthy. I'm planning on watering tomorrow. Wondering if I should start to add some silica to strengthen the stalks. Also wondering if I should add more soil to some of the pots like I did to the other one as the stretched a little. This is something I may do tomorrow before I water.
Went back over to switch the lights on and pull the plants back and lock up at 7:30. Forgot my phone of course and these girls were looking amazing. I have to water tomorrow. I coukd add more soul to some of the pots but I'm reluctant due to stem rot. They'll get buried much deeper in there final homes. Don't want to mount up soil and then water and promote rot. Anyway plants are adapting amazing. Dialing the light closer to normal here. This is a great transition place for them to he. I've noticed a few wrinkled leaves but thats to be expected. Oh, I got my free pure Michigan seeds from premium cultivars!!!
5/27 WATERED EVERYTHING TODAY WITH HALF A Powerade BOTTLE APPROX. 16OZ. Plants are in direct light in the mornings and I haven't seem any burning yet. I noticed a small spot on one of the first true leaves but I think it's just a bite from an insect. Everything is green as hell. I'm wondering if I should add fresh soil to the pots but I didn't want to do it on a watering day. Plus the plants will be going in there final homes shortly. Very happy with progress this far.
UPDATE Went over at 1230 and everything looked great. I sanitized the cage AND the pallets. Also bought 3 more 30 gallon grow bags. Once they go in there they will explode! I can't wait. I'm considering ordering netting for moths. Depending on price i might get some. If not I'll keep using the BT.
UPDATE: Went and checked around 430. Temps were in the 70's and they had a few hours of direct sun. No burns evident as of yet. Pallets fit in the cage like puzzle pieces. Now I need to sanitize my grade stakes bamboo and trellis and setthat stuff up. I'm going to screw the grade stakes to the pallets and attach garden rods and bamboo with zip ties and I'll have a horizontal trellis. Once branches are a little bigger I'll begin LST. The plants that I topped AND the ones I FIMed are doing great. The FIMed ones with at least three colas some have four. Hoping the plants took that time growing roots.
5/28 Plants are all standing up tall. They loved that water. Haven't noticed any burns and they get direct sunlight in the mornings. Soon I can put them in the cage and start setting up my trellis and supports. Fan leaves on soms are bigger than my hands. These girls are probably the healthiest plants I've grown. I usually do clones and end up starting with problems. This is great starting with seeds and have no problems.
UPDATE: Went back around two because Temps had reached 92f and rh was only 20%. Nights cool off greatly so it's a dramatic temperature shift. Plants looked great. All standing up looking great. Put plants in at 7:30 ,and continue the light until 9 and have it turn on at 4am. Then they are out by sunrise. Did notice some burning on one of my plants a large fan leaf. What can I say? It was extremely hot. I'm surprised they did as well as they did.
5/29 Everything standing up perfectly looking great. Plantscget an extra hour of sun at night and morning and are on 19/7 with the extra added light. Trying to acclimate and finish hardening off this week. I'd love to be able to at least put them in full sunlight for the day. I think they'd be fine. I'm really impressed with how they are growing. Second guessing not HST all of them. However I think I might light dep a couple. We'll see. I've still got work to do.
UPDATE: put the plants in around 7. One of my lights shit the bed. They are just 150 watt hps but I was using them to finish hardening off my plants and slowly adjust them to the natural light. The on/off switch fell off. I'm sure my cousin can fix it bit the one is pe9bably fine as I'm only going fir a few more days. The thing about having this many plants to choose from is that I can pheno hunt and put the VERY best into the final containers and if I decide too I could light dep.
5/30 WATERED EVERYTHING TODAY WITH HALF A POWERADE BOTTLE. My cousin can probably fix the other light but I don't think it will matter. Within a week I'm going to have these girls in their final homes. I just need to sanitize the trellis and posts and then screw them to the pallets. I'll have this all taken care of before the plants go in the hole. I did notice another burn on a leaf. Def glad I'm taking the time to do this right.
UPDATE: I put the girls in the barn around 7:30 and flicked the one 150 watt HPS light I have working on. I added a half hour more of darkness to try to acclimate them quicker. Light stays on until 9 qnd came back on at four but i changed it to 4:30. I'm usually there by 5. I'm looking through my surveillance cameras and it doesn't even look like the light is on. Of course its super bright out but I should be able to see from that image. Luckily the building the go in has massive windows up top to let light in and windows on every side so the light is probably unnecessary. However due to my bullshit luck last year I'm being as cautious as I can. Tomorrow is supposed to be extremely hot again as is the next day. I think I'll leave the door down a little, open the other and move the plants back so they have no direct sunlight and adding a fan. That way they can continue to recover. They seem bigger everything I see them.
5/31 Another hot day. I figure a few more days (under a week) and I can transplant these girls! Supposed to be 85 today and 90 tomm. It was 45 when I got here. These girls are doing well handling this bipolar weather.
UPDATE: IM AN IDIOT AND THIS IS AN 8 DAY WEEK lol. Maybe I'll do a six day week next time to get back on track. Went back over at two and noticed some burns. Sent a video to a friend andcwith the sun we've had and the weather in the 90's he agreed the damage was minimal. However there was someone there working who opened more doors which let a lot more light in. It's supposed to be in the 90s tomorrow too. I may leave the doors shut. There are windows on everyside and an enormous cone at the top so the get plenty of sun. He also grows and I've been careful to not let anyone that grows go around my plants. I'm going to have to talk with family about this. To be honest I'm kinda pissed. Next watering I may add some kelp me kelp you and start a small nute regimen.
UPDATE Went back over at seven after having a panic attack. Half stoned half asleep. Stupidly I was looking at a plant and thought "shit" the FIM must not have took but in reality I was just stoned and tired so I topped a plant that had already been fimmed so we'll see how that goes. Purple punch is so far behind everything else it's not even funny. There might be one that's doing pretty well and that of course is the one with no HST. Branches on the other strains are thick and ready for LST though. What I think I'll do is transplant the 10th planets and the blueberry cheese ones that are ready and hold off on the rest for a while. Hopfully I'll be able to show plants in final homes next week.