
Likes
Comments
Share


@Medgrow93
Follow
Had mold at the very end so ended chopping then down early. Delicious smell. Smells like vomit or piss and gets stronger as they continue to cure.

Likes
23
Share


@Piorkeed
Follow
Week 6 (20/94 - 26/04)
D36: -
D37: 0.8 liter of tap water.
D38: -
D39: -
D40: -
D41: 0.5 ml of Calmag, 1.5 ml of Bio-grow, 2 ml of Bio-bloom into 1 liter of tap water @ pH 6.3. Out four days for vacation, during these days the plant stretched a lot and start showing some orange spots on lower leaves. Moreover, there are first signs of flower.
D42: -

Likes
5
Share


@Plants_of_tayoat
Follow
The happiest day of planting is coming soon. That’s my first grow. I have never experienced before this time. I did it 😎. i made flushing at 26.1.2023. Chopping is coming next week.

Likes
46
Share


@eldruida_lamota
Follow
Vamos familia que ya actualizamos la cosecha de estas Candy Rain de Zamnesia, para el concurso POWER BUDS Plagron x Zamnesia CONTEST.
Ya era hora de cosechar, estoy bastante contento con los resultados.
Vaya flores que se han marcado repletas de tricomas, y las flores se marcan aromas dulces y afrutados.
Es una variedad bastante fácil de cultivar y muy resistente, crecieron desde el principio bien vigorosas, sin problemas y al final de todo recompensó.
Las condiciones ambiéntales han sido máximas en 25 y mínimas en 20 y una humedad estable en torno al 36% al final de floración y en el secado.
Os comento que tengo un descuento y para que compréis en la web de Zamnesia de un 20%, el código es ZAMMIGD2023
The discount 20% and the code is ZAMMIGD2023
https://www.zamnesia.com/
Espero que disfruteis este diario, buenos humos 💨💨

Likes
34
Share


@ertaverd
Follow
Tuve plagas de Araña roja y de Mosca blanca, he fumigado 2 veces y parece que esta solucionado. Los cortes Apical y FIM van creciendo correctamente.

Likes
8
Share


@Darkside419
Follow
First time growing indoors so this trellis net or scrog thing really isn’t for me any suggestions? Do I put up second net?

Likes
3
Share


@TS_Greens23
Follow
This plant is showing me everything I want to see ,,when it comes to LST,,,really healthy specimen,,branches popping out of everywhere,,!👌
Have been giving her a foliar feed,,with some Australian made kelp extract solution,,watered down,,,,I find it really gives the girls a good kickstart,,and acts like an antibiotic for the plant in its early stages,,👍💚💚
Likes
1
Share


@Cannabis_Therapy
Follow
Planted seeds June 12th at 12:26am. While germinating the seeds and during the night time I will be keeping them all in a 2x2x5 grow tent under three 2 foot T5 bulbs to maintain a 24 hour light cycle. I am also using a seedling heat mat to raise the root zone temperature, along with creating a humid environment.
Three seeds are visible from peat pellets June 14th at 8am.
Last seed is visible through medium at 5pm.
All plants sprouted with cotyledon leaves June 15th at 11am.
Transplanted all the plants into 5 gallon fabric pots with pre-amended medium at June 17th. Three plants have first leaves forming, while one seems to be a little behind. Gave a light watering, along with heavy misting on the soil.
Last plants first leaves started forming June 18 at 7pm. All plants are progressing well with minimal stretching.
All 4 plants have their 2nd set of leaves starting to grow June 20th at 12pm. Put outside right at 12pm, then brought them inside at 9:30pm.
Put outside June 21st at 1pm
Watered them lightly twice with several hour gap in between. All leaves are praying up and all growth is progressing. Put inside at 11pm.

Likes
34
Share


@Fronti89
Follow
Ala Erstes muss ich mich für die Bilder entschuldigen...Mein Handy ist leider defekt und das Ersatz Handy bringt nich so gute Bilder hervor ! Blüte hat richtig gut eingesetzt ,hab Heute ein Paar Blätter geschnitten und ein Paar nach unten bzw. nach innen gebogen weil sie so extrem Buschig sind und ich befürchtete das die neuen Triebe bzw. Blüten nicht genug Licht abbekommen . Die 1 kleinere Pflanze hinten Rechts hab ich leicht erhöht das sie mit den anderen 3 gleich auf ist "unterschied 9 cm" ! Das Netz wird nur zur Stabilisierung der Pflanzen genutzt und gedüngt wird jetzt mit Biobizz :
Grow 1,5ml pro Woche (Montag 0,75 & Samstag 0,75 pro Pflanze )
Bloom 2ml pro Woche (Montag 1ml & Samstag 1ml pro Pflanze )
Top Max 1ml pro Woche (Montag 0,5 ml & Samstag 0,5 ml pro Pflanze)


Likes
9
Share


@Kushizlez
Follow
Black Garlic #1
Yield: 53.6
Smell: 8/10 - gassy, piney, earthy, skunky
Bag appeal: 7/10 - slightly leafy/stemy
Crystal coverage: 7.5/10 - very impressed
Ash: 8/10 - thick, uniform white ash
Fire holding: 7.510 - stays lit for 45+ sec
Smoke: 7.5/10 - taste is good until the end
High: 7/10 - sativa dom
Comment: looks nice, smells nice, tastes nice, burns great but quite leafy.
52.5/70 = 75% 👍🔥
Black Garlic #2
Yield: 42.3
Smell: 7/10 - woody, earthy, tea
Bag appeal: 6.5/10 - slightly leafy/stemy
Crystal coverage: 7/10 - impressed
Ash: 6/10 - flaky, mostly white/grey
Fire holding: 4/10 - stays lit for 10-30 seconds
Smoke: 6/10 - taste is decent, needs curing
High: 8/10 - sativa dom
Comment: looks nice, smells nice, tastes nice, burns like shit.
44.5/70 = 63% 👎🗑️

Likes
4
Share


@AestheticGenetix
Follow
6/13/25 everything is coming along smoothly for the Divine Rapier autos. I had to pick a seed shell off of the more scraggly looking one but they’re green and happy In their environment except for the weird one that had the cotyledon leaves come out the seed before the tap root. Her tap root started to grow up out of the soil and that made me think that maybe I was wrong so I tried to bury her slightly so that maybe she’d figure it out for herself. She doesn’t seem to be so I may need to pop the 3rd seed
Stay tuned for what comes next. Also check out my X account and YouTube for any extras that I can’t post here. I have a full seed planting video on YouTube of these strains, that is too Long to post on here.

Likes
16
Share


@DaddyPrime2
Follow
Defoliated and flipped to 12/12
Slight stretch.
Plants didn’t like that I only gave them half veg nutes and half bloom. They look nitrogen deficient. They’ve also shown some calcium deficiency i believe. The uprising foundation is cal mag and sulfur mostly I believe. So it’s good to have

Likes
43
Share


@The_Good_Twin
Follow
09 May 2021
Today starts the 15th week of my grow, and the 6th week of flower. Just over a month till the scheduled harvest, and today the nutrient amounts change according to my feeding chart. So today feeding went like this: CALiMAGic 5ml, FloraMicro 7.5ml, FloraBloom 15ml. Today we aren’t using any of the FloraGro, and won’t be for the rest of the grow. I chilled the water again, but not as long this time and the temperature of the solution was 56.3 degrees F. I thought it odd that the website doesn’t allow for entries lower than 50 degrees in that block, but oh well. The initial pH was 5.89, and I added pH UP 2.5ml which adjusted the pH to 6.53. The runoff pH was 5.63. Lower than I want, but still within range for a healthy plant. Temperature in the tent was 81 degrees F, and humidity was at 53%. The plant looks great, and is maturing quite nicely.
11 May 2021
Today was a busy day! My DarkStar Kush is doing very well! The smell is starting to get stronger and the buds are fattening up as well. I’ve noticed some mild nutrient burn on some of my leaf tips, but nothing terrible. I’ll keep an eye on it to make sure that they don’t get worse. I haven’t really made any adjustments to the nutrients lately with the exception of increasing the FloraBloom by 2.5ml’s, and stopped using the FloraGro in accordance with my feed chart. Feeding today went as follows: CALiMAGic 5ml, FloraMicro 7.5ml, and FloraBloom at 15ml. The initial pH was 5.85, so I added 3ml of pH UP to increase the pH to 6.52. The runoff pH was 5.65. I finally received my TDS meter today, so the TDS reading was 1070 ppm. My feed chart says that the ppm range in looking for is 1050-1400 ppm, so 1070 puts me in that range. I chilled the water again today, and it was 46 degrees F. The temperature in the grow tent was 81 degrees F, and humidity was 40%. So far so good, and I’m starting two new diaries today for some clones I was gifted by Buddabud, so check them out.
13 May 2021
Just when I thought I was on cruise control with my baby here, she throws me a slow curve. The question is; will I hit it, or miss it? The light nutrient burn that I noticed in my last entry on the 11th has gotten just a small tad worse, but nothing terrible. I believe it’s not from the feeding, but the build up of nutrients in the soil. I finally got my TDS monitor as I noted the other day, so I tested the ppm in the runoff and it was over 4000. Then, as I was shaking the excess water off the end, the end cap for the battery came off and the whole monitor plunged back into the water completely submerging for a moment before I could get a hand free to grab it. It’s been sitting in a bowl of rice since yesterday. I just hope it dries out and keeps working. I need to see what the TDS of the soil at this stage is supposed to be and then either keep going and damn the burn, or maybe feed with pH’ed plain water for a feeding or two and then see how it reacts. I’m still deciding, but will research first before making my decision. For today I kept to the feed chart. I gave the following: CALiMAGic 5ml, FloraMicro 7.5ml, and FloraBloom 15ml. The initial pH was 5.92, so I added 2.5ml of pH UP which raised the pH to 6.47. That is what I fed the plant. The TDS reading of the feed solution was 1036 ppm. Runoff pH was 5.63. Tent temperature was 79 degrees F, and humidity was 40%. I have just about 4 weeks left in this grow till the scheduled harvest.
15 May 2021
Today is the last day of the 6th week of flower, and I’m going to try and arrest my mild nutrient burn on my baby. I’ve decided to just give water and CALiMAGic today properly pH’ed to see if it does anything to improve the situation. I wanted to have a significant amount of runoff today so I fed 1.5 gallons of water with 7.5ml of CALiMAGic. The initial pH was 7.60, but adding the pH DOWN is much different than adding pH UP! I initially added just 0.5ml to the gallon of water which lowered the pH from 7.60 to 4.9. I was like, “DAMN!” 😳 so I had to pour it all out and start over again. I learned through research never to mix pH UP and DOWN in the same solution. If it’s wrong, you need to start over;!so I did. After 3 tries and lots of wasted CALiMAGic, I finally got it right by only adding 5 drops (gtts) of pH DOWN to get it to 6.64. The TDS meter dried out and still works, so the TDS going in was only 403ppm. Like I said, I wanted a lot of runoff to try and clear out some of the nutrient buildup in the soil. The runoff pH was 5.58, and runoff TDS was 3803 ppm. Daytime temp was high today at 86 degrees F, and humidity was 31%. She looks good. She smells good. I hope she stays good! A few weeks left till harvest!

Likes
14
Share


@Weedig_Weedigson
Follow
Es geht in Woche 4. So langsam nimmt man das Strawberry in dem Cookie wahr. 😊

Likes
Comments
Share


@Pablo_420
Follow
Muy contento con los resultados y estás es una de ellas las demás increíbles también

Likes
20
Share


@Justa_Retard
Follow
Day 15 update;
Morning;
Was definitely a mistake to cut the leaves already.. I let the leaves stay on one of the 3 plants I have, and after it got repotted yesterday, growth have taken off completely.. It's 3 days younger than this one, and almost twice the size, having set the second set of leaves on the sidestems already. I'll add some fertilizer today, to the 2nd one I cut leaves on, and see how it goes, and then decide tomorrow if the other two will get some then or if waiting a few extra days is best.
- It's looking incredibly healthy tho, for a plant that lost a bunch of it's roots yesterday.. It's hugging the light from the lamp with the rest of its leaves, even more than before. So hoping I didn't set growth back too much.
- Added a video of the setup. It's nothing fancy, but should work nicely.
Night;
Still really healthy looking, and still hugging the light with pretty much every leaf, even the ones sprouting on the side have begun to do so.. Seems like it's starting to grow a little again as well, not much, but definitely a start to getting back on track.
Day 16 update;
She's definitely begun to grow again. Hopefully she'll catch up to the other two pretty fast.
Day 17 update;
There reqlly ian't much to say today. I think she's picking up the pace for growth, bit can't be too sure..
Day 18 update;
There's no doubt that she's back to growing nicely again. She might even have a healthier green colour than before.
Day 19 update;
Morning;
Pretty sure she's showing signs of the beginning of sexing this morning. A little earlier than I'd hoped, especially with the setbacks she's had. But she still got time to grow before flowering, so hopefully not a problem now that she's back on track.
Evening;
She popped a few hairs during the day.. I tried taking some better pictures, but damn phone camera just won't focus when getting closer than what I've uploaded, so I underlined the hairs slightly.. They hard to aee in the pic tho, but they're there.
Night;
She's set another couple of hairs at the top, they're very tiny tho and I still can't get a good picture.
Growth is definitely progressing faster.
Day 20 update;
She's had a productive day. Definitely preparing to flower within the next week or so. Hairs should be pretty noticable on the top-down pic this time around, the way it looks close up, it could be suspected that she was already flowering.
Day 21 update;
Not quite flowering yet, but definitely very close from the looks of her top.. another couple of days, and she'll be there.
Likes
4
Share


@weed_gastro
Follow
day 42: LOTTA leaves, had to defoliate 2-3 times.
they started to show their first pistils a couple days before the Ayahuascas, hope I can do a harvest before May,(the Peyotes) but it seems really tricky..unfortunately I need to leave them for a week in April. I'm pretty scared to leave them alone at the end of flowering...
Day 43: do you think the leaves on 2 plants might be too dark green? Thanks!
day 46: defoliating

Likes
18
Share


@TheGreenLeopard
Follow
Starting to take shape and smell😂 was able to take a fastbuds down this week to help the ramp into harvest. 😂😂 gréât strains - spring is here - on Twitter now @greenleopard420 - all good. Variation if feeding in the tent. Those little fleas still there , nematodes didn’t work so disappointed there.
Likes
12
Share


@GeekSayWhat
Follow
Nothing much to report. Its growing nicely. Tricombs are already showing...and loads of them!
Tomorrow is watering day, going to up the feed a little but use fizzy water instead of plane.
I only take leaves away that are blocking bud sites... only 2/3 per 7-8 days.
Processing
Likes
Comments
Share


@Grownewgenetics
Follow
we opened these diaries the bsfseeds guys give us these Strains to testing.
the rainbow on week 3 the oldest and one on week 2 , the two really beautiful and become beautiful Jung lady's really quick.
the small one is the San Fernando Valley also from b.s.f.seeds , to our bad we get just one of these and take 3 week's.

Likes
4
Share
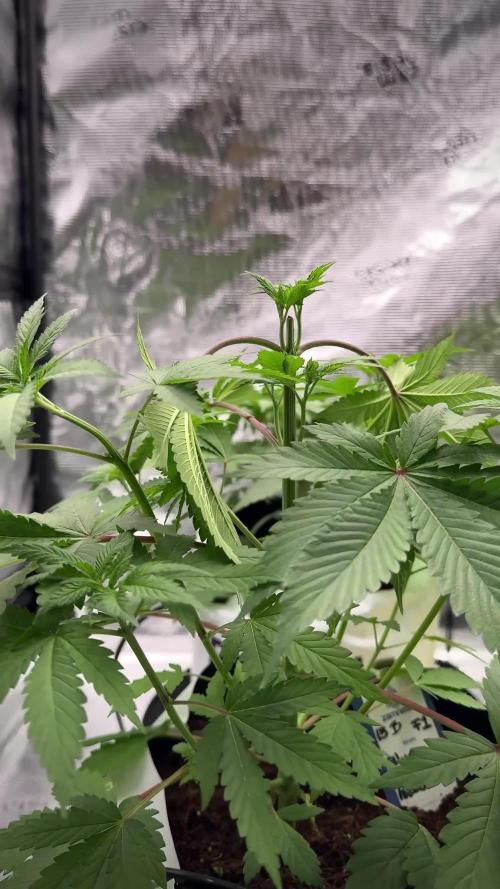

@DogDoctorOfficial
Follow
🥒 Project Blue Tent – Week 4
Pickle Lemon Haze F1 – Pheno A (Folder 14A)
Hello everyone, and welcome back to another update from Project Blue Tent! 💙🌱
For anyone joining this journey for the first time, this project follows four individual plants, each documented in its own diary from seed to harvest. Although every plant shares the exact same environment, nutrients, lighting, and care, each one is given the opportunity to tell its own unique story and reveal how its genetics express themselves.
Today we're catching up with Pickle Lemon Haze F1 – Plant A.
⸻
🌱 Week Four – Recovery and New Beginnings
Last week marked an important milestone when Plant A received her very first topping.
This week, however, was all about patience.
After performing a high-stress training technique, I always prefer giving the plant time to recover before asking anything more of her. Rather than continuing with additional training, I simply let nature do its job while carefully observing how she responded.
Sometimes, the best thing a grower can do is... nothing.
Looking at her now, it's safe to say she appreciated that decision.
The recovery has been outstanding.
The two new leading shoots have quickly taken over, growth has remained vigorous throughout the entire plant, and the side branches are now pushing with much greater determination than before. The change in architecture is already becoming obvious, with the canopy beginning to widen naturally as the plant redirects its energy away from a single dominant tip.
It's always rewarding to watch such a dramatic transformation from one small cut.
⸻
🌡️ Environmental Conditions
Consistency continues to be one of the biggest priorities inside Project Blue Tent.
Stable environmental conditions allow the plants to recover quickly from training while encouraging continuous vegetative growth.
Average conditions this week were:
• 🌡️ Day temperature: 27°C
• 🌙 Night temperature: 25°C
• 💧 Relative humidity: 67%
• 🥥 Root zone temperature: 24°C
• 💦 Nutrient solution: 18°C
• ⚗️ pH: 5.8
• ⚡ EC: 1.88 mS/cm
• 💨 CO₂: approximately 450 ppm
• 💡 Light schedule: 18/6
With the Phytonaut LED providing an even spread across the canopy, the plants continue receiving all the energy they need while maintaining compact internodal spacing and healthy vegetative growth.
⸻
🥥 Feeding Adjustments
As mentioned in the previous updates, all four plants developed a slightly lighter shade of green during the last couple of weeks.
Although their posture remained excellent and growth never slowed down, I felt they were asking for just a little more nutrition.
Rather than waiting for deficiencies to appear, I increased the base feeding slightly.
Current nutrition now consists of:
• Plagron Hydro A — 1.8 ml/L
• Plagron Hydro B — 1.8 ml/L
• Plagron Hydro Roots — 1 ml/L
By the end of this week I was already beginning to notice a richer, healthier green returning to the newest foliage across the entire tent, suggesting the adjustment was exactly what the plants were asking for.
One of the things I'm really enjoying about growing in coco is how quickly the plants respond to small, measured changes.
⸻
🌿 Pickle Lemon Haze F1 – Plant A
This phenotype continues to impress me every single week.
The recovery after topping has been remarkably smooth, and it's already clear that the plant has shifted into a completely different growth pattern.
The two new main leaders are developing beautifully, while the lower branches are accelerating as they receive more energy than they would have under normal apical dominance.
Instead of growing upward through one dominant stem, the plant is now beginning to spread outward, creating the broad, balanced framework I'm hoping to build before introducing the SCROG later in the grow.
The stems continue to thicken nicely, the internodal spacing remains tight, and the foliage has maintained excellent posture throughout the week.
Although she's still carrying that slightly lighter shade of green, the improvement in colour over the last few days is already noticeable, and her overall posture tells the real story.
Leaves are praying toward the light.
Growth is continuous.
The plant simply looks happy.
⸻
🔍 Looking Ahead
Next week should be another exciting step forward.
With the topping now fully recovered, I expect both new leaders to begin stretching more aggressively while the side branches continue filling out the canopy.
For now, I'll continue allowing the plant to develop naturally, avoiding unnecessary stress and simply monitoring her structure as she prepares for the next stage of vegetative growth.
Every week these genetics reveal a little more of their personality, and Plant A is becoming exactly the kind of bushy, well-balanced plant I was hoping to create.
⸻
💙 Thank You
A huge thank you goes to Zamnesia for making Project Blue Tent possible, from these fantastic Pickle Lemon Haze F1 genetics to the complete ecosystem surrounding this grow.
A sincere thank you as well to Plagron for providing the Premium Coco Growbags together with the Hydro nutrient line that continues supporting healthy growth every step of the way.
Thank you to GrowDiaries for providing a place where growers from around the world can document their journeys, share experiences, and continue learning from one another.
And finally, thank you to everyone following along.
Whether you've been here since germination, recently discovered these diaries, leave comments every week, quietly follow in the background, or simply enjoy watching these ladies grow, your support genuinely means a lot.
Project Blue Tent is about sharing the complete journey—the successes, the lessons, the experiments, and everything in between.
I hope you're all having an amazing week, and I look forward to seeing you again in the next update as these beautiful ladies continue their adventure.
Until next time...
Growers Love, happy growing, and take care everyone! 🌱💙