
Likes
Comments
Share


@MrBz21
Follow
OMG! So happy i finally harvested!
Shakira and Gertrudes are two fat girls!
The whole growing process was smooth. Both plants had nutrient deficiencies late flowering but it was my fault because I wasn't feeding them :p the problem stopped when I started using calmag and the bloom/micro.
They were string from the begining: i drowned them when they were seedlings, one of them had some mold in the root at that time. But, as soon as I changed pits and corrected my watering there was nothing to worry about.
I struggled to observe the trichomes with my cellphone camera hahahahhaha, i still think they're 30% clear but when I noticed a couple of amber ones it was my cue to turn off the lights! I'm not a fan of couch lock effect, so let's see how it went. I'm sure the amber trichomes were not even 10%, so I guess I'm good.
Also, i chopped my plants when they completed exactly 77 days from the moment they showed up above the ground.
Humidity was a bitch and with a small tent I had no alternative but to use a small dehumidifier from Amazon. It did NOT help that much. I hope they can dry with humidity around 75%, I'm having one small fan blowing on too of them (i know I'm not supposed to but it's 100% outside). Reaching 55 seems like an intangible dream :(
I enjoyed the while process of growing, it was easy but i got paranoid far too many times.
On the other hand I DETESTED to trim it. Im exhausted, my shoulders hurt and I have NO IDEA if I did it too much or not enough.
Hoping drying and curing to be smooth as well.
If anyone is reading this, thank you for hanging on with me :)
Ps. it's too potent and the smoke is soft, almost too easy to be smoke

Likes
12
Share


@PedroAndHisPlants
Follow
Day 22:
Hey everyone!
Update on the second grow: the plants are looking very healthy and seem to be growing much faster than the first batch. 🌿 I feel like we've already done a lot better with these plants compared to the first grow.
What do you all think? Any thoughts or suggestions?
Day 26 (Second Grow):
Hey everyone!
Exciting news: the plants in our second grow have names now too! 🌿 This will make it easier to identify and keep track of each one, especially if they get moved around. It should also help you all follow along more easily with the pictures we post.
We've built a SCROG (Screen of Green) net for the plants in both grows. For those who don’t know, a SCROG net helps to train the plants to grow horizontally, which maximizes light exposure to all parts of the plant and promotes more even growth. We're using it to ensure all plants get plenty of light and develop a uniform canopy.
Additionally, we've placed a hygrometer among the plants to measure the humidity between the leaves. We've noticed that the humidity sometimes exceeds 70% in those areas.
We're considering whether we need more fans, an intake ventilation system, or if a dehumidifier would be a better option. We're leaning towards adding more fans to improve air circulation, but we'd love to hear your thoughts and suggestions!
Stay tuned for more updates as we continue to watch both grows progress!


Likes
13
Share


@JoeyGonz
Follow
Seems I was letting the temp get to low during the night.. I noticed some slow growth did some investigating and that was it. During the day 86/87 and at night it was hitting like 60 and 50’s.. So I’m hoping that was my issue.. But other then that they look beautiful and healthy.. Nutrient burned Red D is 100% now and growing.. I defoliated both of them yesterday, mostly cleaned the Red D’s branches. Just want all her energy going up not out.. But the slow growth sucks hoping it changes now..


Likes
4
Share


@amazingautoflowers
Follow
Howdy All,
Happy New Year!
The girls are getting close. The pictures were taken on the 29th. Today is the 3rd of Jan. They are getting close as you can see in the pictures. I began flushing last week with just Regeisys and still giving Terpinator. They are not going to finish at the same time, it looks like I have 2 that will go first and then the other 2 within a week or so.
They smell great, and as the Pics show they are frosty. Don't want the Trichomes to get to amber, maybe 25% of them and we are about there.
I will follow up early next week.
Happy Growing in 2020 everyone!.


Likes
5
Share

@Skynets_Growing
Follow
Tessa my Triploid plant has nothing to laugh. She work hard with all the LST I have done to her. But I know that all this going into a hopefully nice Harvest at the end and the Vegi Part is the most demanding time in my grow. She become her own box with a 230 w LED that I could give her enough light if she need and enough place without her sisters. The 12/12 Lightmodus for her change and hopefully in 1 week she will start in her flower Part… we will see in her week 5.
Likes
9
Share


@Chubbs
Follow
Weekly update on these absolutely gorgeous girls. I was gone for the beginning of the week and came back today and I swear the flowers have doubled in size. They're smelling super strong and gassy. The flowers are dense as rocks so I hope with the summer heats they'll stay that way and not become airy. All in all Happy Growing.
Likes
4
Share


Likes
1
Share


@GreenSunrise
Follow
The flowers really started to show this week. Still looking healthy. I ran out of the biobizz grow feed this week so hopefully don't need any more of that.

Likes
6
Share

@Sense63
Follow
🌿 Woche 3 – Vegetative Phase (19.–26. Oktober)
Die Mädels sind jetzt deutlich in der Hauptvegetation angekommen.
Das Wachstum hat sich in dieser Woche sichtbar beschleunigt: kräftige Stiele, gleichmäßige Kronenbildung und eine stabile, tiefgrüne Blattfarbe prägen das Gesamtbild.
Die Spider Farmer SE3000 läuft inzwischen auf 55 % Leistung (≈ 480 µmol/m²/s · DLI ≈ 30–31) und liefert eine gleichmäßige Ausleuchtung über die gesamte Fläche.
Keine Pflanze zeigt Lichtstress oder Verbrennungen – das Canopy ist geschlossen und harmonisch.
📋 Aktuelle Eindrücke
Canopy: gleichmäßig, kräftige Farbe, leichtes „Lifting“ der oberen Blätter – Zeichen hoher Photosyntheseaktivität.
Substrat: lebendig und locker, leichte Mikroflora sichtbar – ein gesundes, aktives Bodenleben.
Klima:
Tag: 25–26 °C · rLF 50–55 %
Nacht: Werte folgen (wird nachgetragen)
Sehr stabile Bedingungen, idealer VPD-Bereich für starkes vegetatives Wachstum.
Lichtabstand: aktuell ~60–65 cm – optimal bei 55 % Leistung.
💧 Gieß- und Nährstoffplan
Zyklus alle 2–3 Tage, abhängig von der Trocknung der Töpfe:
1️⃣ Bactrex-Tee (~1 g/L) auf trockene Erde
2️⃣ Reines Wasser (pH ≈ 6.5)
3️⃣ Orgatrex (2 ml/L, kein Run-off, langsam gegossen)
Die Erde trocknet gleichmäßig in 48–72 h – ein deutliches Zeichen für starke Wurzelaktivität.
🌱 Strain-Layout / Zeltanordnung
Position Sorte Kurzbeschreibung
Front L/R Cherry Poppers × 2 🍒 kompakt, symmetrisch, satte Farbe, ruhiger, gleichmäßiger Wuchs
Center-L (gelber Topf) Karate Kit 🥋 kompakter Phänotyp, kräftiger Mitteltrieb, frühe Seitentriebe
Center-R (terracotta) Lemon Orange 🍋 größte Pflanze im Zelt, breite Fächerblätter, moderater Stretch
Back L/R White Gorilla Haze × 2 🦍 dunkelgrün, buschig, enge Nodien, stabile Struktur
📸 Visuelle Entwicklung (19. → 24. Oktober)
Vom Start der Woche bis heute hat sich das Canopy sichtbar verdichtet.
Die Pflanzen stehen kompakt, zeigen kräftige Stiele und einen gleichmäßigen Aufbau.
Die Blattfarbe ist tiefgrün mit leicht glänzender Oberfläche – Hinweis auf optimale Ernährung und Photosynthese.
White Gorilla Haze (Back L/R): buschig und dicht, starke Blattmasse, kräftige Blatttiefe.
Lemon Orange (Center-R): größte Pflanze im Bestand, breite Blätter, gleichmäßiger Stretch.
Karate Kit (Center-L): symmetrischer Aufbau mit deutlicher lateraler Entwicklung.
Cherry Poppers (Front L/R): kompakt, gleichmäßig, ruhig wachsend – klassischer Indica-Habitus.
Das Gesamtbild des Zeltes ist geschlossen und vital. Keine Mängel, kein Lichtstress, keine Verformungen.
🧠 Notizen & Beobachtungen
Luftfeuchte bei 50–55 % halten – kurzzeitig anheben, wenn sie unter 45 % fällt.
Umtopfen in 18 L Endtöpfe, sobald die Wurzelballen vollständig durchzogen sind (voraussichtlich Anfang Woche 4).
LST-Training ab der 5.–6. Nodie geplant.
Aktuelle Lichtleistung (55 %) bleibt bis zum Umtopfen konstant – PPFD und Temperatur perfekt ausbalanciert.
✅ Fazit – Woche 3
Eine rundum stabile und produktive Vegetationswoche.
Die Pflanzen entwickeln sich kräftig, gesund und gleichmäßig; keine Stresssymptome oder Mängel.
Das Klima ist konstant, das Substrat aktiv, und die Beleuchtung optimal abgestimmt.
Woche 3 hat das Fundament für Training und Umtopfen in Woche 4 gelegt.
Gesamtbewertung: 🌿 9.5 / 10
Vitales, ausgeglichenes Wachstum – starke Struktur, gesunde Blätter und lebendiger Boden.


Likes
2
Share


@Islandgrowbro
Follow
This week has started of with the girls doing well some new growth. A lot of wind this week but cooler temps. Plastic layer added aswell as gravel on top to help with parasites and possible cooler temps. Plants treated for pest and fungus once a week until flower.
Day 3
Sprayed for parasites and fungus.
Day 4
It has been raining before day break. Jah has taken over the watering for us today. But not enough. Watered with nutrient water in the afternoon. Everybody praying.
Day 5
Removing all leaves with spider mites, washed down the rest of the leaves and sprayed for parasites and fungus.
Day6-7
Plants were left in the car of the gods. He did well and took care of them very well with a 2 nice showers of rain followed by sun.

Likes
2
Share


@C_More_Budz
Follow
Things are goin by smoothly started to give them some calimagic in low doses so they can get use to it. The upper 4 more so towards the left I believe are white Runtz because they all have similarities, and the bottom three in a triangle are all mac and jacks because again they all have similarities, the last two smaller ones I believe may be gelato but I still don’t know. Goin to start giving them low dose feeds and gradually increase it. I’m gone try my best to upload every Thursday and make a YouTube video as well I will provide all links once things are set in stone. Any input is appreciated happy growings growmies

Likes
22
Share


@Bread_n_Buds
Follow
We have a super successful young lady. The Sweet Cherry Pie is taking color, is starting, the flowers are still swelling and we look forward to seeing the final form.
The top tops are higher but all made a nice bunch flower, the Marshydro care is fitting. We are in flush at pH 6.0 recommended to promote the absorption of all feeding residues.
LIGHT >> MARSHYDRO SP3000 AT 100% OF POWER ..
TENT >> MARSHYDRO 120x60x180
CHECK IG >> https://www.instagram.com/marshydro_aliexpress2/
Buy >> marshydroled.aliexpress.com
TENT >> MARSHYDRO 120x60x180
CHECK IG >> https://www.instagram.com/marshydro_aliexpress2/
Buy >> marshydroled.aliexpress.com

Likes
33
Share


@Hawkbo
Follow
This is probably the final week of the full tent shots, these were taken a few days ago and at this point there is only 8 plants that have not yet been harvested. I learned a lot this run, tried some new shit, grew out my own crosses, dialed things in by getting rid of the light leaks and adding the heater so it was a success. The new lights out performed my expectation and the leaf strip might become a staple in my garden. The leaf strip made me nervous I wasn't sure how it would turn out but all of my buds are noticeably larger, the lowers are filled out and as dense as the tops and it saved space, water and nutrients. The lights could have contriuted to the larger buds but the other things made it well worth it. I have been vegging out the next run for a while trying to keep them from growing too much in 1/2 gal bags so there should be some interesting plants there stay tuned.
* The ones remaining are MC2 MC3 and MC4, MC6 got tossed but I have a cut to run back. MC2 I have grown many of times and reversed for pollen, MC3 and 4 are new. 3 is almost done I should be chopping that one this week at some point and might be more impressive than 2 it has some serious nugs on it. 4 is also solid but taking a little longer than I would like it might be a 75-80 day finish. Next update I will have some good pics of at least 2 and 3, I am going to wait until I am ready to harvest before I bring 4 into the studio.
REMEMBER , IF YOUR SHOPPING FOR GEAR YOU CAN USE THE CODE “BANGDANG” FOR 10% OFF YOUR ENTIRE PURCHASE FROM ANY OF THE FOLLOWING COMPANIES.
@greenbuzzliquids
@rainscience_growbags
@gorilla_grow_tent
@growlightscience.led
NEW* @Rocbudinc Seeds on his website *
*****Gorilla grow tent discounts extend to all companies affiliated with grow strong industries which include..*****
@super.closet
Lotus Nutrients
Kind LED grow lights
Processing
Likes
7
Share


@x_grower
Follow
Last week, first of flowering, was outstanding, I could water the girls regulary and the work paid off they stretched a lot and are looking super healthy. The girl right below the upper fan is suffering a bit with the shadows and is notoriously shorter than her sisters, I will need to rethink the air circulation for the next grow. Another concern of mine is their height, hoping they dont stretch anymore as the lights are already at maximum possible height inside tent and there is only 20cm gap between it and the plants.
Likes
10
Share


@Furfacefarmer
Follow
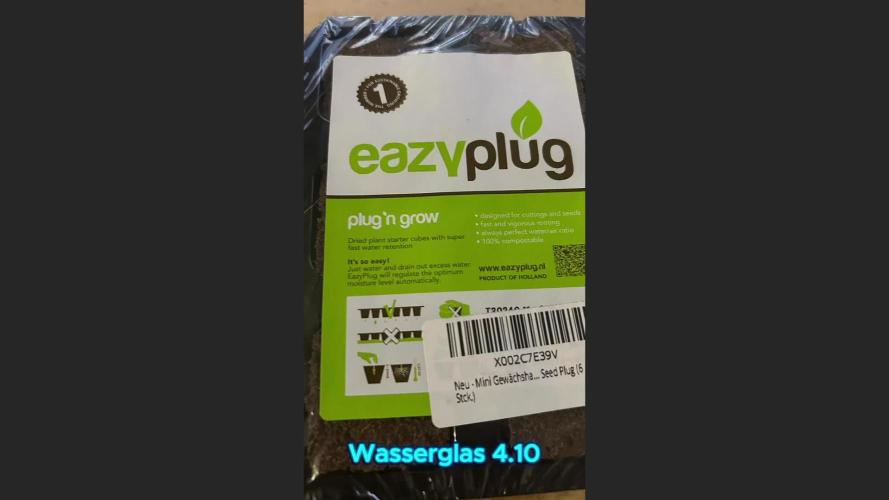
Eternity Grow Cup, day 1.
Seeds are germinating in starterplugs from Zamnesia.
And now we wait for the magic to happen 😊
Sofar one seedling. The others will pop up soon.

Likes
4
Share


@Jungle
Follow
Was thinking about going to 12/12 this week, but have put it off till next. Veg filling >1/4 of the 16sq ft net, but I can't wait much longer! Moved from one 13g container to 2x13 (one with plant) plus a 27g reservoir. Expect to be much more stable on nutes now. Remote reservoir keeps temp of nutes down.
Likes
4
Share


@CanadianFillmore
Follow
Start of week 5. Week 4 went well, bud site development is going great, she's gaining size and weight, the smell is like fresh greenery, almost like walking in the spring forest.

Likes
9
Share


@TheGreenGroomer
Follow
🌿 Grow Update: Week 6 of Flower 🌸
Hey growers,
We're cruising through Week 6 of flowering, and I gotta say, things are looking solid in my grow setup. This being my first rodeo, I'm pretty stoked with how it's all turning out.
The plant's rocking a deep green, which could be a bit of nitrogen overload or just her natural vibe. Regardless, she's thriving, Ive been so stupid letting her get so big in a 5gallon i wouldn't be surprised if she is rootbound..
Got a bit of a snag with some lower bud sites getting overshadowed by the top canopy. Didn't want to push my luck with more defoliation i cant really at this point of flower, but hey, it's all a learning experience next round, I'll be more surgical.
Already thinking about the next grow — tossing in a couple of plants in 5-gallon pots, keeping veg short and sweet at 4-5 weeks. Gonna tighten up the training game for sure.
Despite the lower buds not getting as much love, the top ones are coming along nicely. She's a thirsty one, so I'm hitting her with 4 liters at lights on and another 2 liters a few hours before lights off to keep that coco from drying out.
Got about 3-4 more weeks to go, and I'm itching to see how it all pans out. Can't wait to see the final yield and taste the goods. Here's to a killer harvest ahead! 🌿💧✂️🌸 #GrowLife #Week6 #FirstTimer #HarvestCountdown
