
Likes
Comments
Share


@GirlGoneWeed
Follow
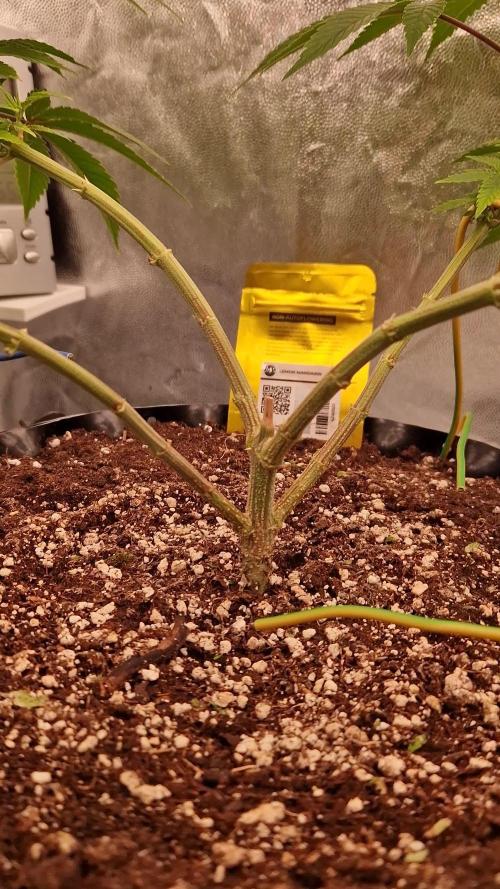
Here we begin, the germination method I use is: soak the seeds for 14h than paper towel, in the dark with a heat mat under it for around. 3-5 days.
After taproots come out, I’ll plant them into organic recycled live soil and under the humidity fome they go.
I keep temperatures around 24-26C humidity high at 70-80%, spray water every day in the am and at night, tap water nothing fancy.
Now we wait for them to take off.

Likes
16
Share


@DoDrugs420
Follow
Mind-expanding and pleasure-inducing, Hypno Seeds presents its autoflowering version of the famous Amnesia Haze, Hazenberg AM Auto. For lovers of Sativa, this quick-growing autoflower cannabis strain will definitely be a big hit. With its incredible earthy flavors and delightfully euphoric effects, like a cannabis mantra, this strain will have you saying its name over and over again.
Tech Specs
THC 16%-21%
CBD 0.40%
Flavor Cinnamon, Lime Tree, Patchouli, Sandalwood, Walnut
Type 25% Indica / 75% Sativa
Flowering 8-9 Weeks From Germination
Height 70-130 Cm
Effect Corporal, Energy, Extra Sensual, Happy, Sociable
Genetics Amnesia Haze X Autoflowering
---------------------------------------------------------------------------------------------------------------
Grow Sponsored by MARSHYDRO
HIGH EFFICIENCY WHITE LED LIGHT: Newest SMD LED technology provide highest PAR/LUMEN output(743umol@18"), designed to replace a single-ended 250watt HPS; MARS HYDRO TS 1000W Plants Growing lamp makes you get 30% higher yield compare OLD blurple led lights, Max 2.0g yield per wattage (power draw)
LOW ENERGY CONSUMPTION GROW LIGHTING : Consuming only 150W with 342 LEDS! It saves up to 50% energy than other led grow lights. Perfect for 2.5x2.5ft,Max coverage 3x3ft. Over 90% light energy can be absorbed by plants; higher intensity and more even coverage in a MARS HYDRO grow tent, reflective area, or by crossing over using multiple TS1000
SUNLIKE FULL SPECTRUM LED INDOOR GROWING: 660-665nm Red IR/3200-4200Knm/5200-6800Knm, infinite close to natural light, best for all plants all stages growing, rapid plant response from seed to flower and increase yield & crop quality
HIGH REFLECTIVE & NOISE FREE-Fanless LED GROW SYSTEM design will make your growing life easy and quiet, quickly heat dispersing material aluminum reducing light lost to aisles and walls, increase the light intensity up to 20%, allowing your plants receive more energy and without burning your plants for maximum headroom
Get your own at https://www.amazon.de/dp/B07ZVFBR34

Likes
17
Share


@Salgeezi
Follow
Finally got a bigger tent. They are much happier. Almost seems like it put them fully into flowering. I'm feeding around 1200 ec but the runoff keeps climbing to almost double. I will flush to about 800. Within a few days it's back up to 2000 Ec. Am I missing something here??


Likes
3
Share


@theplantdaddy
Follow
Temps and humidity stable at 81-83f and between 72-78%. Ppms up to 700 for both. Dli at 20-22 roughly. 300 ish ppfd for 20 hours.
Both looks great, squat and great internod development. Quite vigorous I would say. Enjoying the 700ppms of nutes and roughly 300ppfd of light too.

Likes
41
Share


@Pierrougarou21
Follow
Bonjour les Growmies, encore une fois je vous remercie de venir visiter mon journal. J ai passé ces Unicorn Sherbert 🦄🌈 @CultclassicSeeds en flo apres juste 3 semaines de croissance.Je n'ai pas trop l habitude d avoir une si petite croissance mais comme dans la tente j ai 3 pieds qui ont beaucoup plus de croissance que d habitude je me dis qu il y aura une bonne moyenne dans la tente.
Les plantes en elle même sont magnifique avec de très grande feuilles d un vert profond .Elles sont toutes les deux bien marqué comme hybride Indica le stretch ça bientôt commencer.Mais je croise les doigts demain j ai ma tente XxL qui arrive Avec ma nouvelle lampe temps attendu FC E6500,💯🔥🔥🔥🔥🔥🔥grâce à cette lumière 💡☀️je compte que mes Unicorn s ressemble a Pegasus et s Envolent en galopant 😁😁😁😁
🌈🦄24/09 Les unicorns ont galopé vers de nouvelle contrée .Et elles se sont installées dans une tente beaucoup plus grand et avec une meilleure lumière un véritable bonheur.🦄🌈.
A côté des autres génétiques leur tige principale est énorme grosse comme mon pouce .C est impressionnant pour le peu de croissance qu elles ont eût
25/09 Encore une journée de passer apr s le passage en 12/12 J ai deux phénos différents les différences commencent à se marquer .Une beaucoup plus touffue que l autre donc je vais les appeler #1 et #2.La plus touffue est #2.
Sinon elles ont des feuilles énormes avec un vert éclatant.

Processing
Likes
57
Share


@MadeInGermany
Follow
Hey everyone 😀.
A lot has happened again this week 👍.
Pheno 1 goes from the color more and more to red 😍, whereby Pheno 2 also slowly starts to color 😃.
Flowering day 21
Today both were poured with 1.2 L each and checked for their health.
The humidifier was also refilled.
Flowering day 22
Today the tent was cleaned and both phenotypes checked for pests and so on.
Flowering day 23
Today both were poured again, this time only 1.6 l for both together.
The tent was cleaned with disinfectant 👍.
Flowering day 24
Today the humidifier was refilled, the activated carbon filter changed after 9 months, and all the electronics checked :-).
Flowering day 25
Today 1.5 l was poured per plant so that some train comes out and rinses out excess nutrients 👍.
The box was also cleaned and the plants checked for health.
Flowering day 26
In both phenotypes, the bottom mini buds were removed for the last time so that the full energy goes into the top buds 👍.
The tent was cleaned and the whole room was cleaned.
Flowering day 27
Like every two days, the water was also poured today, but this time only 0.7 l per plant, because two days ago it was poured with Train 😄.
The lamps were adjusted to the size and placed about 5 cm high.
All in all, it was a perfect week, everything is going as it should and the plants are feeling very good 👍.
I wish you all a lot of fun with the update, stay healthy 🙏🏻 and let it grow 🍀
You can buy this Strain at :
https://sweetseeds.es/de/red-mandarine-f1-fast-version/
Type:
Red Mandarine F1 Fast Version
☝️🏼
Genetics:
Red Poison Auto®️ (SWS39)
X
Tangie (California Orange x Hybrid Skunk)
👍
Vega lamp:
2 x Todogrow Led
Quantum Board 100 W
💡
Bloom Lamp :
2 x Todogrow Led
Cxb 3590 COB 3500 K 205W
💡💡☝️🏼
Soil :
Canna Coco Professional +
☝️🏼
Fertilizer:
Green House Powder Feeding
☝️🏼🌱
Water:
Osmosis water mixed with normal water (24 hours stale that the chlorine evaporates) to 0.2 EC. Add Cal / Mag to 0.4 Ec Ph with Organic Ph - to 5.5 - 5.8 .

Likes
Comments
Share


@weedhouse420
Follow
todo bien buena aplicacion para no olvidar por q semana voy y poder hacer lo seguimientos

Likes
10
Share


@DeepRootsGrowTrees
Follow
ROYAL QUEEN CBG AUTO
ROYAL QUEEN SEEDS
Week #3 Overall June 19th-26th
Week #2 Veg
This week no issues she's growing well medical CBD grow so it's a all organic grow. Stay Growing!!
ROYAL QUEEN SEEDS
ROYAL QUEEN CBG AUTO

Likes
57
Share


@Mrs_Larimar
Follow
2021-09-03
Last week I topdressed the Ladies with "BioBloom" from GreenHouse Feeding
2 days later i could see alot of mycelium growing on the Surface of the Soil
Plants are doing very well, Buds are bulking
They are smelling very Diesel like
Plants are fading a little, what is totally Ok for me
i think 3 more Weeks for them
Here are some codes
Shopping Link for the LIghts:
Amazon US:
XS1000 10% off: it10mlarimar http://yx-8.cn/0y-6
XS1500 5% off: it15mlarimar http://yx-8.cn/0yA
XS2000 5% off: it20mlarimar http://yx-8.cn/0y2Y
XS4000 5% off: it40mlarimar http://yx-8.cn/0y5k
Amazon Canada
XS1000 10% off: it10mlarimar https://amzn.to/38udUVe
XS1500 5% off: it15mlarimar https://amzn.to/3esVUyr
XS2000 5% off: it20mlarimar https://amzn.to/3l5zAfg
XS4000 5% off: it40mlarimar https://amzn.to/3l7k5Uj
This code works for Europe
https://viparspectra.eu/discount/M.Larimar
And for The fertilisers:
https://greenbuzzliquids.com/en/shop/
Code: mrs_larimar
gives you 15 Percent with a minimum Ordervalue

Likes
11
Share

@TrickzGrowz
Follow
Sie hat das umtopfen super vertragen! Habe noch die unteren Triebe entfernt.
Spraymix alle 2 Tage.
Likes
20
Share


@Comfrey
Follow
Eine kurze Wochenbeschreibung findest du unter den Fotos.
Die 16 Liter Töpfe sind bereits gut durchwurzelt. Was denkst du, sollte ich die beiden Shamaninnen noch einmal Umtopfen? Ich bin mir nicht sicher, ob das eine gute Idee ist zu Beginn der Vorblüte, habe aber Sorge, dass ich in ein paar Wochen Probleme bekomme mit der Wasserversorgung und dem Stickstoff.
Sollte ich in einen größeren Topf umsetzen? Wenn ja wie groß? Schwarzkohlekompost habe ich noch genügend.
Freue mich über Feedback und Tipps.
Happy Growing!

Likes
6
Share


@MotherNaturesSon
Follow
good strain for symptom relief while staying mentally present. potent yet chill when treated well from seed to cure. hoping to try growing this strain outdoors in the future. this was a fun grow, thanks for looking. cheers


Likes
3
Share

@Borberad
Follow
Blütewoche 5: Alles läuft gut! Der Düngeplan bleibt unverändert.
* Zustand der Pflanze: Gesunde Blattfarbe, kompakte Blüten und glitzernde Blüten
* Wichtige Ereignisse: keine
* Düngung & Messwerte:
* Gießwasser: pH ca. 6,3. Leitwert 1,4 bis 2 S.
* Drain: Wir stellen sicher, dass der pH-Wert nicht unter 5,5 und nicht über 6,8 liegt und der Leitwert die +/- 500 S Abweichung einhält.
* Anpassungen: keine

Processing
Likes
12
Share


@ELPIRATA
Follow
Asi van las cosas hasta el momento; Dia de actualizacion en la semana: 4/junio/20 (dia 29)
+Se agrega malla Scrog con 49 Espacios (Se podra completar?)
El día 04/06/2020 se han regado 3 plantas en macetas de 11 litros:
X2 Semillas Auto Lemon Kix= 1L [1mlKnactive+3ml/L ATAGrowth-C+3mL ATAFlower-C] PH 6.2 / EC= X Tº=23
X1 Semilla Auto Tutankhamon= 1L [1mlKnactive+3ml/L ATAGrowth-C+3mL ATAFlower-C] PH 6.2 / EC= X Tº=23
*El día de hoy se han regado 1 planta en macetas de 7 litros:
X1 Semillas Auto Lemon Kix#3 = 550 ml [1mlKnactive+3ml/L ATAGrowth-C+3mL ATAFlower-C] PH 6.2 / EC= X Tº=23
El día 08/06/2020 se han regado 3 plantas en macetas de 11 litros:
X2 Semillas Auto Lemon Kix= 1L [1,5mlKnactive+3ml/L ATAGrowth-C+3mL ATAFlower-C] PH 6.1 / EC= 1.17 Tº=23
X1 Semilla Auto Tutankhamon= 1L [1,5mlKnactive+3ml/L ATAGrowth-C+3mL ATAFlower-C] PH 6.2 / EC= 1.17 Tº=23
*El día de hoy se han regado 1 planta en macetas de 7 litros:
X1 Semillas Auto Lemon Kix#3 = 550 ml [1,5mlKnactive+3ml/L ATAGrowth-C+3mL ATAFlower-C] PH 6.2 / EC= 1.17 Tº=23

Likes
2
Share

@Muuuy
Follow
Already in week 7 of our little experiment!
They are all growing slower while prioritizing on thickening their buds. #3 is still and will for ever be a problem, though! But we have definitly learned a lot from our fine ladies so far.
The smell is getting better every week, mostly consisting of a sour-apple-ring-aroma, which is actually kinda delicious!
Adjusted nutrient intake by increasing the amount of Bio-Grow because #2 showed signs of deficiency by her leaves slowly turning pale.
Watering every two days due to them living in that small 4,4L pot and probably having an dense root system by now.
This is plant #1/3.
She has developed the biggest buds so far, even merging some into one huge bud on a few branches.


Processing
Likes
52
Share


@CBD_Sweden
Follow
@MephistoGenetics,
Hi all the happy people here in GrowDiaries.
This is my second cultivation ever and it will be fun to try a bigger space than my closet grow.
First, I'm just going to say I'm done with the construction of my new growroom.
The room is 2.14 meters by 1.7 meters and has a ceiling height of 2 meters.
It provides a floor area of 3.6 square meters.
I use a 54 Watt Lightwawe T5 for germination and 2 Pcs 400 Watt HPS lamps.
I have a channel fan that replaces the room air about 40 times an hour to get a comfortable environment in the room, the air enters a fresh air intake from the outside.
The air is purified through a carbon filter to then leave the room to the rest of the basement.
Then I use that heat to heat the rest of the basement.
I will use 10 pcs 15 liter Autopots to grow with and a 100 liter water tank that supplies the pots of water and nutrition.
I will grow completely organically in soil and will watercure my buds to get the best possible medicine for me.
But there are no cultivation rooms to be displayed here, so I continue with what is most important.
Today I have put my seeds in paper towel and hope the seeds have germinated within a few days.
I am very excited to see how the new growroom will work and how this Stilton Special will turn out.
Strain Name: Stilton Special F1
Genetic heritage - Sour Livers F3 x Northern Cheese Haze F3
Strain behaviour - Stilton grows well from the off, and develops into a stout but branchy specimine that leads to a fine yield of awesome flowers. She's not too stretchy but also is sizeable enough with good growth, to train and shape to your liking. Flowers develop pretty fast and grow to a good size, it may to advised to clear out some undergrowth and if needs be a very gentle defoliation mid-way through the grow, although leaf tucking may suffice well enough.The end product is of top shelf quality and she doesn't lack in yield either.Give your garden, nose, and body a treat and be sure to indulge in a slice of Stilton this year, You won't regret it.
Size - 50 - 70 cm
Structure - Medium height but bushy
Flower Density - 9/10
Indica/Sativa - 65/35
Cycle Time - 65 to 70 days from sprout
Yield - 90 to 140 grams as a single plant
Best Method for overall high yield - 9-12 per 1,2m x 1,2m sq in 10-15 Liter pots (Soil)
Aroma - Very strong, Cheesey/fruity/sour/spicey/ with a dash of coffee.
Taste - Dank berries
Effect - Good hybrid powerful but balanced effect
Medicinal Benefits - TBA
Best Grown - Indoor/Greenhouse
Cannabinoids - TBA
Extract information - Ideal extract candidate - High in resin, oil and terps.
.................................................................................................................................................................................................................................................................................................................................................
2017-08-21. Started to germinate the seed.
.....................................................................................................................................................................................................................................................................................................................................................
2017-08-23. Seed germinated and put in small pot in the humidity dome.
.........................................................................................................................................................................................................................................................................................................................................................
2017-08-27. Slow and steady she grows.
----------------------------------------------------------------------------------------------------------------------------------------------------------------------------------------------------
2017-08-28. Transplanted to the 15 liter autopot.
--------------------------------------------------------------------------------------------------------------------------------------------------------------------------------------------------------------
2017-08-29. New movie of the girl and a new pic of the grow room from now.
-------------------------------------------------------------------------------------------------------------------------------------------------------------------------------------------------------------
2017-08-29.
Hello to you who read my diary, I just want to say that I am pleased that you have chosen to check in with me and in my diary.
I just want to say that I do this for myself and for a steady flow of my medicine.
Everything you read and see in my diary is 100% honest and I will never distort or beautify anything here.
I document my crops so that I can learn from my mistakes and also to look back at those different crops.
I try to update with pictures every day and with text if something special has happened in the garden.
This is my strainhunt for the best medicine and the beginning of my journey with cannabis and the cultivation of it.
-----------------------------------------------------------------------------------------------------------------------------------------------------------------------
2017-08-30. Cleaned the room this morning, just vacuuming and cleaning with chlorine solution. Im testing the fan to control temp and humidity, it works great.
Added a movie. Everything is looking great right now.
------------------------------------------------------------------------------------------------------------------------------------------------------------------------------------------
2017-08-31. 3 new pics.
--------------------------------------------------------------------------------------------------------------------------------
2017-09-01. New pics and a video of the room from today.
-----------------------------------------------------------------------------------------------
2017-09-02. New pic
----------------------------------------------------------------
2017-09-03. Video of the girl this morning.
----------------------------------------------------------------------------------------------------------------------
2017-09-04. Week 2 starts, new pics.
----------------------------------------------------------------------------------------------------
2017-09-05. KL 08.00. Cleaned the room this morning, just vacuuming and cleaning with chlorine solution.
KL 12.00. The girl got 2 liters of water with nutes in it, added a video.
----------------------------------------------------------------------------------------------------------------------
2017-09-06. KL 08.00. The girls woke up after their beauty sleep, the leaves are always a bit down after 6 h of darkness, but they will stretch now when the HPS lamp starts.
Everything looks good and I keep trying to tuck the leaves so they get the maximum amount of light where needed. Added pics and video.
--------------------------------------------------------------------------------------------------------------------------------------------------------
2017-09-07. Day 17 from sprouting. I have never tested PH in my grows, when growing organic in soil iv learned that it adapt PH by it self. But im curious by nature so i had to test.
Kl 10.00 Tested PH in the soil, it was 6.9 and tested my tap water and it was 6.8. Added video of the girl.
Kl 22.30. New pics
------------------------------------------------------------------------------------------------------------------
2017-09-08 KL 08.00. Good morning, added new video.
2017-09-08. Kl 23.50. Gave every girl 3 liters of water and nutes, added new video.
--------------------------------------------------------------------------------------------------
2017-09-09. Kl 21.00. Defoliated a lot and added pics.
------------------------------------------------------------------------------------
2017-09-10. Kl 08.00. Last day of week 2. New video.
2017-09-10. Kl 23.00. 3 new videos.
-----------------------------------------------------------------------------------

Likes
6
Share


@Lazuli
Follow
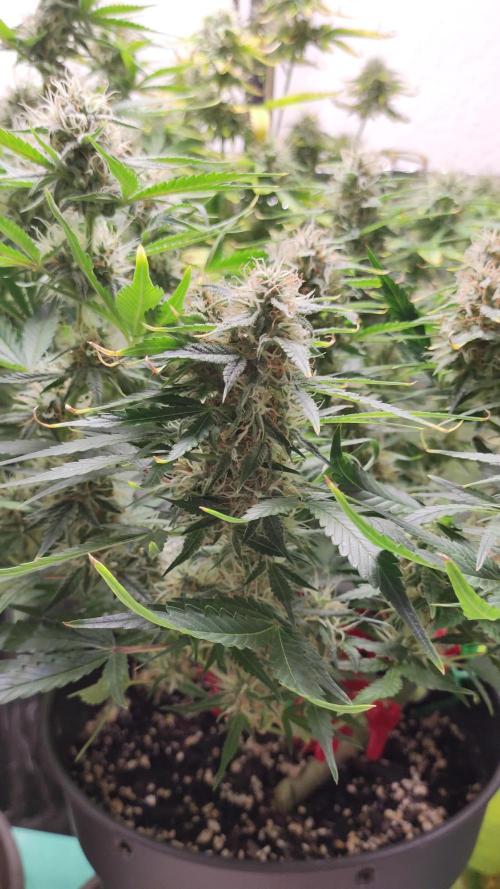
Buds are very dense and hairs start to go brown it smells amazing
I lowered the nutrients strength a bit i aim for a 800ppm runoff
