


Likes
Comments
Share


@MadeInGermany
Follow
Hey guys :-) .
Today the plant was sprayed again with neem oil.
There weren't any more trips to be seen after the second application, but to be on the safe side, you did it again today get a cure.
That's why the beautiful dark shimmer on the leaves :-).
It was poured this week 1 time with 0.2 l because the roots are from clones should only spread in the substrate.
(For nutrients see table above)
The fact that the lady gets a very long time in the veggie phase I started topping for the first time today after taking the pictures.
in the coming weeks LST and will certainly be used topping a few times.
Otherwise everything was cleaned and, as always, everything was checked.
Have fun with the update and stay healthy 🙏🏻
👇🏼👇🏼👇🏼👇🏼👇🏼👇🏼👇🏼👇🏼👇🏼👇🏼👇🏼👇🏼
You can buy this Nutrients at :
https://greenbuzzliquids.com/en/shop/
With the discount code: Made_in_Germany you get a discount of 15% on all products from an order value of 100 euros.
👇🏼👇🏼👇🏼👇🏼👇🏼👇🏼👇🏼👇🏼👇🏼👇🏼👇🏼👇🏼
You can buy this strain at :
https://www.amsterdamgenetics.com/product/kosher-tangie-kush/
Water 💧 💧💧
Osmosis water mixed with normal water (24 hours stale that the chlorine evaporates) to 0.2 EC. Add Cal / Mag to 0.4 Ec Ph with Organic Ph - to 5.8 - 6.4
MadeInGermany

Likes
14
Share


@BruWeed
Follow
Esta cepa quería cultivarla hace un año aprox y por cosas de la vida no pude y hace cuatro o cinco meses aproximadamente pude darme el lujo de cultivarla.
Su germinacion fue perfecta, sin ningún tipo de problemas y en esa etapa la deje dos semanas en Enraizamiento.
En etapa de crecimiento la deje cinco semanas, ya que nunca había dejado más de tres, yo creo que haberla dejado bastante tiempo en crecimiento ayudo para que se desarrollarse de forma correcta y ayudar a la hora de floración para sacar los cogollos que saco.
Y en etapa de floración la deje nueve semanas, tampoco tuve problemas en toda esa etapa.
Me sorprendió su fácil cultivo, lo unico que tuve que hacer fue regalarla con sus despectivos fertilizantes.
Tema enfermedades o plagas por suerte no tuvo en todo su desarrollo.
Como siempre digo super recomiendo el banco de semillas BSF Seed ya que la calidad es de 10 puntos. Estoy super conforme con los resultados, en húmedo los cocos pesan 196g, utilicé una lámpara led de sólo 100w, en un indor de 1.60mX60x60.
Los fertilizantes que siempre utilizó y me ayudan a sacar los resultados logrados son de Top Crop, y uso toda su línea de fertilizantes para cada etapa de la planta. Super recomendable también!
En las últimas imágenes se puede apreciar las raíces densas que desarrollo durante todo el cultivo. Y utilizó macetas de la marca Root House de 10L.
Saludos a todos y a esperar que la weed se seque para poder ya meterlos en el frasco y que se empiecen a curar.

Likes
17
Share


@Fabhz
Follow
Plant fully recovered. I am really surprised because of the buds development. I had to use some vegetation fertilizer for the leaves color.


Likes
23
Share


@CornerBud
Follow
01/01/2024 - Monday:
Girls' ages:
#1 - 35 days
Today nothing was done, everything is going well!
01/02/2024 - Tuesday:
Today nothing was done, everything is going well!
01/03/2024 - Wednesday:
Watered #1 with 1.5 liters. I noticed that the main branch was practically being "strangled" by the tie, so I redid it to make it loose. I did this for all ties that seemed too tight.
01/04/2024 - Thursday:
Today nothing was done.
01/05/2024 - Friday:
1.5 liters of water for #1.
01/06/2024 - Saturday:
Today nothing was done.
01/07/2024 - Sunday:
Watered #1 with 3 liters of water and 15g of Tropikali Sauce (7.5g Vega and 7.5g Flora).
--------------------------------------------------
01/15/2024 - Monday:
Girls' ages:
#3 - 35 days
#4 - 35 days
#5 - 35 days
Watered #4 with 3 liters of water.
01/16/2024 - Tuesday:
Watered #3 with 1.5 liters, the recommended flowering dose of Flowermind, and 1.5ml of Biobizz Fish Mix.
01/17/2024 - Wednesday:
Today nothing was done.
01/18/2024 - Thursday:
Watered #4 with 3 liters of water and 3ml of Biobizz Fish Mix. Watered #5 with 500ml of water, the recommended dose of Flowermind, and 0.5ml of Biobizz Fish Mix.
01/19/2024 - Friday:
Watered #3 with 1 liter of water, the recommended dose of Flowermind, and 1ml of Biobizz Fish Mix.
01/20/2024 - Saturday:
Today nothing was done.
01/21/2024 - Sunday:
Today nothing was done.

Likes
1
Share

@pareto
Follow
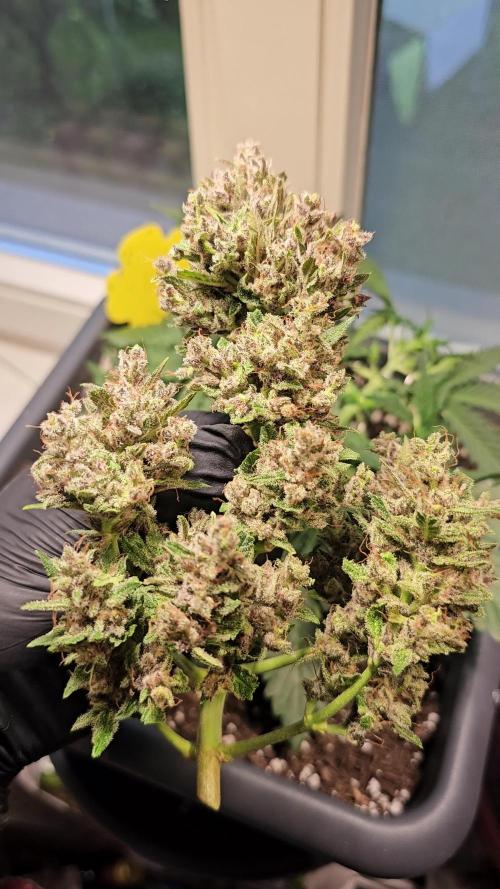
The summer was super wet and humid so she lost 2 of the big buds to mold.
Other than that she did great! really big, vigorous and heavy, dense buds. All arround winner. Really looking forward to the seeds.
These plants are not mine. I am just documenting them.
--------------------------------------------------------------------------------------------------------------------------------------------------------------------------------
Set up cost (fixed costs)
-Lamp: 40€
-Timer: 3,5€
-Pot: 4€
-Total fixed costs: 47,5€
Given 5 years (or 15 grows) usage time translates to around 3,17€ per grow in materials.
Variable costs:
-Seeds: 13,17€
-Soil: 6€
-Fertilizer: 3,50€
-Power (100 days 18h/day): ~25,92€ (exact figure after harvest)
-Total variable costs: ~38,59€
-Total costs per grow: ~51,76€


Processing
Likes
3
Share


@Therbalist
Follow
Not much to say just growing like crazy through wind and rain!
Keep getting dry they drink so much.
One has copper defiency and has fraggled leaves but the rain keeps washing my nutrients away and I've ran out of Activera 🙈 so I'll have to find another fix
Likes
5
Share


@Evilzdyuk
Follow
Сорт однозначно рекомендую к выращиванию, стойкий и сильный, растет без проблем 😉 Дальше хочу попробовать вырастить два куста этого сорта в горшках по 3 литра, один будет расти без всяких вмешательств, второй будет с LST
Всем спасибо и удачи 🍀 ✊
Likes
1
Share


@Jaschkoo0
Follow
This week i thought i should gave the Phosphor plus from hesi but ist was zu much and same nutrien Burnout started
Likes
52
Share


@TheDoctor
Follow
i know i know, i promised to harvest this week, but to me they just don't seem ready yet!
Although i harvested the main-buds from the LSD and put the other buds with the plant into a vase in order to let her ripe more, i want to harvest the other plants in one piece.
The Peyote Critical will be the next one, in three days or so, i'm just waiting for her to develop some amber trichomes and the lower buds should ripe some more.
The blue gelato could be harvested in a week or shorter, she seems damn sticky and rock solid!
Shiskaberry need a week or so, some pistils are still white and trichomes are pretty glassy at some points!
Srawberry lemonade will need one or two weeks, trichomes are glassy, but leaves are already yellowing, i think she will taste bests because she took so much nutrients and is now losing colour already!

Likes
2
Share


@Ganjagrandaddy
Follow
Hi all
Well here we are at their stated 11 weeks flowering and I can see how ripe and ready they are looking . They all have a fairly nice trichrome build up now and I had hoped they would pistil flush again but it doesn't look likely now so i am thinking is harvest time any day now. I am now just giving them water to signal theor end coming . I am hoping the plants respond with a panic burst of thc to protect her buds. Not as substantial as I had hoped but as mentioned in previous entries , it has been a simple, lazy grow. Until the next one. Be Happy

Likes
24
Share


@CanarianGrow92
Follow
This girl smells really good 😁 but i didn't expected less from this strain, i already tried several strains from fastbuds and they are all great.
This week i started to give some extra PK apart from the typical bloom nutrients, i expect this girl to finish all covered in tricomes, we can see already quite some tricomes everywhere and its only the 4th week of flowering, i hope that the weather stays good 😊👍
Likes
16
Share


@Pelias
Follow
VIDEO------->
this is my other baby, Maybe she's being attacked by a snail or slug. you know?


Likes
4
Share


@Ultraviolet
Follow
0.23v tuned to 7.83Hz Plants exposed to the Schumann resonance often show greater resistance to stress factors such as drought, diseases, and pests. It is possible that these natural electromagnetic waves strengthen plants' immune systems and increase their ability to resist disease.
Pretty neat, in the afternoon when the tent hovers around 84F the plants are 🙏, can visually see in time around 10 minutes after I opened the tent the temp had dropped to 76 pressure was lost, she is still chilling but she doesn't quite have that perk anymore.
*Salinity3.5% - 100ml H2O=100g The concentration of salt in a solution 3.5%= 3.5g in 100ml.
Growing well. Not going to top or do any training, I'll let the plant do its own thing, she is constructing foundations now for what she senses ahead. Smart girl. ✨️ Let her, do her thing, let me do mine.
The voltage that is needed for electrolysis to occur is called the decomposition potential. The word "lysis" means to separate or break, so in terms, electrolysis would mean "breakdown via electricity. Green hydrogen is hydrogen produced by the electrolysis of water, using renewable electricity. The production of green hydrogen causes significantly lower greenhouse gas emissions than the production of grey hydrogen, which is derived from fossil fuels without carbon capture.
Electrolysis of pure water requires excess energy in the form of overpotential to overcome various activation barriers. Without the excess energy, electrolysis occurs slowly or not at all. This is in part due to the limited self-ionization of water. Pure water has an electrical conductivity of about one hundred thousandths that of seawater. Efficiency is increased through the addition of an electrolyte (such as a salt, acid or base).
Photoelectrolysis of water, also known as photoelectrochemical water splitting, occurs in a photoelectrochemical cell when light is used as the energy source for the electrolysis of water, producing dihydrogen . Photoelectrolysis is sometimes known colloquially as the hydrogen holy grail for its potential to yield a viable alternative to petroleum as a source of energy. The PEC cell primarily consists of three components: the photoelectrode the electrolyte and a counter electrode. The semiconductor crucial to this process, absorbs sunlight, initiating electron excitation and subsequent water molecule splitting into hydrogen and oxygen.
Water electrolysis requires a minimum potential difference of 1.23 volts, although at that voltage external heat is also required. Typically 1.5 volts is required.
Biochar, a by-product of biomass pyrolysis, is typically characterized by high carbon content, aromaticity, porosity, cation exchange capacity, stability, and reactivity. The coupling of biochar oxidation reaction (BOR) with water electrolysis constitutes biochar-assisted water electrolysis (BAWE) for hydrogen production, which has been demonstrated to reduce the electricity consumption of conventional water electrolysis from 1.23v to 0.21v.
Biochar particles added to the electrolyte form a two-phase solution, in which the biochar oxidation reaction (BOR) has a lower potential (0.21 V vs. RHE) than OER (1.23 V vs. RHE), reducing the energy consumption for hydrogen production via biochar-assisted water electrolysis (BAWE).
BAWE produces H2 under 1 V while eliminating O2 formation: key word "eliminating". Air with a normal oxygen concentration of around 21% is not considered explosive on its own; however, if a flammable gas or vapor is present, increasing the oxygen percentage above 23.5% can significantly increase the risk of ignition and explosion due to the enriched oxygen environment.
The addition of ion mediators (Fe3+/Fe2+) significantly increases BOR kinetics.
Air:
Nitrogen -- N2 -- 78.084%
Carbon Dioxide -- CO2 -- 0.04%
Hydrogen in homosphere H -- 0.00005%
Hydrogen "GAS" H2 in homosphere - 0%
"Nitrogen, oxygen, and argon are the three main components of Earth's atmosphere. Water concentration varies but averages around 0.25% of the atmosphere by mass. Carbon dioxide and all of the other elements and compounds are trace gases. Trace gases include the greenhouse gases carbon dioxide, methane, nitrous oxide, and ozone. Except for argon, other noble gases are trace elements (these include neon, helium, krypton, and xenon). Industrial pollutants include chlorine and its compounds, fluorine and its compounds, elemental mercury vapor, sulfur dioxide, and hydrogen sulfide. Other components of Earth's atmosphere include spores, pollen, volcanic ash, and salt from sea spray."
Although the CRC table does not list water vapor (H2O), air can contain as much as 5% water vapor, more commonly ranging from 1-3%. The 1-5% range places water vapor as the third most common gas (which alters the other percentages accordingly). Water content varies according to air temperature. Dry air is denser than humid air. However, sometimes humid air contains actual water droplets, which can make it more dense than humid air that only contains water vapor.
The homosphere(where you live) is the portion of the atmosphere with a fairly uniform composition due to atmospheric turbulence. In contrast, the heterosphere is the part of the atmosphere where chemical composition varies mainly according to altitude. The lower portion of the heterosphere contains oxygen and nitrogen, but these heavier elements do not occur higher up. The upper heterosphere consists almost entirely of hydrogen, cool.
78%nitrogen as N2, a far too stable bond to be used by organisms.
20%oxygen
0.04%co2
0.00005% hydrogen
When lightning strikes, it tears apart the bond in airborne nitrogen molecules. Those free nitrogen atoms N2 nitrites then have the chance to combine with oxygen molecules to form a compound called nitrates N3. Once formed, the nitrates are carried down to the ground becoming usable by organisms. Will it react with the oxygen in the air spontaneously, the answer is no. The mixture is chemically stable indefinitely. A mixture with air near the release point can be ignited, but if this does not happen then when its concentration gets below 4% it will be unable to carry a flame. Taking a small detour into chemistry here, a key concept to understanding the health impact of nitrogen-based compounds is knowing the difference between nitrates and nitrites.
What Are Nitrates and Nitrites?
A nitrite (NO2) is a nitrogen atom bonded to only two nitrogen atoms. Very strong bond
A nitrate (NO3) is a nitrogen atom bonded to three oxygen atoms. Weaker bond The optimal pH for nitrate (NO3-) depends on the process and the type of bacteria involved.
Nitrification
The optimal pH for nitrification is between 7.5 and 8.6
Nitrification is the process of oxidizing ammonia to nitrate and nitrite
Nitrosomonas has an optimal pH between 7.0 and 8.0
Nitrobacter has an optimal pH between 7.5 and 8.0
Nitrification ceases at pH

Likes
8
Share


@4F1M6
Follow
Nice and stocky plant and suits its location well. Colas are gaining structre and form by the day. Shes in great health and growing strong. Can't wait to see her branches once she piles some more flowers on.
She got treated with Dr zhymes as a preventative. That will basically wrap up her treatments ...possibly once more with lost coast.
Upped the pk intake as she is blooming strong now. Gotta keep her engine well fuelled. Response was stellar. Happy happy happy girl.
Until next update. Happy growing and stay lit fam.
Processing
Likes
27
Share


@Silverback_Guerilla
Follow
2/10:
I watered today with about 3/4 gallon each, plus cal-mag, signal, bembe, armor si, a little open sesame, and their final dose of endoboost.
The short one never did stop making the hook leaves on all her new growth, but she seems happy..budding faster than anybody else..
2/11:
Wife home sick today....postponing construction project to raise the lights.
2/12:
Today, I tackled the project to raise my ceiling another foot. In addition to that project, I installed and hooked up my new AC Infinity 6" intake fan. It's pulling in fresh air from the soffit vent on the eave of the attic, and currently feeding the garden with 46f fresh air. I'm able to easily maintain daytime temps in the lower 70f's now. I am able to drive the nighttime temps as low as I want. The only issue is that the outdoor RH varies quite a bit, so I ordered a 30-pint dehumidifier to put in the top of the closet.
I sprayed everybody with boomboom spray to try and mitigate the light burn damage that is likely to ensue.
2/13:
The taller one is still stretching a little bit, but the 2-footer is just budding up.
2/14:
I fed them today with about 3/4 gallon each including grow big, big bloom, tiger bloom, cal-mag, signal, bembe, humic acid, and I switched over from Open Sesame to Beastie Bloomz. Raised the lights another couple of inches. I did some training on them and defo'd a little bit.
2/15:
Installed the new dehumidifier and rigged the continuous drain on it...works great.
2/16:
I rotated the edge plants and removed some old leaves. I added another 22w 3000k 4' bar light under the canopy.
2/17:
I rearranged the garden and defoliated a little bit. That's it for week 8-

Likes
77
Share


@Basementganja
Follow
I love the sativa shaped nug-towers! When my plants grow big, I like to grow them until the very end of their cycle! That's why the extended flower period.
Video of Measurement of yield: T=Tops(92grams), M=Mids(59.1 grams), L=Lowers(58.6grams)
Total: 209.7 grams (1-2 grams worth, was taste-tested prior to scaling.)


Likes
7
Share


@HoffmanShulgin
Follow
¡Hola a todos! Han pasado 3 semanas de floración y ya se pueden ver pequeños brotes. He estirado aún más las ramas que han crecido. También he recortado las hojas enormes para que la luz pueda penetrar en el interior de la planta. He agregado más fósforo al fertilizante para estimular la floración. Ahora solo queda la etapa final de la floración. ¡Estoy esperando con ansias!
Likes
24
Share


@Finniegrow
Follow
NOTES:
This week I'm starting to flush with only water and Final Solution -nutrient, so emptying the tanks and refilling them as doing so. I'll try to keep the pH at around 5,8-6,2. Overall everything looks pretty good and I can't wait to harvest. 🙏
Day99 (23.1.)
Took some pics and videos for the diary with my shitty camera.
Day100 (24.1.)
Emptying and refilling all nutrient tanks with fresh solution as mentioned above.
Day101 (25.1.)
Increased the dark-/night-time by 30min so now the lights are 11,5h On / 12,5 Off.
Day102 (26.1.)
Day103 (27.1.)
Reducing 30min of light again so now my timer is set to 11h On / 13h Off. I also moved the lights a bit higher for the rest of the grow, about 10-15cm higher than before.
Day104 (28.1.)
Day105 (29.1.)