
Likes
Comments
Share


@the_big_pink_place
Follow
01/10/22 Everything is Going good, which means something bad is going to happen. Plants were 9 inches at the end of week 4 on day one of week 5 they were topped and defoliated which brought the height to 4.5 inches, So after the shock of having there tops removed they grew 4 inches in one week. Extremely happy I'm keeping track.01/13/22 Defoliated and LST'D the plants.01/14/22 Adjusted LST , removed all branches growing on the underside to allow for proper Growth of other branches. Fingers crossed this should be a decent harvest flipping on week 9.

Likes
36
Share


@nonick123
Follow
Día 59 (29/07) Este cultivo no es muy entretenido con solo agua, asi que...
Le hago supercropping a todas! 😁 A ver como reaccionan!
Riego 500 ml H2O pH 6,5 SÓLO a OnionOG #1
Día 60 (30/07) Las plantas se están recuperando muy bien del supercropping! 😁
Todos las puntas hacia arriba! 💥
Come onnnnnnn! A por esa floración en 2-3 semanas!
Riego 500 ml H2O pH 6,75
Día 61 (31/07) Las plantas se han recuperado genial del supercropping y están lanzando TODAS las ramas hacia arriba 😍
Un espectaculo la fuerza de estas plantas! 💥
Redistribuyo las plantas, para ver si OnionOG está más protegida del sol, ya que consume muchisima agua y voy a estar en unos días fuera...
También reubico ligeramente la malla de sombreado, debido a que en mi latitud el sol empieza a incidir lateralmente por las tardes...
Riego 500 ml H2O pH 6,55
OnionOG: Riego 1 Litro H2O pH 6,5
Día 62 (01/08) OnionOG me impresiona con su vigor. Sus ramas se están estirando de forma impresionante!
OnionOG le hago una poda de partes bajas de las ramas para mejorar el flujo de aire y que concentre su fuerza en las ramas superiores
Vuelvo a redistribuir las plantas en el invernadero dejando a OnionOG todavía más protegida del sol directo, para tratar de disminuir su consumo de agua estos días que no voy a estar...
Pongo una protección "visual" en el invernadero en el lado que da a los vecinos (cara norte), porque he "cazado" miradas indiscretas...
Riego 500 ml H2O pH 6,55
OnionOG: Riego 1 Litro H2O pH 6,5
Día 63 (02/08) Debido a que me voy de vacaciones unos días, adelanto el riego semanal con Té y la aplicación foliar de Kelp
Riego con 1 Litro de Té Vegetativo de Lurpe Solutions. Preparación: 24 horas con bomba de aire (oxigenación) con ingredientes:
Green Sunrise 8 ml/L + Insect Frass 16 ml/L + Hummus Lombriz 8 ml/L + Melaza 1 ml/L + Kelp Hidrolizado 0,25 g/L
Aplicación foliar Kelp hidrolizado de Lurpe Solutions a 0,25 ml/l
Día 64 (03/08) Cerrado por vacaciones
Día 65 (04/08) Mi amigo viene a casa a hacer un riego con 1 Litro de H2O pH 6,5
💦Nutrients by Lurpe Solutions - www.lurpenaturalsolutions.com
🌱Substrate PRO-MIX HP BACILLUS + MYCORRHIZAE - www.pthorticulture.com/en/products/pro-mix-hp-biostimulant-plus-mycorrhizae

Likes
2
Share


@walletinspector
Follow
At this point all of them are doing pretty good except the Merengon, I dont think she will make it


Likes
74
Share


@Hou_Stone
Follow
🌱🌿🌱🌿🌱🌿🌱🌿🌱🌿🌱🌿🌱🌿🌱🌿🌱🌿🌱🌿
C'est partis pour la culture de la Kong's Krush. Disponible sur :
https://shop.greenhouseseeds.nl/feminised-cannabis-seeds/usa-genetics/kongs-krush/
Pour la première fois j'essayer de faire germer dans des cubes de laines de roches.
J'ai préparé une eau avec 0.5g de bio enhancer/L puis j'ai abaissé le PH à 5.5. Je laisses trempé mes cubes dans cette eau 24h avant d'y placer les graines pour la germination.
Erreurs de la semaine :
Trou dans cubes : Certaines graines n'étaient pas à l'abris de la lumière. J'aurais mieux fait de pousser les graines dans les cubes sans les trouer.
🌟👨🚀🌟👨🚀🌟👨🚀🌟👨🚀🌟👨🚀🌟👨🚀🌟👨🚀🌟👨🚀🌟👨🚀🌟👨🚀
Venez me voir sur Instagram ❤️️
https://www.instagram.com/hou_stone420/

Likes
16
Share


@JUNGLE_B4RNS
Follow
-Bio 8-2-2 + CalSiMag
-AllZymes + Bio RootBooster
FC6500 x 4 @ 37.5%


Likes
41
Share


@Santica_Garden
Follow
Just another update for the Alien OG by The Cali Connection , I have uploaded a video for you guys which gives you guys a better look and how I'm progressing and how I'm training the ladies.
Any questions guys just ask.
Happy Growing 👍🏾🌱💚😎

Likes
12
Share


@Tmasm
Follow
obrigado Royal Queen Seeds por fornecer a genéticas, hipérion F1 e bolo de casamento.
Entrega segura, dentro do prazo e muito discreta, entrega prevista em 5 a 10 dias, recebi em 5 dias, por serviço de entrega não trabalha ao fim de semana, senão recebia em 3 dias.
Experiência para possível plantio em massa, dependendo dos resolvidos.
1/5 hipérion F1 estará germinado, nos próximos dias.
1/5 bolo de casamento estará germinado, nos próximos dias.
Restantes hipérion F1 e bolo de casamento, germinarão assim que estás, terminar seu ciclo de vida, devido organização de esposo, e com isso estudo diferentes épocas do ano.
O diário será atualizado toda semana, espero que gostem (eu também)
Likes
6
Share


@Lymegrow
Follow
Flushed it last night. Seems to be the same as it was yesterday when I noticed it.
Likes
13
Share


@GrowerGaz
Follow
Easy week the autopots are doing the hard work. I have been foliar feeding with my KNF collection LAB, FAA, WCAP.
I also went foraging to make some IMO , have added pictures if anyone is interested.


Likes
5
Share


@MarcelMarcel
Follow
Způsob klíčení
Sklenice s vodou, papírový ubrousek, kokosové peletky.
Ve skleníků 3 dny, na topení, vysoká vlhkost. Vyrostly 4 z 6
Sázeno do stanu 2.1.2023

Likes
51
Share


@420DeepGrow
Follow
Gracias al equipo de Fast Buds 420 y a MarsHydro por ofrecerme esta gran oportunidad de probar sus nuevas FF y ofrecerme una luz de calidad.
La Tropicana Cookies FF (Fastflowering) es la variedad ideal para los principiantes que buscan estirpes que prosperen en exterior e interior y en todo tipo de climas. Se trata de una variedad de alto rendimiento y fácil de cultivar que crece bastante y no deja de mostrar su vigor híbrido, incluso con un mantenimiento mínimo. Espera un efecto potente y duradero que relaje tus músculos y eleve tu estado de ánimo, dándote ese empujón extra que necesitas en una perezosa mañana de lunes. La Tropicana Cookies FF ofrece toda una gama de terpenos cítricos y amaderados, con un potente fondo dulzón que viene de la mano de un 28 % de THC, lo que la convierte en la opción perfecta para quienes tienen una alta tolerancia y buscan hacerse con las variedades más deliciosas y potentes del mercado.
Esta variedad cultiva hermosas flores púrpuras con matices a menudo claros, pero predominantemente oscuros, que se ven resaltados por toques de rosa y azul, y pelos de color naranja oscuro esparcidos por todas partes. Los cogollos de Tropicana Cookies FF se desarrollan densos y compactos, con una gruesa capa de resina que les da un aspecto casi esponjoso y muy pocas hojas de azúcar, lo que facilita al máximo tus sesiones de recorte. Al romper los cogollos, se revela una mezcla dulce, casi de caramelo, de peladuras de cítricos y madera de sándalo, que es tan única que hará que todos tus amigos se mueran de envidia. Definitivamente, es la elección correcta para los fabricantes de hachís y los extractores que buscan ese perfil de terp especial.
🚀 🌻 Consigue aquí tus semillas :
https://2fast4buds.com/es/seeds/tropicana-cookies-fast-flowering
📆 Semana 1 crecimiento:
Relleno las macetas de tierra evitando espigamientos.
Aplico tierra de diatomeas para evitar futuras plagas y humus de lombriz para mejorar el sustrato y así también el sabor final de los cogollos.
Solo regaré una vez con nutrientes con una EC de 550 y el resto con agua y calmag hasta 350 ppm, al haber aplicado el humus de lombriz y la tierra de diatomeas.
Humedad: 70%
Temperatura: 30°C
Likes
15
Share


@CanadianFillmore
Follow
Overall very happy with this plant grow. She was by far the hungriest of the four plants in this grow, but she still developed nicely, loads of sticky sweet smelling buds. Will update in 2 weeks, after the first smoke.
Update! Smoked the first buds from this harvest, the smoke was smooth, light berry/fruit taste, it will get stronger as they cure in their jars. Overall, I am happy with the plant, the bud product and quality. She's not a super heavy indica, but she can still pack a punch!


Likes
9
Share


@caspersaints1
Follow
Day 51-26
Fed 2 L till run off . She was thirsty from no feeding yesterday but humidity still fighting hard in the high 50s
Day 52-27-
Fed 1.5 L
Starting to lower nutes
Day 53-28-
Fed 1.5L
Day54-29
Fed 1.5L
Day 55-30
Missed
Day 56-31
Fed 2.5 L
Day 57-32
None
Day 58-33
Fed 2L
Day 58-34
No feed
Day 35
Feed2 L
Day 59-36
In one
Day60-37
Fed 2L
Day 61-38
None
Day. 62-39
Feed 3 L . 1st L plain ones water as no run off last few days
Then fed 2L with nutes
Day 63-40
None
Day 64-41
None
Day 65-42
Fed 2L
Day 66-43
Nothing - starting to see fading I think . Might start flushing in next few days
Day 67-44
Fed 2.5 L
Say 68-45
None
Likes
6
Share


@eldruida_lamota
Follow
Vamos familia, actualizamos la 4 semana de floración de las Originales de GB.
Están enormes, tienen un buen color, se ven sanas, y van progresando las flores adecuadamente.
La alimentación de Agrobeta la están aceptando muy bien , ya se las puede apreciar.
Agrobeta:
https://www.agrobeta.com/agrobetatiendaonline/36-abonos-canamo
Mars hydro:
Code discount: EL420
https://www.mars-hydro.com/
Las maximas de temperatura no superan los 26 grados y las mínimas no bajan 20, así que no me puedo quejar.
Los niveles de humedad también son los correctos van entre 50%/65% de humedad relativa.
Por supuesto el Ph lo estamos dejando alrededor de 6.
Hasta aquí es todo, buenos humos 💨💨💨.

Likes
6
Share


@Sup3rNov4
Follow
She is beautiful. Slowed down on water intake but thats fine as I believe the roots are spreading before the fruits fatten

Likes
Comments
Share


Likes
9
Share

@Salokin
Follow
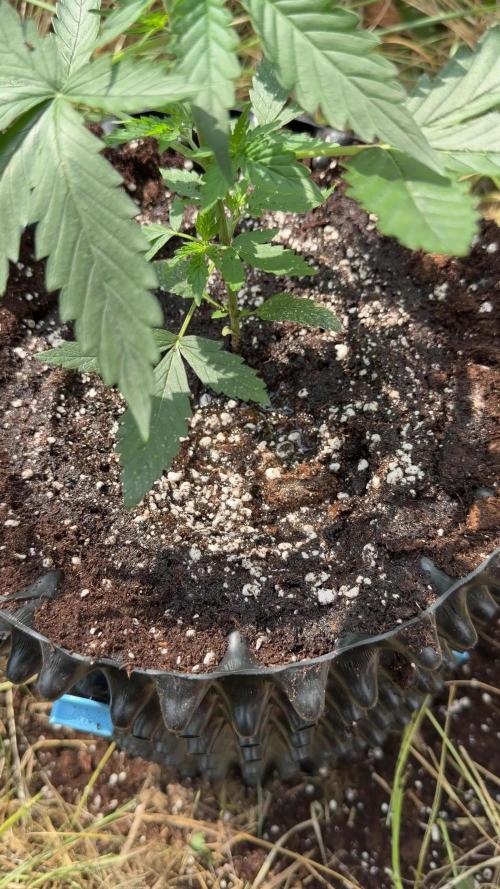
Week 4 | LSD Auto
Decision made. After three weeks of side-by-side comparison, one plant clearly outperformed her two siblings in vigour, structure and overall development. The other two have been discarded, and the winner has now moved outside — straight into a 12L airpot, bottomless, set in the garden next to the 46 Kush.
**RootX** was applied again at this transplant, delivering mycorrhiza (*Glomus intraradices*), *Trichoderma harzianum*, 13 strains of *Bacillus spp.*, humic acids, amino acids and vitamins straight into the new root zone — giving her the same strong start outdoors that got her through the indoor selection phase. She got 300ml of water on transplant day to settle in.
Last recorded indoors before the move: Week 4, height 18cm, light schedule at 17 hours, EC 1.5 mS/cm, pH 6.2. Now she's outside and adjusting to natural light and the elements.
She's settling in well, leaves looking healthy and well-watered. Updates every Sunday. Stay tuned.

Likes
2
Share


@TheBudWhisperer
Follow
Week 4’s in the box and these plants are lightning quick outta veg. We’ve confirmed the presence of at least 3 males and 1 guaranteed female so far. They’ve all started to hit vegetative maturity in full stride so it won’t be long until we look to flip. A couple have been topped once more for the sake of additional colas and if we get lucky, the remaining females may be suitable for a scrog. Either way, can’t be much happier about how well they’re growing at this stage. Here’s hoping it remains so through flower🤞.
***Notes: strongest plant to this week is first confirmed female. Prob a prime candidate for cuts and back pollination with the F1 pollen dump.***