The Grow Awards 2026 🏆 


Likes
Comments
Share
@Merrymoosefamilyfarms
Follow
Hey hey everybody! I hope you all had a fantastic week and I am excited to be back for our latest update which marks the end of week 15 and the beginning of week 16!
Now I don’t know if it’s just me or the beginning of the year can be explained off as Mercury being in retrograde (I’m not saying it is, that’s more my wife’s deal- I wouldn’t know either way) but things have been absolutely nuts over here and I needed a little something good to help level out the crazy…
I have some awesome things in the mail (still rolling in from the spending spree I went on) but truth be told we were between deliveries, and I needed instant gratification- soo I may have accidentally brushed up against the timer and flipped to flower ( and by accidentally brushed up against, of course I mean I fully intentionally programmed the time to flip to flower in a moment of weakness…🤷♂️🏻)
Am I sorry? No… will it slightly kill me from an aspect of my struggle with occasional OCD? Oh yes…. Ohhhh yesssss…. That little corner is/was driving me nuts but I figured it was time to just let it do it’s thing- honestly once I noticed I picked a pot that was too small for what I was trying to do, I should have just there in the towel, flipped and taken it as a learning lesson for next time…. Buuuuut alas, I am stubborn and that is NOT how that went down… I’m still excited for what’s to come, we should have some (hopefully) pretty impressive things developing soon so I am stoked!
That being said however, I have also had some unimpressive things happen, for instance- yesterday, I go in to feed the girls and my light is off! I (obviously) must have screwed something up when I went to change the light schedule- specifically, due to the fact that there are 9 or 10 possible lighting schedules you can set, I think I had correctly set the on/off times BUUUUUT I think after I had switched to the next programmed on/off times which were incorrect-
I noticed when I saw that the lights were off, they should have been on for another three hours (give or take) - so I immediately started messing with the timer and turned the lights back on and continued to tend to those lovely ladies. I then went and made dinner- after, I just had this feeling that I should check on the tent, just in case- and sure enough, an hour after the lights were supposed to be turned off, there they were, on like grey poupon (I apologize I haven’t heard that in like a decade or more, had to
Likes
14
Share
@iLoveGoodWeed
Follow
She had some samll defolation done and one more will be done this week. She should start getting tall next week.

Likes
22
Share
@Gram_Solo
Follow
Can't believe the purple coming through on one atm 🤑🧐 lol looks mad!! Hopefully a few more purple dominant phenomes on others now.
Leaves were looking a bit yellow and pale last week I've been giving some extra cal mag and bud factor X see if she improves.
Also found out my PH was off by abit was at 7.47 when I checked. Didn't know that My PH pen was uncalibrated the whole time. Bought some salts and corrected it so we're all good
Theyve all had feed of the fresh ph and nutes , hopefully bring some darker colour back to it.
Can't stop peeping in the tent 👀
Likes
80
Share
@Roberts
Follow
FBT 2307 has been killing it. She got some nice big colas on her. I switched to ph water a few days ago. I will be looking to harvest in about 10 days roughly. I did add orange essential oil to ph water. Dunno if it will effect anything. She grew great under the Mars Hydro FC4800 light in the Athena blended line nutrition. Thank you Mars Hydro. Athena, and fast buds. 🤜🏻🤛🏻🌱🌱🌱
Thank you grow diaries community for the 👇likes👇, follows, comments, and subscriptions on my YouTube channel👇. ❄️🌱🍻
Happy Growing 🌱🌱🌱
https://youtube.com/channel/UCAhN7yRzWLpcaRHhMIQ7X4g
Likes
11
Share
@ChefSpliff
Follow
Week 3 has come and gone and it was a sight to see!! All the pistills came in nice and strong. I have to get in there and defoliate every couple a days a bit. This will be the last week of defoliation. Once I can see the main bud sights I will do my final trim. Started reducing the Nitrogen as the stretch faze comes to an end and up the bloom ferts. I cant raise my light much more so I hope they stop stretching this week. Im excited to see the flowers grow into these pistills and watcch the calayx swell.


Likes
11
Share
@Enki_Weed
Follow
🌸 Woche 5 der Blüte
Die Early Skunks sind jetzt mitten in der Blüte und entwickeln sich richtig stark. Der Stretch ist so gut wie durch und die Pflanzen haben ein schönes, gleichmäßiges Blätterdach aufgebaut. Die Blüten werden von Tag zu Tag sichtbarer und setzen schon ordentlich Harz an.
Das DWC-System läuft stabil: frische Nährlösung, klare Werte und die Wurzeln strahlend weiß. Genau so soll es in dieser Phase aussehen. Die Pflanzen nehmen sehr gut auf und zeigen keinerlei Mängel oder Stress – Farbe, Struktur und Wachstum sind voll im grünen Bereich.
Das Klima bleibt konstant und das Setup arbeitet sauber zusammen. Licht, Luft und CO₂ greifen perfekt ineinander, wodurch die Pflanzen richtig Tempo machen.
Fazit:
Sehr starke Woche. Gesunde Pflanzen, satte Farbe, stabile Blütenentwicklung. Alles bereit für die nächsten Wochen, in denen die Buds jetzt richtig zulegen werden. 🌱🔥


Likes
Comments
Share
@eldruida_lamota
Follow
Vamos familia, actualizamos la décima semana de floración de estas Sagrada amnesia de Seedstockers, salieron las 5 de 5, 100% ratio éxito.
Aplicamos varios productos de Agrobeta, que son increíbles para aportar una buena alimentación a las plantas.( Justo esta variedad 2 de 3 son bastante sensibles y marcan en las hojas exceso pero no están las puntas quemadas)
Temperatura y humedad dentro de los rangos correctos dentro de la etapa de floración.
La tierra utilizada es al mix top crop, por cambiar.
De 5 ejemplares seleccioné los 3 mejores para completar el indoor y trasplanté directamente a macetas de 7 litros, el fotoperiodo a 12/12, también aplique una buena poda de bajos, se ven bien sanas las plantas, tienen un buen color, ya progresan las flores, llevan ya una tricomada… increíble.
Agrobeta:
https://www.agrobeta.com/agrobetatiendaonline/36-abonos-canamo
Hasta aquí todo, Buenos humos 💨💨.

Likes
57
Share
@HinduGod
Follow
WOW LOOK AT DAT!!! DAT FADE IS STARTING TO COME IN!!! PLANT IS STARTING TO DRAW NUTRIENTS FROM THE LARGER FAN LEAVES!!!! SUN GOD HAS BEEN VERY VERY GOOD!!! RAIN GOD SHOWED UP FOR A LITTLE BIT DIS WEEK!!!!
PLEASE COME AGAIN!!!!
Likes
57
Share
@LockDownGrow
Follow
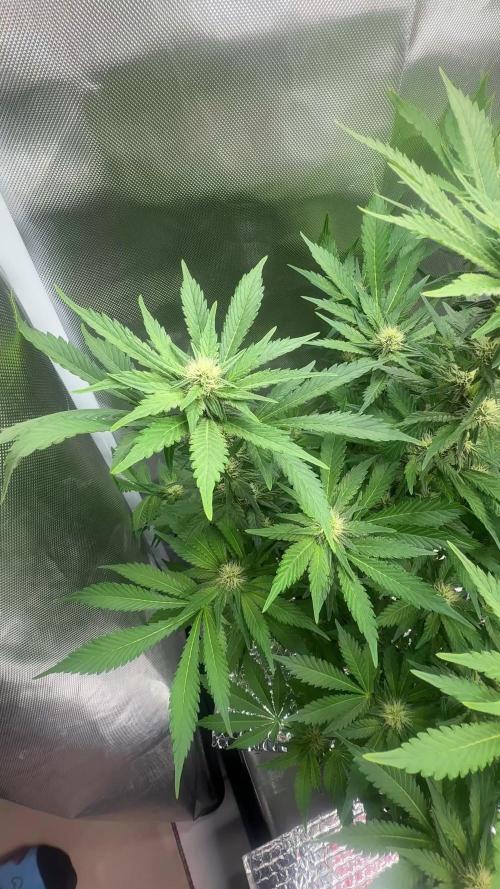
Ok so this week I did a defoliation and a tigh down too the netting , I really was not planning on doing such a big defoliation but the leafs became thick and dense and there was almost no light penitration down too the lower branches of the plant , so she is opened right up now and the humidity and temperature has dropped loads and the air is moving alot better around the leaves and branches , I will not take anything more off her now , I have also added Cal mag too the nutrients for this week only , she is well into pre flower now but the stretch has not yet started so I figured it's no or never too defoliate and tigh them down , this grill really has grown right out this week and is unrecognisable from the plant just a few days ago ,
I am very happy with them so far and being new too all this it's all very exciting ,
Thanks for looking :)
Likes
5
Share
@Cannaseur2k19
Follow
They dont really strech much its more like cruise control, still not sure if I need nutrients?

Processing
Likes
1
Share
@Nvchods3
Follow
se realizo una 2da poda apical a una de las plants la otra solo quedara con la poda apical inicial y se transplanto a maceteros de 11lts.

Likes
Comments
Share
@grower0007
Follow
Great strain! I was to get such plan with tree leaves instead of two.


Likes
4
Share
@Cannibalgardens
Follow
Wow these genetics are awesome the plant has grown so much in the last week after i put her into the bigger pot. The growth took off fast after I topped her and started to spread her out with the LST training . Been feeding her hard and I'm looking forward to how this next week is going to go lots of growth .. Thanks for checking in and cheers canna family ..
Likes
4
Share
@el_cultivito_colombia
Follow
Semana 1 (18/7/22 - 24/7/22)
Se preparo una solucion de Mills Start R:
- PPM : 100
-pH : 5.8
Se submergio cubos de roca de lana dentro de la soulcion.
Cada semilla que se germinara se paso a un cubo de roca de lana y se mantuvo sin luz.
Cuando las plantulas salian del cubo, se pasaron a otra bandeja de germinacion con domo de humedad bajo una luz T5.
Likes
5
Share
@SgtDoofy
Follow
Feb 27
Swapped over to an 18/6 light schedule a couple days back. Getting some really good perking-up during sleep.
Not quite ready for LST yet.


