Likes
Comments
Share


@Tallermanu
Follow
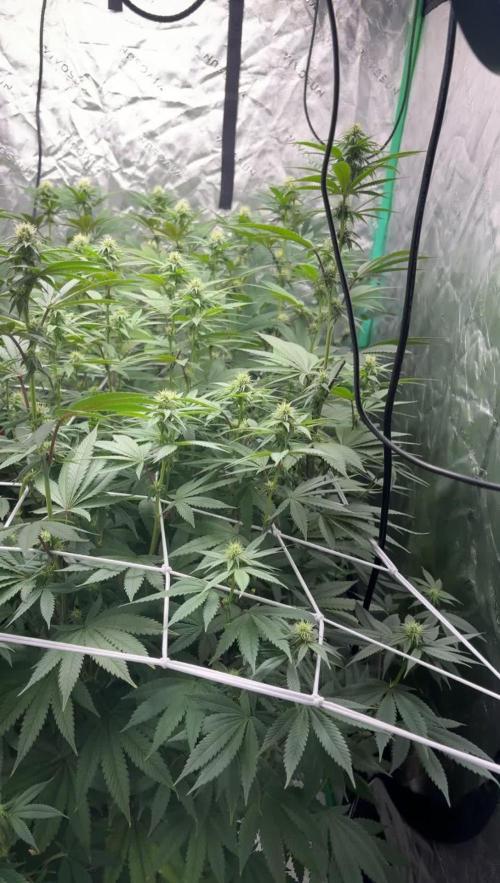
Estoy muy satisfecho de mi primer cultivo Indoor. El resultado a superado con creces mis mejores expectativas. Ciertamente disponía de unas condiciones mas que buenas para llevarlo a buen término. Una habitación de 6 metros cuadrados que con un radiador, un deshumificador, un ventilador y por supuesto un termohidrómetro wifi que en todo momento me indicaba temperatura y humedad.

Likes
1
Share


@85IWinParlays
Follow
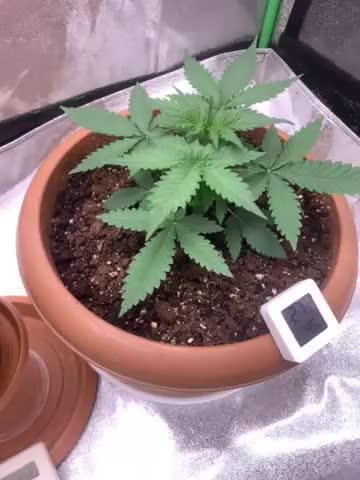
On February 6th, I transplanted clone into a 7 gallon fabric pot. I put 70 cups of Ocean Forest in, then placed clone (still in pot), in the center of 7 gallon fabric pot, then filled the rest of the pot up with Happy Frog.
Before I transplanted, I sprinkled Great White in transplant area.

Likes
17
Share


@Zkittlezman
Follow
Incredibile ma vero...ho trovato alcuni ragnetti rossi in una zona del palco. Dopo aver rimosso la parte "infetta",ho dato una passata di piretro(essendo solo alla seconda di fioritura,non dovrebbe creare peoblemi ma,per ogni evenienza,mi sono procurato dell'olio di neem) e per ora,sembra che i ragnetti rossi siano definitivamente deceduti,speriamo tutti. Cmq il mio bellissimo veleno cresce e ci sono un sacco di cime che si stanno riempiendo di peletti bianchi

Likes
19
Share


@Gruenerfinger85
Follow
5 Blütewoche:
In der 5 Blütewoche kann man Tag täglich sehen wie die Buds immer mehr an Größe zu nehmen. Die hübschen Ladys achten nicht auf ihre Line. Sie haben sehr großen Hunger alle 2-3 Tage bekommen sie zwischen 1,5l bis 2l Essen. Bei einer hab ich vielleicht ein Calcium Problem oder aber es kann dieser Pilz Befall sein denn Namen habe ich vergessen, ist aber nicht leicht voneinander zu unterscheiden weil sich der Mangel und Pilz Befall sich sehr ähnlich im Aussehen sind.
Ansonsten geht’s allen gut ich werde mich wieder melden vielen Dank für dein Interesse, ich werde euch auf dem laufenden halten.
Likes
9
Share


@Drtomb
Follow
Start of Week 4 begins tomorrow, unfortunately I'll be out of town. I've been removing branches, but in the last 3 or so days I've stopped removal. It's time for these girls to really start stacking. ran out of potassium silicate. Will be continuing with out it for the rest of the grow.
Started to notice a slight smell when leaving the door open and returning after a few minutes. This started in the last couple days

Likes
18
Share


@BobtheBUDbuilder
Follow
-Notes
Green crack is over 34 inches while the La chems around 24. Next time i do a diary i will do each plant differently.
Light height is 12 inches from highest colla which belongs to GC1. And let me say wow. Not only did she bounce back but she has went back to outgrowing all the other plants with stride. If a pro grower had this seed she would have got her own 3x3 cause that is a 1 pound plant.
So.. I flushed TD2, GC2 and TD1. Nothing major just about 3 gallons fush each. Most of the ppm readings where already low. Its a good idea to flush out the soil. Already the lime green color is gone from gc2. Td2 is starting to frost golden brown. So far all the plants are on the road to good health.
My ppm is around 600 but going to bump up to 900. We will see. We did the final defoliate. Mainly cleaned up the bottom of the plants and a few of them got pruned. Also cleaned out the tent and wiped down and moved fans around.
-GC1 has grown almost 20 inches this week. Insane. I am about out of room in my tent. My light is near max and the colas are 10 inches away. Just going to have to deal with the fox tail later on those sadly. Any advice message me. Td2 has grown a few inches only in 2 weeks but the buds are fattening up. The La Chems finally started stretching. I am guessing 3 or 4 weeks on td1 and 2 weeks after gc and la chems. We will see.


Likes
13
Share


@KingSalomonsWeed
Follow
Und weiter gehts.
Hat ein paar Blattläuse.
Habe den Ventilator umgestellt und noch einen bestellt!
Blattläuse bãh.
Da. Blattlåuse, ich machs euch unbequem... 😛
Ok, nur noch 2 Ventilatoren.
Fragt nicht.
Ich sage nur Mitbewohnerin.
War ja eh ihrs. SEUFZ
Ok neuer Monkey fan und der alte. Zusammen bringen die was.
Keine Blattläuse zu sehen, nach 4 tagen Wind.
Yes! Am 001.009.021
ist sie seit 5 Wochen in der Blüte.
HALBZEIT.
Und weil ich ja DER CHAOSGROWER!!
schlechthin bin. Wird mein geliebtes Pflänzchen in ca 4 Wochen für eine Woche ausziehen.
Grund ist ne völlig ausser rand und band geratene andere photo period Pflanze, die sich da irgendwie reingeschlichen hat.
Und die muss! Mit aktiv Kohle filter Trocknen .
Deswegen gibts n kleines technikupgrade, denn das ausweich quartier braucht ja auch Licht.
Too optimistic. Aphids re still there.
But
I think they re getting fewer.
..
Likes
6
Share

@Trinidad
Follow
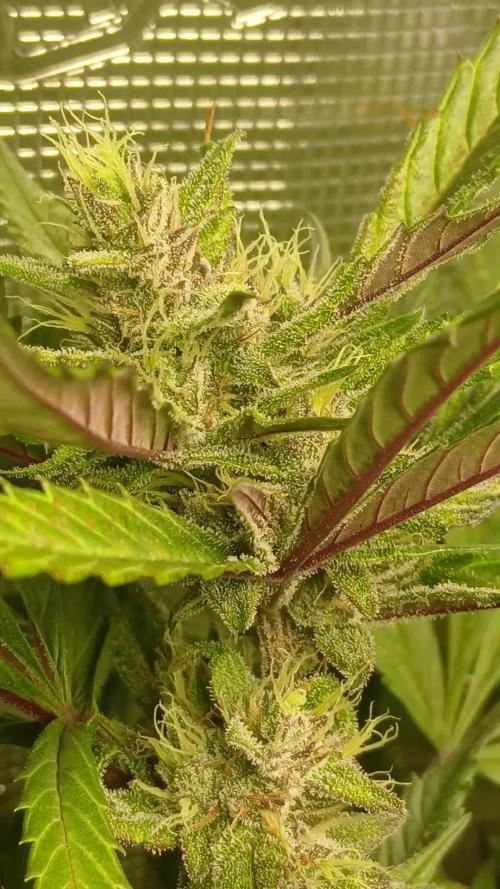
Day 65. Omg the smell is so amazing, it's hard to describe, sweet and sour at the same time. Maybe a young guava. I could smell her all day. The buds are small but frosty. These buds will make for easy trim.


Likes
18
Share


@pifflestikkz
Follow
Day 36F
This skunk is kicking OUT 😍
I love it, smells so damn good! Nostalgia of 90s back with a sweet skunk but pungent nostril pinching aroma 👌
Buds forming amazing in my opinion concidering the abuse she has taken and sharing 3gal pot.
Still just alternating feed/water and there happy 💚
Day39F - skunk is absolutely thriving, swelling and increasing her blanket of thc all over, and the colours are of a golden orange and green 😍
Likes
19
Share


@blady1989sqn
Follow
Plants look great and fresh, auto one looks pretty good, lots of smelly buds, very good for an auto. Other two from RQS starts flowering pretty nice.
Likes
9
Share


@Chuckwaggon420
Follow
This girl is doing awesome. She has completly taken over that corner of the tent 100%. She is a funky plant you can see how her leafs just stick close to her main stem along with her branches its a weird pheno its time to flower her and see what we get!. Will give her a hair cut/ defoliation over this next week so the light can "penetrate" her more.
She is getting a heavy dose of nutrients from canna and my my she has just exploded. Still keep it at 5.6-5.7 PH and about 3 L of food every 2 days for her.
Released some more lady's in there just to make sure no cross contamination is going on from other flower tent. Have soaked the garage in bleach almost died!!! Don't smell bleach when u spray in container and see mist in there!!! DUH now whem I open twnt floor is soaked in bleach and make sure clothes are clean.
Learn from ur mistakes and move forward in a running motion!!!
Stay tuned it's gana get frostyyyy

Likes
9
Share


@Cheezy
Follow
Due to the tiny growth of this plant I haven't been keeping up to date with its diary. Photos have been taken throughout the process and I do plan on updating it eventually. I'm hoping that the quality of smoke turns my opinion around on this strain as I have had to turn to humor to deal with the absence of growth... But shes a perfect mini Christmas tree and boy does she smell good!!
Processing
Likes
2
Share


@Valedor
Follow
vamos a poner a lavar las raíces de las White Widow y la Mamá mía ya están listas, el sistema Critical sigue en floración la Swiss cheese esta imprable, tiene muy grandes sus pistilos y huele bastante bien

Likes
4
Share


@HowtoBubatz
Follow
My Strawberry Gorilla Automatic from Fast Buds is now in its third week of flowering, and I couldn’t be happier with how she’s progressing.
She looks incredibly healthy, with vibrant green leaves and strong branches. The stretch phase is nearly over, and she has developed a solid structure with a well-defined main cola.🌱
One of the most exciting changes this week is the first appearance of trichomes on the main bud. Under the light, they’re starting to sparkle, hinting at the resin production that’s about to take off.
The buds are forming nicely, and I can already smell a faint but promising aroma developing.
So far, she’s responding well to the nutrients and environment, with no signs of deficiencies or stress. If she keeps going at this pace, she’s going to be a real beast by harvest time.😊
Likes
28
Share


@Felloffthegrid420
Follow
This week is amazing they have took a growth rate 📈 unbelievable how much they have grown I find myself sitting back here for hours at a time just enjoying life happy growing everyone caring growing loving life

Processing
Likes
15
Share


@eldruida_lamota
Follow
Como las veía familia? Yo las veo verdes, sanas y con muy buen ritmo, no olvidemos que pueden llegar alcanzar un 25% thc y eso está crazy 😝.
La temperatura mínima son 17 y la máxima esta en 27 , la humedad la mantenemos por encima de 50%.
Esta cepa es resistente aguanta bien los cambios de temperatura y el trasplante ayudó a mejorar su ritmo.
Las pasamos a 12/12 esta semana y pronto empezaremos con la floración.

Processing
Likes
42
Share


@Gabarram
Follow
Day 60 (12/11) and starting the second week since I change the photoperiod, but she's not really flowering yet, she's producing florigen. The fertigation solution is only Bloom and also Foliar spray. Since it's still transition I won't raise the concentration, I'd rather go low on fertilizers.
Day 61 she keeps on growing and stretching the actual shoots. She looks very pretty at this moment. I'm satisfied with her sight so far.
Day 63 EC of run off is 1114 uS/cm. I'm using foliar fertilization (Foliar from Power Flower fertilizers) every day just after the lights go off.
Day 64 (16/11/2019) fertigation includes 1.3 mL/L Cal-Mag, 0.2 g/L Flower Power "Foliar" fertilizer (this time is not foliar application, I added the solid to the solution, I think the only disadvantage with this is that one needs more powder and it's the most expensive of all the flower power fertilizer line) plus 0.3 g/L Flower Power Bloom Fertilizer pH 6.1 EC (inflow solution) is 1.33 mS/cm. Some shoots that are good candidates to bear buds in the future seem very weak so I'm supercropping a little more while there's still time! I want strong stems to carry heavy calixes ;) and I plan to fill the surface yet a little more
Day 66 today a big defoliation, I don't like getting rid of that amount of stored energy, those precious carbs, and the associated risks of such a high stress technique, but some things have to be done. 🙏