
Likes
Comments
Share


@Hydronaut
Follow
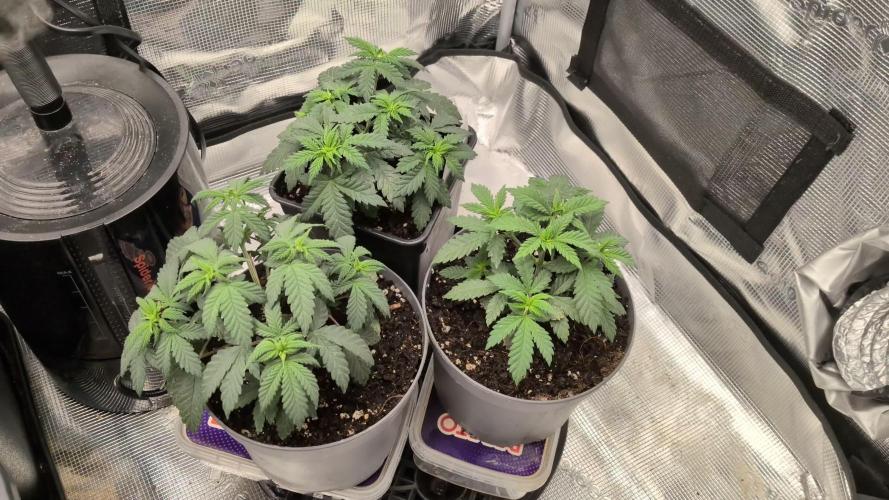
Preparing to yank out top shelf and rejig things. I can only gain 4” but it will be needed as this thing is running hard. Closer than 8-10” to the LED light, and she WILL get cooked! Next Gen grow box gains almost 8” in height with same dimensions, so problem solved. I may have to cut CO2 until stretch is over or just cut altogether. I got a close eye in her.
Day 44: She's looking good, and stretching at a rate of 2"/day in her tin can. I did a light defoliation and cleaned up training wires. I'll leave her be from here on out; less some selective defoliation to keep sites open. I cut CO2 (which would have been helpful a bit earlier), and may turn back on at the end of week 8, time will tell.
Day 46: She looks like she is 4+ days behind when compared to the other 4 autos I have grown. She will either catch up, take longer to mature, or I'm screwed because of the heavy defol. Flower development seems slow/odd. 10pm and she’s now 22” tall and too close to the light. Flower productivity accelerating for sure. Maybe she will just catch up, and finish late? Bummer I had this one in quarantine.
Day 48: leave symptoms developed further into dark rust spots very suspect to a calcium deficiency. I flushed for a few hours, cut Gro out all together and bumped Micro and Bloom. Increased CalMag from .8ml to 1.5 ml/gallon. Now observing.
Day 49: Another day or two will tell but it feels like the deficiency is slowing as the progression on day 47-48 was an hour by hour progression.
Throughout the week, and almost everyday, I have taken a dozen or so leaves throughout the canopy and the undergrowth. One day I defoliated her pretty good, but not super heavy. Massive leaf production and has crowded the plant/bud sites out in a matter of a day or two.
Day 52: Looks like calcium or possibly potassium deficiency back in check. Newer leaves look good and no progression on older leaves.

Likes
18
Share


@MadeInGermany
Follow
Flowering day 19
since the time
change to 12/12.
Hey all together 😀.
This week she has developed beautifully ☺️.
I poured it 3 times with 1.2 l this week.
Tomorrow I will add the 2 g GHSC Powder Feeding Bio Bloom because the first blossoms are coming :-).
I checked all the leaves thoroughly for pests or diseases and everything is fine ☺️.
Next week I'll look at your roots as soon as the coconut is completely rooted.
As every week, the tent was cleaned and the entire technology checked.
The humidifier was also refilled every day 👍.
In the next few days I will remove the bottom shoots so that the energy doesn't end up being wasted in the small popcorn buds.
I wish you a lot of fun with the update.
Stay healthy 🙏🏻 and let it grow 🍀
You can buy this Strain at :
https://sweetseeds.es/de/red-mandarine-f1-fast-version/
Type:
Red Mandarine F1 Fast Version
☝️🏼
Genetics:
Red Poison Auto®️ (SWS39)
X
Tangie (California Orange x Hybrid Skunk)
👍
Vega lamp:
2 x Todogrow Led
Quantum Board 100 W
💡
Bloom Lamp :
2 x Todogrow Led
Cxb 3590 COB 3500 K 205W
💡💡☝️🏼
Soil :
Canna Coco Professional +
☝️🏼
Fertilizer:
Green House Powder Feeding
☝️🏼🌱
Water:
Osmosis water mixed with normal water (24 hours stale that the chlorine evaporates) to 0.2 EC. Add Cal / Mag to 0.4 Ec Ph with Organic Ph - to 5.5 - 5.8 .

Likes
12
Share


@Greenthumbguru
Follow
Week 9 ive stopped feeding and now I've begin flushing my first harvest is fastly approaching I had high standards I watched countless videos and looked at yalls diaries I want them big dense nugs I got lost In the sauce n almost forgot to enjoy the process this will be the first time I successfully growed anything let alone cannabis I enjoy the anonymous of being able. To share what I'm doing its like a secret society for cultivators ,farmers what ever u wanna call it but someone should really design an app

Likes
79
Share


@MiyaguiOkPolilla
Follow
Hola cultivadores 🌊🌊🏄♂️
Una semana más ha pasado para esta chica, su primer semana asomándose a conocer el mundo real, donde los calores le dan duro pero se resiste abrazando al sol, apuntando con sus hojas al cielo.
Así la encontré hoy, bajo el domo que usamos para mantener un ambiente húmedo y darle a sus raíces la posibilidad de expandirse entre el aireado sustrato. 💦♻️
El suelo parece estar bastante bien, cada vez que entierro los palillos chinos a partir de unos 4 cm por debajo de la superficie se mantiene húmedo pero no abundante. Sólo recibe 1 litro de agua cada dos días con una dosis de MicroVita®️ y algunas heces de cabra
No mucho más que decir, solo que deseo ver ese fenotipo de duckfoot para disfrutarla en mi terraza, donde recibe aprox 7 horas de luz directa y otras 8 indirectamente.
Intentaré no alimentar con minerales hasta la cuarta semana de floración ya que he planificado el sustrato 🤞🌱
Smokin' love
Un saludo grande a esos seres que siempre están por ahí, haciendo crecer el mundo!

Likes
16
Share


@JJs_Js
Follow
This week has been a breeze. Simply watered at 6.5, kept the humidity at 65%, and increased the power of my light to about 70%. Also made a tea with Roots Organic Terp Tea Grow, and watered it down 1 -4 tea to water. Even with diluting the tea, the plants showed a little burn, so I’m holding off on ferts til next week. All are looking great, besides the one LSD25 that is off to a slow start.
Likes
4
Share


@UKBUDBROS
Follow
week 7 I am having a troublesome time. I am feeding a litre a week per plant with nutes and a litre water 2 days after so 2 feeds a week to each plant I give 8ml sensi bloom part a and 8 ml part b to 1 gallon dechlorinated and ph at 6 water with 4ml carbo load 4ml sensizyme and 4ml overdrive and also some calmag in between feeds! I will carry on as I am but I need help! I don’t know why the fan leaves are browning and yellowing I have trimmed the plants of most dead/dying foliage after giving a feed and adding calmag I hope they will pick back up! I have added all photos from last update in order to date
Likes
6
Share


@Reidy_B
Follow
Things are looking great! I started some backup seeds when things were looking really rough. Just in case. 😉 I also FIM’d my bigger plants because they were looking so much better! I have also removed the drip irrigation, just to make it more of a personable experience with my ladies. ☀️💦


Likes
16
Share


@SeshHouseCannabis
Follow
Have been clearing out a lot leaves and branches, decided to just LST on one plant and Fiming on the other one. And training have been applied to all plants.


Processing
Likes
6
Share


@Ferenc
Follow
Hey! Just back well
They are getting better and better soon need to start to flower them. Fertilization happens 3x a week with the mixture of Biobizz family (Biobloom, Topmax, BioGrow, Epsom salt, Gunokalong extract.) They grow as hell. 600W LED, 18 hours on 6 hours off, 200 ml water per plant a day, humidity approx 35 percent.
Day 53: They are bushy keep doing LST on them.
Day 56: I constantly do LST for them and also some lollipopping so I removed the bottom unwanted leaves especially the yellow ones. From tomorrow I provide darkness for 2 days and then Monday the beggining of the 9th week I will switch to 12/12.


Likes
12
Share


@TrueNorth
Follow
okay guys this is insane.....232 grams wet... with a final dry weight of 17 grams..... im devastated.... although they are dense buds with such wonderful colour and smell, the yield and time was not worth it.... i gave it same treatment as the other ladies in the tent and they all BY FAR exceeded this.
STRAWBERRY NUGGETS has a great berry flavour and honestly you can taste it a bit when you exhale and keep in mind this is not cured fully yet. every day it smells better and better.
i am super disappointed with the yield, i was really excited for this considering it was my first prize ever! i do love the smoke but i will for sure never grow this again i was super disappointed......
there was 32 grams of HUGE stems lol
after trimming i had 73.6 grams wet. total dry was 17 grams...... not even an ounce folks.....
i will be making bubble hash, rosin and edibles with this! STAY TUNED!!!!!!!
LOVE YOU ALL THANK YOU FOR LOOKING

Likes
107
Share


@Tropicannibis_Todd
Follow
Alright Then
REMINDER I DO 2 UPDATES PER WEEK 👉WEEKLYROUNDUP👈👉MIDWEEKLY UPDATE👈
We just hit week 4 and all is well , have to admit she's showing pre-flower growth super happy with how shes coming along 😃 .......
I'm still training her with LST looking good 👌 And she's filling out the pot perfectly👌
Very little water given ,so far and rain water to be used entire growth
Lights being readjusted and chart updated .........👍
I GOT MULTIPLE DIARIES ON THE GO 😱 please check them out 😎
👉I WISH GD HAD DISCORD SERVER SO GROWMIES COULD HAVE A PLACE TO HELP AND TALK THINGS RELATED TO GROWING IN REAL TIME .....👈
👉SO I CREATED ONE ALL YOU NEED IS TO JOIN THE GROWDIARIES DISCORD SERVER !!!!!!!!!!!👈
LINK IS 👉 https://discord.gg/zQmTHkbejs
AND SEE HOW IT PLAYS OUT !!!!!!!

Likes
19
Share

@Tropicannibis_Todd
Follow
💩Holy Crap We Are Back💩
Well i had so much fun the last round , that we are going at it again 😁
So super happy to be trying this one out , can't wait😝 .....it's a twist of Cream Caramel and Deimos so I'm all for that flavor 👌 plus theres very few Diaries on it .....👍
Seed soaked for 24 then placed in a tub with paper towels , once it cracked and rooted , placed into its main pot 👌
👉I WISH GD HAD DISCORD SERVER SO GROWMIES COULD HAVE A PLACE TO HELP AND TALK THINGS RELATED TO GROWING .....👈
👉SO I CREATED ONE ALL YOU NEED IS TO JOIN THE GROWDIARIES DISCORD SERVER !!!!!!!!!!!👈
LINK IS 👉
https://discord.gg/zQmTHkbejs
AND SEE HOW IT PLAYS OUT !!!!!!!

Likes
13
Share


@NSABND
Follow
Day 66 ... the weather get´s more worst too cloudy and cold at night 😱😫😵... so i decide to harvest today 😃👍
Now "Hilde 2.0" is hanging in the dark in the basement and can dry... I'm curious to see how the harvest turns out 😃🙌🙏
Likes
2
Share

@Thedibber
Follow
Waiting for more 20l pots for the blood moon gelato transplant should be done for new year
Likes
5
Share


@Krissci
Follow
Day 1 -BP1 to be cut down due to it staying in veg..
It may turn into a monster but I don't have the space or time...
Likes
Comments
Share


@Organic473
Follow
This girl is purpling out I guess because of the weather. She a beauty and she has seeds from the male Durban Skunk…these should be some amazing seeds I await her taste when she is ripe.

Likes
86
Share


@TheFoxFarmer
Follow
Week 8 Flower
My favourite part; Flush flush flusshhhhh 🚽🌊💦
This is the time where you will see the most swelling and ripening of the buds, and also it's winter colours in its leaves and possibly even flowers (strain dependent) as the plant cannibalizes itself of all of its stored nutrients. Many strains will fade into a bright yellow, but a lot of strains can turn to many stunning colours such as purple, orange, red or even black! Purpling can also occur on your flowers throughout flush, which only adds to it's bag appeal!
I believe it's extremely important to include a flush period at the end of each cycle. I don't necessarily mean you have to flush copious amounts of water through them like I do, but the end goal is to have a cannibalised plant before harvesting, regardless of your system, methods or medium. Having a proper flush is what gives you the clean burning, smooth smoke in the end. If many nutrients are left in the flowers, it can create a hard black ash that can spark as you toke 💥😷 and would be quite toxic for you to smoke.
I start by pouring just enough water through the pot to get a decent run off in the catch tray below. I then take a note of the ppm/EC and pH of that run off to see how she's doing, and then adjust the pH of the rest of the water to be flushed if required. This girl's run off was a little high, at approx 6.2-6.5pH so I adjusted the rest of the flush water to around 5.5-5.6pH. This should bring it back down a bit more, although it doesn't really matter so much later in flush as she's only feeding on herself anyway, not what is in her pot. Once adjusted, I pour around 30ltr through her pot to reduce the salt contents in the coco. I then take another reading of her last bit of run off in the catch tray and make a note. I find that flushing a large amount of water through the coco speeds up the process because it has taken away many more nutrients from the coco than with not doing so. This gives the plant no choice but to instantly start to cannabilize on the only nutrients available; it's own. Once they're fading fast I'll simply feed them enough for a decent run off as I know there's nothing left in the coco.
The amount of buds on this girl is absolutely insane! She's a monster! She's swelling up but still getting taller, with her tallest cola almost touching the reflector now. I'm definitely glad I supported her! I'm going for a 3+ week flush as I can't take her any further with plants in veg waiting for spaces, so hopefully she'll ripen up!
Thanks for following and happy growing!
🦊
Likes
8
Share


@Lord_21
Follow
How do y’all think for my baby, brothers?
This is 9 weeks of my baby. Actually I can’t wait to hit this cuz of my first time. But I’ll. So let’s wait...
