The Grow Awards 2026 🏆 


Likes
Comments
Share


Likes
3
Share
@Krautis_IndoorFarm
Follow
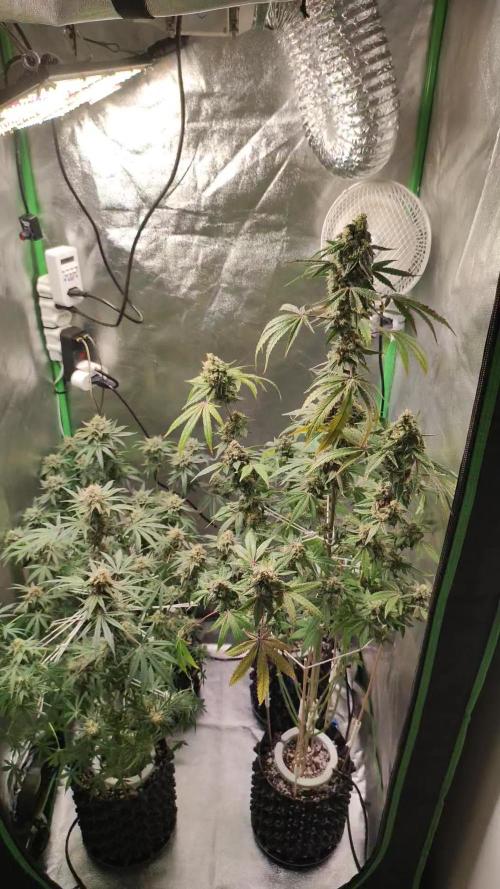
Tag 77 | Blütetag 37: Die Frost-Explosion! ❄️🚀
7 Tage nach dem letzten Update hat sich das Blatt im 90x90 Zelt gewaltig gewendet im wahrsten Sinne des Wortes!
Das Video von heute zeigt. Der Stretch ist endgültig vorbei, jetzt regiert der Zucker.
Das Update vom Feld (Montag zu Montag):
• Zapplez 2.0 (The Centerpiece): Sie hat in der letzten Woche massiv an „Frost“ zugelegt. Die dunkle Färbung bildet jetzt den perfekten Hintergrund für die weiße Trichomschicht. Ein absoluter Blickfang in der Mitte des Zelts! 🍇❄️
• Z-Vally Power: Die Buds schwellen ordentlich an. Man sieht deutlich, dass die Lichtausbeute nach dem Entlauben vor einer Woche die unteren Etagen jetzt voll befeuert.
• OreoZ Milkshake: Hier ist der Name Programm. Die Harzbesetzung ist für BT 37 phänomenal. Die 30L Stofftöpfe leisten ganze Arbeit und versorgen die Damen optimal für den Endspurt. 🥛🍪
Präzision zahlt sich aus.
Seit einer Woche gießen wir wieder präzise mit pH 6,0. In dieser Phase (BW 6) ist das entscheidend, damit die Nährstoffaufnahme für die Terpenbildung nicht stagniert. Das Living Roots Pro in Kombination mit der Feinjustierung lässt die Pflanzen vitaler denn je aussehen keine Mängel, nur pure Energie.
Der „Forest-Floor“ Effekt
Die Luftzirkulation ist trotz der dicken Kolben perfekt. Die Entscheidung, letzten Dienstag radikal zu entlauben, war genau richtig, um die RLF im Griff zu behalten, während die Blüten jetzt ihre maximale Dichte erreichen.
Die Crew & Partner:
🌿 Genetik: @conscious__genetics & @positronicsseedsgermany
🤝 Support: @panova25.de & @living_roots_pro
📍 @cannacommunity.deutschland


Likes
7
Share
@Andres
Follow
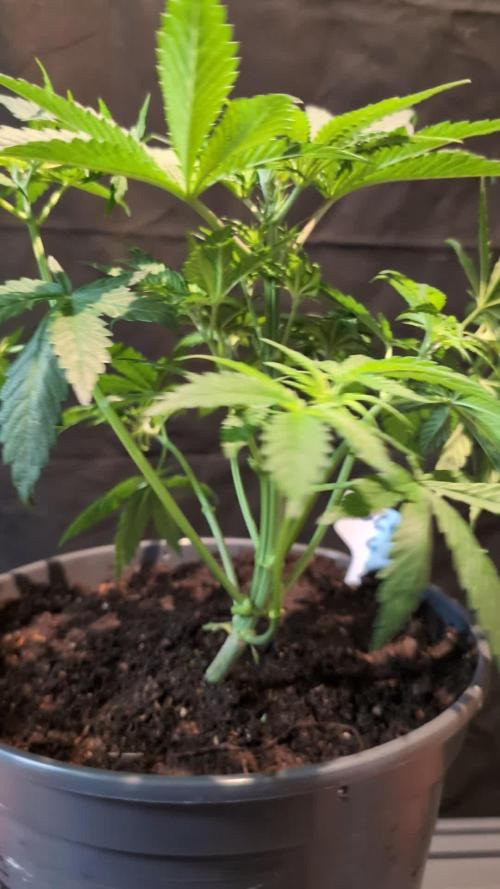
she grows healthy ... and her flowering begins ... she is small because I change her very late to a bigger pot ... I hope she delivers something

Likes
16
Share
@Naujas
Follow
girl, from the beginning she was watered with water from the tap, the value of which is almost 350ppm. and a lot of lime, which prevents me from growing it bigger, but I'm happy with the result :) it's a small pot and only 50 w :) the flowers look very beautiful and sticky :) super
Likes
20
Share
@420DeepGrow
Follow
Gracias al equipo de MSNL y XpertNutrients sin ellos esto no sería posible.
💐🍁 Forbidden Fruit Auto:
Forbidden Fruit Autoflower, llamada así por sus deliciosos sabores, es un cruce entre Cherry Pie, Tangie y Siberian Ruderalis. Esta variedad ofrece efectos estimulantes y relajantes con un sabor afrutado, cítrico y a pino. Ideal para quienes buscan un dulce escape.
🚀🌻 Consigue aqui tus semillas:
💡TS-3000 + TS-1000: se usaran dos de las lámparas de la serie TS de Marshydro, para cubrir todas las necesidades de las plantas durante el ciclo de cultivo, uso las dos lámparas en floracion para llegar a toda la carpa de 1.50 x 1.50 x 1.80.
https://marshydro.eu/products/mars-hydro-ts-3000-led-grow-light/
🏠 : Marshydro 1.50 x 1.50 x 1.80, carpa 100% estanca con ventanas laterales para llegar a todos los lugares durante el grow
https://marshydro.eu/products/diy-150x150x200cm-grow-tent-kit
🌬️💨 Marshydro 6inch + filtro carbon para evitar olores indeseables.
https://marshydro.eu/products/ifresh-smart-6inch-filter-kits/
💻 Trolmaster Tent-X TCS-1 como controlador de luz, optimiza tu cultivo con la última tecnología del mercado, desde donde puedes controlar todos los parametros.
https://www.trolmaster.com/Products/Details/TCS-1
🍣🍦🌴 Xpert Nutrients es una empresa especializada en la producción y comercialización de fertilizantes líquidos y tierras, que garantizan excelentes cosechas y un crecimiento activo para sus plantas durante todas las fases de cultivo.
Consigue aqui tus Nutrientes:
https://xpertnutrients.com/es/shop/

Likes
2
Share
@GoodTimesOrganics
Follow
Welcome Back!💚
Nach der vierten Woche entwickelt sich die GG#4 weiterhin sehr homogen und sie erreicht jetzt die 6 interniode.
Die Seitentriebe wachsen schön an dem Haupttrieb mit hoch.
Und es ist ein Weibchen.
Jetzt habe ich die Pflanze in ihren Enddtopf gesetzt und lasse sie jetzt erst Mal noch eine Weile im Wachstum.
Da es sich um ein Indica Hybrid handelt, lass ich die Pflanze noch weiterhin Wachsen, da ich den Seitenaustrieb noch etwas weiter in die Höhe ausbreiten möchte.
Die Umgebungsgegebenheiten sind bis jetzt optimal:
—————
🌞 Temp: 23°C bis 24°C
🌚 Temp: 18°C bis 19°C
💨 RH: 70%
VPD: 0,55 kPa👍
—————
Grüne Grüße 🥦

Likes
43
Share
@Regenwurm
Follow
Diese Woche alle Ladies (jedoch besonders die orange Sherbert) entlaubt. Die Indicas neigen schnell zur Überdüngung mit nur der Hälfte der Menge des Düngeplans mit Regenwasser EC=0,0…..also Düngemenge etwas reduziert! Die Orange Sherbert liegen ca. 2 Wochen zurück und bilden nun Blüten ohne Ende. Ich muss die 2 Pflanzen leider unterschiedlich zu den Indicas düngen da die Ladies das Futter anders verwerten und einen anderen Entwicklungsstand haben. Nächste Woche gibt es mal bessere Bilder ohne Beleuchtung der NDL Lampe. Klima keine Probleme, läuft sehr gut. Bewässerung alle 2 Tage mit 2 l pro Pflanze. Aktive Zuluft und aktive Abluft mit Unterdruck im Raum für die Dauer der 18 Std Beleuchtung….


Likes
39
Share
@SamDo
Follow
Hello,, fin de semaines 11, floraison 5. Je dirais que dans l’ensemble tous ce passe correctement,, les buds se développent, elles commencent à prendre en volume. Et de plus en plus de cristaux apparaît aussi. L’odeur est aussi bien plus présente, j’ai donc mît mon filtre à charbon.
La gorilla Cbd me semble très prometeuse, elle est très collante déjà avec une odeur délicieuse. La critical n’est pas en reste n’ont plus avec des note de parfum différent mais tout aussi délicieux,, 🤩
Pour l’arrosage cette semaine, en milieu, j’ai juste utilisé un peu de bio-bloom, histoire de pas trop les sur-fertiliser.
Voilà voilà, c’est à peu près tout pour cette semain...
Happy grow...😎

Likes
4
Share
@FourTwenty_Plants
Follow
Soooo im out of base nutes so the girls start to develope some nute deficiency but a package from Advanced is on the way to give them everything they need!
Already getting fatter and fatter im really really hyped for the outcome of this run.
Likes
4
Share
@AmsterdamAutos
Follow
Initially ran this plant as a way to get dial in my tent and setup while coming to grasp with tent growing in general. Since its an autoflower the growing was easy. However this is a very commercial seed bank and the quality you get is in line with that. Now i'm moving, getting a larger setup, and going to run more genetics. Zamnesia will not be a part of that.

Likes
4
Share
@WuTangVibez
Follow
This week I decided to remove the LST and let her strech out as much as she wants. I lollipopped her on day 49 and cutted down all the branches that will never grow to the light.
She has to strech as much as possible because there are some way taller plants under the same light. I hope she gonna produce some nice flower and will continue to strach abit.
Thanks Fastbuds for the Amazing Strain !
Likes
152
Share
@EBxAH
Follow
Week 13 and 3rd week of flower started today 8/29. I did some Schwazzing last night! They were definitely ready!!! And today they are absolutely LOVING their new cut, leaves justa pointing right up 😎 Now I just sit back for a bit and watch the progress 😁 I have a video on my YT of me doing the Schwazz: https://youtu.be/gV8Ca02IJIY If it doesn't click here with a link you can just copy and paste!
Happy growing everyone ✌️🍀✌️
UPDATE: 9/1 Everything is looking good! The ladies are still taking well to the Schwazz and flowers are coming along nicely! Starting to get that beautiful aroma 🙃 It's hurricane season so we'll have some rain coming up but I'm only 3 weeks in flower so that will be gone come crucial time. Temps outside are starting to go down so it's looking like a nice, gradual transition! You don't want to immediately adjust your temps, rh, etc. You have to ease it all down during early flower 😉 That's about it for now, just wanted to share my vibes with yall. It's all about the VIBES 😎
Happy growing everyone ✌️🍀✌️

Likes
21
Share
@VicFor
Follow
So I chopped the plant today on day 48, so now it’s drying time. I’ll be back in one week to see the results.
Processing
Likes
15
Share
@greenflipcali89
Follow
Finished week 2 of flower. I have been inspecting every single leaf for PM and have found a few spots, but quickly spot treated with solution. I have learned that PM is a SYSTEMIC disease and the spots on leaves are a symptom of an already infected plant. So the best thing I can do is keep the symptoms in check by spot spraying and its working! Only a few burned leaves as a result, but nothing like my first grow where it was widespread!
Defoliated to thin out a bit and allow for better airflow. Light LST to a few of the taller stems to maintain an even canopy. Overall, I am happy with the way my 2nd indoor grow is progressing.

Likes
75
Share
@Theia
Follow
Started week 7 with another topping. She looks a bit of a mess ATM as I have had to bend some of her arms a full 90degrees and do some funky leaf tieing to keep everything in shape.. Nothing snapped and she seems okay. I will see how she recovers in the next day or two.
Re introduced grow to her feed.
I shall check back in after a few days of recovery and try to get a better pic then the blurple ones I managed earlier.
Day 48
She is so strong. The topping did not bother her showing 3 cm of growth the night I topped her.. I have cleaned all old fan leaves and defoliated the mainlines. Just have 8 colas atm. I attached a ring from a plant holder to try and hold the shape. 7 of the 8 colas have grown exactly where I wanted but 1 has taken a funny turn and as a result it's grown a bit short of where I need it. I shall try to bring them all to a uniformed height then I think I'm going to let 2 more nodes grow out and if that looks like it's given me enough space I will do the final topping for 16 colas. If she looks like it will be to busy I shall stick to 8..
Thanks for looking stay safe and happy growing.😁👍🤘

Processing
Likes
5
Share
@FlyHighhh
Follow
Gaat goed ga volgende week in de bloei zetten . Heb wel 2 achterblijvers maar dat groeit wel bij hoop ik 🤔🤔

Processing
Likes
43
Share
@Master_weeda
Follow
Jour42 defolliation
Stretch 10 centimètres
Jour47 arrosage avec de l'eau ph6.3 à laquelle j'ajoute 1ml par litre d'eau de topmax biobizz


Likes
Comments
Share
@Pixie
Follow
Still not started to flower pistols are shouting out everywhere tho can't wait to see it flower iv never grow weed before so it's going to be good having a ganja plant

