
Likes
Comments
Share


@GrowInger420
Follow
Last 2 weeks was good, but buds gettin not as big as i thought. But i think, 7 to 10 days to go, could be get bigger. Have nice week everyone✌️

Likes
18
Share


@Staffedition
Follow
Привет друзья. Моей растихе сегодня 88 дней.
Растение пришло в себя.
20.10 буду переводить на цвет.
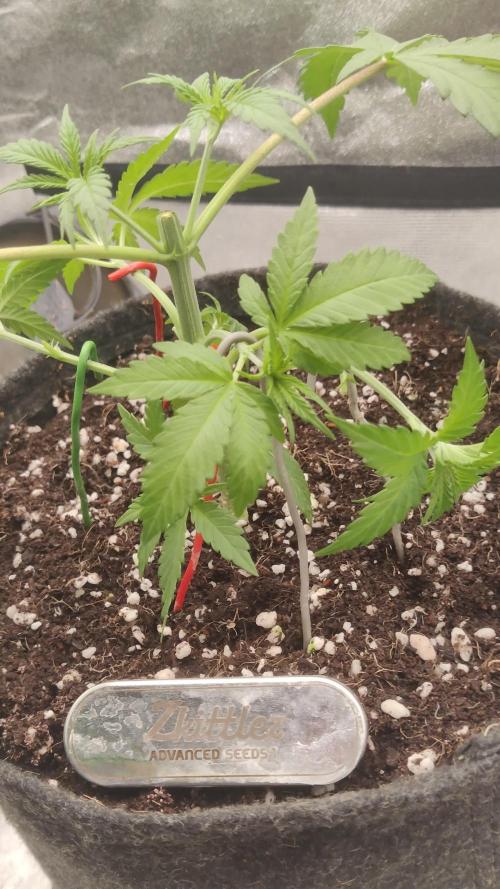
Начал применять LST технику на 19 дне и продалжаю применять её через день, а 18 августа добавил ДЕФОЛИЗАЦИЮ
С 20.08 ДЕФОЛИЗАЦИЮ делаю каждые 3,4 дня
С 20.08 LST технику делаю каждые 4.6 дней
На сегодняшний день влажность 54%
5.09 заметил высокий Ph 7.9
С 48 дня Ph не ниже 5.8
На сегодняшний день Ph 6.0
Начал кормить с 60 дня Canna Terra Vega
PPM 450
Погладитель влажности хорошо справляется со своей задачей. Рекомендую
Всем мира и добра!
Не забудь поставить лайк❤️, если понравилась как прошла неделя
И читайте наш TELEGRAM: https://t.me/smail_seeds
#Smail_Seeds😃#Fast Buds

Likes
11
Share


@dutchm913
Follow
start of week 3 gave her some big bud and at the mid week she was thirsty again so decided to brew up flowering tea for my other and gave her some , loving the growth of this strain

Likes
4
Share


@Ctsbestsmoke
Follow
This grow had its up and downs but I must say I’m very happy with the out come with over 2 pounds. One of the plants gave me 7.5 ozs alone. Now I’m on to my next journey after my grow room reset. I will be running some fast buds white widow auto and jack herer auto in the grow ace air Cube be on the look out for that journal. Thanks for all who kept looking and liking the journal. Lots of more fun content coming soon.


Likes
31
Share


@Canna96
Follow
Hey now, I hope everyone is having a great weekend and happy father's day to all the dads. The Strawberry Banana is almost done stacking and almost heading to the ripening phase. I did raise her up on a 10 inch milk crate last week to ensure all plants have an even canopy. She is really starting to smell very strong, I definitely smell both strawberry and banana's on my fingers after working with her.
currently have the Spectrum X running at 100% power and have upped the time on the UV/IR bars to 90 minutes just prior to lights off. I am super happy with this light so far, she puts out impressive PAR, and runs fairly cool. The only thing I would change is to have individual timers for the different spectrums. I did hear they sell a timer that does this but it does cost 0.
Not much to do this week other than keep the reservoir full and in the correct PH range. The tomatoes outside are absolutely loving the runoff from these autos, as that is all they have had to drink since they were about 3 weeks old.
Thanks for stopping by, Stay Safe and Blaze On!!! 💪
Website: https://medicgrow.com/
https://growdiaries.com/grower/medicgrowled
Likes
6
Share

@Jardineiro_Br
Follow
Agora sem aplicações de técnicas, apenas fertilizantes e água, para que a energia da planta seja usada nos botões, quero ver lindos botões, densos e resinados . Por enquanto estou bem satisfeito com o resultado, essas próximas 3 semanas , acredito, serão decisivas para definir um boa produção.
Processing
Likes
30
Share


Likes
24
Share


@CanarianGrow92
Follow
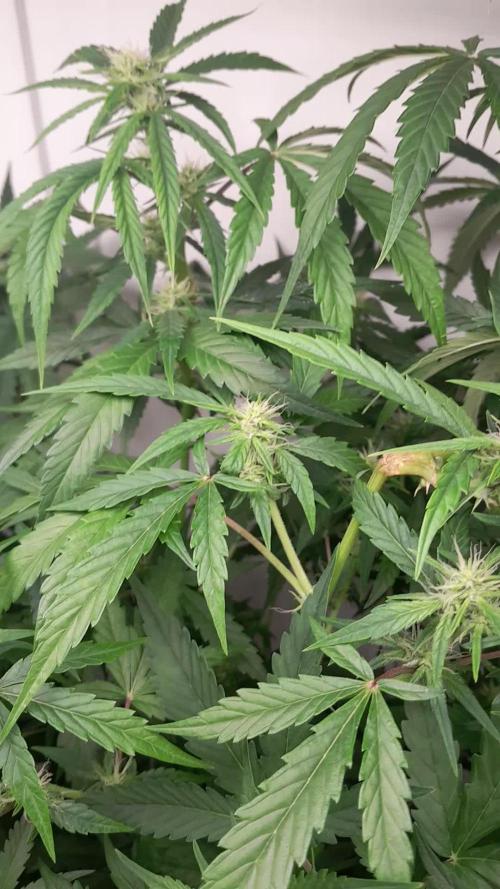
This girl smells really good 😁 but i didn't expected less from this strain, i already tried several strains from fastbuds and they are all great.
This week i started to give some extra PK apart from the typical bloom nutrients, i expect this girl to finish all covered in tricomes, we can see already quite some tricomes everywhere and its only the 4th week of flowering, i hope that the weather stays good 😊👍
Likes
25
Share


@BudHaks
Follow
I am now flushing her with plain Brita filtered water PH'd with lime juice to lower her PH.
I initially first flushed her with 42L of water and now I am flushing her once a day for 8 days and then I will put her in for darkness for 3 days and then I will harvest her and dry her for 9 days and then cure her for 28-48 days.


Likes
91
Share


@Drgreen13
Follow
Hi guys, Another week gone, these DC cures are tanking along. These are gonna be pretty big considering the size of the pot and the fact there's three of them in there. Started feeding nutrients a few days ago and it's showing 😁👍🏼.
Please check out my other diaries and feel free to leave a like, maybe even a follow and I'll be sure to check out your diaries to.
The light being used Is the Mars hydro SP150, its a great quality light and is very bright, ideal for a rectangular space.
Drgreen13#6724 (discord)
Stay high, stay fly, #420everyday. 🥃

Likes
2
Share

@DerEkstaseHase
Follow
Diese Woche wird die Pflanze getoppt und die Seitentriebe runtergebunden.
Außerdem habe ich das Substrat noch mit etwas wieder aufbereitetem Coco aufgefüllt.

Likes
24
Share


@SkunkyDog420
Follow
Hallo zusammen 🤙.
So das war es für sie habe sie heute geerntet
Sie riecht fantastisch und sieht sehr lecker aus.
Wir sehen uns in 3 Wochen mit dem Erntebericht.
Rabattcode für den BIOTABS-Webshop https://biotabs.nl/en/shop/ GDBT420, damit erhalten Sie 15 Prozent


Likes
6
Share


@AlpineGoat
Follow
Week is going good!
I think I missed some days but I’m not a guy who counts days of flowering..
I feel it’s going all right! This sunday I performed final bottom defoliation. Now I added a plastic circle to create space between stems, so every bud has his space to grow properly :)
Likes
1
Share

@Earthsower
Follow
The super skunk feminised stands at 62cm tall with bushy growth. The growth this week has ceased with most of her energy being used for bud formation. Her leaves are dulling. Calyxes beginning to swell. Ph remains at 5.9 as she is fed when the her pot is light enough. Overall the super skunk looks good!

Likes
100
Share


@AsNoriu
Follow
Day 85. Few days ago I trimmed most leafy Northern Lights and she loved it ! So tomorrow two most mature Alaskan Diesels go to chop room. All other plants will get defoliation too, will have space to reach all plants.
Third Alaskan Diesel is catching, but he is a week behind.
Green Cracks will fall in 2-3 weeks, Northern needs at least 4 ....
Will move my Bruce Banner's to main tent.
I still feed Northern , but all other plants are on pure water.
Day 86. Rearranged all girls, trimmed them heavy, gave new positions.
One Northern lights is still in dark part of tent, I think I need 7-10 days til last Alaskan Diesel will mature and it will be only 8 girls left.
Brought other diaries girls to main tent and added Mars Hydro SP150 as supplemental side lightning ... They miss height a lot compaired to older plants, so I hope it will help a bit . Never used lights that way before ...
Happy Growing !!!

Likes
19
Share


@MaxMo8
Follow
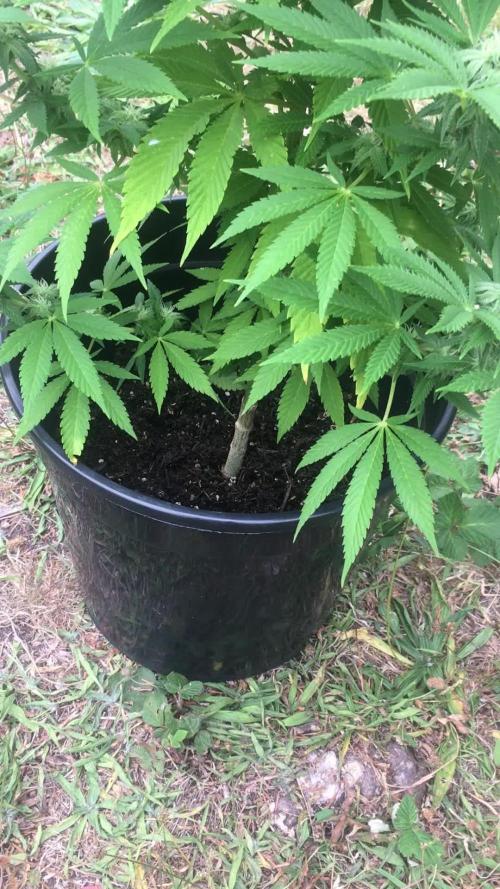
I transferred it to a half-gallon pot and I mixed the organic fertilizer with the soil.
Likes
24
Share


@Dingle
Follow
These ones look to be moving from the stretching phase into full bud production now.
I am starting to see more and more trichomes develop which is exciting.
Carried a good bit of defoliation this week cleaning up the lower branches and removing larger leafs that block multiple bud sites.
Light still is set at 90% power.
✌️🌱🙂


