
Likes
Comments
Share


Likes
52
Share


@MissFlowerPower420
Follow
Steady away bless her , small drops of water every couple of days as I don't want to drowned her .
Using bio bizz soil n mixed in a bit of worm humus in to slowly top her up as she grows , as I believe it helps her stalk thicken up , strengthens too .
Happy growing n peace to all you fine herbalists 🕊️🕊️🕊️

Likes
4
Share


@805homegrown
Follow
Apple fritter and wilson! Zero are 7 weeks from popping the seed's in ro water ph to 6.2 and mystery mix, Geist grow are 4 weeks from popping the seed's same process as above.
Blumat watering system
3x3 area for growing 4 plants in 4 10gallon fabric pots in living soil top feed with compost tea and foliage spray (LABS) lactic acid bacteria. 2 x TS1000 and I use pod tech to feed my worms with down to earth amendments.

Likes
14
Share

@Radagast_
Follow
04.08.
Runtz#
Day 64# Day Flowering 47#
The plants are nearing the end, 5 days ago I started to give them a "flawless finish" and if some people needed another 2+ weeks at that point according to what the microscope says, the leaves and the very form of the flowers, but the humidity is high, the rains are frequent lately and the conditions for mold are ideal, so I will not risk it and they are this small, and the caterpillars have also started to be annoying...
However, the situation has changed... half of the plants were almost at full strength, but with the fact that a week ago I gave it overdrive because I planned to give it another two weeks and then give it only clean water for a week or two, it prolonged their flowering, that's what I concluded, a bunch of new transparent trichomes appeared on the flowers and now they need two more weeks at the moment, and I already started with "flawless finish" 4-5 days ago, but well, I'll continue like that when when they are ripe, I pick them unless mold appears or caterpillars attack...
3 or 4 plants will be through a week to a maximum of 10 days ripe (the way I like it) for picking, the rest in two weeks (as I said before, if no caterpillars or mold attack)…
Yesterday was the end of their ninth week.
Rutnz 1# picture no. 29# harvested,trimmed and left to dry on 31.07. it is still drying.
This dwarf had only one big bud along the whole plant, and I expected something like this, especially because it was in grass that is bigger than it, and the humidity has been really high lately... mostly, the mold started and some spiders also ruined it a lot, I must have thrown away a third of the flowers... I had to cut the plant into heads so that I could see all the infected ones and remove them.
Runtz 2# picture no.30# and these two videos
Harvester,trimmed and left to dry 02.08.
This plant also started to mold, the whole two heads that were below, immediately up to the main bud, they started to mold (the empty space between the main head and the lower heads where the stem can be seen), and later, after picking, I inspected the plant in more detail and found something else small all the way down... everything that was even a little bit infected was removed (if a head was slightly infected, the whole head was removed, not just the infected part)
I lost a bit here
less than a quarter of the flowers, approx.
Stay High and Keep Growing!!!

Likes
6
Share

@Calo
Follow
It's time to start a new selection!
In this growing cycle I will select 1-2 mothers that will become part of my personal genetics collection :)
Unlike other cycles in which I use organo-mineral fertilization, in this cycle I will use pure minerals from the Athena line. I have heard a lot of good things about this line of fertilizers and I can't wait to try them.

Likes
14
Share


@MG2009
Follow
12/22/2021
Starting the over night soak in H2O2 water, then onto soil mix to finish germination.
Soaking in H2O2 and water, about an ounce h2o2 mixed with .500ml spring water. It aids in breaking down seed shell, and sanitize seeds at the same time. I will sow directly into soil as breeder suggest.
12/25/2021
All I5 seeds sprouted in water little 1-2 mm tap roots, potted into small cups and reppot as necessary, should get 100% germ rate if I don't hurt them tiny tap roots putting them in soil.
12/28/2021
Lemon OG 100% germ rate, Biscotti Skunk 4 of 5, Grape Skunk 4of5,and I will take the blame if others don't take because of miss handling, so very happy with the germination rate I'll give it 100% Thanks @QCS for given me the opportunity to grow your genetics.🙏🏻
Ps.
ROJI OGS will go next round I'd like to do them alone I think she will be special.
Biscotti Skunk
Biscotti Skunk Cannabis Seeds Feminized
With a noteworthy lineage, Biscotti Skunk is a mix between the Cookies variant and Kush on one end, acting as the base layer for flavors and effects, while the Skunk addition rounds it off beautifully on the other end, creating Biscotti Skunk a totally unique marijuana strain.
This strain works good indoors or outdoors it produces nice big buds. The flowering period for her is 8 to 9 weeks Outdoors this plants will be ready to harvest at the beginning of October, and offer yields of around 700g per plant in ideal conditions.
The effects you can expect from Biscotti Skunk strain are relaxation with a good creativity boost, followed by a gradual energizing body feel.
A bud with a very complex flavor profile, this indica-leaning hybrid Skunk come from planting 50 Skunk F2 seeds and one of the fenotip came out looking like this. We liked the strain so much that we have finally duplicate the strain.
Grape Skunk is one of those tangy, tropical smokes. Her flowers give off the unmistakable scent of tropical citrus, with some accents of grape.
THC levels is between 20% and 24%. Grape Skunk is a large producer under optimum conditions. A dense cannabis plant with pink purple colors.
Growing Grape Skunk cannabis is easy and great for first time grower. This strain is also great for relieving stress and anxiety, as well as reducing chronic pain, nausea, and insomnia.
Lemon Og Kush Cannabis Seeds Feminized
This strain joins the OG Kush genetics, with strong Indica and physical effect, cross with a Skunk plant which has a very distinctive and special lemony flavor.
The result of this crossing between these two robust genetics a plant with similar structure than the OG, average internodal distance, columnar structure that can branch a little more if the plant has enough space and substrate. Still, it mantains the average height of the OG Kush , producing lots of flowers in relation to its average size.
Production can reach 550g/m2 in about 8-9 weeks , which will allow us to harvest our plants before the rainy season arrives, without worrying about molds: it is a mold resistant marijuana strain.
Regarding the flavor, it huge amount of resin and terpenes will release a strong fuel and lemon smell, which is noticeable even when we smoke, reaching every corner of our palate. Moreover, its effect is very medicinal , ideal to eliminate nausea and stimulate appetite, deeply relaxing both body and mind.
It's obvious I get regular seed at this point. But feminized information was all they had on website,assuming it's all the same.


Likes
293
Share


@Ju_Bps
Follow
Hello growmies 👩🌾👨🌾🌲🌲,
👋 Girls keep maturation, End is very close, Harvest in few days 💜🌲✂️🏁🏁
Flush Started
💧 Give water each 2/3 day
2l Water + Flash Cleaner (3 ml/l)
2l Water + Flash Cleaner (3 ml/l)
PH @6
💡Mars Hydro - FC 3000
50% 13 cm
Mars Hydro Fan kit
Setting 9
Have a good week and see you next week 👋
Thanks community for follow, likes, comments, always a pleasure 👩🌾👨🌾❤️🌲
Mars Hydro - Smart FC3000 300W Samsung LM301B LED Grow Light💡💡
https://www.mars-hydro.com/fc-3000-samsung-lm301b-led-grow-light
Mars Hydro - 6 Inch Inline Fan And Carbon Filter Combo With Thermostat Controller 💨💨
https://www.mars-hydro.com/6-inch-inline-duct-fan-and-carbon-filter-combo-with-thermostat-controller
Fast Buds - Gorilla Cookies FF🌲🌲
https://2fast4buds.com/us/seeds/gorilla-cookies-fast-flowering
Likes
12
Share


@2Byte
Follow
Not a lot to add this week here. Started adding GP Rezin in preparation of flipping soon.
Still looking great!

Processing
Likes
13
Share


@mr_smooke
Follow
I'm a little late with update, I was very busy. In grow room it is all under control. the buds are filling up. Strech has stoped. There is 14 days since flower
Smeel is pretty strong, i just need to set up carbon filter. Next update will be in a fev days.
✌️🤘💚💜

Likes
24
Share


@Ganjaman19
Follow
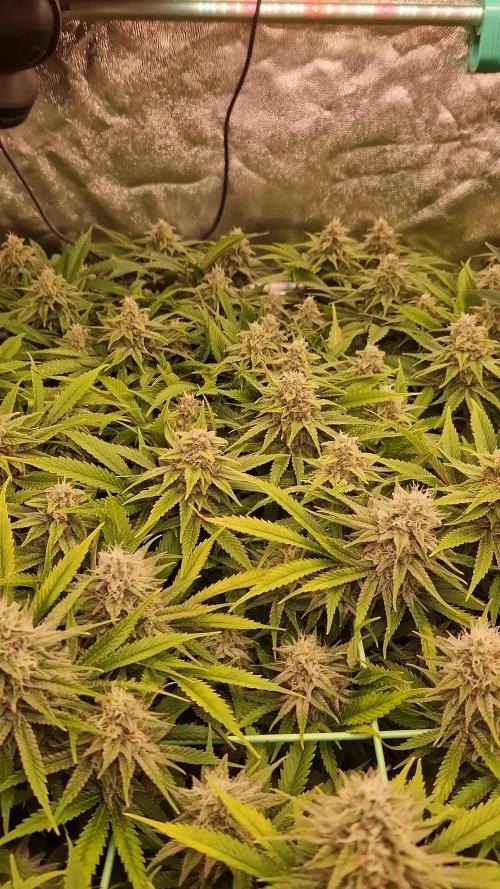
Week 4 flower has come to an end if really happy with the look of things atm all plants are stacking nicely and kicking the crystal right out there's a nice variety of strains by various breeders all different sizes and smells 😊 the Divine indica by divine seeds has the largest flowers this has been an awesome strain that will definitely be getting run again the opium also by divine seeds is huge aswel.
The 3 barney's farm strains left in there also look very promising the mimosa evo smells unbelievable and the pink kush and weeding cake are ticking all the boxes.
The banana kush by anesia seeds looks to have the most crystal and the pink starburst is buried behind these monsters the need a haircut asap thanks again to my sponsors this wouldn't be possible without yous I'm more grateful then yous know
@barneysfarm
@divineseeds
@Anesiaseeds
@HydroproWashington
@adyfutureharvestuk
Get them followed on Instagram and get some fire strains and Nutrients for yourselves
See yous next week for my week 5 flower update peace out and happy growing growmies


Likes
5
Share


@Ashbash
Follow
Just waiting for the malana bomb to finish drying then ill chop this and pop it in the box for drying. Lots of Amber visible and the foxtailing is getting worse so wanna do it as soon as possible. Hoping it'll be nice and couch lock.

Likes
4
Share


@Crusty_Juggler
Follow
60x60 cm tent in a 1920's peek-in-closet
Oversized vent for silence
High power DIY LED
True SoG 12/12 from seed with 15 plants in 2L pots
Watering all plants in bottom tray with 30% of total pot size (10L)
WEEK 1
DAY 1 - Germinated in paper towel
DAY 3 - Planted into pots + Lights ON at 125w
DAY 5 - All plants have broken soil
DAY 7 - Slight stretch - Light at 185w
WEEK 2
Two of the Iced Out are lagging behind, others are on point - I'm trying to push light and nutes to the max.
Extraction fan (AC infinity Cloudline T6) on level 2.
DAY 13 - First full watering (10L) with 20 ml Canna Terra Vega
DAY 14 - Circulation fan turned on (low) during lights on
WEEK 3
Good growth, two Iced Out still lagging
DAY 18 - Light at 225w, Extraction fan on level 3 during lights on
DAY 20 - 2nd watering, 8L with 30ml Vega + Light at 250w
DAY 21 - On point, mostly :) Could've pushed nutes a bit more from the go
WEEK 4
DAY 24 - So far this week I'm just kicking back and watching them do their thing. The two lagging Iced Outs are trying to catch up.
DAY 26 - Watering 10L with 50 ml Vega (one day too late...) + light on 300w (max)
DAY 28 - 4 weeks from popping the seeds, looking good except for the two Iced Outs, one of them is trying to get with the program, the other... Well, some plants are just pricks.
WEEK 5
I think this is the week we'll see them take off :)
DAY 29 - Plants are starting to show sex, removed 2 Urkle Mints males, the other two are females, the rest are fems so we're down to 13 female plants total with only a single weakling
DAY 29 - Watering 8L with 50ml Vega (shouldn't have been later than today!)
DAY 33 - plants exploded over the last 4 days and most are stretching and starting to flower
DAY 33 - Watering 10L with 60ml Vega (feeding Vega once or twice more then we switch to Flora)
DAY 35 - Just cruisin' 😎
WEEK 6
Lots of stretch the past week, flowers are setting in, the laggy Iced Out was culled, 3 plants are a bit behind the others..
DAY 36 - Watering 10L with 50ml Vega
DAY 39 - Watering 10L with 50ml Vega
DAY 42 - Defoliation
WEEK 7
DAY 44 - Watering 10L with 50ml Vega
DAY 47 - Switching to flowering nutes - Watering 10L with 50ml Flores
WEEK 8
HAa to break the stem on the stretchy Sugar Cane to keep it low enough
DAY 51 - Watering 10L with 60ml Flores
DAY 54 - Watering 10L with 60ml Flores

Likes
1
Share


@Gratak
Follow
Leider habe ich von diesem Grow nur die Bilder Kurz vor der ernte aber ums mal kurz zusammen zu fassen:
Ich habe die komplette Plagron Dünger Linie benutzt und bin damit auch sehr gut gefahren.
SANlight:
Zur Anzucht auf 30%
Zum Start der Blüte 60%
Wochen Später auf 80%
Ab Woche 7 dann 100%
Der Grow verlief reibungslos wie immer bei 420 Fastbud, da ich aber viel geschäftlich unterwegs war konnte ich den Dünger nicht ganz auf die Bedürfnisse anpassen.
Ich denke beim nächsten Versuch kann ich das Ergebnis noch mehr optimieren, obwohl ich schon extrem zufrieden bin was Qualität und Quantität angeht.
Likes
13
Share


@HIAZ_urbanbudfarmer
Follow
Veg day 39 week 6. These plants were mainlined to produce 12 to 14 colas ( branches) , completed last round of topping.
They are now free to start growing upwards. They have developed really strong thick branching due to pinching the stems, H.S.T.
Have done my share of damage to them, getting a little bit rough with some of the branching, splits & breaks in stems.
Although they are very hardy plants & don't seem to be affected by it to much & it also helps to strengthen stems & branches to support the weight of BIG DENSE BUDS, & also aids in the increase of nutrients being delivered to your plants because it also increases the size of the Nutrient highway! (The hollow inner middle of the branches gets bigger allowing the uptake of more nutrients and water.
Likes
2
Share


Likes
5
Share


@Budzalot
Follow
Day 28. Trim them 3 times last week. Trying to figure out how much stretch I'll get with led lights. Haven't used led forever. Grew this last grow under hps got 571 grams with 600 hps.
Likes
2
Share

@JolliGrowz27
Follow
Lemon-lime, pinesol, gassy, chemicals on the back terps. Grew well, stacked tight, dense and kushy nugs. Ready for harvest on the end of week 9. Could push to 10 weeks. Doubles in size when flipped to flower cycle. Grew 3 girls of this cross I made. Baby Yoda female to a Red Zkittles male. Even the smallest one doubled in size when stretched and had the biggest main cola and had more of a Pinesol chemmy terp. The tallest pheno had more medicine and had the lime terps going.