
Likes
Comments
Share


@tokesly
Follow
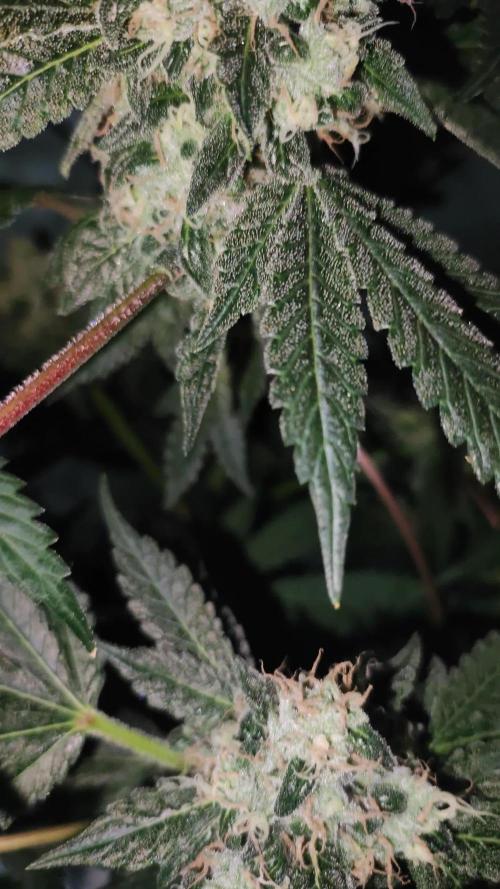
More Flowering! The rest of the strains started to catch up, but nanners started showing in the hermies and TP started to overripen with orange hairs. I would've gone extra days if there were no nanners, but it wasn't worth it to risk seeding the nugs, I'll just have to settle with more larfy buds. Going to start flushing next week.

Likes
13
Share


@Hashy
Follow
********************************************
Week 12 Mid flower (week 6 flower)
********************************************
Light cycle=12/12
Light Power=160w 67%
Extractor controller settings (during lights on).
High temp= 26c
Temp step=0c
High Rh= 50%
Rh step=0%
Speed max=10
Speed min=3
Extractor controller settings (during lights off).
High temp= 21c
Temp step=0c
High Rh= 55%
Rh step=0%
Speed max=10
Speed min=3
Smart controller settings (during lights on).
Lights on=9.00am
Radiator on= -22.5c
Radiator off=+23.0c
Top fan on=
Smart controller settings (during lights off).
Lights off=9.00pm
Radiator on=-18.5c
Radiator off=+19.0c
Top fan on
VPD aim=1.0-1.5
DLI aim=40-45
EC aim=1.0-1.8
PH aim=6.0-6.5
💧💧💧💧💧💧💧💧💧💧💧💧💧💧💧💧
NPK= 10-19-30
Method= Automatic
Feed=Flower nutes
Neutralise=0.1ml/L
Plagron bloom=5ml/L
Plagron Power buds=1ml/L
Green Sensation=1ml/L
Easy Ph Up=0.053ml/L
(1ml=23 drops, each drop is 0.043ml)
Ec=1.75 PH=6.3/6.2
Runs=18
Run times=4mins (0.3L each)
Gap times=16 mins
Total runtime=72mins(5.5L each)
Total flowrate= 152ml/min(76ml/min each)
Auto start time=10.00am
Auto stop time=15.44pm
💧💧💧💧💧💧💧💧💧💧💧💧💧💧💧💧
********************************************
********************************************
📅22/12/24 Sunday (Day 78)(flower day 38)
📋
💧
Automatic mid bloom nutes
Ph up=0.64ml, 15 drops
Ec=1.75 PH=6.3/6.2
Volume=12L
Volume left=1L
Volume used=11L(152ml/min)
Volume each=5.5L(76ml/min)
Runoff.
Total runoff=0.7L
Ec=4.0 PH=/6.1
💧
📅23/12/24 Monday (Day 79)(flower day 39)
📋
📅24/12/24 Tuesday (Day 80)(flower day 40)
📋 Christmas Eve.
📅25/12/24 Wednesday (Day 81)(flower day 41)
📋Christmas Day. Have a merry Christmas.
📅26/12/24 Thursday (Day 82)(flower day 42)
📋 Boxing Day.
💧
Automatic mid bloom nutes
Ph up=0.69ml, 16 drops
Ec=1.8 PH=6.3/6.2
Volume=13L
Volume left=2L
Volume used=11L(152ml/min)
Volume each=5.5L(76ml/min)
Runoff.
Total runoff=1.0L
Ec=4.4 PH=/6.2
💧
Leaf tips are getting burnt and runoff Ec is climbing so just water next time, should have really just been water this cycle.
📅27/12/24 Friday (Day 83)(flower day 43)
📋
📅28/12/24 Saturday (Day 84)(flower day 44)
📋H=81cm D=32cm Dli=40.3 ppfd=932
********************************************
Weekly roundup.
📋 She has done fine this week, showing a bit of nute burn but plodding along at a decent speed. This zoap is further along in development then the other strain. The weather is still fairly cold so used 34.17Kw £8.64 on the radiator.
Back soon.
Take it easy.
********************************************


Likes
17
Share


@Leonweed10
Follow
Ya an alcanzado unos 25 cms las nenas,todas bien parejas....en unos dias mas ya paseremos a floracion al alcanzar unos 35 a 40 cms cada una...se viene lo mejor!!

Likes
18
Share


@Manic
Follow
This week the girls have stretched for the last time then the fun will really begin with the buds blowing up. Alaskan purple has the frosty sugar leafs which tells me she will be more potent at this point of the grow cycle. Both of the girls are in good health but Alaskan purple has 2 leafs that look like nutes burn from the feeding last week of the ff nutes, so only distilled water this week to kinda flush her then back to nutes feeding, which will be perfect timing for buds to start coming in. Overall it's rained a lot where I live which has made humidity a problem so I got another dehumidifier for my room to help with that problem other than that this grow is on track for a nice harvest.

Likes
74
Share


@Ferenc
Follow
Hi! 3rd edition is on the way! Thanks for RQS /James/, Spliff Seeds, Emerald Triangle Seeds for these beans and support.
Thank you ViparSpectra providing me this outstanding quality XS2000 light.
16/09/2021:
Seeds are placed in the water and now I will leave them in it for approx 18 hours.
17/9/2021:
Hiiiiii!
They had been in the water for almost 18 hours. Tested them after several hours just a little push if they sink. They did so they supposed to be viable. Spliffs Strawberry was a bit more nasty the seed didn't want to submerge easy but it did.
Northen Light is crazy tap root is already out of it was a race she would have already won it lol.... less the 18 hours tap root out in the water nice...
Rest of them are normal nothing much to say!
So I placed them between damp paper towel and we waitin'
Let's gooooo
19/9/21:
The winner of the race is Northen Light tao root was out even the day when I placed in the water.
Cookies Gelato is the second and then Mastodon Kush and the Spliff kids.
Well, 2 of them coud not make it they submerged in the water but then that's all not sprouting at all. This 2 Afghani Gold and Spliffs Strawberry have been replaced with another try /seeds/.
So hopefully those will be alright.
Anyways, rest of them are planted with today.


Likes
16
Share


@Marshydrots1000
Follow
Just letting them cruise along now. Hopefully they dense up and start adding a bit of size on. Pushing them pretty hard seem to be taking it. 900ppfd and 2.5 ec only just showing tip burns on one. Seem to be holding nitrogen. 24 to 25 degrees and 50 humidity most the time.


Likes
43
Share


@Indica_Jones
Follow
Gorilla Zkittlez 😃 Hunrig Gesund, und stressfrei 😃 endlich läuft es und der anfängliche Kopffick ist etwas in vergessenheiteraten wenn ich täglich meine Babys so sehe :slight_smile: habe diese Woche mit der Halbenration gestarte. DOch musste bemerken dass sie etwas mehr gebraucht haben eine der vier hatte ein kleinen Tick verdrehtes Blätterwerk was nun aber am ende der Woche so gut wie verflogen ist es wurde 2 mal gegossen 1 mal mit der Halben Portion des Hesi chemas und in der Mitte der Woche nochmal mit voller Dosis :slight_smile: die blätter Wachsen nun wieder gleichmäßig ohne wellen zu schlagen :slight_smile: getopt habe ich diese Woche noch nicht da ich das gefühl hatte ein wenig schonzeit würde Ihnen noch gut tun


Likes
4
Share


@Santica_Garden
Follow
Sorry for the lack of updates guys but we all can agree that the Veg stage is the boring part 😅 But the ladies are doing & looking great, I am going to be flipping them to flower tonight. 👍🏾


Likes
11
Share


@sellem
Follow
Done.
Harvested ALL on Day 72 - one LCC was very heavy on amber trichomes, one BPP and one LCC were what i consider optimum, and one BPP was VERY milky, like peak potency. very few amber. Interested to try them all!
Total Drying time was 7 Days for both LCCs and 8 Days for both BPPs.
I decided to do my first proper dry trim. For two plants i hit the spot and could just shave off the remaining leaves. For the other two it was much more of a hassle.
They already smell way better than my previous runs where i dry trimmed. Also the colors are awesome for both plants that purpled.
Smoke review will have to wait some time. Right now, all of them are curing.
Likes
79
Share


@JuanHaze_Arg
Follow
🚿 Lunes 26/09 -2do riego de levado de raíces. se riega con 8 litros de agua + 3ml de detox por litro, EC:0.2 PH:6.3 Drenaje: EC:0.7 PH:6.5
🚿 29/09 -3er riego de levado de raíces. se riega con 8 litros de agua + 3ml de detox por litro, EC:0.1 PH:6.3 Drenaje: EC:0.4 PH:6.5
Esta semana le saque muchas fotos porque estoy deseando cortarla! Jajajaja
Aún esperando que se pongan ambars algunos tricomas. Comenzó el amarillamiento de las hojas.
Likes
13
Share


@Hyperbunny
Follow
das sind die bilder der letzten ca. 2 wochen… ab jetzt gibts passende infos zu den bildern ;)
Likes
69
Share


@Seed2WeedYT
Follow
1/24 Seeing balls I think :( - Welp - Confirmed they are balls, #2 has them also, not sure if LST caused to much stress or what. To much pride to just kill them all. I will continue this grow concealed in the 3x3. Honestly thought I was doing everything right. Going to leave them together, I got a auto water system to help keep tent closed more often. Doing this for the experience, will deep clean tent and all equipment after. I guess my goal now is to just finish her up, I'm 4 weeks through, going to try to use this bud for edibles, etc. This is for the people who had a hermie, wanted to continue growing it, but couldn't due to there conditions. Here ya go, this will be a fun run. If this isn't a good idea let me know LOL.
1/25 - (early morning) after a little researching and thinking, I think I'll just kill the hermies out. #2 had the same sacks. Going to keep a close eye on #3,#4, but so far they haven't sexed yet, ended up chopping #1, #2 for the better. Done buying cheap seeds, I have went through recommendations to find the best genetics and a more reputable breeder, very soon will start diary on that which I am very pumped for. With 2 of these out now, Planning on putting another strain in with them. I got a little unmotivated experiencing this, but figured rather fix it now then set my self back another 4 weeks. Hopefully we still have luck with #3, #4 will hope for the best!
1/30 - Since chopping #1, and #2 due to them becoming hermie, I definitely lost some motivation on this run. I still have been watering and adjusting canopy with trellis. They have definitely blown up since 1/25, and are giving me much more motivation moving forward. I gave them recharge today. I have started slight LST again but just bending the top cola so it won't grow higher then other colas. I have started another run with Brother Mendel Genetics, and will be starting another grow diary series on them. Look out for it. I do apologize for the late updates, I hope you enjoy the updated documentation. Closing this week out, Definitely had a roller coaster typa week but things are starting to look up.
👉Check out My Instagram for daily updates @Seed2Weed_YT👈 Will Follow Back, Let's Grow Together 💪
Likes
2
Share


@Clemo
Follow
Not watered for 5 days, watered a little on last day week3
Growing well...
But don't know if I should trim them?
Likes
37
Share


@MG2009
Follow
9/27/2018
Been a rainy damp week,cooler nights, no moulds as of yesterday and will update photos shortly if weather permits.
Speak of the Devil, this am #2 has two spots of mould,cut ✂️ out,and trashed. All others no mould, #4 is covered with sand it keeps getting blown over!.#2 fading, #1 still Growing nice green very little fade just lower leaves lots of new pistils,#3 all hairs gone brown, and smells like Real old school Skunk!👍not much bud but still have couple weeks of flowering to fatten up and taste of Skunk getting me excited😁
10/02/2018
Week 7, day 5. Rainy days still very little mould just #3 so far. #1 looking fantastic.#2 pistils brownish,#3 pistils all brownish red dont see any New pistils but branches drooping from their weight #4 is still popping New flowers but lots brown all over, hope 2 weeks to finish! But cold is coming soon. #1 no signs of slowing down putting out lots of fresh flowers! Does not mind the cooler weather. Last bit of molasses to super charge microbes in the soil. Hope she comes in at 8-10 weeks👍 53-70 days flowering.


