


Likes
Comments
Share


@AsNoriu
Follow
Day 106. Trim jaiiiiiilllllllll !!!!
First done, think it could reach my record 240. Insane quality. 4 rows of solid buds hanging ....
Next one ....
Both finally finished and honestly, that's my plants to be proud of !!!
Day 114. All is done, no doubts its my best grow.
Happy Growing !!!

Likes
9
Share


@TheNug
Follow
dont know how im feeling about this one , she looks weak and stretchy meeeh???? showing sex though

Likes
2
Share


@High_Grade_Dadli
Follow
Both plant are doing well for the lil that is being done....going to take one or two cutting in the upcoming week so they can live up to the mothership name n allow more vertical branches

Likes
11
Share


@Green_Dream
Follow
Such a great week!
I’ve never seen such a fast growth before.
Since they were ready the girls got transferred in their final pots, 5l pot + 2l extra from the self watering grow box.
The soil is ca. 50% coco, 50% soil … well there’s probably about 15% perlite in there as well.
They soil mix is amended with ca. 1,5g/l green house feed biogrow. Plus ca. 6g/pot Aktivator.
And from now on they will stay in the greenhouse.


Likes
5
Share




Likes
6
Share


@Naujas
Follow
shit, the snail got to her, even though I try to protect myself from them with special pellets, out of the 4 girls she chose the biggest one :( ... it's a pity, I let her grow further. she doesn't touch the other girls, this one is probably the tastiest :).


Processing
Likes
10
Share


@GrowerGaz
Follow
This week just water from the autopots and a soil soak with some bio enhancer . Plants are really starting to smell now . Resin production on the Rado z is insane. Sadly they did not make the cut for the next drop. Happy to have been able to test them. I think they look and smell great.
Likes
9
Share


@Scilef
Follow
Daily reports:
Day 1.
Watering - Night: 6.0 pH 636 ppm 3.0 l => 5.95 pH 1120 ppm 0.6 l
Day 2.
Watering - Night: 6.0 pH 596 ppm 3.0 l => 5.6 pH 2250 ppm 0.4 l
Day 3.
Watering - Day: 6.0 pH 596 ppm 3.0 l => 5.95 pH 2110 ppm 0.75 l
Flushing - Night: 5.75 pH 8.0 l => 750 ppm
Day 4.
Watering - Day: 6.0 pH 636 ppm 3.0 l => 6.45 pH 703 ppm 2.3 l
Watering - Night: 6.0 pH 619 ppm 2.0 l => 6.4 pH 833 ppm 0.3 l
Notes: This week goal is to fix my mistakes and return Heracles in the normal state.
Day 5.
Watering - Day: 6.0 pH 636 ppm 2.0 l => 6.1 pH 954 ppm 0.65 l
Watering - Night: 5.9 pH 600 ppm 1.5 l => 6.1 pH 935 ppm 0.25 l
Day 6.
Watering - Day: 5.85 pH 552 ppm 1.5 l => 6.1 pH 950 ppm 0.4 l
Watering - Night: 6.0 pH 416 ppm 2.0 l => 6.0 pH 916 ppm 0.5 l
Day 7.
Watering - Day: 6.0 pH 512 ppm 2.0 l => 5.95 pH 1040 ppm 0.4 l
Watering - Night: 5.9 pH 616 ppm 2.0 l => 5.8 pH 1060 ppm 0.8 l
Likes
11
Share


@Ninjabuds
Follow
The Blackberry Moon Rocks are looking promising. One of them is growing into this beautiful little bush, and I think it's almost ready to harvest. The other plant is stacking up buds, but I'm thinking it's still a couple of weeks away.
The past few weeks have been so beautiful, watching the plants grow and change. It's amazing how something so small and fragile can turn into something so strong and vibrant. Now that they're getting ready to bloom, it feels a little bittersweet. I'm so excited to see the finished product, but I'll definitely miss having them around while they're growing.
Likes
8
Share


@Artyparty
Follow
This week I added CO2 to the garden. My pH in the DWC dipped to 4.6 which was scary. I knew something was wrong bc usually I'm adding water every 36 hours and it was still alot left. I adjusted it to 6.1 and hopefully she recovers...I must say the dwc is so sensitive compared to soil..good grief. During week 4 they only got hit with nutes once then water throughout the rest of week.
Update: I decided to drain the dwc and just put in 1gal of water at 5.8 pH. I'm being extra cautious since it's up in the air if the issue is light burn or nutrient deficiencies.
Update: Two days before the end of week 5. The purple punch is doing great so far..glad I took cuts. Ice cream cake is absorbing nutrients but the pH is still dipping to the 4s almost every 6 to 8 hrs. I'm just going to keep adjusting the pH and keep her rolling.
Likes
7
Share

@Naujas
Follow
great!!! the girl gained momentum :) and started growing rapidly :) she looks healthy, maybe a little sad, due to the lack of space for roots and leaves, but I believe she will get used to it :) good luck to everyone:)

Likes
18
Share


@Ironblimp
Follow
The gg#4 twins seem to be advancing well, been feeding them ffos recommended dosage,etc...In the transition into the weekend, I added 4 bamboo sticks in the corners of the pots. I also bound all 4 bamboo with additional sticks in the middle, in a shape resembling a square. This setup is kinda modular. Using string too. My goal is to maximize my lights penetration by slowly bringing the cola's/tops, into the maximum flowering area provided by my led light, tying them with string loosely and without cracking them. I brought them 4 inches closer from all directions. But the left and right sides still need another 4 inches each to come towards the center. Because of this manipulation, the top canopy is nowhere near flush anymore, with the outer-edge buds reaching 4-8 inches higher, being slightly bulkier, and more mature(a week part), then the center lower colas. Its end of 5 week flower, with 4 to 6 weeks until harvest.

Likes
26
Share


@Batista
Follow
This week we increased the quantity of fertilizers and transplanted it into a 5 liter container.
Next week we will start LST.
The total height decreases due to the transplant.
We use mycorrhizal fungi (Mykos) in the transplant.


Likes
2
Share


@KEVS_BEST
Follow
Woche 6 - Übergang zur Blütephase und erste Herausforderungen
Die sechste Woche markierte den Übergang von der Vegetations- in die Blütephase. Bis zum Wochenende wurde weiterhin der Terra Vega Dünger verwendet, mit einem Verhältnis von 30 ml pro 10 Liter Wasser. Am Samstag, dem ersten Tag der Blütephase, wurde jedoch deutlich, dass ein Wechsel auf den Blütedünger nötig war. Leider führte die verspätete Umstellung auf die Canna Terra Bloom Linie zu einem leichten Nährstoffmangel, der sich in den ersten Tagen der Blüte zeigte. Anfang der ersten vollen Blütewoche wurde dies korrigiert, indem vollständig auf Canna Bloom umgestellt wurde.
Die pH- und EC-Werte blieben stabil und optimal eingestellt. Die Temperaturen stiegen minimal an, blieben jedoch bei angenehmen 26 Grad. Mit Beginn der Blütephase startete der sogenannte Stretch, und die Pflanzen legten beeindruckende 2,5 cm pro Tag zu.
Während dieser Woche wurden die ersten unteren Blätter entfernt – ein leichtes Lollipopping, um die Energie auf die oberen Bereiche zu konzentrieren. Die entfernten Blätter wurden getrocknet und sogar laminiert, um den Fortschritt dieses besonderen Grows festzuhalten. Es wurden ebenfalls einige kleinere Zweige und Blätter im unteren Bereich entfernt, um die Belüftung zu verbessern. Das eigentliche, umfassendere Lollipopping wird jedoch erst in zwei bis drei Wochen erfolgen.
Trotz des anfänglichen Mangels aufgrund der zu späten Umstellung des Düngers blieben die Pflanzen insgesamt kräftig, gesund und wuchsen konstant weiter. Der Übergang in die Blütephase verlief somit erfolgreich, und die Pflanzen zeigten weiterhin ihr beeindruckendes Potenzial.
ENGLISH
Week 6 - Transition to Flowering and Initial Challenges
The sixth week marked the transition from the vegetative to the flowering phase. Until the weekend, the Terra Vega fertilizer was still used at a ratio of 30 ml per 10 liters of water. On Saturday, the first day of flowering, it became clear that switching to the flowering fertilizer was necessary. Unfortunately, the late transition to the Canna Terra Bloom line caused a slight nutrient deficiency that appeared in the first few days of flowering. This was corrected at the beginning of the first full flowering week by fully switching to Canna Bloom.
The pH and EC levels remained stable and optimally adjusted. Temperatures increased slightly but stayed at a comfortable 26 degrees. With the start of the flowering phase, the stretch began, with the plants growing an impressive 2.5 cm per day.
During this week, the first lower leaves were removed—a light lollipopping to focus the energy on the upper parts. The removed leaves were dried and even laminated to document the progress of this unique grow. Some smaller branches and leaves were also removed from the lower areas to improve ventilation. However, the main lollipopping will take place in about two to three weeks.
Despite the initial deficiency due to the late fertilizer switch, the plants remained overall strong, healthy, and continued to grow beautifully. The transition to the flowering phase was successful, and the plants continued to showcase their impressive potential.

Likes
10
Share

@NaturalBornHustla
Follow
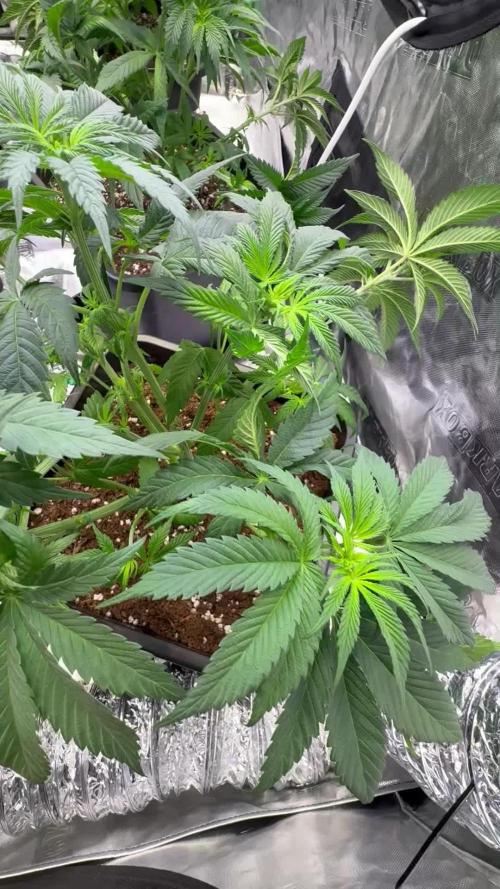
Lfg growing so healthy and looks strong,I made them a good defoliation and opened them as you can see in video,(3left will be done tomorrow).
SANLight Working at 100% intensity.

Likes
36
Share


@nonick123
Follow
Día 9 (10/06) N/A
Día 10 (11/06) N/A
Día 11 (12/06) Llueve mucho. Humedad alta por aquí. Eso les favorece
Día 12 (13/06) Se empiezan a desarrollar las hojas verdaderas a una buena velocidad! Todo en marcha! 💨
Día 13 (14/06) Riego ligero 100 ml sólo H20 EC 0,5 en previsión del trasplante en el día 15 de la planta
Día 14 (15/06) Se nota que estamos en el día 14 desde germinación y la mayoría de las plántulas van viento en popa!
Día 15 (16/06) Hoy procedemos a trasplantar a las chicas a su maceta intermedia de 6,5 litros
Se prepara con 5,5 Litros (85%) de sustrato PRO-MIX HP BACILLUS+MYCORRHIZAE + 1 Litro de Insect Frass (15%) + 65 gramos de Earth Vibes Super Soil (10 g/L substrato)
Se llena la maceta de sustrato con las manos (limpias) y rompiendo los trozos más gruesos, para que el sustrato esté aireado y esponjoso, sin presionar
Se coloca una maceta vacía de 1L para que quede la forma perfecta de la maceta donde están las plántulas (ver fotos)
Se espolvorea la parte proporcional de la probeta de microorganismos sobre el agujero de trasplante
Se saca la plántula de su maceta actual (bonitas raíces 😍) y se coloca en la maceta final
Se riega muy lentamente hasta percolación profunda con H2O EC 0,5 pH 6,5
Se coloca mulch (acolchado) de paja para evitar traspiración excesiva y cuidar a los microorganismos del suelo
A ver como reacciona al trasplante!
💦Nutrients by Lurpe Solutions - www.lurpenaturalsolutions.com
🌱Substrate PRO-MIX HP BACILLUS + MYCORRHIZAE - www.pthorticulture.com/en/products/pro-mix-hp-biostimulant-plus-mycorrhizae

Likes
9
Share


@MacBrGrow
Follow
this week is the penultimate transplant before flowering, my intention is two more weeks of vegetation so that they present the preflowers signaling the full ripening of this phase, healthy root, I noticed that it is very important for the results

