
Likes
Comments
Share


@MadeInGermany
Follow
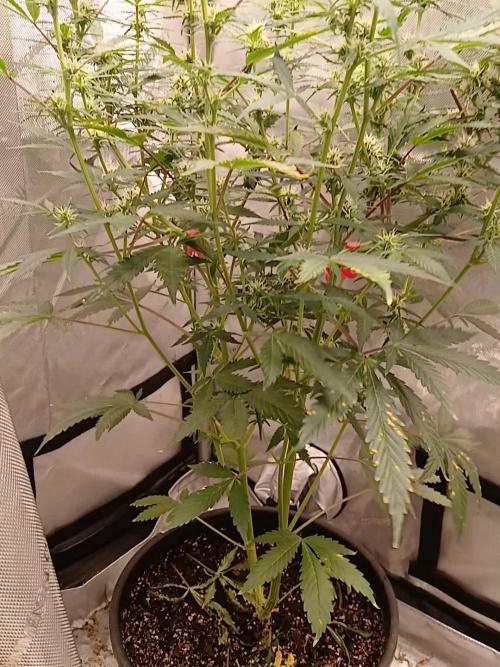
Hey guys :-)
She is growing great and will be ready for the flowering tent in the coming days :-)
A few cuttings are taken beforehand.
Was poured 2 times with 1 l each.
I'm looking forward to the start of flowering :-)
have fun and stay healthy 🙏🏻
👇🏼👇🏼👇🏼👇🏼👇🏼👇🏼👇🏼👇🏼👇🏼👇🏼👇🏼👇🏼
You can buy this Nutrients at :
https://shop.greenhousefeeding.com/us/
👇🏼👇🏼👇🏼👇🏼👇🏼👇🏼👇🏼👇🏼👇🏼👇🏼👇🏼👇🏼
You can buy this strain at :
https://www.amsterdamgenetics.com/product/double-blue/
Water 💧 💧💧
Osmosis water mixed with normal water (24 hours stale that the chlorine evaporates) to 0.2 EC. Add Cal / Mag to 0.4 Ec Ph with Organic Ph - to 5.8 - 6.4
MadeInGermany

Likes
44
Share


@RakonGrow
Follow
Note : jegliches Zubehör wird in der GermniationsWoche aufgelistet .
Day 29:
+ PPFD 550 * 20h = DLI 39.6
+ Flaschenwasser mit Canna-Boost 1.5Liter
Die war komplett Trocken ... kaum zu glauben lol
Day 30:
Sie alles recht normal aus . Es entfaltet sich noch .
Day 31:
+ Flaschenwasse 2L EC 0.26 PH 7.3
+ + mit Dünger EC 0.7 PH 5.7
+ Drain 0.25L mit EC 0.9 PH 6.8
Fazit : ich übe noch mit dem Dünger und dem "zuviel" an Urgesteinsmehl :))
Day 32:
Das Wetter ist eine Katastrophe . Draussen ist es 21°C mit 90%rH . Hier drinnen sind es im Zelt 26°C und 67%. Im GrowRoom ,also praktisch meine 1 Zimmer Wohnung mit 2x2m Niesche hat so 25.5°C und 60%rH. Luftentfeuchter läuft , sonst geht hier gar nichts, aber der produziert Abwärme .
Will ich nun kalte Luft von draussen wirds hier mit 77%rH geantwortet aber die Temperaturen gehen runter :)) Lass ich es bleiben und entfeuchte , ich habe eine undichte Hütte was die Luftfeuchtigkeit betrifft , dann steigt die Wärme wieder . ES IST EIN TEUFELSKREIS :)) Aber wie gut das ich weiss das auch die ganzen CSC's und auch die Profis ihre liebe mühe haben die Temp und Luftfeuchtigkeit zu regeln . Und nein , ich werde mir keine Klimanalage einauen die beides regeln kann. Ich wollte nicht ewig viel Geld für das Gras ausgeben :))
Also liebe Brüder und Schwester des gepflegten Ganja komsumes und Produzenten , wir sitzen alle im selben Boot . Und jeder versucht der beste Kaptain zu werden :))
P.S. ich weiss, ein neues Bott wäre gut :) Aber dadurch ändert sich nicht das Meer :))
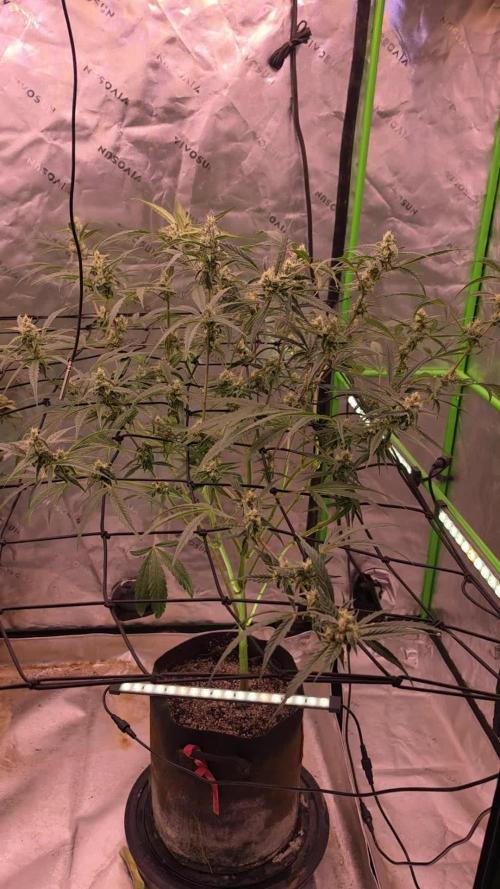
Day 33 :
Das Spiderfarmer Zelt 70x70x140x200cm ist fertig und Einsatzbereit . Meine kleinen Zwerge ziehen um . Im großen Zelt läßt sich die Luftfeuchtigkeit und Temperatur besser regeln. Klingt komisch , ist es auch :)) Aber Ihr müsst auch nicht in denkbar schlechtester Bausubstanz leben und gärtnern :))
Day 34 :
+ Flaschenwasse 2L EC 0.26 PH 7.3
+ + mit Dünger (Terra Vega 3.8ml/l , Rhizotonic 2.0ml/l , Boost 2.0ml/l , CannaZym 2.5ml/l ) = EC 0.7 PH 6.5
+ + Final PH 6.1
Nach einigen Problemen mit der Abluft und der Umluft und die Luftfeuchtigkeit , versuchen die Zwerge sich jetzt im neuem Zelt zu aklimatisieren . Ich drück die Daumen .
Day 35:
Die Düngung war genau richtig . Meine Luftfeuchtigkeit geht auch . Temperaturen sind etwas hoch . Aber Sie entfaltet sich . Videos gibts heute Nacht.
P.S. Da ich mal wieder zu schusselig bin eine Zeitschaltuhr und das Sanlight DIM System richtig zu nutzen , haben wir ein paar Lichtaussetzer gehabt , somit sind nicht an allen Tagen 20h Licht . In der nächsten Woche kommen 18h * PPFD 750 + 1h sonnenaufgang und + sonnenuntergang wird zu DLI 46.29 was etwas über das Limit von 45.00 geht . Schauen wir was passieren wird :))

Likes
8
Share


@RhynerWongl
Follow
Harvested her on day 70. Very loud smell and dense nugs, like expected. Very excited about how it turns out after curing. Absolutely recommend fastbuds if you are looking for high quality seeds for a reasonable price.

Likes
18
Share


@Wicked_Stix
Follow
We are at 21 days from these girls breaking the surface and they are making progress. I noticed at the beginning of the week that they were a little overdosed on nitrogen so I added 2 gallons of tap water to the reservoir and adjusted the ph to 6. They are still looking a little heavy on N but their growth rate is going great so I think it should balance out by the end of next week. I dont plan on doing a water change until I flower them. I left the plants alone most of the week. Tied most of them down to spread them out and defoliated a few lower leaves on day 20. The branches on most of these plants are thick and solid already. They don't budge easily. Bananasicle is looking pretty funky with uneven branch and node growth but we are just going to push forward. Still pumping nutrients and beaming light 24 hours a day. I'm thinking day 28 we will switch them to flower and see if any of these ladies can bring some❄️🔥💨

Likes
190
Share


@Herbalize
Follow
Hello Folks
3rd week of flowering and the girls are in good shape
I made a flush this week because the ph started to go down too low (ph 5.7 / 5.6)
So 15 liters of water per plant ph 6.2 with a good drain and then I put another 5 liters with nutrients this time, about 700 ppm ph 6.2
I continue to remove some leaves but I go slowly
The next week they will be around 30 days of flowering, it will be time to give them some PK 😎
Follow, like and comment if you enjoy it
I also have a second diary with 2 remo Chemo
Peace Love & Weed 😍👊

Likes
8
Share


@Chrisandweed
Follow
Pues la catastrofe pasó. Usé una bomba de descarga (un spray de esos que apretad y tira todo) que en teoria es compatible con las plantas dentro.... Se lío, ya se ve en las fotos y video que muuuuuchas hojas han reaccionado, fitotoxicidad y capúm. En fin, el cultivo lo voy a terminar, se salva mucha cosecha, en principio, pero eso. Fuera de aquello, la planta sigue tirando muucha resina, engordando el cogollo y oliendo muuuuy fuerte a gas y frutas.

Likes
22
Share


@Naujas
Follow
Well, I came back after vacation, and this is what I found: it jumped up to the light.... I made a little cropping and tried to use more LST, the problem is that it no longer fits :D :D :D but at the same time, it's really interesting to me trip :)also, several rings are already affected by the light, my 50w light currently shines at 100%, maybe it would be better to reduce it to at least 80%?.
Likes
41
Share


@Stork
Follow
Day 120
PH 5.8
EC 0.2
PPM
DLI 6h
PPFD/
Water 18c
Day 121 Tue
PH 6.0
EC 0.2
PPM
DLI 6h
PPFD/
Water 18c
Day 123
PH 6.0
EC 0.2
PPM
DLI 6h
PPFD/
Water 18c
Day 125
PH 6.0
EC 0.2
PPM
DLI 6h
PPFD/
Water 18c

Likes
2
Share

@TheFamilyShire
Follow
Right now the plant is doing good. She seems like she had slight deficiency on some of the fan leaves. I gave her good water of nutrients and recharge so she will be fine.
Little budlets are everywhere. No purple yet. Was hoping I got a solid purple pheno. Well well see if she purps in the end.
Stay tuned.

Processing
Likes
4
Share


@Skillgrower
Follow
As mais pequenas um pouco atrasadas em relacao a maior, estavam muito estressadas e atrasaram um pouco a floracao mas ja foi resolvido o problema com o revive da advanced nutrients, foi dia de lolipop nas mais pequenas pois a maior ja o tinha feito a semana passada por estar mais desenvolvida, strain forte compacta mas robusta com muita ramificação....

Likes
8
Share


@Red_toad
Follow
Buds are getting more noticeable now with a lemony smell when rubbed. Couple of the plants got stunted when they were left in the green house for a week are now recovering nicely all be it a bit on the small side. One auto started flowering and then reverted back into vegertive state, has been sent to live down the end of the garden as I have know idea what she's up too.


Likes
50
Share


@DogDoctorOfficial
Follow
An in to soil she and her sister testers go, i know that for know everything looks the same , apart from the photos, but this will start changing with them growing. For now all of them are growing pretty much the same and now that they move in to soil and start feedings they will start showing the phenotype and genetic differences, but for now all looking great , healthy and strong af!!!
Haded a intro video from seed in to now, including how i transplant and what i use wen doing it so, and from here the moon is no limit for this babes i believe , so stay tuned as this testers they promise to be a interesting ride <3 <3 <3
She is moving fast and from all the tallest so far <3 <3 <3 need to keep this one under close attention <3 <3 <3
As always thank you all for stoping by and for supporting me on this journey, i am super passion about growing and fell blessed to have you all with me on this new journey <3 <3 <3
Genetics - Fast Buds Tester 08 09 10 11
Ligth - LUMATEK ZEUS 465 COMPACT PRO
Food - APTUS HOLLAND
#aptus #aptusplanttech #aptusgang #aptusfamily #aptustrueplantscience #inbalancewithnature #trueplantscience #fastbuds #dogdoctorofficial #growerslove
With true love comes happiness <3 <3 <3 Always believe in your self and always do things expecting nothing and with an open heart , be a giver and the universe will give back to you in ways you could not even imagine so <3 <3 <3
All info and full product details can be find in can find @
https://2fast4buds.com/ wen released
https://aptus-holland.com/
https://autopot.co.uk/
https://lumatek-lighting.com/
<3 <3 <3 Growers love to you all <3 <3 <3
Likes
42
Share


@GanjaReaper
Follow
The end of the 5th week of flowering.
Just like the other 2 weeks before this was a cold and rainy week. The buds are really struggling to grow/fatten. they grow thought, but slowly because of the colder climate.
Because of the struggle and colder climate, they don't drink as fast as they used too, so I give them less to affoid overwatering.
I might have to lower my EC as well to make sure they will keep drinking properly.


Likes
4
Share


@Greenbum
Follow
This was a solid week but my PH keeps dropping. PPM dropped from 780ish to 560 so I know she's eating. Buds are forming nice and compact for their first week of actually forming. Other than the PH problem that I'm correcting daily until my fresh res change, my tallest stalk in the back grew into the light so hopefully those buds don't bleach!
Open to constructive criticism btw!
Likes
3
Share


@NoProbation4Weed
Follow
This plant has stayed relatively compact and has developed extremely dense buds.
Light is hitting her with around 850 PPFD.
Likes
38
Share


@FrulaFrulaki
Follow
Nothing special this week. I added another light, now there's a light for every plant. From the photos you can see that they're not growing equaly so I'm treating them seperatly from now on. Otherwise 2 are floweing and the third will begin flowering probably this week as it's already showing signs.
Likes
66
Share


@GODSGIFT_2005_JM
Follow
Powder: GREENHOUSE BIO FEEDING Line which are organic!
For LIQUIDS ******GREEN BUZZ LIQUIDS***** also organic.
Also i’m using their LIVING SOIL CULTURE in powder form!
MARSHYDRO ⛺️ has large openings on the sides which is useful for mid section groom room work. 🤩
☀️ MARSHYDRO FC 3000 LED 300W
☀️Also special thanks to VIPERSPECTRA P2000 (200W) & XS2000(240w) LED growlights
💨MARSHYDRO 6” in-line EXTRACTOR with speed-variation knob, comes complete with ducting and carbon filter.

Likes
9
Share


@SamDo
Follow
Week twenty-two is officially done on the Pineapple Upside Down Cake.
This week is a turning point, marking the end of vegetative growth and the start of the flowering transition.
I decided to switch the light cycle to twelve-twelve.
Initially, the plan was to wait for a stronger recovery, but the reality is simple: it wasn’t happening.
The plant was given roughly three full weeks to acclimate after stress, and the response stayed limited.
Rather than staying stuck in an endless waiting phase, I chose to move forward.
This means accepting that flowering may not be extremely vigorous or high-energy.
That’s fine. This run is also about observation, learning, and adapting.
Flowering was initiated gently, at around three hundred PPFD, to avoid adding more stress.
At the same time, I switched the nutrient program to Athena bloom and adjusted the recipe accordingly.
The plant has now been under flowering conditions for about twenty-four to forty-eight hours.
Over the coming week, I expect to see the first signs of stretch.
It’s a bit frustrating, because structurally the plant was doing really well.
The LST work created a clean, balanced canopy, and the potential was clearly there.
Now the focus is simple.
No rushing.
No over-correction.
Just letting the plant transition naturally into flower and observing how she reacts.
Next week will officially mark the first true week of flowering.
From there, we’ll reassess posture, stretch, and overall vitality.
For now, the plant is left alone to settle into its new rhythm.
That’s it for week twenty-two.
See you next week.


Likes
Comments
Share

@Count-Dooku
Follow
Had to flush some nutes out of the soil last week, ec was 4.0, pushed 6 gallons and dropped it to around 3.5.
I notice some nitrogen tox and clawing going on, so I will continue with heavy saturation and light feeding to balance out the ec.