
Likes
Comments
Share


@Atom_x_Andromeda
Follow
Plants doing fantastic add your opinion.. stay till the end im sharing my medical grow pics


Likes
13
Share


@masterofsmeagol
Follow
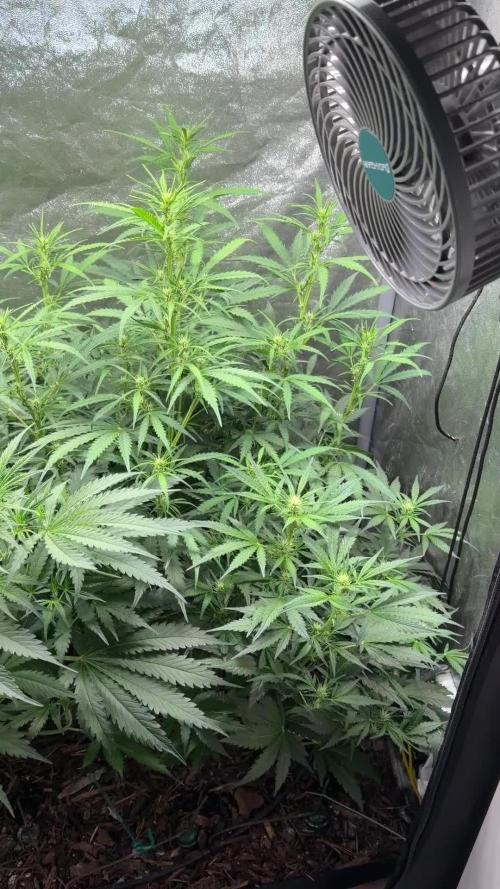
7/20 Went over this morning to plants soaking wet and heavy rain. Went back around 4pm and plants actually look really good. The rain has stopped for a bit and the girls looked great. Apart from some septoria leaves I needed to defoliate on the first plant I treated. I also noticed a few others on other plants so it's spreading albeit slowly. I treated the three in the middle with their second dose of Plant Doctor at 3tsp/1gal. One gallon administered to each plant via root drench. I think I may treat the other plant showing signs with a diy Dr. Zymes using citric acid as the active ingredient. That way I Gould start treatment right away without having to rely fully on plant doctor. Plus it would kill any pests. Ive seen damage but the birds do a number on them. I dont want to spray my plants with a bunch of chemicals if I don't have too. I shouldve replaced the pallets and cleaned the cage better. I think I did a good job sanitizing as I have no wpm. Just this septoria I probably got when the lady mowing the lawn cut all tjis fucking grass and blew it in my pen, throwing bird seed and I'm sure tons of disease into my grow bags. I literally had to harvest a bunch if fucking sunflowers. It looked like my plants had been mulched. Just with small disease carrying shrubs. At some point some of this stuff has to be on purpose. You CAN'T be that stupid. A couple kushes in the back look hungry. I think I may need to up my feed. I've written to much. I'll keep this updated. Thanks if you made it this far.
7/21 I guess it rained last night. Oh well. It was blue skies for hours before dark. It must've rained late/early morning. I'm sure the app of plant doctor will be fine. Like I said I'm considering using citric acid as a foliar spray to help with the septoria and clean up any pests. I don't have enough pests to warrant spraying. I just don't want to put all my eggs in the plant doctor basket. Today is overcast and windy. The wind has really assisted in spreading this virus. I remove anything I see infected immediately and since these plants are reveges they have plenty of leaves. Plants are really stretching. I know I talk about the septoria a lot but realistically if someone looked through my garden they'd have a hard time spotting it. I don't want to exaggerate the problem but I don't like dealing with ANY fungus or molds.
7/22 It was 55° this morning when I went over. I defoliated some septoria leaves and a few that were fading or damaged. I saw almost a whole leaf eaten so it's probably a good idea to move forward with citric acid. I can add that to the plants I've already treated with plant doctor. This is the first year it's been so noticeable. It's the reveg 10th planet that started this off. Oh well. I've dealt with MUCH worse. Plants LOOK good (other than septoria leaves (on bottom of plant). Today is water day for me but it's been raining and it's a lot cooler today. Bags still had weight to them. I want them to have a proper wet dry cycle. Temps top out at 75° so I'll monitor during the day and if something NEEDS WATER I'll give it to it. I'm suprised I have ZERO WPM. The septoria is much more identifiable but pm is usual present in these conditions bur I don't have a spot of it. I may do some defoliation today. I also need to add supports for flowering but one thing at a time.
EDIT: Went over around noon. 70°. Bags seem to be holding weight (it was easier to tell as ONE plant was substantially lighter than the rest) so I decided to hold off on watering. At least until tonight. There are three plants (at least that are going to NEED water). They look phenomenal now though and we've had lots of rain. Plan is to go over later and get the light ones and mix the water for the others so I can administer it in the morning quickly. I have an early doctor's appointment but I don't to overwater or water unnecessarily just because. But when you grow alone sometimes you need to do things when your able. I have people there that would help if I asked. And I have before but its late . I'm very grateful. I defoliated quite a few septoria leaves. They were all from the bottom of the plant. A couole wete bottom interior. I know there are worse things to contend with but still a pain.
EDIT #2 WENT BACK AT FOUR AND PLANTS LOOKED FANTASTIC AND STILL HELD WEIGHT. THE REVEG MK ULTRA IN EARLY FLOWER "MAY" HAVE STARTED TO DROOP AND "SEEMED" LIGHT. THE LARGE SPECIAL KUSH FUETHEST IN FLOWER BY THE DOOR WAS ALSO EXRRENELY LIGHT. I HAVE AN EARLY DOCTORS APPOINTMENT BUT DONT WANT TO OVER WATER MY PLANTS JUST BECAUSE IM IN A HURRY. ITS COOLER THIS WEEK. 70 TODAY AND HIGH OF 80 TOMORROW BUT DAD SAID THATS NOT UNTIL THE AFTERNOON. I MIXED UP ENOUGH WATER TO WATER EVERYTHING IN THE MORNING IF IT NEEDS IT. I HAVE AN IMPORTANT DOCTORS APPOINTMENT EARLY THAT WILL TAKE ME AWAY AND IM FEELING A LITTLE ILL SO I WANTED TO GET DONE WHAT I COULD TODAY. WATERED THE TWO THAT NEEDED IT WITH TWO GALLONS A PIECE (30GAL REVEG MK ULTRA AND THE BIG SPECIAL KUSH IN FRONT I DIDNT TOP THATS FLOWERING THE FASTEST. EVERYTHING ELSE CAN WAIT.
7/24 Surprisingly the plants still held weight this morning! The looked pretty good too! However its going to be highs in the 80's for the next 7 days. Since the plants still had some heft to them I watered everything just a gallon. I gave the 10s a half gallon and skipped the 50gal container plant. I think this is a good happy medium. I'm still seeing random septoria leaves but still no WPM. I defoliate daily sometimes a couple times. I need to get a minute to myself and add a foliar spray. I'll start with a dih Dr. Zymes while I'm looking into other products like bicilus (i have bt but its a different bicilus) or trichodermia. I need to feed sometime this week too.
7/25 Plants looked great this morning. I watered the 10th planet on the end that hadn't been watered in forever. I think I had been overwatering during those 100° days. I didn't water today as everything looks great and they don't seem to need it. I'll check later today. I did water the pink kush beside the 50 as it was much lighter (1/2 gal) to get it on par with the others. I'm starting to see pest damage as well so I think an app of Dr. Zymes would be a good idea. Both for pests and septoria. Plants are REALLY stretching. One special Kush is far ahead of the others.
EDIT:WENT OVER AT NOON AND 4PM. PLANTS LOOKED GREAT APART FROM MIRE SEPTORIA ON THE 10TH PLANET. I NEED TO WATERING DIFFERENT IN THESE TEMPS. IT WAS BREEZY AND 80° BUT THE BAGS DIDNT FEEL TOTALLY LIGHT AND THE PLANTS LOOKED AWESOME! THE HUGE EARLY FLOWERING SPECIAL KUSH IS PRETTY DAMN LUGHT BUT ITS PRAYING AMD LOOKING GREAT. I DECIDED TO WATER AND FEED IN THE MORNING AND HOPFULLY APPLY A DR. ZYMES PRODUCT ON THE ENTIRE GARDEN IN THE EVENING. PLANTS LOOK HUNGRY AND I HAVE RANDOM PESTS. ITS MOSTLY FOR THE FUNGACIDE ASPECT. PLANT SOCTOR SEEMS TO BE WORKING GREAT ON TWO OUT OF THE THREE I USED IT ON. THE THIRD IS A REVEG AND HAS TONS OF FOLIAGE I NEED TO ADDRESS AND CLEAN OUT. IT SEEMS LIKE IT WILL SPIT OFF SOME SEPTORIA LEAVES A DAY OR TWO BEFORE ANOTHER APP IS DUE. I'M LOOKING INTO MY OPTIONS. IF ANY OF YOU HAVE A SURE DIRE WAY TO DEAL WITH LEAF SEPTORIA IN EARLY FLOWER HIT ME UP! IM NOT TOO WORRIED THOUGH. I CAN SUPPRESS IT ENOUGH IF I HAVE TO EVEN IF I GOTTA SPRAY THE LEAVES WITH THAT 9.0PH ALKALINE WATER.


Processing
Likes
11
Share


@4F1M6
Follow
I started germination of 2 Moon Walker kush beans on 29/12/2020. I pre moistened my rockwool cubes with ph balanced water to 6.4. Made sure the plugs were just damp and not soaked. Using a small wooden dowel I increased the size of the plugs pre made holes. Than I sowed my beans into the holes. Ripped off a small piece of rockwool and mulched it up.h Lightly filled the holes in with the mulched rockwool. Than stuck the plugs into a misted humidity dome, to complete germination.
Shouldn't take anymore than 4-5 days to see some sprouts. Once I see some cotlydon leaves bursting to the surface. I will get the plugs planted into some 1 gallon pots. Plus get these ladies situated into their home. Cant wait!
Some background information on my first run with MWK. She gets very branchy fast and absolutely loves lst. Responded everytime with a vigorous growth spurt after training sessions. Very easy going on nutrients and didnt have any different needs outside my normal feeding schedule. Super tight compact colas in definite need of increased air flow and movement. Ended up having the fans turned up much higher in the room she was in because of the shear mass and density. Super trichome production outta these genetics. One of the frostiest strains I've grown to date. Just diamonds!!! Amped for this second run.

Likes
6
Share


@RzDreams
Follow
18/10/2022 Se controló la plaga de mosca del sustrato, no están exterminadas definitivamente pero no se siguen reproduciendo a la misma velocidad.
19/10/2022 Mediados de la 4ta semana de crecimiento se trasplantan 03 y 09, queda pendiente 04 no contamos con más macetas y el espacio no es suficiente dentro de la carpa se deja dentro la semana completa.
22/10/2022 Se aplica tierra diatomea para exterminar por completo la plaga de la mosca del sustrato.
23/10/2022 Se quita excedente de tierra diatomea de las hojas para no ralentizar el crecimiento. 04 se saca del indoor para continuar con la semana 5 de crecimiento solo con 4 plantas y buen espacio para su correcto crecimiento, 04 se pretender pasar a maceta más grande y se deja en exterior esperando sobreviva.
No se agregan nutrientes específicos aún hay buenas reservas y restos de control de plaga
Processing
Likes
Comments
Share


@MG2009
Follow
06/23/2020
Here she is very well pollinated, and fattening up! I will post a video of her mid week to show her progress.
The waiting begins.
I'am really hopping #3 passes his flower structure
(week 3 first pic) into the cookie cake for bigger buds, and less cookie like structure but either way taste should be great and potency off the charts!🙏
06/24/2020
Video 2 shows remains of Red Sky male, his pollen is a nice yellow. I kept 1.4grams and must of been 5 grams on floor and walls!
Likes
2
Share


@Valley
Follow
Geruch etwas weniger als erwartet trdm sehr sehr sehr geile terps bin gespannt wenn’s fertig gecured ist wie es dann schmeckt


Likes
2
Share

@Organic_G
Follow
Wachsen wirklich perfekt, keine Mängel, super fette Stämme, extrem vital und gut am Stacken die Ladys…
Die Automatics sind auf einem Rekordrun wenn es so weiter geh, für 2. Woche Flower sind die extrem robust geworden…
Likes
2
Share

@CWolcott1991
Follow
08/31 Day 29 start of week 5 of flower. Both seem tk be doing really well no signs of light stress or anything. Should start packing on weight now. Fed small pot 1310ppm didn't measure runoff
09/01 watered big pot runoff 338ppm. Watered small pit runoff off 395
09/02 fed em both 1700ppm
09/03 both got watered
09/05 fed both 1810ppm
09/06 watered small pot. Watered big pot
Likes
13
Share


@Chubbs
Follow
420FASTBUDS
FBT2103 WEEK 3
The 2 of these beautiful ladies are gorwin amazing so far. Really I couldn't be happier with how they're turning out. Veg for an auto is so quick and they appear to show no issue's what so ever. Started brewing a molasses tea I'll fed them in 48hrs after its aerated for a couple days. That should really activate the microbes in the soil and give them an advantage on there journey into flower. Happy Growing
Likes
25
Share


@Herbz_Unkraut
Follow
This strain is just incredible, perfect indica high with a sativa sidenote
It grows strong and is quite resistent to mold. All plants were done after about 60 days of flowering.
First time i used a tumble trimmer and it works perfectly.
I didn't check PH or EC at all

Likes
29
Share


Processing
Likes
49
Share


@Guerilla_Jack
Follow
Hello growers!! I bend the main branches down.Side branches are spreading nicely.. Everything looks fine for now.Nice green day too you all😁


Processing
Likes
14
Share


@kevgrow
Follow
Hey Growers, end of week 7 from seed :)
This is plant #2
Its a female
Took a while for me to reveal its gender. She is looking healthy and is growing fast.
Did some trimming
Slowing increasing nutrients, I am Currently feeding every three days 1 gallon of water with 1/2 of the recommended feeding schedule given from the manufacturer.
Will keep you guys posted with more, see you next week 😊


Likes
47
Share


@Reyden
Follow
Continua il tragitto verso metà della fioritura e ieri sono state sciacquate solo con acqua a ph neutro.
The Sin è la pianta più alta di tutte con foglie più strette presentando caratteristiche più Sativa..quando entro nel box sento odori buonissimi 🤤 da rimanere lì ore per cercare di catturare più possibile ogni sfumatura della sua fragranza 💜non resta altro che aspettare 🌱👌

Likes
17
Share


@JuicyFruit
Follow
Hi! Thanks for checking out my Royal Dwarf grow!
Please comment on how healthy you think the plant is or any thoughts.
In less than 2 weeks I have learned so much from you guys and i want to make a point of thanking you as this medicine allows me to live what I would consider a normal day to day life! :)
So... Beginning week 2 and from the first few pictures and videos I think the plant is getting healthier, Getting a ph meter this week also, will probably resolve any issues I think I'm having.
Day 7/8
I was going to switch from the Vitalink Plantstart + Canna Rhizotonic schedule to Canna A, B, Rhizotonic and Cannazym. I have not gotten around to doing so yet as I think I've been overwatering the plant. stopped watering and started using the spray bottle to keep the moisture up. will water with the new nutrients once the plant has dried out a bit.
Day 9:
Transplanted from a 1L to a 19L/5Gallon, the top half of the 1L container was dry and had what looks like well developed roots and the bottom half was wet and the roots were hanging out when transplanting. I definitely should have let it dry out more.
Day 10: Rhino pro 200/600 Carbon filter arrived and it's the 1100cfm/overpowered version as I read it was better to get a filter with a better CFM rating than what your fan can move. The fan is an Isomax 900cfm or is it m3/hr ?
I added a short video after the pics so you can get a fairly good view of the setup.
I got 5m acoustic ducting and connected it up as best I could with the space I had. I Was covered in rock wool, didn't have wire cutters and had to go buy some to finish the job 😅. Talk about a nightmare!
I left 1mtr spare ducting for the intake fan in future grows.
I think it's worth mentioning that the 6 fans on the back of my grow light are louder than the filter/ducting/fan/ducting (in order).
Noise level of light and fan combo is between a really expensive/good quality bedroom fan and a hairdryer as a comparison.
As I don't have my intake fan yet Im using passive intake and my fan has a 3 speed controller so I have it on speed 1 and there is negative pressure.
Finally i mixed up the canna nutrients and changed ph from 7 to 6, I'm not sure what's ideal for autos but I read that anywhere between 5.8 and 6.3 is good for autos? Let me know!
Day 11 (update)
As I have now realised how to edit my weeks in the diary I will start doing so!
Read that a fluctuating PH is good between 5.5-6.5 so I'm gonna stay at ph 6 and let it do its thing.
The plant seems to like this a lot more than ph7 although it is still stressed from transplanting (1ltr-19ltr) it's still growing new leaves but growth appears slower.
Finally after a few cold showers I have recovered from being covered in rock wool! (thank god😂) also I started a RQS Quick One as a backup for the dwarf and RQS Fast Eddy as Im eager to see if medical marijuana has a better effect on my depression, anxiety and sleep problems than regular high thc low cbd strains. Check out my profile (JuicyFruit) to see my diaries for these strains!
Day 13-
my dwarf still seems stressed from the transplant, its growing some new leaves slowly but is still drooping from transplant. gonna be a dwarf-dwarf by the sounds of it! 😆 and i was doing some research on optimal hang heights for my Phlizon "3000w" COB LED, it seems that 40 inches is good to start from.
i also read another users opinion that the switch on the fixture labelled VEG&BLOOM is mixed up with the other switch that is labelled STRONGER.
The VEG&BLOOM switch is LEDs along with IR. (i read that the IR is probably further stressing my transplanted dwarf) and the STRONGER switch is COBs.
i took a minute to think about this but after realizing that the plants can probably handle the COBs (STRONGER) at the right distance i may aswell use them for veg and switch the LEDs and the COBs on 1 or 2 weeks before flowering for full flower power!
after reading all that i went straight over and switched the LEDs off and put the COBs on. il post pictures in the morning to show how the plants reacted.
fingers crossed people!
Please comment on anything you think i could improve on or any advice to help this plant grow better as it is much appreciated!
Peace!
Day 13 Update:
took some photos and it likes the COBs, although they are very hot combined with a sunny day reaching high temps of 29c. turned the fan up and opened another passive intake on the tent. finally im going to get some calmag and a oscillating fan for the leaves and hot spots in tent :)
Likes
44
Share


@GreenHouseLab
Follow
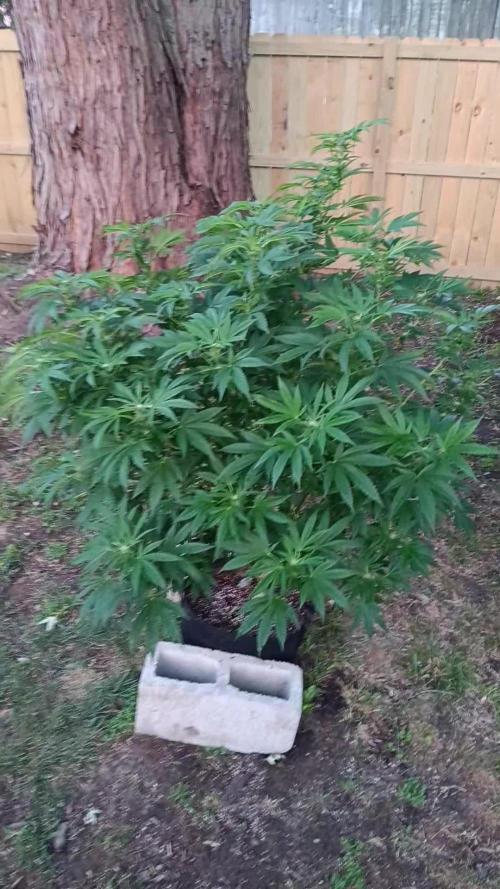
Transplanting today into 3 gallon with some dry organic amendments. Coco, perlite, gaia green, EWC, Mycorrhizae will be the weapons of choice.
Currently under 4000K light might change to 3000K as only 2 x 3 or 5 gallon pots will fit under the preferred veg light.
Main focus has now shifted to this new run will try and get her ready for flower 2-3 weeks from today.
Cheers to all fellow growers.


Likes
12
Share


@RandomNoob
Follow
The yeast fermentation is real. They were on a yeast fermentation regimen yesterday. Getting it again today. The effects are amazing.
Day 17. - The ghetto CO2 generator did it's thing! They all exploded yesterday.
I fed this morning @ full strength (1mL/L) Green Buzz Organig Grow Liquid, with about 1.5tsp molasses, and 1mL of Bokashi EM Juice (not bokashi tea, but the EM inoculant).
After feeding I tied up and down. Ponytails for the top fan leaves, to expose the bottom nodes. And stakes to get the bottom nodes a bit more horizontal.
Ahh. Free seeds. Who would turn down a free bean from Seedsman tagged 'Strawberry Cheesecake Auto'? Am I glad I gave her a shot. This plant is beautifully symmetrical and healthy AF. I'm really looking forward to checking out the strawberry terps in a couple months.
I bumped up the smell in my diary to 'strong'. It's not flower smell yet, but the veg smell is reeking. A friend noticed it as soon as I opened my vent-room door. But the good news is that she said she couldn't smell anything before then. When I open the tent, it's so strong that it's dank already. Again, not a flower smell...but I've never smelled a stronger veg-oder than these.
Nobody could ever convince me that yeast is futile or too much work. The growth from day 16-->17 was simply mind-blowing. I'm expecting more tomorrow, after the heavy feeding today.
Day 20. So...some news. Yesterday I got the new fan. Freaking sweet- screw that clip on fan nonsense.
And today, I've been busy.
Non-tent related...
I put together a worm farm. So I'm hoping for castings in a few months. Fed the bokashi bucket. I've had a problem with fungus flies (look like gnats, but live in soil). Elsewhere, notice that this falls under 'Non-tent related' :D. So I removed the top inch of soil in that houseplant, sprayed a soapy water mixture and covered with 1.5 inches of sand. I'm including this here, because I was terrified that those dudes would somehow find their way to my tent (on the other side of the house). But I think I've seen the last of them.
Tent related...
I watered with a nice castings tea that brewed for about 24 hours. I hope I didn't f*ck up. I hit GG and Strawberry Cheesecake with it before I pH'ed it down. So they got dosed at around 7.6. I went back to them and hit them with a cup of pH'ed tea (6.5). Then the light cut off, and it was their bedtime. I had to wait for LST until after their nap. But while they were on black out, I got a package. Some dope-AF smartplugs. I can now control my LED, my exhaust, and my air mover from my phone. There's a built in digital timer where I can schedule on/off's. And it *measures* my usage! :D How cool is that?! Welcome to the space age. I also got a USB microscope, which is also badass. So look for pics from that in the coming weeks... Later when the light went back on (courtesy of my new smartplug!) I went back and did LST and pics for today.
Day 21. New dehum. :)