Recommended
Likes
Comments
Share
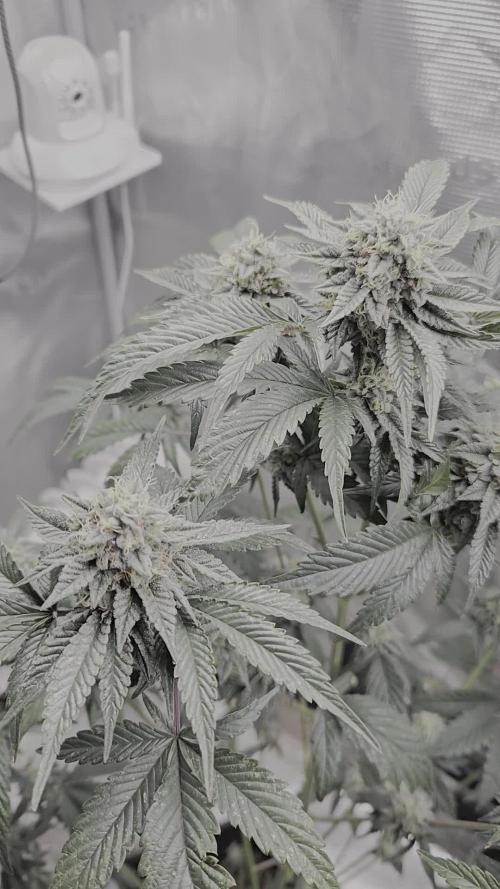
I absolutely love to watch them grow! Especially that moment they hit their first growth spurt. I started with RO water that is remineralized for drinking purposes. The ppm is only 18! My tap is 156! So considering they don’t need much water, I’ve been stealing some of our drinking water. The RO water starts at pH of 7. After I add the nutrients, ppm of 249 @ pH of 5.8 while soil is still sweet @ pH of 7 I think my days are off as a new week begins on the last day of the previous week. I am going to leave that for consistency. 04/21 - Noticing some possible nutrient issues with the Fruity Pebbles for several days now. Going to see what she needs. Up front I’m thinking maybe just a super small amount of Amino Acids with a little Epsom Salt. Maybe she is struggling to access the nitrates from the neem cake. IF it’s a issues with nitrogen. We will see. Maybe she would benefit from some extra calcium?… Any ideas are greatly appreciated. Day 22 and I am noticing how these girls have been burning up a lot of potassium lately, dealing with the wind and sun 💨 ☀️, getting pushed around all day. I plant to top dress with some Kelp Meal pretty soon. Day 24 -> 4/22/22- a quote from the weather on today’s red flag warning and dust storm warning. “ HAZARD...Less than a quarter mile visibility with damaging wind in excess of 60 mph. SOURCE...Satellite imagery. IMPACT...Dangerous life-threatening travel.” I’m keeping the girls inside today. Day 26, I was planning to check the runoff on some of these girls, especially the fruity pebbles, however I messed that up as I also top dressed WAY too much of the seaweed bliss. So I flushed with plain RO water at pH of 7 until there was only slight coloration in the runoff. I didn’t check the runoff as a lot has changed with all that flushing. So next watering/feeding I will make sure I check the runoff on multiple plants. So the seaweed bliss with its 17 on potassium, seems to be the most likely culprit for why there is a bronze-ish color on the inside of the new growth. Hopefully a foliar feed of Epsom salts can correct the problem. Inside tent, lights on LOW. Noticing similar pattern in all of them to a degree, most noticeable in the fruity pebbles.
Likes
12
Share
Harvest day 70 since time switch to 12 / 12 h Hey guys :-) Finally it's time 💚 The lady is done the large leaves have been removed and hung upside down to dry in the dark drying room. You can now stay there for 13-15 days at a temperature of 18-20 degrees and 55-62% humidity. After 13-15 days it is neatly trimmed by hand and placed in jars with boveda packs 62. After 4 weeks Boveda 58% come in and are ready for testing ;-). After everything has been cut cleanly, the last update comes with the smoke report and the finished pictures. Let's get to the plant 💚. First of all I would like to compliment Green House for this genetics. Unfortunately, the rating system at Growdiaries is a bit strange because I have to give the stars before the Smoke Report and in the end it might have led to more stars in terms of taste. The growth was great from start to finish. She had no problems at all and also had no problems with animals 👍. I'm amazed at the great smell the beautiful buds give off😀. Of course I cut cuttings and if the taste is as good as the smell it will be grown again ☺️. A final report comes with the Smoke Report. Until then, I would like to say thank you to the whole Green House team and wish you all the best fun with the diary 💚🙏🏻 Have fun and stay healthy 💚🙏🏻 👇🏼👇🏼👇🏼👇🏼👇🏼👇🏼👇🏼👇🏼👇🏼👇🏼👇🏼👇🏼 ‘Powered by GreenHouse Feeding’ Copy the link for 10% off all Nutrients 👇🏼 http://shop.greenhousefeeding.com/ affiliate/madelngermany_passiongrower/ 👇🏼👇🏼👇🏼👇🏼👇🏼👇🏼👇🏼👇🏼👇🏼👇🏼👇🏼👇🏼 Water 💧 💧💧 Osmosis water mixed with Cal/Mag (24 hours stale that the chlorine evaporates) to 290 ppm and Ph with Ph- to 5.8 - 6.4 MadeInGermany
Likes
19
Share
Why hello, if you are still here thank you for the love & support. I cant believe we are already on the start to week 3 of bloom! This lady here has been streching the last 2 weeks! During the first week of bloom I gave her nutrients with both bloom a & b as well with bud candy! Then water in betwen watering. Shes been needing watered everyday in this 10 Gallon pot! So im very careful with the nutrients and keeping a close eye on her! Ive also used dried coconut powder with irrarated, ph balanced water. To help the roots absorb the nutrients and really up take! Im beyond ready to see what week 3 brings us! Ive been behind on defoilation only taking about 3 to 5 leafs a day just to try to get other coals light! If you have any question feel free to ask! Much lovee lets go guava!!!
Likes
13
Share
Pesei a mão na cobertura orgânica, joguei muito perto dos caules, e ainda inoculei com chorume, queimaram as folhas novas
Likes
15
Share
@dank604
Follow
Both are growing strong, amazing the kind of growth my light creates, girls seem to be loving it! Hope to start LST on the older lady soon (Thelma). Happy growing y'all!
Likes
49
Share
@AsNoriu
Follow
Day 65. Heavy training in progress ... All done, hopefully not many natural protectors lost, took about 30 liters bag full off leaves and shoots, could do like 100 clones easy ;))) All girls lolitoped, cleared, defoliated, rewired, some had supercroping. Skunks were happy when last Cheese was done, so i think/hope - all will go smooth. This time i really cleared them a lot, maybe the most in my career ... Cheeses performed thicker and more stacked branches . Fun is starting !!! Day 66. Got my last puzzle of protection against thrips. I think i beat them already, yesterday haven't noticed any thrips on leaves, but i am old and blind ;))) They where ordered a week ago, so just in case ... Girls look just fabulous !!! I think it will be very nice harvest by bag appeal, hopefully weight will make me smile too ;)))) I still think to strip them hard at the end of week 5 or week 6 if they will delay in progress .... At the moment they are just perfect ! Day 69. Here comes my moan ;)) Stretch was not so big as i expected, looks like 80 is more real target than 100. They look very nice and healthy and i beaten thrips , but this time i cleared too much i feel ;))))) Future will show ... Happy Growing !!!
Likes
38
Share
I took the tiny plant out of the tent due to state laws. She is happily sitting in a window... we'll see what happens with her! Massive growth for both plants this week! They both doubled in size! I don't know whether to call my plants vegging, pre-flowering or flowering. I figured this was the last week of veg and next week is full on flowering!! They both stink! Gassy for sure! I'll need to turn start using my carbon filter soon... I caught a few cool time lapse videos this week. Especially after feeding them last night!! I fed them twice this week. The first time was at a third recommended dose and I jumped it to half yesterday. The leaves are clawing at the top of the plants... I think it is a lack of phosphorus due to me only watering them the last 2 weeks. Any thoughts out there? I'd love advice about defoliating... I have a couple massive fan leaves I could remove to open the canopy for flowers... I just don't want to stunt the plant or rob the main cola of a major energy source... Thoughts are definitely welcome! I tried my hand at LST... I think a few are working and a few aren't doing the job... Definitely need to figure this out! Again advice is welcome! If you've made it this far... thanks!! Cheers!
Likes
8
Share
Day 43 : Watering with co2 tab / 5L. Also added food again because i think they need it. Increased ppm to 850. Maybe the next one will be pure water. Ventilation works all the time when lights are on. Temp and humi are stable and this is good for the girls. She has a lot of burns and i dont know why. Dont want to flush or something. I will let her take her way. Patience is the key always. Also removed some burned leaves from all ladies. She took 4cm in 3 days, so i guess stretching finished and start bud production. Edit (Day 47) : Watering with co2 tab every 5L. DsD drank pure water because of burns. She has lost a lot of leaves from bottom. I dont know what to do. I will keep watering her with pure water to see if burns stabilized.
Likes
23
Share
@Kynareth
Follow
Dia 5 y las plantas ya muestran su primer par de hojas verdaderas que practicamente triplica en tamaño a los cotiledones y con un buen color verde. Pasaré a abonar conforme a la table de crecimiento y ph a 6 (algo menos realmente pero se estabilizará a 6 en las próximas horas). El ph mas y menos que uso es de boom nutrients que alguien me lo preguntó, tengo el de ghe pero como ya tengo las dosis pilladas con boom nutrients uso este, en teoría de ghe debería ser más estable pero tampoco es algo con lo que haya tenido problemas. La ec se ha ido hasta 1,9 aplicando la dosis recomendada del fabricante, creo que el fulvic/diamond nectar sube mucho el valor. Quizás con agua destilada se puedan mantener esas dosis Dia 10 - The plant keeps developing good. i have lowered the water dosage
Likes
44
Share
**Encontrarás la traducción a español al final de la descripción** From/Desde: 10/05/19 || To/Hasta: 16/05/19 From day/Desde día: 78 || To day/Hasta día: 84 You can find the Money Maker Diary here: ** Podéis encontrar el diario de las Money Maker aquí:** https://growdiaries.com/diaries/25667-gorillamakingmoney-gorilla-vs-money-m -----IMAGES & VIDEOS----- 5 - HomeMade Organic & Cheap CO2 generator (more info in week summary) 9, 10, 11 & 12: The bud on the right is a Gorilla one, the buds in the left or/and in the middle are Money Maker ones. 15 - Same Gorilla plant buds, one affected by CO2 in the roots and the other not. -----WEEK SUMMARY----- The smell is more sweet and intense every day, friends that came home turned them eyes into crystals when they see this little babys. The size isn't awesome, but the high ammount of buds full of crystals plus the strong sweet aroma makes them awesome. Buds are growing and fattenning very very well. This week i added a boost of HomeMade CO2, i never measured the results of this invention so i can't give CO2 measurements. This method is widely used in home aquariums and there is where it comes from. For those interested i'm going to write here more detailed instructions. The 4 liters i've made will last for about 2 weeks. ---NEEDINGS--- - 250 ml Bottle - 6~10 l Bottle - 400 g Sugar / l water - 1 Envelope of organic baker's yeast / l water (CHEMICAL WILL NOT WORK) - 3 mid plastic tubes 40~50 cm - 1 short plastic tube 5~6 cm - 4 tube adapters - Hot glue to seal adapters The process of creating CO2 is simple, mix water, organic yeast and sugar in a bottle, and the sugar will free CO2 in the process of fermenting to alcohol due to the yeast. 1. Make a hole in the center of the big bottle cap, insert an adapter and secure it with hot glue 2. Make 3 holes in the small bottle cap and glue the other 3 adapters 3. Link both caps with one of the mid tubes and insert the other tubes on free adapters 4. Insert a short tube in the bottom of the small cap in the adapter that came from the big cap 5. Watch the Video!! -----WATERING CALENDAR----- Plants are beginning to drain the pots a bit faster so from now on i will raise the water ammount on each watering day 0.25 l. 11/05/19 - 1,5 l with All week nutrients -(Nirvana & Blombastic) also Big Bud half dosed @ PH6.4 & 2 E.C. 14/05/19 - 1,5 l with Bud Candy, Big Bud, Nirvana, B52, Bud Factor-X, Sensizym & Blombastic @ PH6.4 & 1.5 E.C. *****ESPAÑOL***** -----IMÁGENES Y VÍDEOS----- 5: Generador de CO2 casero, barato y orgánico (más info en el sumario semanal) 9, 10, 11 & 12: El cogollo que sale a la derecha es de una Gorila, el de la izquierda y/o el de en medio son de una Money Maker 15: Dos cogollos de la misma planta, uno afectado por CO2 en las raíces y el otro no -----SUMARIO SEMANAL----- El olor es más dulce e intenso día a día, los amigos que vienen a casa a verlas se quedan ojipláticos al verlas. El tamaño no es una maravilla, pero la gran cantidad de cogollos llenos de cristales añadido al aroma que entra por las fosas nasales las hacen increíbles. Los cogollos crecen y engordan de maravilla. Esta semana he añadido un boost de CO2 casero, nunca he hecho mediciones de los resultados por lo que no puedo darlas. Este método es ampliamente usado en peceras caseras y de ahí saqué la idea. Para aquellos interesados dejo aquí instrucciones más detalladas. Con los 4 litros de agua que he preparado yo da para unas 2 semanas. ---NECESITAMOS--- - Botella de 250 ml - Botella de 5 a 10 litros - 400 g de azúcar por litro de agua - 1 sobre de levadura de postre orgánica (LA QUÍMICA NO FUNCIONARÁ) - 3 tubos de plástico de tamaño medio 40~50 cm - 1 tubo de plástico de tamaño pequeño 5~6 cm - 4 adaptadores para los tubos - Cola caliente para pegar y sellar los adaptadores El proceso de generar CO2 es simple, mezcla agua, levadura orgánica y azúcar en una botella, y el azúcar liberará CO2 en el proceso de fermentación a alcohol. 1. Haz un agujero en la tapa de la botella grande, inserta un adaptador y séllalo con cola caliente 2. Haz 3 agujeros en el tapón pequeño y haz lo mismo con los otros 3 adaptadores 3. Conecta los 2 tapones con uno de los tubos y conecta los otros 2 tubos a los adaptadores restantes 4. Conecta el tubo pequeño en la parte libre del adaptador del tapón pequeño que viene del tapón grande 5. Mira el vídeo -----CALENDARIO DE RIEGO----- Las platas comienzan a secar los tiestos un poco más rápido, asi que de ahora en adelante incrementaré 250 ml de agua adicionales en cada riego. 11/05/19 - 1,5 l con todos los nutrientes semanales -(Nirvana & Blombastic) BigBud mitad de dosis @ PH6,4 & 2 E.C. 14/05/19 - 1,5 l con Bud Candy, Big Bud, Nirvana, B52, Bud Factor-X, Sensizym y Blombastic @ PH6,4 & 1,5 E.C.
Processing
Likes
26
Share
@GrowGuy97
Follow
Day 7 & 2 of the NHLs still havnt popped, transplanting the one NHL that did pop today! Day 12 think 1 of the orange sherbet have nute burn so flushing it out and dropping the dose a little hopefully that helps!
Likes
12
Share
This was their last week! Harvested on Day 60. Smells are incredible, tricomes are carpeted and have a good mix of amber and cloudy. Love the wireless microscope I got of Amazon ❤️ i gave the girls their last watering on day 55 , and I watered till I had about 15% runoff. I like to whole plant hang dry my plants in my tent, hopefully, aiming for about 60 degrees and 60% humidity for about 10-14 days. Typically the more there is, the longer it takes. i cant wait! 🤤
Likes
11
Share
Hello Diary, He finished the first week of flowering. Apollo F1 is the smallest on "my little farm", but that's why it's also my favorite. The shape of the plant is round without pronounced main cola. The leaves grow thickly, so from time to time I remove a leaf so that the plant can breathe better. The flowers have started to form little by little, now we will see at what speed. Watering is a little more frequent, this week I added bio flowering booster with one watering. I don't always add supplements when watering, about once a week. The temperature at the Farm has risen slightly, around 28 degrees, while the humidity is around 50%. Here's what it looked like last week. 23/05/2023 - Day 24. Watering. I prepared 8 liters of water, lowered the pH. to 6.0 and added the first two components of the bio flowering booster. I watered all three plants on the farm with that amount. 27/05/2023 - Day 28. Watering and photography. This time I watered with clean water, I just lowered the pH. on 6.0. Apollo F1 - 31 cm That's all for now, see you soon.
Likes
152
Share
@EBxAH
Follow
Well week 19 and week 9 of flower did start Monday 10/11 but because of my delay in update last week I waited a bit to start the week. The smell is freaking AMAZING!!! Got to sample some more cured stuff and I absolutely love it!!! Still bummed the Black Widow never made it but hopefully next time. The mothers are all flushed, the temps are down, the humidity is down. I'm thinking about dimming the light a bit to see if it helps with ripening. In truth, this grow was all an experiment, lol. Mistakes were made but learned from. But the most important thing is I had alot of fun this time around. There was minimal stress/pressure which I believe is a major part in growing. I feel I really connected with the universe with this! My ultimate goal is quality first, then quantity. Quality will always be one of the pillars of life! I can't get a good pic of the trichomes but there's a decent amount of amber and will be ready for harvest on 10/20 🌕 That's pretty much it, just a waiting, lol. Happy growing everyone ✌️🍀✌️
Likes
2
Share
It’s now time to start flower. They are looking amazing and I’m going to go ahead and throw his crocs in there. I have one tent that I have not put in flower yet just for the main fact that one of my seats became a auto flower so I’m letting them run more time to let that auto flower finish and see what that becomes
Processing
Likes
10
Share
She's 4 feet tall!!! Wow! I'm a little concerned about light burn, but don't notice any signs of light burn yet. And she will be going outdoors soon. But I'm very impressed with this girl so far! 👍
Likes
22
Share
I've been pretty sick so keeping up with pictures and diaries have not been in the forefront of my mind. However!!!! I just have to show you guys these ladies!!! They amaze me! The one I transplanted has taken off! Thank you fastbuds for the opportunity!!
Likes
Comments
Share
Venga familia que ya viene la cosecha de esta Amaretto Tarmac de Seedstockers, que ganas que tenia ya de darles machetazo. No veas que pinta que tienen estas plantas. Las flores aparte se ven bien resinosas, y tienen un color rosado púrpura brutal. a sido una genética con la que disfruté mucho cultivarla, no es complicada de cultivarla pero merece la pena si eres cultivador con experiencia las flores serán increíbles. Hasta aquí es todo , espero que lo disfrutéis, buenos humos 💨💨.
Likes
3
Share
@AndrewC
Follow
So this experiment is going terribly! LOL This ulitmately taught me a few important things about this sytle of growing. 1.) My Frequency was way to high in the beginning. When i start over next, i will be going for 1 hr -> Spray for 1 min -> Wait 1hr (Repeat) 2.) Never reuse hydroton or CC. It ends up having left over material and nutes in it, which not matter how much you wash just make the soil a land mine of nutrients etc. 3.) Do no use rockwool cubes inside the medium, they hold onto water for too long leading to rot. 4.) Fill the buckets up right until about 2cm short of the nozzles that spay. Otherwise you lose too much water and nutrients to the misting, which spreads your nutes all over the enviroment. Ultimately, even though this is a living disaster, I have learnt valuable lessons, and who knows, some of them still might produce smokable flower!
Likes
47
Share
👇 This week: --- Watered again as usual with the standard Plagron scheme + Calmag (last feeding with Alga Grow) (PLEASE CHECK YOUR WATER BEFORE USING CALMAG) Phosphorus foliar spray - red stems pretty much gone now PPFD at canopy height approximately 350-400, VPD ~1 Performed a major defoliation again Ordered more Autopots 😂 --- Happy growing and thanks for checking out my report! I really appreciate you! 😁💪🙏
Likes
5
Share
Very happy with how this lady has performed, amazing quality buds, very sticky and dense flower with a concrete smell that I love so much, which is that kind of fruity sweet flavor that this lady is able to produce, it's been a beautiful journey, I'm gonna enjoy a lot this flowers. Very recomended guys!