


Likes
5
Share


Likes
18
Share


@JeyGanesha
Follow
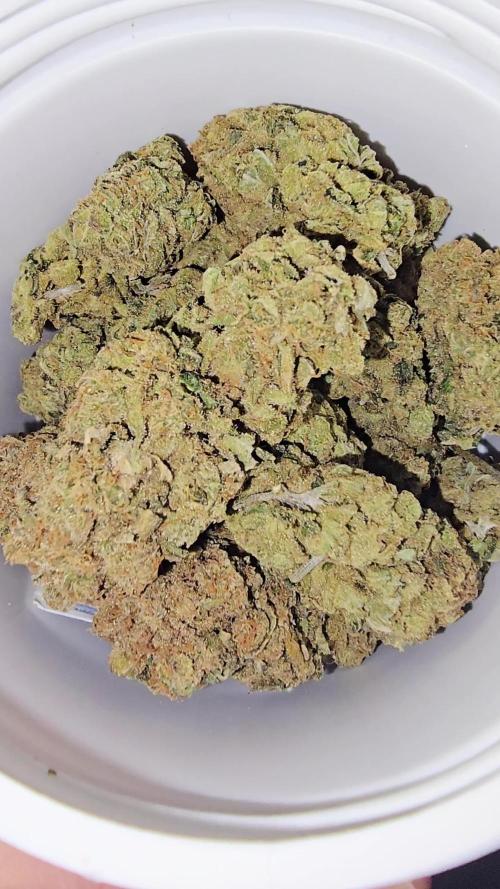
Terza settimana di fioritura inoltrata..andiamo più che bene con lo sviluppo.buona genetica anche questa papaia cookie...bravi 👏 fast buds. Continuate così .,💪✌️


Likes
16
Share


@Nugget_head88
Follow
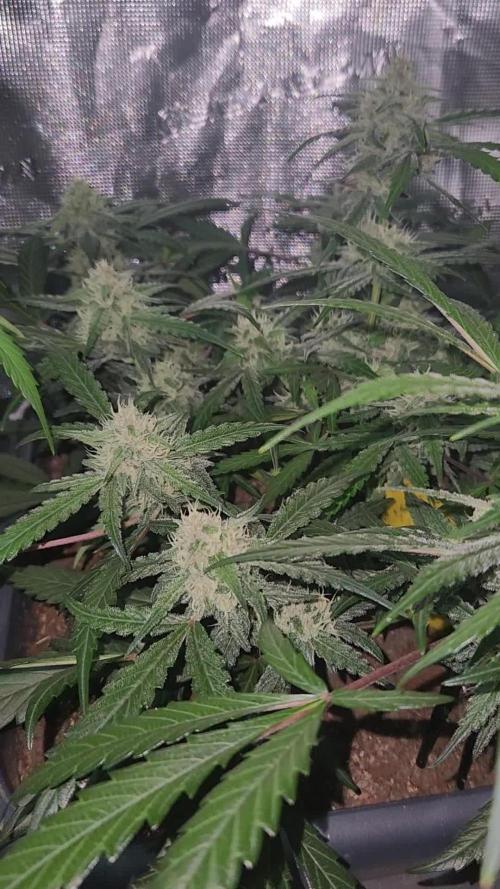
07/07/2025, beginning of week 8, a few issues have reared their head, done as many checks as I can on conditions and soil conditions and have come to the conclusion that I need to carry on sensibly feeding as these issues were probably present weeks ago but just not showing until now.
Bud development seems ok and they are lengthening/stacking ok, she's becoming more and more frosty and starting to smell a bit, I think she will carry on lengthening this week before starting to flatten up from next week and will feed a accordingly.
Fingers crossed it doesn't fall apart haha.
Likes
361
Share


@Ju_Bps
Follow
Hello my friendly growmies 👩🌾👨🌾🌲🌲,
We start to be really close to the harvest 🌲✂️, trichromes not yet ready but soon, I like a few percentage of amber, they are almost totally milky, so probably ready in end next week 🙂🙂
Smeel fruity/diesel
💦 1 watering this week 2.75l/plant
Water + flash clean
Lamp @100% and start to be really close to the plant, but not burning sign for the moment.
Thanks community for follow, likes, comments, always a pleasure 👩🌾👨🌾❤️🌲
Have a nice end years 2022 💜👨🌾👩🌾🎅
See you new year 🍻🥂🥃🥃💨💨
Mars Hydro - TS1000 💡💡
https://www.mars-hydro.com/ts-1000-led-grow-light
Mars Hydro - FC3000 💡💡
https://www.mars-hydro.com/fc-3000-samsung-lm301b-led-grow-light
RQS - Fat Banana Auto 🍌🍌🌲🌲
https://www.royalqueenseeds.com/autoflowering-cannabis-seeds/487-fat-banana-automatic.html


Likes
15
Share


@BushDoctor740
Follow
Day 11 i feel like the girls are getting stronger so I top dressed with 4-4-4 Gaia Green and watered with recharged tea ph to 6.5.


Likes
19
Share


@Tommy716
Follow
This week has gone great. My lovely lady's are thirsty and taking there nutrients wonderfully. I have increased there water and nutrients intake and they are responding well. They continue to grow rapidly I am moving there light almost daily. I'm running out of vertical room.. All the hard work is paying off, they are starting to show there reward of amazing bud sites developing everywhere. A few more weeks and they will get added micronutrients. I'm pumped to see there development coming soon
Processing
Likes
10
Share


@Fibro_Witch
Follow
Good growth this week. The inchworms are still munching away so I sprayed with some neem oil. Will be watering in some Big Bloom and molasses later. Really looking forward to this one flowering in a couple weeks. It had the prettiest purple flowers last year!


Likes
39
Share


@Velk1
Follow
It's flush week in the main room for the girls I have kept back one gold glue the monster mbap and gwk they will be given longer as a bit behind
This has been a smooth run can't wait to move the wilmas in to there new home more space efficient and feeding friendly
The gold glue I will definatly run again and again lol one of my new favs
This grape walker kush was neglected Unfortunatly but still turned out super frosty and stankkkkkkky the ones one my next run will have all my care and love
Mbap great bud formation and size this is another strain to put in the vault to save for years to come !
Updates have been a bit slow due to my phone being rubbish 🙈 Issues uploading vids and photos catch my vids on my Instagram @velk_1

Likes
5
Share


@Ieiogrow94
Follow
Eccoci di nuovo qui!!!
Super eccitato per questa nuova collab con Exotic Seed, team davvero al top, che mi ha dato l’opportunità di testare questa nuova genetica e di condividere i progressi con tutti voi!!!
Come sempre partiamo nei bicchieri per poi travasare.. Questa volta verrà svolto tutto sotto la Lumatek Zeus 465 ProC, mi aspetto molto da questo ciclo!!
WOOOOW!!
Grazie a tutti per il supporto ❤️🍀🔥

Processing
Likes
33
Share


@Ferenc
Follow
Day 50: Water intake is 150ml per plant, light schedule 18/6. Humidity is approx 50%. Fertilization continues the same way Monday, Wednesday, Friday Biobizz family, Tuesday, Thursday, Saturday bat guano and Epsom salt. Flowers are developing nicely and getting thicker. Plants love the new 600W Viperspectra:) All good so far! They are all approx 30-35 cm.
Day 53: Smell is getting stronger, really nice mix one.
Day 55: Nice smell comes out from this tent. Plants are nice buds are getting dense and the smell is getting stronger and stronger. All of them do well, some more some with less bud development but they all look happy.

Likes
Comments
Share


@HideAndFly420
Follow
Day 29, giving structure to ghe little baby, trying to multiply branches and giving some attention to the topped one.
Day 30 fertisilisation today. Next time just water. LST is still in the middle
Day 32 31/10 dinner at 100% now and pushing hard with grow, just watering without fertilisation this time and lamp higher for 2 cm. Stretching a little bit before passi into flow, next 7/8 days of veg
Let’s see what’s happen


Likes
Comments
Share


