
Likes
Comments
Share


@cheetah844
Follow
She's staying shorter, that's her genetics -good old NL. Very excited for the strain, the flower that I currently have is my favorite smelling strain ever. I hope this phenotype smells like that. It's one of those strains that you keep smelling over and over again, it just keeps luring me back with that beautiful smell.

Likes
8
Share


@LonelyStonerz
Follow
I had to top a few of these because they were hanging so far out, making lots of new space for bud sites I really like to bush/stretch out my plants making as many colas for flowers. Im seeing small pistils popping out here and there.

Processing
Likes
49
Share


@Guerilla_Jack
Follow
Hello growers! The plants become bushy. Some little problems with Somango.. i think 1 more or mybe 2 weeks veg. and then switch to 12/12. What you think?🙂


Likes
7
Share

@Mimi420
Follow
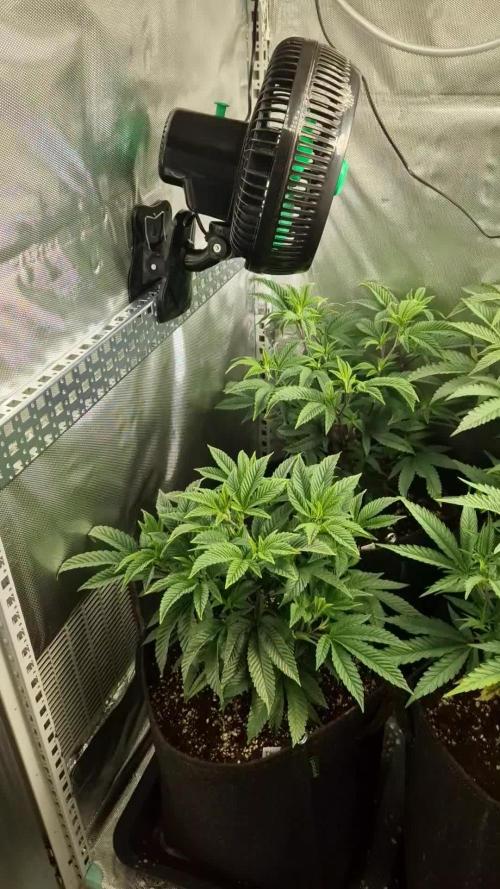
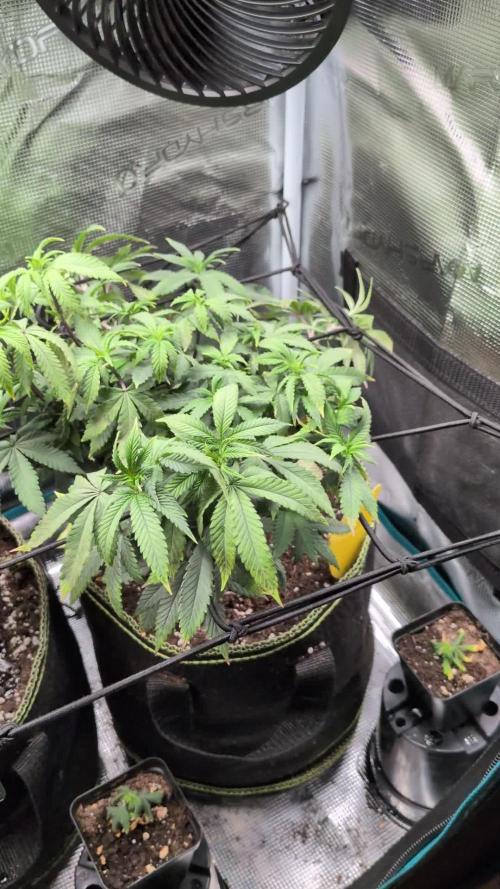
This week I was planning to do some LST, but didn’t really find time for anything except watering…
The girls have exploded in growth though, so I decided to throw the net in instead.
I set the SCROG net around 25–30 cm above the soil, and tomorrow I’ll clean up the lower parts a bit and start training them under the net.
The canopy’s already getting pretty full, so I’ll probably need to flip to flower in about 1–2 weeks.
They’re drinking a lot lately — about 3L of water every two days.
One watering was just plain water, and the next one was with 1.5 ml of Bio-Grow per liter.
I also moved the fans around — one is now blowing under the net, and the other above it for better air movement.
The pics are taken right before setting up the net and right after.


Processing
Likes
28
Share


@Bud_E_grows
Follow
Not much to update. Seen first set of pistols on top two nodes. Branches have definitely started their stretch, still early but might not grow that tall. Hoping for bulky 🤞🏾🤞🏾. Seeing what I believe is phosphorus deficiency could be needing flower feed but could just be wanting more, this is last feed of cal mag + week 3 foxfarm nutrients @50% dose. Going to switch to flower nutes @75% Temp 69.1-82.1•F
RH 40-51%
Likes
47
Share

@Salokin
Follow
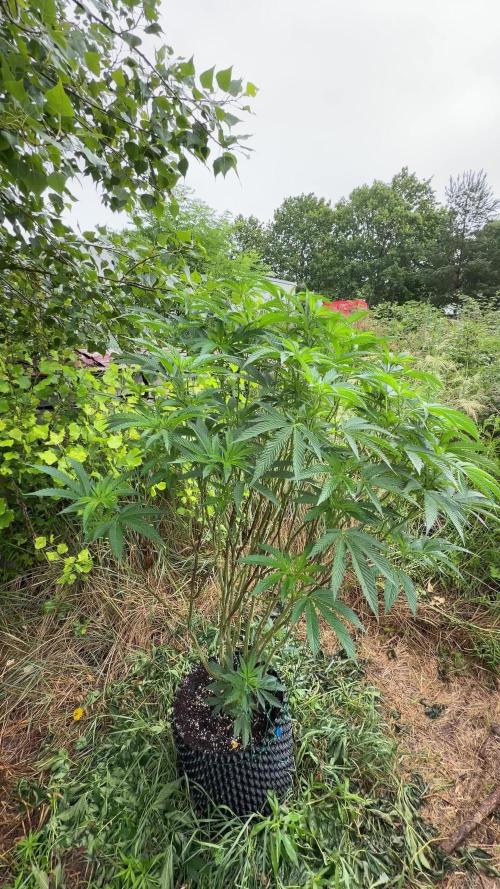
GMO × Triangle Mints BX – Week 18 Veg | Transition on the Horizon
145cm now and she’s been given more room to breathe — moved to a more open spot with full sky exposure, and it shows. The upper internodes have started stretching out noticeably, which at this time of year with daylight slowly declining from the solstice peak is likely the first signal that transition is not far off. No pistils visible yet but the structure is beginning to shift.
Did another defoliation pass to keep airflow through the canopy and gave the main stems some support with wire ties — at this size and with what’s coming in flower, a bit of structural insurance makes sense.
Day temps 28°C, nights 18°C. Watering holding at 25L per feed, EC at 1.2 mS/cm, pH 6.2. Nutrients: CANNA Aqua Vega 3ml/l, CalMag Agent 1.1ml/l, Aptus Regulator 0.1ml/l.
The forecast this week brings some rain — around 15mm with the heaviest hitting Tuesday morning, temperatures reaching up to 27°C by Thursday. Winds light throughout. After the heat of recent weeks, a bit of rain is welcome.
Updates every Sunday. Stay tuned. 🌿
Likes
12
Share


@ciansta
Follow
Germinated for 24 hours in a glass of water, 48 hours in a paper towel and then I planted them into biodegradable seedling pots. Northern Lights looking a bit ahead of the Dosidos seeds but that was expected I’ve grown Northern Lights before and they sprout real quick. One of the Dosidos’ first true leaves is looking a bit wonky but we’ll see how it goes I suppose.

Likes
47
Share


@Mrs_Larimar
Follow
April, 5th
We are coming to an End.
The Triple G sits in 15l Smartpots filled with my Soilmix and
amended with EASY BOOST ORGANIC NUTRITION from RQS
Iam Watering them with Beneficals and Bloom Fertilisers from @GreenBuzzLiquids
One Plant was already Harvested, the other ones coming soon
Iam going to do a single Application with "Clean Fruits" and then Iam going on with Feeding them until Harvestday
The Last Days ,Buds were maturating, Pistils turned more orange, and the smell......hmmmmmmmm
i think 10-14 more Days
#keep on Growing
Likes
13
Share

@therealgrowmie
Follow
The canopy has spread out nicely, and I’ll be moving to 12/12 any day now. The structure looks balanced, and we’re close to that ideal fill before the stretch kicks in.
The single Critical Mass plant is still a bit limey in colour, but I won’t wait for it to fully even out. The fresh growth looks healthy, which is what matters most at this stage.
Now it’s time to flip and let them show what they’ve got.
Stats so far:
💧 Watering: Every third day
🌡️ Temp: 26–28°C
💦 Humidity: 65% RH
📈 VPD: ~1.18 kPa
💡 Light: ~600 PPFD
Likes
7
Share


@I_Identify_As_A_Dan
Follow
Week 9 for Lemon OG by SSSC
Ive pulled her apart to see if she gets some equal growth all the way around her. Still trying to stay positive for her to grow more😂 Shes also going to be moved outdoors today likely into some shaded area as its been so hot outside lately. Lets hope her transition goes well.

Likes
44
Share


@Roberts
Follow
Casey's Rollex OG has a sweet fruity aroma. She is loaded with frost. She is in the mist of her bulking. Everything is looking good. A few more weeks left and she will be ready for a harvest. Thank you DutchFem Seeds, and Spider Farmer. 🤜🏻🤛🏻🌱❄️
Thank you grow diaries community for the 👇likes👇, follows, comments, and subscriptions on my YouTube channel👇.
Thank you Happy Growing 🌱🌱🌱
https://youtube.com/channel/UCAhN7yRzWLpcaRHhMIQ7X4g


Likes
269
Share


@JohnnyBlaz3
Follow
Day 129
Flower 67
Remaining 10?!?
WOW! lol they keep plumping up. most have slowed down but some of the colas are still noticeably growing.
The plant on the right is quite a bit different then the other two. much shorter and has different looking colas. much more rounded. Also this plant has lots of white hairs on the main colas. Is this a sign they are still growing? how come the other 2 only have a few white hairs and this one is loaded. another distinction is that this plant hasn't really started fading yet. it has a few purple leaves but doesnt have the fade like the other 2? weird? why this plant so different.
I'm quite nervous still but its all good, its just because its foreign to me. most the trichs are clear but theres a growing number of milky ones and the odd amber one. this is for the top colas i've been watching.
I'm stoked to see the harvest. theres 24 yo yos in there holding up these massive colas!
The flush should be any day now. I'm still confused as to know when i'm a week out and to start the flush?!? I understand harvest is when mostly milky with a few clear and amber. I cant believe the crystals on these ladies. its absolutely insane! also sticky as all hell, amazing!
I'm very excited, the big day is coming up very quick
Thanks again for following along and helping to make this grow what it is, let finish strong! 👌👊👊

Processing
Likes
32
Share


@Platinouuu
Follow
noto que estan comiendo mucho, osea se secan rápido que es que estan comiendo bastante de lo comun. Las ojas tornandose color amarillo para cambiar a color vino. se ven muy bonitas y estan fewlices. No he cambiado mucho entre los nutrientes (Té y Recharge), he sostenido alimentarlas simples y he tenido muy buenos resultados. muy contento con todo, sigas adelante, buenos humos y feliz 2021

Likes
32
Share


@UGrowGuy
Follow
Sprouted in 24hrs, directly into soil with the sprayer mixed light with velokelp.
Processing
Likes
5
Share


@IgnesFatui
Follow
Plants are too dark green, dropped nutes back to 6ml a gallon. 18 is too close to the light so I'm about to tie down my largest branches. Grow is looking good! Auto flowers is where it's at!


Likes
4
Share


@Lmnhz91
Follow
È venuto un bel casino, perché tra la prima e la seconda settimana di fioritura sono stato via 5 giorni, e al ritorno mi sono trovato 3 piante che avevano preso il sopravvento sulle altre e allora ho potuto solo piegare perché già non ci stavano più. Le piante hanno 25 giorni di vegetativa e 36 di fioritura


Likes
63
Share


@AsNoriu
Follow
Day 125. Chop day.
Report will follow, maybe smoke quality will be that only positive thing in all dirt that this strain brought me ....
Dry triming chosen.
Plants where such crap that never got names even, so Smaller and Taller plant is chopped.
Other two went hermie.

Likes
16
Share


@Reddgrower
Follow
Got everything hung up. Stripped the fan leaves and broke down into sections. Run 60/60 or as close as i can get until the stems snap.