
Likes
Comments
Share


@JuanHaze_Arg
Follow
18/05 se riega con 2,5L de agua (60% de agua de osmosis inversa + 40% de grifo) + 1ml/L de calmag de top crop, + 0,5gramos de trico+ de namaste nutrientes.
21/05 se riega con 3 litros de agua (50% de agua de osmosis + 50% de ml grifo) + 1,5ml de cal mag de top crop. + 0,5 gramos de monster bloom de grotek PH: 6.4 EC: 1.1


Likes
28
Share


@Growthetics
Follow
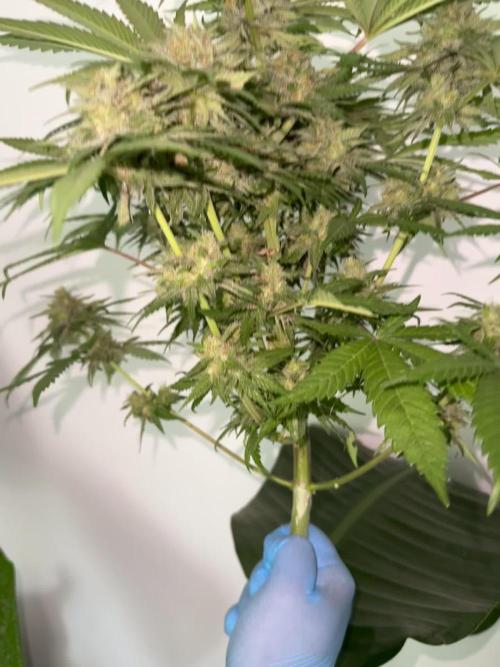
She had her last fed last night, microscope shows a few oranges so I think it the final week/10 days hopefully flush time! Oops forgot the videos

Likes
15
Share


@Ultraviolet
Follow
Human Body
65% Oxygen (in all liquids and tissues, bones, and proteins)
18% Carbon (everywhere)
10% Hydrogen (in all liquids and tissues, bones, proteins
3% Nitrogen (in all liquids and tissues, proteins
1,5% Calcium (lungs, kidney, liver, thyroid, brain, muscles, heart, bones)
1% Phosphorus (urine, bones, DNA)
0,35% Potassium (enzymes)
0,25% Sulphur (proteins)
0,15% Sodium (in all liquids and tissues) (in terms of salt)
0,05% Magnesium (lungs, kidney, liver, thyroid, brain, muscles, heart)
The average adult male contains about 140 g of K(Potassium); the level varies with body weight and muscle mass. We ingest about 2.5 g per day of K from our food and excrete about the same amount. 0.0118 % of that is K40
The answer is that they were present when our earth was formed. Any radioactive material originally present at the formation of the earth would have decayed and disappeared if its half-life was short compared to the age of the earth. However, if its half-life were long, close to or greater than the age of the earth, then such materials would not have disappeared but are still with us today.
There are several radioelements in this category, such as the well-known elements uranium and thorium. Thorium (Th232) has a half-life of 14,000,000,000 years, uranium has two long-lived radioisotopes; U238 has a half-life of 4,500,000,000 years, and U235 has a half-life of 710,000,000 years. These give rise to the radium and thorium atoms found in all humans, acquired from the food we eat. That food, of course, obtained these materials from the soil in which it grew or on which it grazed.
Potassium is also in this category. There are actually three potassium isotopes: K39, a stable isotope, is the most abundant, at 93.26 % of the total; K41 is next in abundance at 6.73 % and is also a stable isotope. The potassium isotope of interest is a radioactive isotope, K40. It is present in all potassium at a very low concentration, 0.0118 %. It has a very long half-life, 1,260,000,000 years. When it decays 89 % of the events give rise to the emission of a beta ray with maximum energy of 1.33 MeV. The other 11 % of the decays produce a gamma-ray with an energy of 1.46 MeV
The forces required to forge thorium 232 can only be harnessed when traveling close to or at the speed of light, so essentially what I'm getting at is 0.0118% of every person alive is formed of the same element that was forged in the anvil of creation itself. We are all one & the same
German chemist Johann Wolfgang Dobereiner attempted to classify elements with similar properties into groups of three elements each. These groups were called ‘triads’. Dobereiner suggested that in these triads, the atomic mass of the element in the middle would be more or less equal to the mean of the atomic masses of the other two elements in the triad.
An example of such a triad would be one containing lithium, sodium, and potassium. The atomic mass of lithium 6.94 and that of potassium is 39.10. The element in the middle of this triad, sodium, has an atomic mass of 22.99 which is more or less equal to the mean of the atomic masses of lithium and potassium (which is 23.02). 9 controls the 6 and 3.
The Limitations of Dobereiner’s Triads are :
All the elements known at that time couldn’t be classified into triads.
Only four triads were mentioned – (Li,Na,K ), (Ca,Sr,Ba) , (Cl,Br,I) , (S,Se,Te).
2. Newland’s Octaves
English scientist John Newlands arranged the 56 known elements in increasing order of atomic mass in the year 1866. He observed a trend wherein every eighth element exhibited properties similar to the first.
Azomite contains 180ppm of thorium.
Your plant will thank you, you are welcome.
Most farmers do have not a proper understanding of what is Azomite and how to use it in gardening, especially if they practice organic farming. Continuous propagation and leaching effects of water deplete the essential minerals and micro-nutrients from the soils. Such soils remain weak, not able to support the production of fruits and vegetables. Azomite mineral contains micronutrients that supplement the soil. It also balances the minerals for growth and overall productivity. Constant use of this mineral rejuvenates your soil renewing its potency again. Azomite is a naturally mined mineral product that is ready to use. It’s a unique rock that comes from a mine in central Utah. Azomite requires no mixing or special preparation before use. It is derived from volcano ash that spewed out millions of years ago. It contains the widest range of minerals of all the rock dust in the world. Azomite provides plants with 70% essential elements. These elements include magnesium, calcium, potassium, and silicon for plant growth.
Facts About Azomite Fertilizer
It’s a natural mineral – 100% natural with no fillers or additives
Does not contain any harmful elements
Requires no special preparation before use
It’s odorless – very friendly to use
Does not restrict water penetration or aeration
Is easily broken down and absorbed into the soil
Does not burn plants.


Likes
14
Share

@valiotoro
Follow
She smells like summer in a jar 🤤
citrus peel with that tropical passion fruit twist.
Tropicana’s got that juicy terp profile dialed in. Perfect for hot days and clear heads.😎


Likes
3
Share


@Radagast_
Follow
12.08.
Sour Diesel
Day 72# Day Flowering 55#
06.08.
SD2# harvested,trimmed,dried and almost smoked lol
The caterpillar destroyed it and I had to take it off so that everything wouldn't go to waste.
10.08.
5 more plants were harvested,trimmed and left to dry, all mature, some more, some less, but I didn't want to risk any more so that the caterpillars wouldn't destroy them, one of these 5 had already started.
2 plants left on site, need 7+ more days.
The day before yesterday was the end of their 10th week.
Stay High and Keep Growing!!!

Likes
105
Share


@Fatnastyz
Follow
Haha took me the next morning to finish trimming. I got sleepy 😁
Yo.. Holy cow, my entry is finally finished!
What a freaking blast! The Auto version. Cut on Day 98.
I got to be kinda serious and still have a ton of fun!
I never shy away from something new! So I did 2 of them!
My Runtz1 which is this last harvested plant.
Was going to be organic. So veg and I top dressed. Hungry late so switched to Success and still kept Green Sensation going.
Good weight in the end.
Runtz2 was purely Success Nutrients. It was also my first time using it and or synthetic.
Omg I love the control it gave me, over everything. ( Omg I feel like a narcissist 😂😂)
But seriously, it brought out levels of funk and ice. I never thought I'd be capable of.
Success
I am an affiliate.
https://successnutrients.com/products/success-nutrients-collection
Promix HP
Promix Irene provided the media
https://www.pthorticulture.com/en-us/products/pro-mix-hp-biofungicide-plus-mycorrhizae
Drops of Balance by Perfect Gardens
Cleans and balances water and adds minerals.
Both organic and synthetic grows.
https://dropsofbalance.com/
Slf-100
Amazing enzymes that cleans roots, salts and makes nutes available.
https://socascade.com/product.php
EM1- Teraganix
Microbial inoculant.
https://www.teraganix.com
Green Sensation
https://plagron.com/en/hobby/products/green-sensation
Runtz
https://www.zamnesia.com/us/6433-runtz-auto-zamnesia-seeds-feminized.html
Thank you so much for having us, as part of this Cup!
Plagron and Zamnesia much love and thank you!
Best of luck to the others out there!
Thank you for following and all that you do. 😁😻🤘
Added some Runtz2 pictures from week 11 harvest. 😁🤘


Likes
12
Share


@Pot_Portraits
Follow
Punch Pie in Flower, stretching nice and doing great, the topping helped to slow down the main stem and spread the plant a bit.
Now its just time to wait for some nice top colas to form.
I cleaned the bottom of the plant up a bit just like the others to make sure we got good airflow in the areas with less light to avoid problems.
Still no fertilizer just living Soil by Sonnenerde.


Processing
Likes
16
Share


@Mr_Motalovah
Follow
Hello Growers and Tokers! 👋 👩🌾 🧑🌾.🔥💨
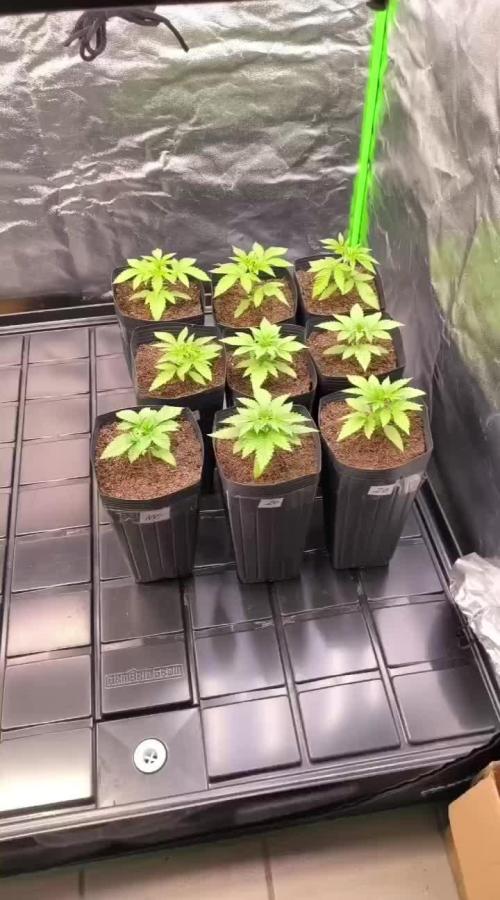
Finally got that transpant done.
Added a bit of root juice to help out the transplant.
Won't be adding nutes until next week, directly bloom nutes..
Took waaaay to long to transplant. They didn't get any growth becuase of the bad weather these past weeks.
Very bummed out about that. Two of the are already in prefower.. the tiniest i hope grows a bit more..
can't really ask for much more given the bad weather and that they're autos..
I'll for sure be doing a re run with this strain with better stable conditions.
Take care out there!
One love!


Likes
574
Share


@TOTEM
Follow
HARVEST DAY!
162 days after the sprout, and 117 days after the switch.
It makes almost 6 months!! What a never-ending journey!
I chopped down the princess and decided to place the colas on the usual hanging net without trimming them directly.
I just couldn't. Every cola requires at least 30-40 mins to be trimmed properly. I got something like 50 or 60 colas in total.
It's a total pain in the ass believe me!!! There are layers consisting in calyx, leaf, calyx, leaf, and so on. You basically need to work between every couple of small calyxes in order to remove the leaf in the middle, while being very careful to not cut down everything. It's insane!!!!!!
So.... just wait a little more for the final harvest and the smoke report.
They will come, but definitely not now!
In the meantime I uploaded some harvest photos and videos.
;-)
See you soon!!!

Likes
6
Share


@Kloud9gardenz
Follow
Don't have a lot of time these days to take pics so I'll sum things up. CO2 got outta control and the plants took tf off literally. The video is around middle of week 3, I had to flip at week 4 BC I literally ran out of room and I had to constantly defoliate.

Likes
199
Share


@CRiSPrGrow
Follow
So finally a dream come set off my next run . Thank you so much to the anonymous generous-hearted genetics inventors who sent me these mysterious seeds. Soaked them with a few drops of kelp extract concentrate i had made for my last grows. Meanwhile this is a bio tabs run, and let me just take the time right now to thank BIG K from @biotabs_f69 for all the help learning more about biotabs ! So it's a front loaded activity, followed the instructions on the box for the biotabs, placed two, added the myco to the substrate and the plug hole watered with orgatrex and my very own smart protein you guys. This is a different type of additive that works like carbos but is directly accessible to the plant. Let's see how it works out ! Germination rate for me was 10/10 , poked out overnight, now the veg begins. I'll be applying a variety of techiques while i set up a perpetual rotation. Advice welcome 🚀 watering 200 ml twice to three times a day , carefully as to not compact the soil - just something i learned from my last grow that really works out over time ! 🚀

Likes
87
Share


@JKent19
Follow
Not going to lie, with everything going on in the world right now, taking pictures of the plants was not high on my priority list. I basically snapped a couple of pics and took a couple of videos today and decided that will be it. This is not the place to get political, but I truly hope that against all odds by the time of my next post peace will have returned to Ukraine. In terms of the grow, plants seem to be doing great. Over the past couple of days, the buds have started to fatten up to the point where I think my yield will at least be on par with the last run. I'm still giving her another 3-4 weeks before I think they'll be finished up, but it honestly could be anywhere from 2-6 weeks, just have to wait and see. On a side note the plants are becoming more and more different, to the point where they don't even look like the same pheno. One plant has airy, larfy buds but has made some progress over past 24 hours towards tightening up a bit. The other plant has these fat, dense, stocky nugs that look very much like an indica strain, we will see how this affects the harvest. Thanks as always for taking the time to read my update, hoping for a more cheery update next week.
Likes
14
Share


@JamieKnolliver
Follow
Gebe ihr noch eine Woche Zeit um das Zelt besser auszufüllen und noch einige Triebe mehr zu entwickeln bevor ich sie dann endlich in die Blöte schicke.
Alle unteren Blätter und Triebe wurden entfernt. Auch ‚Lollipopping‘ genannt.
Bis jetzt wurde sie mit 300 Watt gedimmt beleuchtet.