
Likes
Comments
Share


@iMeus
Follow
(11.20.18) Hello friends,, I'm going to update this grow on my computer since the phone is struggling to even handle typing this message... I'll try to have everything ready by tomorrow. Much love
(11.21.18) ~ Update ~
Hello again! I have some good news! The buds are purple and beautiful, I can’t wait to see the end results :) I hoped the cold weather would bring out some purple qualities and boom! It did it :D as a side note it was a bit weird making a vlog while being sick but hey that’s how it goes. I hope you guys have a wonderful Thanksgiving, enjoy the holidays my friends, much love <3
~ Individual Progress Notes ~
[CBD Blueberry]
Height: 23”
Tops: 7
Notes: This girl may be the weirdest one but she’s got the buds! I’m not sure what will become of this mutated girl, though I’m sure she’ll have fantastic anti anxiety qualities. I might turn most of the end product into RSO. Though I’ll cure and keep some on the side for times of need.
[Mazar]
Height: 22”
Tops: 16
Notes: Had a bit of nute burn, not too much though. I’m going to feed this girl separately so I can avoid stressing her out. The Mazar has the most bud sites, this make her buds smaller in comparison to CBD and SSH.
[Super Silver Haze]
Height: 23”
Tops: 16
Notes: I have to say it, this plant might be my favorite. I love Mazar and all her fluffy beauty but the heavy stems, big fans, packed buds, she took my number spot! I love how strong and easy it is to deal with her. As a new grower I couldn’t ask for a better beginner strain.
[White Widow]
Height: 23”
Tops: 16
Notes: Okay, White Widow will always be my numero uno. An all day smoke that never gets old (to me). I could work, study, game, or sleep without any distractions or odd effects. This might be in part to my personal chemistry, so I can’t say this will affect you the same way. I hope this girl is like all the WW I’ve had before or better!
~ Final Thoughts ~
As I bring my weekly update to a close I wanted to say thank you all for the support and comments, you have no idea how grateful I am to each and every one of you. Enjoy the holidays, much love & good grow’n <3

Likes
9
Share


@mheat
Follow
Waiting on some Xtreme Gardening products to arrive. Will give her some azos and mykos next feed.

Likes
18
Share


@Earthsower
Follow
She has suffered some root damage due to lack of co2 at the root zone so I dried the cup out before I repotted her to give the roots some space. Good news is she seems to be bouncing back. She now stands at 7 cm


Likes
32
Share

@TheBloomer1
Follow
In der woche befanden sich die Pflanzen in der späten Blütephase mit klar fortschreitender Bud-Reifung. Die zuvor etablierten Trainings- und SCROG-Strukturen zeigten weiterhin ihre Wirkung, da die Haupttriebe optimal im Licht verteilt waren und eine gleichmäßige Canopy bildeten.
Die Blüten nahmen sichtbar an Dichte und Gewicht zu. Besonders die oberen Budsites entwickelten sich stark und begannen, sich deutlich zu verdichten. Die Harzproduktion nahm spürbar zu und die Pflanzen wirkten insgesamt sehr stabil in der finalen Füllphase.
Das Blätterdach blieb größtenteils vital, wobei einzelne ältere Fächerblätter begannen, ihre Nährstoffe in die Blüten umzuleiten.
👉 Eine sehr produktive Woche, in der die Buds klar an Masse und Struktur gewonnen haben.

Likes
25
Share


@Filippo
Follow
Oggi è iniziata la terza settimana di vita della mia Purplematic CBD.
Sembra sana e cresce piuttosto velocemente, oggi 19/10/2020 l'ho trapiantata nel vaso smart pot (quello di tessuto che mi è stato gentilmente dato, insieme al kit dicrescita, dalla royal queen seeds, per il contest).
Ho poi, nella medesima data, utilizzato per la prima volta easy combo, in particolare la capsula per la fase vegetativa. Purtroppo, ho a disposizione solo una capsula per la fase di crescita, e innaffiando poche volte alla settimana (a causa delle temperature non troppo elevate) ho fatto la scelta di frazionare la capsula in 4 parti così da non sprecarla e poterla utilizzare ancora.
Ho diluito 1/4 della pastiglia in circa 750ml di acqua del rubinetto (so che non è la scelta migliore, ma almeno ho potuto regolarne la temperatura) e versato nel vaso circa 200ml-250ml.
Sto iniziando, quando possibile, a dare un po' più di luce alla piantina.
Durante il trapianto ho notato che, probabilmente grazie all'utilizzo dei fertilizzanti che mi sono stati inviati, le radici erano molto ben sviluppate e qualcuna stava già uscendo dai buchi sottostanti al vaso.

Likes
13
Share

@Sobreruedas
Follow
This week everything continues to progress smoothly with no major changes.
I slightly reduced the LED intensity, and the plant is now receiving around 650–700 PPFD to keep the environment balanced during flowering.
For now, I’m just maintaining stable conditions and letting the flowers continue developing 🌸💪

Likes
8
Share

@MindFlowers68
Follow
Got a little hot outside this week again and temps in the tents reached a high of 92. They hovered around 85-88 most of the time, and nighttime temps around 75. The plants have been loving the tropical like environments, and in fact showing less signs of stress now they are in warmer temps. I got my magnesium dialed back in with a few applications of Epsom Salt. The pants drank twice as normal this week. I also gave them a feeding with my fermented fruit juice I made and they seem to be loving it. I got a new bottle of cal-mag and does not seem to be as acidic, so i can add a little more than I was without it ruining my ph. It too about 15ml per gallon of the FFJ to Ph my water down form 7.8 to 6.5. I tested it before use and its PH is around 2.5. Between the Epsom salt, FFJ, and kelp. The plants are really starting to bounce back from their slight unhappiness. They are all looking near 100 percent health. At the end of the week they are are raging and praying to the light like theirs no tomorrow. Glowing vibrant lush green, the buds are also already a decent size for only being week 2. The plants and in much need of some defoliation but I will wait one more week after stretch to get that taken care of. The dehumidifier running during night cycle has been keeping things in check. The clones rooted and I potted them up to 1 gallon so I now have small moms. I got new worms and my worm bins cleaned out and set up again. Each of the 65 gallon pots got a small ball of worms added to the top soil to get the worm populations growing in them again. I was hoping those casting I added a few weeks ago with added worm eggs would hatch some but no luck so i just got some from Uncle Jim's worm farm.

Likes
20
Share


@eldruida_lamota
Follow
Como estamos , aquí seguimos de confinamiento pero entre buenos humos y hoy toca actualizar las farm cheese de genofarm,
A estas alturas e de decir que ya entramos en la recta final y estoy completamente satisfecho con esta variedad.
Crecimiento rápido floración mucho más rápida cogollos compactos y llenos de resina, eso que hablo de que quedan varias semanas entre lavados y demás pero muy bien.
Sigo controlando ph 6.2 humedad 50% y temperatura en 26.5 .
Y estos resultados gracias al ts600 de mars hydro.
Esta semana Añadi overdrive importante al final de una floración, para conseguir mejores resultados, nos vemos la semana que viene, buenos humos fumetillas.

Likes
151
Share


@PEAKYPLANTERS
Follow
Respect for all of you, brother farmers! masters and beginners! thank you again for gathering on the pages of my diaries! we carry out our work with dedication and live on ambition! Come on guys....We have almost reached the end of this umpteenth harvest, the colors and aromas are something enchanting, dense flowers and liter glue

Likes
25
Share

@TrickzGrowz
Follow
Ein sehr dichtes Wachstum mit riesigen Blättern. Langsam bekommt man etwas vom Stretch der Pflanze mit.

Processing
Likes
5
Share


@PETEROG
Follow
Hey everyone at week 4 know and wow have these girls grown early this week I applied some LST and all took really well to say it was my first time trying this


Likes
12
Share


@2Stones1Bird
Follow
Checkout my Instagram @smallbudz to see the Small budget grow setup for indoor use, low watt, low heat, low noise, step by step.
04/01/2020 - Did the last defoliation, removed about 1/4 of plant material.
06/01/2020 - Fed her 1.5l of 6.5PH water with 0,3ml Cal Mag (Atami) 0,25ml of Grow, 0,6ml of Bloom and 0,5ml Max, and 1ml of each: Heaven, Alga-mic and Vera, noticed some run off, I use about 1/3 of the nutrient dosage on the chart, to achieve about 200/300PPM (500 scale).
Likes
4
Share


@Backyardnewbie
Follow
Plant is recovering well from defoliation. No pistles yet but looks like beginning of flowers forming. Going to call this first week of flowers.
Plant doesn't seem to be getting any taller this is a genetic issue I think. Going to a different breeder next run. I think they are white label genetics which can be hit or miss.

Likes
18
Share


@plant
Follow
Out of the 4 girls I’ve transplanted two today, both white widows, I’ll do the other two Santa Marta haze’s in a weeks time when they have developed better roots, looking good, starting to flower. Bit of a slow start as seedlings due to being in hot soil, but we are well past that and cruising nicely now. 🤙🐞🙌

Likes
15
Share

@D33jW
Follow
📅 Week 3 – Day 21
BOX: 50x50 – 100W lamp
🌞 Temp: 27°C
💦 RH: 70–72%
💥 PPFD: 400–650 µmol/m²/s
🌬️ VPD: ~1 – 1.1 kPa
This is my first time planting directly into the final pot, and the difference is clear – I definitely saved a few days of growth.
Watering volume is increasing steadily: started at ~400 ml and today I went for the first runoff with about 800 ml.
EC stays on the lower side, around 0.6. They’re also getting Power Roots and enzymes.
DOKI got her first LST today.
Stay tuned – and keep growing 🌱
Likes
11
Share
@eldruida_lamota
Follow
Que pasa familia, vamos con la tercera semana de floración de estas Gomu Gomu Mango feminizadas de HighBreed.
Vamos al lío ,se colocaron en macetas de 7 litros definitivamente.
El ph se controla en 6.0 , la temperatura la tenemos entre 24/20 grados y la humedad ronda el 50%.
El ciclo de Floración puse 12 horas de luz, el foco está al 80% de potencia.
De momento va creciendo, tiene buen color y va progresando.
Comentar que superaron el estrés hídrico porque subí par de grados por la noche y va volvió a comer normal .
Gracias a Agrobeta por el kit para la temporada, unos jefes, siempre apoyando 💪.
- os dejo por aquí un CÓDIGO: Eldruida
Descuento para la tienda de MARS HYDRO.
https://www.mars-hydro.com
Hasta aquí todo, Buenos humos 💨💨💨
Likes
40
Share


@Kitties_and_Colas
Follow
~_~_~_~_~_~_~_~_~_~_~_~_~_~_~_~_~_~_~_~_~_~_~_~_~_~_~_~_~_~_~_~_~_~_~_~_~_~_~_~_~_~_~_~_~_~_~_~_~_~_~_~_~_~_~_~_~_~_~_~_~_~_~_~_~_~_~_~_~_~_~_~_~_~_~_~_~_~_~_~_~_~_
❤️💡🌱😽💨
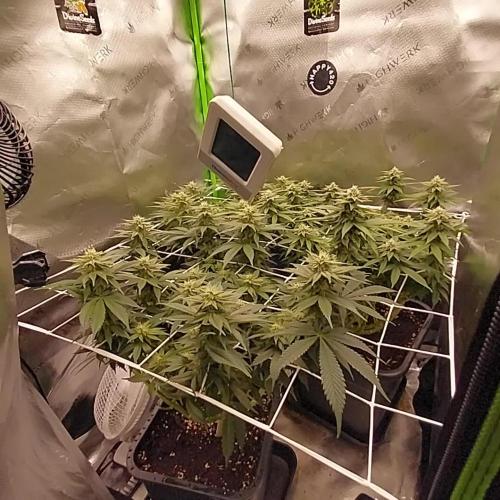
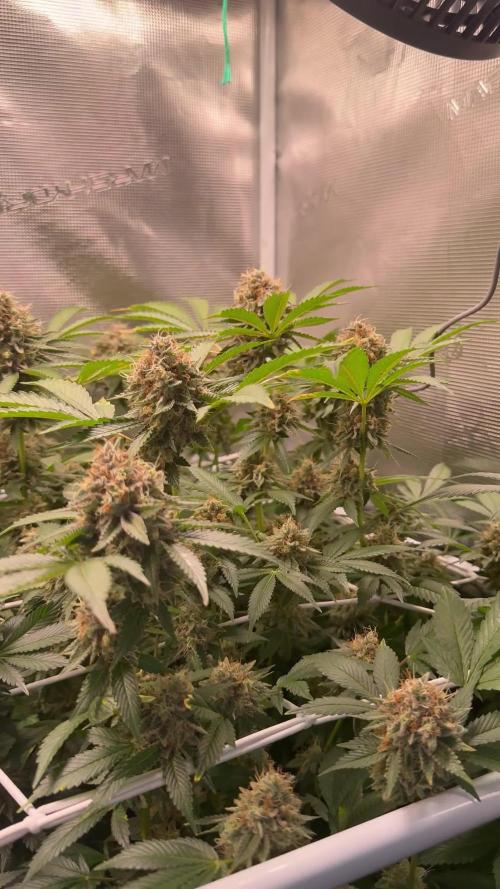
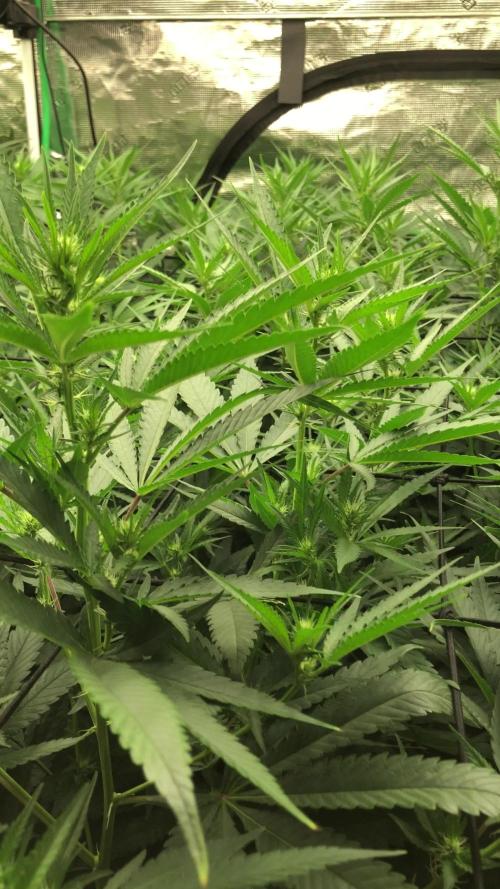
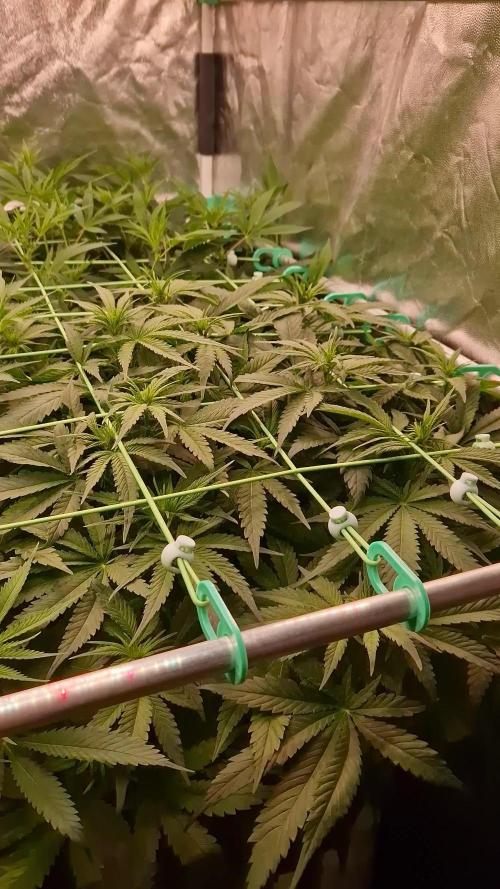
We finally got our calmag order, these girls were begging for it..the color is a little limey on 1:2 but she should be just fine.. plants are praying a lot, i take this as a good sign. Buds are forming fast and given the node spacing I think they'll be nice and long.. We removed most the top fans and cleared the bottom 1/3 growth from all plants this week, light penetration is awesome , we're still at 75% power with the Solux 350 but this seems to be more than adequate for now (we're trying to keep power consumption low between 4 active tents to avoid anymore power issues).. The Solux 350 is surprisingly cool, i genuinely thought we would be fighting heat with driver inside but is as cool as all other tents in the room.. not too much else to report, its been a great week!..Thanks as always for dropping by and happy harvests folks!!
⚡Hortibloom/Solux 350⚡
Specifications ⚙️:
Diodes: Samsung LM281 Pro / Osram DR (1,440 total)💡
Driver: Inventronics 350 watt🔌
PPF: 1015 μmol/s ☢️
PPE: 2.9 µmol/j 〰️〰️
Lifespan: 50k+ hrs ⌛
Weight: 14.3lbs lbs (6.5kg)
Veg Coverage: 5 x 5 ft 🌱
Flowering Coverage: 4 x 4 ft 🌼
-Uses an aluminum heatsink (no fan), quiet while operating 👂⬇️
-IP65 waterproof ratings, tolerant to high humidity grow environments 💦
-May be daisy-chained via RJ14 and managed from a single controller 💡~💡~💡~💡~💡
🌎 https://hortibloom.com/products/solux-350-led-grow-light
~_~_~_~_~_~_~_~_~_~_~_~_~_~_~_~_~_~_~_~_~_~_~_~_~_~_~_~_~_~_~_~_~_~_~_~_~_~_~_~_~_~_~_~_~_~_~_~_~_~_~_~_~_~_~_~_~_~_~_~_~_~_~_~_~_~_~_~_~_~_~_~_~_~_~_~_~_~_~_~_~_~_

Likes
11
Share


@RFarm21
Follow
Week 9 november - 15 november
11 november - i did a little defoliation on the first 2 Nodes in branches.
I also gave the first bloom nutrients because in the next week it will be flowering and it looks like it was asking for more phosphorus
14 november - One more soft session of defoliation/lollipoping
Led power: 240W (80%)
Likes
46
Share


@pifflestikkz
Follow
This plant was an absolute dream to. Grow, no issues at all with health of plant, just struggled to tame her as she was a a thick strong climber 💪💪.
I'm so impressed with how this turned out, I could have flushed for another 3 days to make it 12days but I needed the space.
After The 2 days of dark I was recommended I can definitely say it has vastly boosted her trichomes and the smell when I opened the tent blew my head away 😍😋
Aiming for a 10-14 day hang dry,
The 10-12 weeks curing in jars with humidity packs.
I will update with a dry bud weight and smoke test 👌
Bud wet weight is just 500g+
Final bud dry weight is 298g.
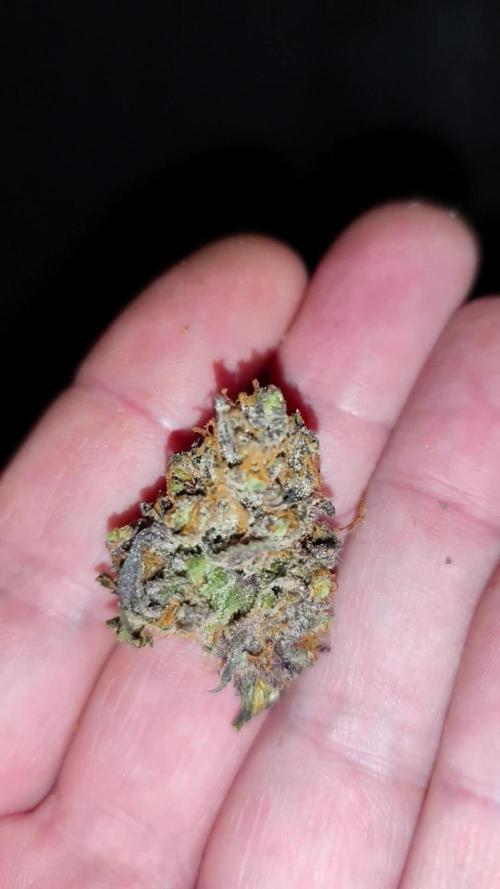
Of juicy resinous purple and orange buds 😍 smells like sherbert and hang dry smoke test revealed a candy sherbert, no banana yet but hoping like the grow it matures with cure process now.
Hits eyes straight away, sandy bottom kids, giggles, munchies, fun time with Mrs, bed. Full cycle with this one very happy over here 😉😁💚
FAT BANANA AUTO FROM ROYAL QUEEN SEEDS, big thank you to the team, and the breaders. What a pheno I received. I appreciate you all

