


Likes
35
Share


@MadeInGermany
Follow
Info:
Unfortunately, I had to find out that my account is used for fake pages in social media.
I am only active here on growdiaries.
I am not on facebook instagram twitter etc All accounts except this one are fake.
Flowering days 14
since time change
to 12/12 h.
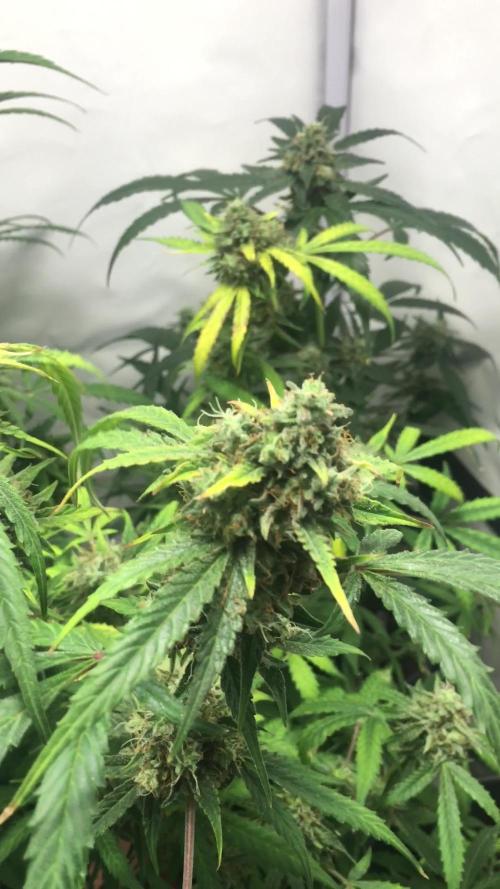
Hey everyone ☺️.
We are in the second week of flowering and she is still developing very well :-).
Very nice growth so far :-).
This week it was poured twice with 1.2 l each time.
The tent was cleaned and the humidifier refilled.
I wish you all a lot of fun until the next update.
Stay healthy 🙏🏻
You can buy this Strain at :
https://www.zamnesia.com/de/3271-zamnesia-seeds-blue-dream-feminisiert.html
Type:
Blue Dream
☝️🏼
Genetics:
Blueberry x Haze
20% Indica / 80% Sativa
👍
Vega lamp:
2 x Todogrow Led
Quantum Board 100 W
💡
Bloom Lamp :
2 x Todogrow Led
Cxb 3590 COB 3500 K 205W
💡💡☝️🏼
Soil :
Canna Coco Professional +
☝️🏼
Fertilizer:
Green House Powder Feeding
☝️🏼🌱
Water:
Osmosis water mixed with normal water (24 hours stale that the chlorine evaporates) to 0.2 EC. Add Cal / Mag to 0.4 Ec Ph with Organic Ph - to 5.5 - 5.8 .

Likes
15
Share


@OrganikTek
Follow
Black Cream stretchig full on flowering. Shes polling up the net. Think i wont train here anymore.
Bomberry Glue Really its a diferent kind. Slow started and look at here now. Shes a beauty. Truly Ganja Leaves.
Wedding starting to flower. Stretshing good. Started Scrog on here.
Purple Couskush looking good. Like how the new branchs are so big for her but still stretching verticaly. Nice genetic nuace. Something to add to newer genetics.
Temps are getting up , vents are getting are dry and up VPD goes. trying some foliar to help.
Lets see what happens
Cheers Brotherhood

Likes
57
Share


@Roberts
Follow
Pablo Escobar is growing really well. She is in the mist of bulking now. She has a really nice layer of frost going. I can't smell due to a cold, so I can't really describe that at the moment. Everything is looking really well. Thank you Spider Farmer, and Divine Seeds. 🤜🏻🤛🏻🌱❄️🌱
Thank you grow diaries community for the 👇likes👇, follows, comments, and subscriptions on my YouTube channel👇.
Thank you Happy Growing 🌱🌱🌱
https://youtube.com/channel/UCAhN7yRzWLpcaRHhMIQ7X4g

Likes
20
Share


@Experimentgreen
Follow
I won't say it was a perfect growing experience, because i kept running into problems with keeping the lights a good distance away, but that was the most difficult problem I faced.
It was definitely a very successful do-over. Both of these plants easily were 2 times the size (width/height) of my 1st sour stomper attempt, they yielded at least double and in Plant A's case...triple. And all by the few simple changes of using LEDs earlier in the grow, larger pots, being in a tent and having one tiny duct fan.
My nutrient regimen stayed pretty low and for the most part the same as previous grow. However in my opinion one of the most crucial differences was having them in the 3 gallon pots. They didn't dry out as quickly and they were able to be soaked more effectively than the 1 gallon smart pot had been.
For me this was a very important grow on grow diaries as this was basically Part 2 of my first indoor, man made grow. Learning these minimal differences in how to have plants turn out enormously better was essential to any future indoor grows I might do, even though I'm sure i just skimmed the surface on potential problems that could occur and how to fix them.
The buds from this grow were not only dense enough to be worth smoking, but every piece of the plant including its leaves will be useful for pressing. The couple presses i did on this plant so far had a beautiful golden color, an amazing smell, and had zero plant byproducts inside it from using the 90 micron bags. The only downfall with the micron bags and the pucks are they retain a fair amount of the pressed rosin, the only solutions I can think of would be to add them to an edibles mixture or to stack them all up and continue repressing.
All in all this was a fantastic grow, and I'm very grateful for all the support and for mephisto for making such a solid strain.

Likes
9
Share


@BelgianBudtender
Follow
Hey farmers.
She's still stretching, loads of defoliation this week.
The smells are getting truly intense, I am so excited to see the end result of this grow.
I feel like I should defoliate more still... maybe i will
My Flower lights:
https://marshydro.eu/products/mars-hydro-ts-1000-led-grow-light/?ref=BelgianBudtender
My Veg lights:
https://marshydro.eu/products/mars-hydro-ts-600-led-grow-light/?ref=BelgianBudtender
Coupon code BelgianBudtender for 3% off
Likes
87
Share

@wolfvb
Follow
🌿 Week 10: The Final Countdown & The Autumn Fade 🍂
The Vibe:
We’ve officially entered double digits! The tent is a jungle of smells, and the air is thick with a mix of sweet pineapple, heavy cream, and that funky cheese undertone. Most of the white pistils have now tucked in or turned orange/brown, and the plants are starting to pull mobile nutrients from the larger fan leaves the "autumn fade" is officially here!
The Ladies:
Pineapple Express F1: Still the undisputed Queen 👑. Her main colas are rock hard and coated in a sticky layer of resin. She’s starting to show some beautiful purple/yellow hues in her fan leaves as she nears the finish line.
White Runtz: The "Chonk" of the tent! 🍩 Even though she the tallest girl is the tent, her bud density is incredible. The frost on the Runtz is next level it looks like she’s been dipped in sugar.(And she is now drying)
Blue Cheese F1: My little rebel. 🧀 She stayed compact and "boujee" with her 3-fingered leaves until the end, but don't let her size fool you the smell coming off her is the most pungent in the tent. She’s finally stopped that weird side-branch stretching and is putting all her energy into ripening those dense little nuggets.
Care & Nutrients:
Feeding: This is the last week of full nutrients. I’m still using the Bio-Bloom and Top-Max combo, but I’ve started tapering down the Fish-Mix and TNT Complex to let the plants use up their stored nitrogen.
Watering: They are thirsty! I’m still giving about 1L per plant every other day, ensuring the pH stays steady at 5.5-6.0 to avoid any late-stage lockouts.
Environment: Keeping the humidity lower (around 45-50%) now to prevent any bud rot issues since the flowers are so dense. Temperatures are steady at 27°C lights on.
Next Steps:
It’s all about the jeweler's loupe now. I’m checking trichomes daily. We are looking for that perfect 10-20% amber ratio before we start the final flush. It won’t be long now!
Question for the Growmies:
Do you prefer to harvest when trichomes are all cloudy for a "heady" high, or do you wait for more amber for that "couch-lock" feel? Let me know below! 👇

Likes
Comments
Share


@MohaDz13
Follow
Une plante qui et petite robuste toufu de résine elle et facile à cultiver et donne deux jolie petit buds dure et robuste elle vous laissera Asie sur votre canapé

Likes
6
Share


@CannaGrown
Follow
Some problems solved, by ph's water regulation and cutting some sick leaves.

Likes
6
Share


Likes
39
Share


@GrowWiththeBro
Follow
Starting the week with a feed. Not much to comment on.
Fed at the end of the week. Just TPS and Bloom.


Processing
Likes
7
Share


@x_grower
Follow
Very fast seedling process, seeds stayed soaking for 24h and in the water they were already showing the first white root hair, another 48h in the paper towel and the day I potted them up they showed cotyledons. They took around 11 days to reach third node and complete germination but honestly I belive it could be faster if in better enviroment, mainly the humidity which was low and I transplanted them a day late. From day 5 I started feeding them exact same nutrients and ratio from the first vegetative week but starting at 0.4EC and increasing by 0.1EC/day until 1.1EC
Likes
33
Share


@FlavoursUk
Follow
So far, so good. Little defoliation, nothing major. As stated before, most likely not topping this run as I'd like to see the natural growth structure. I'd also like a more chilled grow this round too. Not too ling till i flip as they get big in hydro.
Day 33 - girls are looking good, just ashame about the 4th girl not making it, but all dependant on genetics 3/4 still good. Most the environment is now dialled in. Will be flipping the next few days. Nutrient dose is currently under what is recommended as less is more when in hydro.
Day 34 - All healthy enough and ready for some flower production. Will hopefully flip these girls tomorrow.


Likes
25
Share


@THcHunteR23
Follow
Elle grandit bien mais j’ai de la difficulté à m’ajuster avec se qu’elle demande en
Nutriments et en eau
Légère brûlure de lumière à quelques endroits.


Likes
8
Share


@GrowerOG
Follow
Hello everybody, the pictures show a split situation: the buds looks good but the rest of the plant scream to overfeeding. Infact at the third day of the week i find an extra water in the saucer so i control the EC and i see 3.5 mS/cm.
This value is clearly too high and i try to recover the plants by watering everyday with 1 L demineralized water adjust with pH-down.
I just hope to see a better situation in a week. 🙏

Likes
7
Share


@MaxWax
Follow
The plants are getting more trichomes every day and the smell is getting stronger—I'm getting more and more excited! Next time I might just do three plants with this setup though, it's getting a bit cramped in here 😄

Likes
7
Share


@HegauHillsFarmers_M11
Follow
Tag 7 - Beginn der 2 Woche.
Die Pflanze wird täglich besprüht.
An Tag 4 der letzten Woche wurde die Pflanze gedüngt.
Nährstofflösung:
0.5 ml/l - B-52 Advanced Nutrients
1 ml/l - Voodoo Juice Advanced Nutrients.
Davon hat die Pflanze 50 ml an Tag 4 erhalten.